seats FIAT 500L LIVING 2019 Owner handbook (in English)
[x] Cancel search | Manufacturer: FIAT, Model Year: 2019, Model line: 500L LIVING, Model: FIAT 500L LIVING 2019Pages: 248, PDF Size: 5.74 MB
Page 11 of 248
KNOWING YOUR CAR
In-depth knowledge of your new vehicle
starts here.
The handbook that you are reading
simply and directly explains how it
is made and how it works.
That’s why we advise you to read it
seated comfortably on board, so that
you can see immediately what is
described here for yourself.DASHBOARD ................................. 10
THE FIAT CODE SYSTEM ............... 12
KEYS .............................................. 12
IGNITION DEVICE ........................... 14
SEATS ............................................ 15
HEAD RESTRAINTS ........................ 18
STEERING WHEEL ......................... 19
REAR VIEW MIRRORS .................... 19
CLIMATE CONTROL SYSTEM ....... 22
EXTERIOR LIGHTS ......................... 25
INTERIOR LIGHTS .......................... 27
WINDSCREEN WIPER/REAR
WINDOW WIPER ............................ 28
FIXED GLASS ROOF ....................... 30
ELECTRIC SUNROOF ..................... 31
DOORS ........................................... 33
ELECTRIC WINDOWS .................... 34
BONNET ......................................... 36
LUGGAGE COMPARTMENT ........... 37
DUALDRIVE ELECTRIC POWER
STEERING ...................................... 39
9
Page 17 of 248
SEATS
7) 9)2) 3)
FRONT SEATS
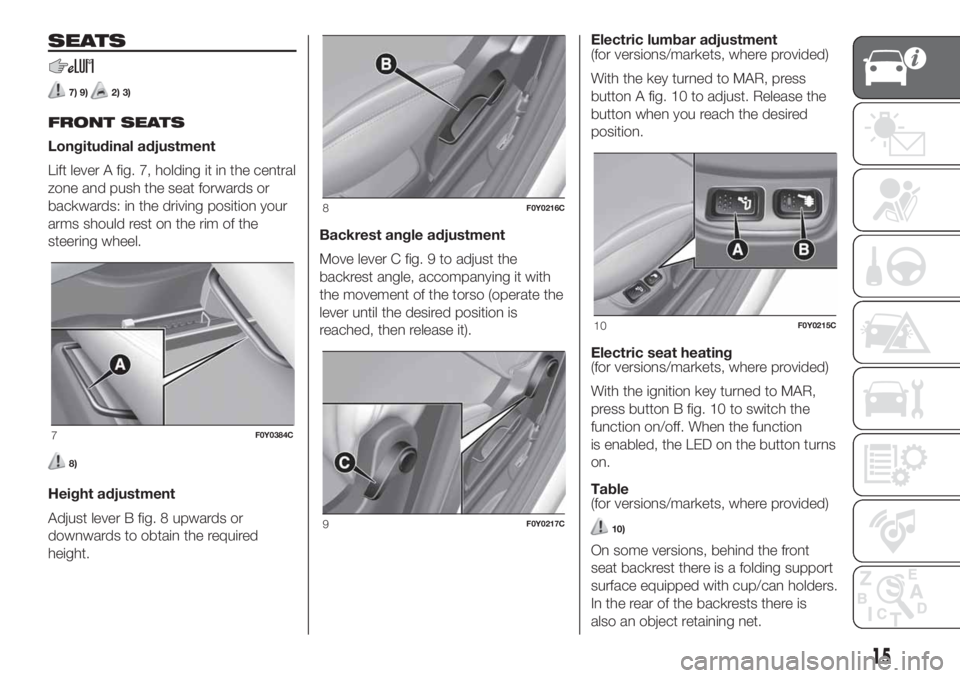
Longitudinal adjustment
Lift lever A fig. 7, holding it in the central
zone and push the seat forwards or
backwards: in the driving position your
arms should rest on the rim of the
steering wheel.
8)
Height adjustment
Adjust lever B fig. 8 upwards or
downwards to obtain the required
height.Backrest angle adjustment
Move lever C fig. 9 to adjust the
backrest angle, accompanying it with
the movement of the torso (operate the
lever until the desired position is
reached, then release it).Electric lumbar adjustment
(for versions/markets, where provided)
With the key turned to MAR, press
button A fig. 10 to adjust. Release the
button when you reach the desired
position.
Electric seat heating
(for versions/markets, where provided)
With the ignition key turned to MAR,
press button B fig. 10 to switch the
function on/off. When the function
is enabled, the LED on the button turns
on.
Table
(for versions/markets, where provided)
10)
On some versions, behind the front
seat backrest there is a folding support
surface equipped with cup/can holders.
In the rear of the backrests there is
also an object retaining net.
7F0Y0384C
8F0Y0216C
9F0Y0217C
10F0Y0215C
15
Page 18 of 248
IMPORTANT Do not place objects
heavier than 3 kg on the supporting
surface: for safety reasons the
supporting surface is detached from its
housing when subject to higher loads.
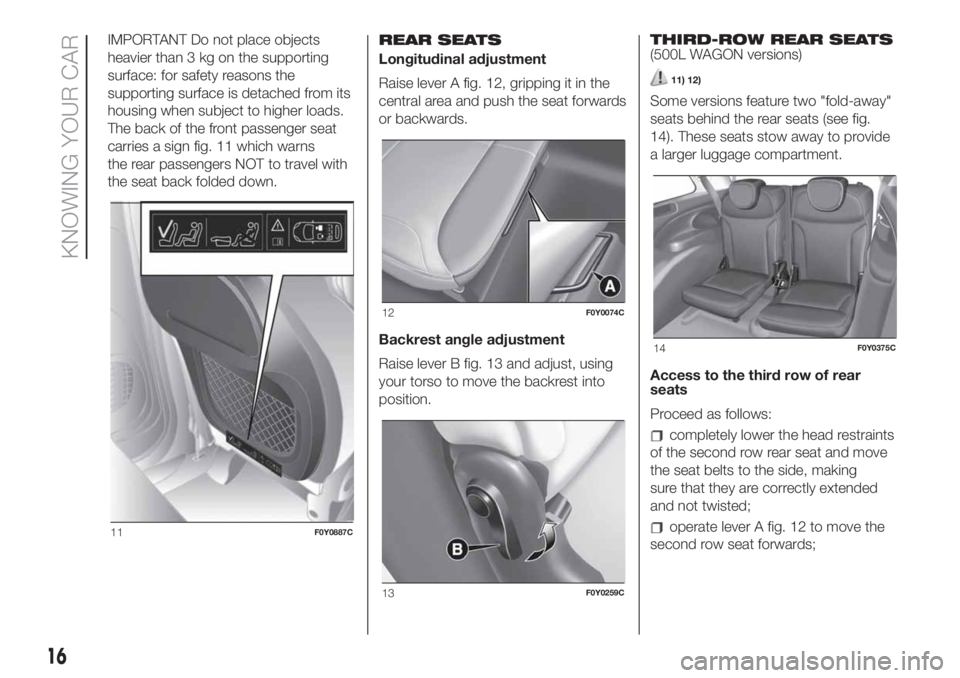
The back of the front passenger seat
carries a sign fig. 11 which warns
the rear passengers NOT to travel with
the seat back folded down.REAR SEATS
Longitudinal adjustment
Raise lever A fig. 12, gripping it in the
central area and push the seat forwards
or backwards.
Backrest angle adjustment
Raise lever B fig. 13 and adjust, using
your torso to move the backrest into
position.THIRD-ROW REAR SEATS
(500L WAGON versions)
11) 12)
Some versions feature two "fold-away"
seats behind the rear seats (see fig.
14). These seats stow away to provide
a larger luggage compartment.
Access to the third row of rear
seats
Proceed as follows:
completely lower the head restraints
of the second row rear seat and move
the seat belts to the side, making
sure that they are correctly extended
and not twisted;
operate lever A fig. 12 to move the
second row seat forwards;11F0Y0887C
12F0Y0074C
13F0Y0259C
14F0Y0375C
16
KNOWING YOUR CAR
Page 19 of 248
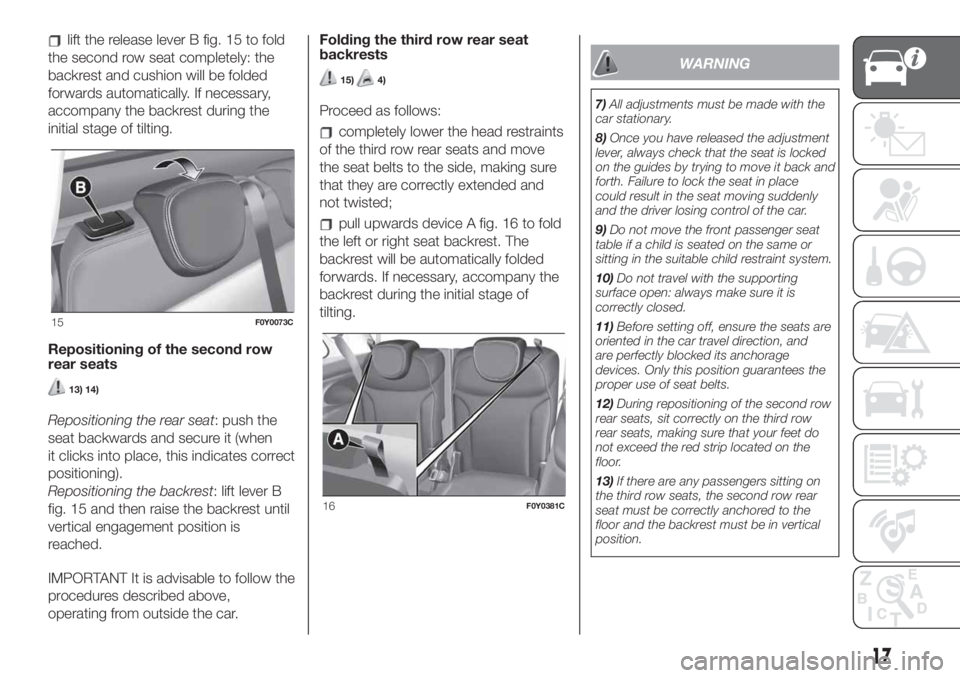
lift the release lever B fig. 15 to fold
the second row seat completely: the
backrest and cushion will be folded
forwards automatically. If necessary,
accompany the backrest during the
initial stage of tilting.
Repositioning of the second row
rear seats
13) 14)
Repositioning the rear seat: push the
seat backwards and secure it (when
it clicks into place, this indicates correct
positioning).
Repositioning the backrest: lift lever B
fig. 15 and then raise the backrest until
vertical engagement position is
reached.
IMPORTANT It is advisable to follow the
procedures described above,
operating from outside the car.Folding the third row rear seat
backrests
15)4)
Proceed as follows:
completely lower the head restraints
of the third row rear seats and move
the seat belts to the side, making sure
that they are correctly extended and
not twisted;
pull upwards device A fig. 16 to fold
the left or right seat backrest. The
backrest will be automatically folded
forwards. If necessary, accompany the
backrest during the initial stage of
tilting.
WARNING
7)All adjustments must be made with the
car stationary.
8)Once you have released the adjustment
lever, always check that the seat is locked
on the guides by trying to move it back and
forth. Failure to lock the seat in place
could result in the seat moving suddenly
and the driver losing control of the car.
9)Do not move the front passenger seat
table if a child is seated on the same or
sitting in the suitable child restraint system.
10)Do not travel with the supporting
surface open: always make sure it is
correctly closed.
11)Before setting off, ensure the seats are
oriented in the car travel direction, and
are perfectly blocked its anchorage
devices. Only this position guarantees the
proper use of seat belts.
12)During repositioning of the second row
rear seats, sit correctly on the third row
rear seats, making sure that your feet do
not exceed the red strip located on the
floor.
13)If there are any passengers sitting on
the third row seats, the second row rear
seat must be correctly anchored to the
floor and the backrest must be in vertical
position.
15F0Y0073C
16F0Y0381C
17
Page 20 of 248
14)Make sure the backrest is properly
secured at both sides to prevent it moving
forward in the event of sharp braking,
with possible impact with the occupants. A
metallic click is heard when locking is
correct.
15)Do not move the seat when a child is
sitting in the car.
WARNING
2)The fabric upholstery of the seats has
been designed to withstand long-term
wear deriving from normal use of the car.
Some precautions are however required.
Avoid prolonged and/or excessive rubbing
against clothing accessories such as
metal buckles and Velcro strips which, by
applying a high pressure on the fabric in
a small area, could cause it to break,
thereby damaging the upholstery.
3)Before tilting the front passenger seat
table fully, remove any objects laid on it.
4)Before tilting the seat backrest fully,
remove any objects laid on it.
HEAD RESTRAINTS
ADJUSTMENTS
16)
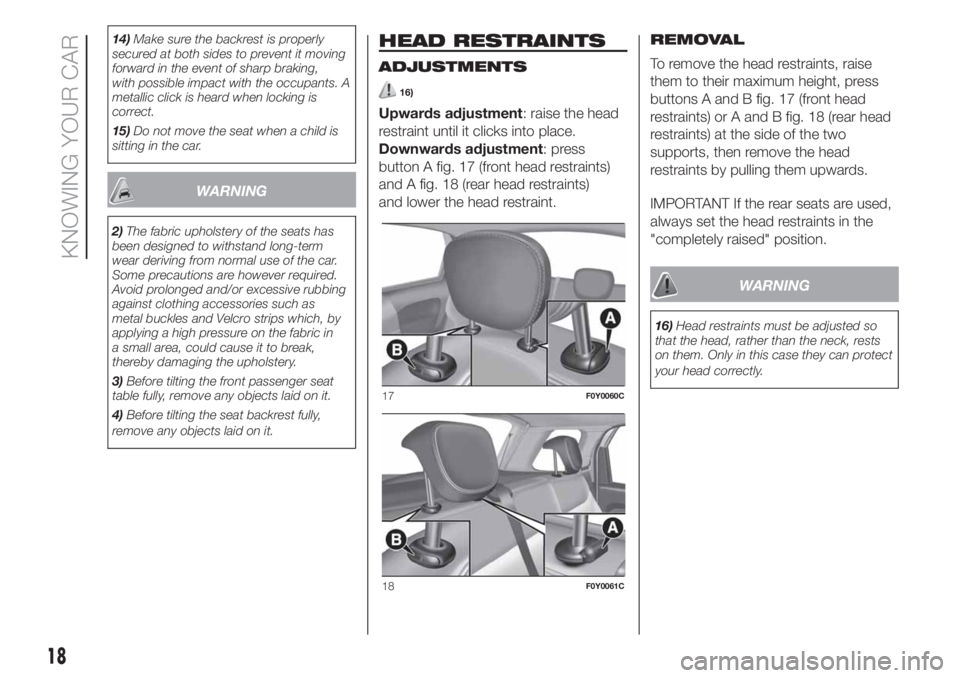
Upwards adjustment: raise the head
restraint until it clicks into place.
Downwards adjustment: press
button A fig. 17 (front head restraints)
and A fig. 18 (rear head restraints)
and lower the head restraint.REMOVAL
To remove the head restraints, raise
them to their maximum height, press
buttons A and B fig. 17 (front head
restraints) or A and B fig. 18 (rear head
restraints) at the side of the two
supports, then remove the head
restraints by pulling them upwards.
IMPORTANT If the rear seats are used,
always set the head restraints in the
"completely raised" position.
WARNING
16)Head restraints must be adjusted so
that the head, rather than the neck, rests
on them. Only in this case they can protect
your head correctly.
17F0Y0060C
18F0Y0061C
18
KNOWING YOUR CAR
Page 39 of 248
LUGGAGE
COMPARTMENT
28) 29) 31)13)
The luggage compartment unlocking is
electrically operated and is deactivated
when the car is in motion.
OPENING
27)
When unlocked, the luggage
compartment can be opened from
outside the car using the electric
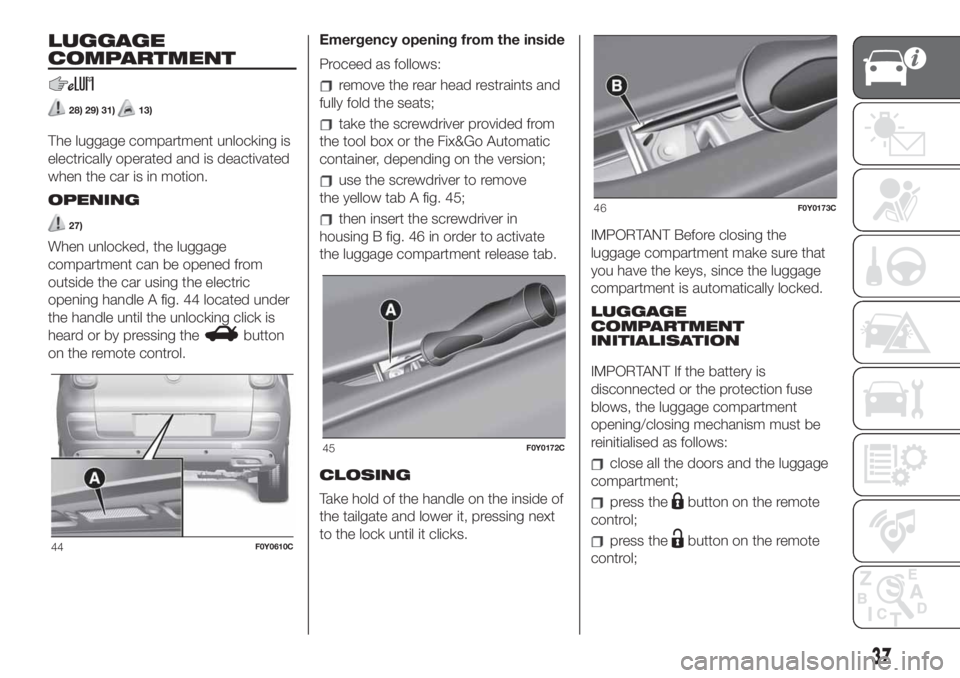
opening handle A fig. 44 located under
the handle until the unlocking click is
heard or by pressing the
button
on the remote control.Emergency opening from the inside
Proceed as follows:
remove the rear head restraints and
fully fold the seats;
take the screwdriver provided from
the tool box or the Fix&Go Automatic
container, depending on the version;
use the screwdriver to remove
the yellow tab A fig. 45;
then insert the screwdriver in
housing B fig. 46 in order to activate
the luggage compartment release tab.
CLOSING
Take hold of the handle on the inside of
the tailgate and lower it, pressing next
to the lock until it clicks.IMPORTANT Before closing the
luggage compartment make sure that
you have the keys, since the luggage
compartment is automatically locked.
LUGGAGE
COMPARTMENT
INITIALISATION
IMPORTANT If the battery is
disconnected or the protection fuse
blows, the luggage compartment
opening/closing mechanism must be
reinitialised as follows:
close all the doors and the luggage
compartment;
press thebutton on the remote
control;
press thebutton on the remote
control;44F0Y0610C
45F0Y0172C
46F0Y0173C
37
Page 40 of 248
"CARGO MAGIC SPACE"
(for versions/markets, where provided)
14)
The "Cargo Magic Space" adjustable
load platform can be adjusted to three
different heights:
Position 0 (platform completely
lowered)
Position 1 (platform at threshold
level)
Position 2 (platform completely
raised)
Load platform tilting
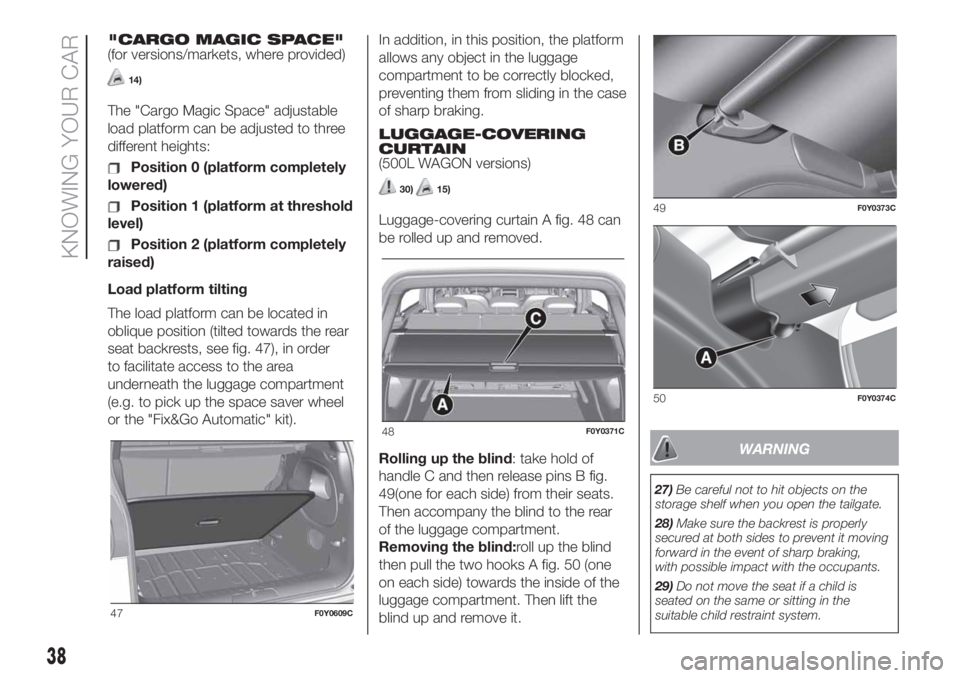
The load platform can be located in
oblique position (tilted towards the rear
seat backrests, see fig. 47), in order
to facilitate access to the area
underneath the luggage compartment
(e.g. to pick up the space saver wheel
or the "Fix&Go Automatic" kit).In addition, in this position, the platform
allows any object in the luggage
compartment to be correctly blocked,
preventing them from sliding in the case
of sharp braking.
LUGGAGE-COVERING
CURTAIN
(500L WAGON versions)
30)15)
Luggage-covering curtain A fig. 48 can
be rolled up and removed.
Rolling up the blind: take hold of
handle C and then release pins B fig.
49(one for each side) from their seats.
Then accompany the blind to the rear
of the luggage compartment.
Removing the blind:roll up the blind
then pull the two hooks A fig. 50 (one
on each side) towards the inside of the
luggage compartment. Then lift the
blind up and remove it.
WARNING
27)Be careful not to hit objects on the
storage shelf when you open the tailgate.
28)Make sure the backrest is properly
secured at both sides to prevent it moving
forward in the event of sharp braking,
with possible impact with the occupants.
29)Do not move the seat if a child is
seated on the same or sitting in the
suitable child restraint system.
47F0Y0609C
48F0Y0371C
49F0Y0373C
50F0Y0374C
38
KNOWING YOUR CAR
Page 80 of 248
34)The iTPMS cannot indicate sudden tyre
pressure drops (for example when a tyre
bursts). In this case, stop the vehicle,
braking with caution and avoiding abrupt
steering.
35)The iTPMS system only warns that the
tyre pressure is low: it cannot inflate
them.
36)Insufficient tyre inflation increases fuel
consumption, reduces the tread duration
and may affect the capacity to drive safely.OCCUPANT
PROTECTION
SYSTEMS
Some of the most important safety
equipment of the car comprise the
following protection systems:
seat belts;
SBR (Seat Belt Reminder) system;
head restraints;
child restraint systems;
Front airbags and side bags.
Read the information given the
following pages with the utmost care. It
is of fundamental importance that the
protection systems are used in the
correct way to guarantee the maximum
possible safety level for the driver and
the passengers.
For the description of the head restraint
adjustment see the "Head restraints"
paragraph in the "Knowing your car"
chapter.
SEAT BELTS
62) 63)
All vehicle seats are equipped with seat
belts with three anchor points and a
retractor.
The reel mechanism operates locking
the belt in the event of sharp braking or
strong deceleration due to an impact.
This allows the seat belt strap to slide
freely and to adapt to the body of
the occupant. In the event of an
accident, the seat belt will lock reducing
the risk of impact inside the passenger
compartment and of being projected
outside the car.
The driver is responsible for respecting,
and ensuring that all the other
occupants of the vehicle also respect,
the local laws in force in relation to
the use of the seat belts.
Always fasten the seat belts before
setting off.
USING THE SEAT BELTS
The seat belt should be worn keeping
the chest straight and rested against
the backrest.
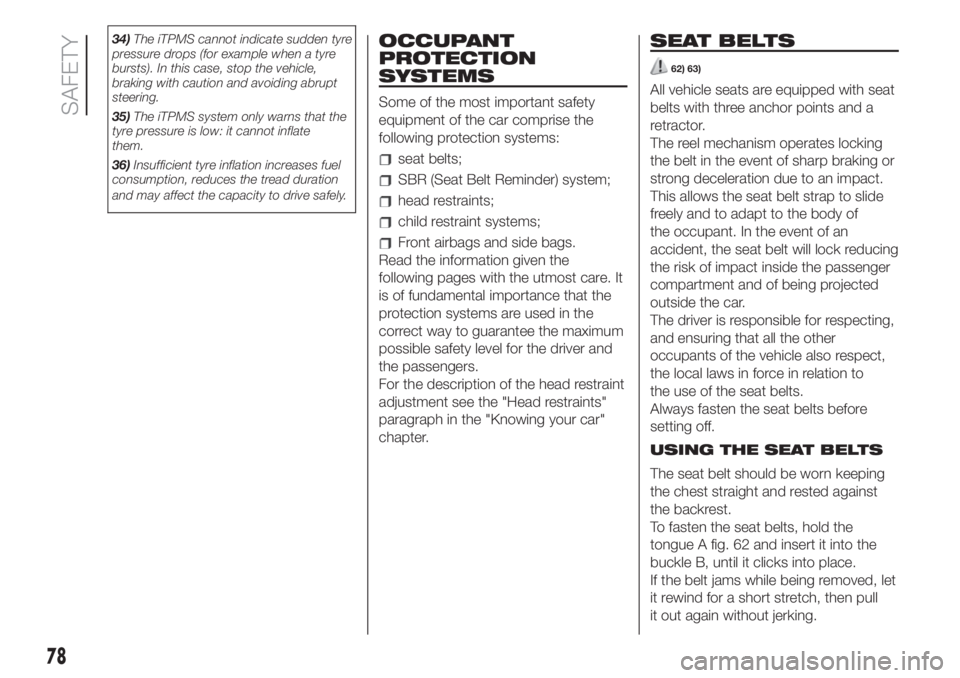
To fasten the seat belts, hold the
tongue A fig. 62 and insert it into the
buckle B, until it clicks into place.
If the belt jams while being removed, let
it rewind for a short stretch, then pull
it out again without jerking.
78
SAFETY
Page 81 of 248
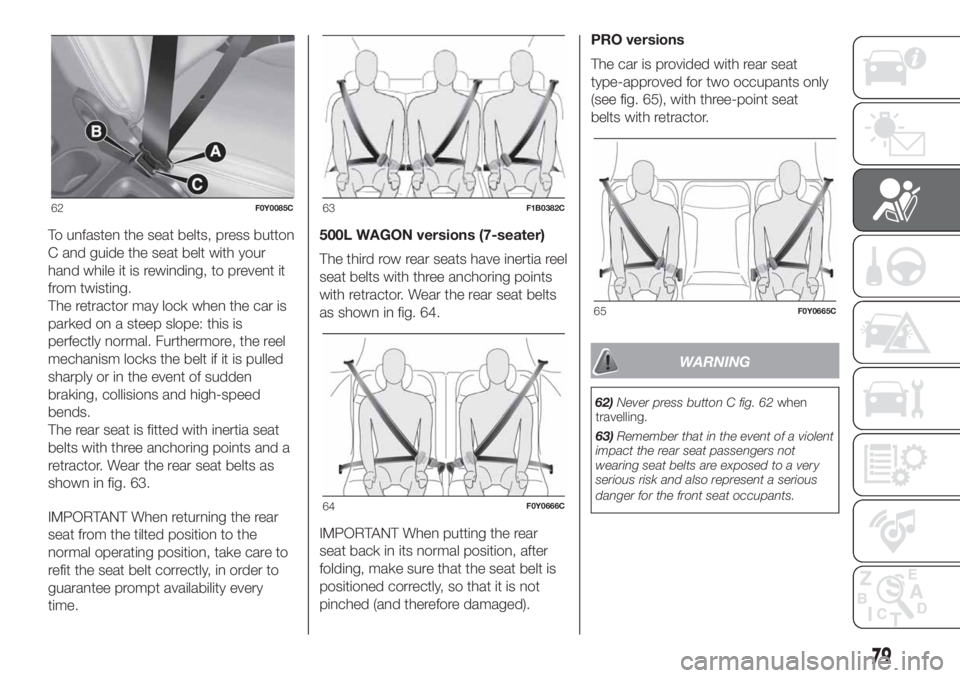
To unfasten the seat belts, press button
C and guide the seat belt with your
hand while it is rewinding, to prevent it
from twisting.
The retractor may lock when the car is
parked on a steep slope: this is
perfectly normal. Furthermore, the reel
mechanism locks the belt if it is pulled
sharply or in the event of sudden
braking, collisions and high-speed
bends.
The rear seat is fitted with inertia seat
belts with three anchoring points and a
retractor. Wear the rear seat belts as
shown in fig. 63.
IMPORTANT When returning the rear
seat from the tilted position to the
normal operating position, take care to
refit the seat belt correctly, in order to
guarantee prompt availability every
time.500L WAGON versions (7-seater)
The third row rear seats have inertia reel
seat belts with three anchoring points
with retractor. Wear the rear seat belts
as shown in fig. 64.
IMPORTANT When putting the rear
seat back in its normal position, after
folding, make sure that the seat belt is
positioned correctly, so that it is not
pinched (and therefore damaged).PRO versions
The car is provided with rear seat
type-approved for two occupants only
(see fig. 65), with three-point seat
belts with retractor.
WARNING
62)Never press button C fig. 62when
travelling.
63)Remember that in the event of a violent
impact the rear seat passengers not
wearing seat belts are exposed to a very
serious risk and also represent a serious
danger for the front seat occupants.
62F0Y0085C63F1B0382C
64F0Y0666C
65F0Y0665C
79
Page 82 of 248
SBR (Seat Belt
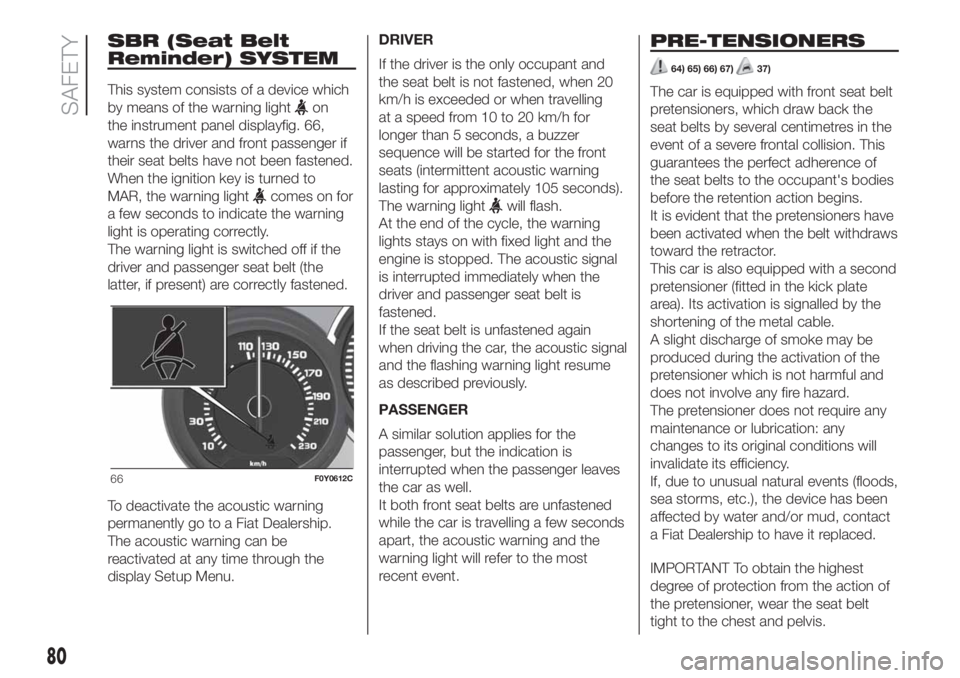
Reminder) SYSTEM
This system consists of a device which
by means of the warning light
on
the instrument panel displayfig. 66,
warns the driver and front passenger if
their seat belts have not been fastened.
When the ignition key is turned to
MAR, the warning light
comes on for
a few seconds to indicate the warning
light is operating correctly.
The warning light is switched off if the
driver and passenger seat belt (the
latter, if present) are correctly fastened.
To deactivate the acoustic warning
permanently go to a Fiat Dealership.
The acoustic warning can be
reactivated at any time through the
display Setup Menu.DRIVER
If the driver is the only occupant and
the seat belt is not fastened, when 20
km/h is exceeded or when travelling
at a speed from 10 to 20 km/h for
longer than 5 seconds, a buzzer
sequence will be started for the front
seats (intermittent acoustic warning
lasting for approximately 105 seconds).
The warning lightwill flash.
At the end of the cycle, the warning
lights stays on with fixed light and the
engine is stopped. The acoustic signal
is interrupted immediately when the
driver and passenger seat belt is
fastened.
If the seat belt is unfastened again
when driving the car, the acoustic signal
and the flashing warning light resume
as described previously.
PASSENGER
A similar solution applies for the
passenger, but the indication is
interrupted when the passenger leaves
the car as well.
It both front seat belts are unfastened
while the car is travelling a few seconds
apart, the acoustic warning and the
warning light will refer to the most
recent event.
PRE-TENSIONERS
64) 65) 66) 67)37)
The car is equipped with front seat belt
pretensioners, which draw back the
seat belts by several centimetres in the
event of a severe frontal collision. This
guarantees the perfect adherence of
the seat belts to the occupant's bodies
before the retention action begins.
It is evident that the pretensioners have
been activated when the belt withdraws
toward the retractor.
This car is also equipped with a second
pretensioner (fitted in the kick plate
area). Its activation is signalled by the
shortening of the metal cable.
A slight discharge of smoke may be
produced during the activation of the
pretensioner which is not harmful and
does not involve any fire hazard.
The pretensioner does not require any
maintenance or lubrication: any
changes to its original conditions will
invalidate its efficiency.
If, due to unusual natural events (floods,
sea storms, etc.), the device has been
affected by water and/or mud, contact
a Fiat Dealership to have it replaced.
IMPORTANT To obtain the highest
degree of protection from the action of
the pretensioner, wear the seat belt
tight to the chest and pelvis.
66F0Y0612C
80
SAFETY