AUX FIAT 500X 2015 2.G Owners Manual
[x] Cancel search | Manufacturer: FIAT, Model Year: 2015, Model line: 500X, Model: FIAT 500X 2015 2.GPages: 240, PDF Size: 10.72 MB
Page 9 of 240
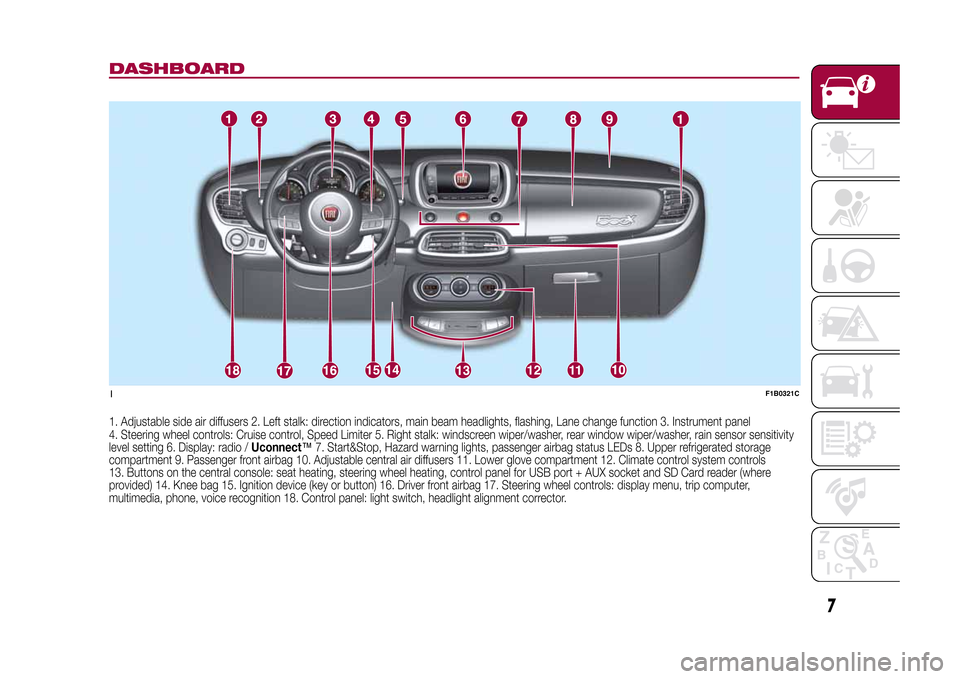
DASHBOARD1. Adjustable side air diffusers 2. Left stalk: direction indicators, main beam headlights, flashing, Lane change function 3. Instrument panel
4. Steering wheel controls: Cruise control, Speed Limiter 5. Right stalk: windscreen wiper/washer, rear window wiper/washer, rain sensor sensitivity
level setting 6. Display: radio /Uconnect™7. Start&Stop, Hazard warning lights, passenger airbag status LEDs 8. Upper refrigerated storage
compartment 9. Passenger front airbag 10. Adjustable central air diffusers 11. Lower glove compartment 12. Climate control system controls
13. Buttons on the central console: seat heating, steering wheel heating, control panel for USB port + AUX socket and SD Card reader (where
provided) 14. Knee bag 15. Ignition device (key or button) 16. Driver front airbag 17. Steering wheel controls: display menu, trip computer,
multimedia, phone, voice recognition 18. Control panel: light switch, headlight alignment corrector.
12
11
1
F1B0321C
7
15-12-2014 8:23 Pagina 7
Page 76 of 240
58)The system is an aid for the driver, who
must always pay full attention while driving.
The responsibility always rests with the
driver, who must take into account the
traffic conditions in order to drive in
complete safety. The driver must always
maintain a safe distance from the vehicle in
front.
59)If the driver depresses the brake pedal
fully or carries out a fast steering during
system operation, the automatic braking
function may stop (e.g. to allow a possible
manoeuvre to avoid the obstacle).
60)The system intervenes on vehicles
travelling in the same lane. People, animals
and things (e.g. pushchairs) are not taken
into consideration.
61)If the vehicle must be placed on a roller
bench for maintenance interventions or if
it is washed in an automatic roller washing
tunnel with an obstacle in the front part
(e.g. another vehicle, a wall or another
obstacle), the system may detect its
presence and activate. In this case the
system must be deactivated through the
settings of theUconnect™system.
62)If the system signals a pressure
decrease on a specific tyre, it is
recommended to check the pressure on all
four tyres.
63)iTPMS does not relieve the driver from
the obligation to check the tyre pressure
every month; it is not to be considered
a system to replace maintenance or a
safety system.64)Tyre pressure must be checked with
tyres cold. Should it become necessary for
whatever reason to check pressure with
warm tyres, do not reduce pressure even if
it is higher than the prescribed value,
rather repeat the check when tyres are
cold.
65)The iTPMS cannot indicate sudden tyre
pressure drops (e.g. if a tyre bursts). In
this case, stop the vehicle, braking with
caution and avoiding abrupt steering.
66)The system only warns that the tyre
pressure is low: it is not able to inflate
them.
67)Insufficient tyre inflation increases fuel
consumption, reduces the tread duration
and may affect the capacity to drive safely.
WARNING
22)The system may have limited or absent
operation due to weather conditions such
as: heavy rain, hail, thick fog, heavy snow.
23)The section of the bumper before
the sensor must not be covered with
adhesives, auxiliary headlights or any other
object.
24)System intervention might be
unexpected or delayed when other vehicles
transport loads projecting from the side,
above or from the rear, with respect to the
normal size of the vehicle.
25)Operation can be adversely affected by
any structural change made to the vehicle,
such as a modification to the front
geometry, tyre change, or a heavier load
than the standard load of the vehicle.26)Incorrect repairs made on the front part
of the vehicle (e.g. bumper, chassis) may
alter the position of the radar sensor,
and adversely affect its operation. Go to a
Fiat Dealership for any operation of this
type.
27)Do not tamper with nor carry out any
intervention on the radar sensor or on
the camera on the windscreen. In the event
of a sensor failure, contact a Fiat
Dealership.
28)When towing a trailer (with modules
installed after purchasing the vehicle),
a vehicle or during loading manoeuvres on
a vehicle transporter (or in vehicle for
transport), the system must be deactivated
via theUconnect™system.
29)Do not wash with high-pressure jets in
the bumper lower area: in particular do
not operate on the system's electrical
connector.
30)Be careful in the case of repairs and
new paintings in the area around the
sensor (panel covering the sensor on the
left side of the bumper). In the event of
a frontal impact the sensor may
automatically deactivate and display a
warning to indicate that the sensor needs
to be repaired. Even without a malfunction
warning, deactivate the system operation
if you think that the position of the radar
sensor has changed (e.g. due to
low-speed frontal impact as during parking
manoeuvres). In these cases, go to a Fiat
Dealership to have the radar sensor
realigned or replaced.
74
SAFETY
15-12-2014 8:23 Pagina 74
Page 119 of 240
TOWING TRAILERSIMPORTANT
120) 121)
For towing caravans or trailers the
vehicle must be fitted with an approved
tow hook and an adequate electrical
system. Should aftermarket installation
be requested, this must be carried
out by specialists.
Install any specific and/or additional
door mirrors as specified by the
Highway Code.
Remember that when towing a trailer,
steep hills are harder to climb, braking
distances increase and overtaking
takes longer depending on the overall
weight of the trailer. Engage a low gear
when driving downhill, rather than
constantly using the brake. The weight
the trailer exerts on the vehicle tow
hook reduces the vehicle's loading
capacity by the same amount. To make
sure that the maximum towable weight
is not exceeded (given in the vehicle
registration document) account should
be taken of the fully laden trailer,
including accessories and luggage.
Do not exceed the speed limits specific
to each country you are driving in, in
the case of vehicles towing trailers.
In any case, the top speed must not
exceed 100 km/h.Any electric brake must be powered
directly by the battery through a cable
with a cross-section of no less than 2.5
mm
2. In addition to the electrical
branches, the vehicle electrical system
can only be connected to the supply
cable for an electric brake and to the
cable for an internal light for the trailer,
not exceeding 15 W. For connections,
use the preset control unit with a
battery cable with section not less than
2.5 mm
2. The use of auxiliary loads
other than external lights (e.g. electric
brake) must take place with engine
running.
INSTALLING A TOW
HOOKThe towing device should be fastened
to the body by specialised personnel
according to any additional and/or
integrative information supplied by the
Manufacturer of the device. It must also
meet current regulations with reference
to Directive 94/20/EC and subsequent
amendments.
For any version the towing device used
must be right for the towable weight
of the vehicle on which it is to be
installed.For the electrical connection a standard
connector should be used which is
generally placed on a special bracket
normally fastened to the towing device,
and a special ECU for external trailer
light control must be installed on the
vehicle. 7 or 13-pin 12 V DC
connections should be used (CUNA/
UNI and ISO/DIN Standards). Follow
any instructions provided by the vehicle
manufacturer and/or the towing device
manufacturer.
117
15-12-2014 8:23 Pagina 117
Page 133 of 240
ENGINE COMPARTMENT FUSE BOXUSERSFUSE AMPEREHornF10 10
Power supply for cigar lighter/power socket F84 20
.
DASHBOARD FUSE BOXUSERSFUSE AMPEREFront electric window (passenger side) F33 20
Front electric window (driver side) F34 20
Supply forUconnect
™
system, Climate Control system, Electric
door mirror folding, EOBD system, USB port/AUX socket, rear
side roof lights (versions with sun roof)F36 15
Dead Lock device (Driver side door unlocking for versions/
markets, where provided)/Door unlocking/Central locking/Electric
tailgate unlockingF38 20
Rear left electric window F47 20
Rear right electric window F48 20
131
15-12-2014 8:23 Pagina 131
Page 140 of 240
WARNING
54)In the event of a puncture caused by
foreign bodies, the kit may be used to
repair tyres showing damage on the tread
or shoulder up to max. 4 mm diameter.
WARNING
3)Dispose of the bottle and the sealant
properly. Dispose of the components
in compliance with national and local
regulations.
EMERGENCY
STARTING
55)
If the battery is flat, a jump starting can
be performed using the battery and
the cables of another vehicle, or using
an auxiliary battery. In all cases, the
battery used must have a capacity
equal to or a little higher than the flat
one.IMPORTANTDo not use an auxiliary battery or any
other source of external supply with
a voltage above 12 V: the battery, the
starter, the alternator and the electrical
system of the vehicle could be
damaged.
Do not attempt jump starting if the
battery is frozen. The battery could
break and explode!JUMP STARTINGThe vehicle battery is located in the
engine compartment, behind the left
light cluster.
148) 149) 150) 151)
IMPORTANT The positive terminal (+) of
the battery is shielded by a protective
element. Raise it to access the terminal.Proceed as follows:
❒operate the parking brake, move the
lever to P (Park), for versions equipped
with automatic transmission, or neutral,
for versions with manual gearbox,
then set the ignition device to STOP;
❒switch off all the other electrical
appliances in the vehicle;
❒should you be using the battery of
another vehicle, park the other vehicle
within the range of the cables used
for the connection, operate the parking
brake and ensure that its ignition is
off.
IMPORTANT If the procedure below is
carried out incorrectly, it can cause
severe injury to people or damage the
recharging system of one or both
vehicles. Carefully follow the
instructions given below.
Cable connection
56)
Proceed as follows to carry out bump
starting fig. 129:
❒connect one end of the cable used
for positive (+) to the positive terminal
(+) of the vehicle with flat battery;
❒connect the other end of the cable
used for positive (+) to the positive
terminal (+) of the auxiliary battery;
138
IN AN EMERGENCY
15-12-2014 8:23 Pagina 138
Page 141 of 240
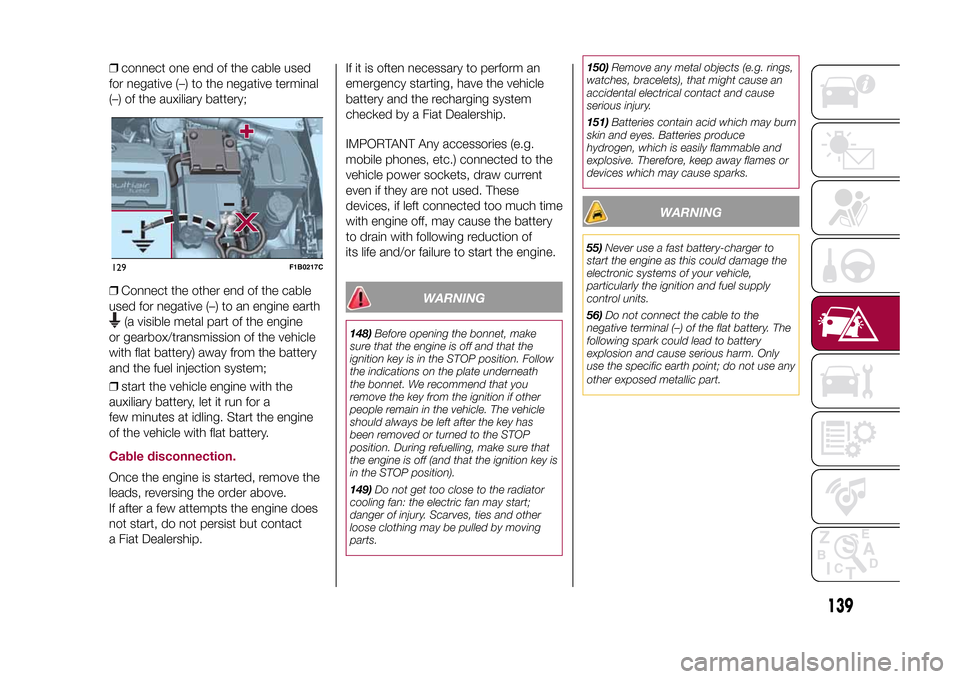
❒connect one end of the cable used
for negative (–) to the negative terminal
(–) of the auxiliary battery;
❒Connect the other end of the cable
used for negative (–) to an engine earth
(a visible metal part of the engine
or gearbox/transmission of the vehicle
with flat battery) away from the battery
and the fuel injection system;
❒start the vehicle engine with the
auxiliary battery, let it run for a
few minutes at idling. Start the engine
of the vehicle with flat battery.
Cable disconnection.Once the engine is started, remove the
leads, reversing the order above.
If after a few attempts the engine does
not start, do not persist but contact
a Fiat Dealership.If it is often necessary to perform an
emergency starting, have the vehicle
battery and the recharging system
checked by a Fiat Dealership.
IMPORTANT Any accessories (e.g.
mobile phones, etc.) connected to the
vehicle power sockets, draw current
even if they are not used. These
devices, if left connected too much time
with engine off, may cause the battery
to drain with following reduction of
its life and/or failure to start the engine.
WARNING
148)Before opening the bonnet, make
sure that the engine is off and that the
ignition key is in the STOP position. Follow
the indications on the plate underneath
the bonnet. We recommend that you
remove the key from the ignition if other
people remain in the vehicle. The vehicle
should always be left after the key has
been removed or turned to the STOP
position. During refuelling, make sure that
the engine is off (and that the ignition key is
in the STOP position).
149)Do not get too close to the radiator
cooling fan: the electric fan may start;
danger of injury. Scarves, ties and other
loose clothing may be pulled by moving
parts.150)Remove any metal objects (e.g. rings,
watches, bracelets), that might cause an
accidental electrical contact and cause
serious injury.
151)Batteries contain acid which may burn
skin and eyes. Batteries produce
hydrogen, which is easily flammable and
explosive. Therefore, keep away flames or
devices which may cause sparks.
WARNING
55)Never use a fast battery-charger to
start the engine as this could damage the
electronic systems of your vehicle,
particularly the ignition and fuel supply
control units.
56)Do not connect the cable to the
negative terminal (–) of the flat battery. The
following spark could lead to battery
explosion and cause serious harm. Only
use the specific earth point; do not use any
other exposed metallic part.
129
F1B0217C
139
15-12-2014 8:23 Pagina 139
Page 196 of 240
Button Functions Mode
Switching on/off
Brief button press
Volume adjustment
Knob clockwise/anticlockwise turningVolume activation/deactivation (Mute/Pause) Brief button pressExit the selection/return to previous screen Brief button press
BROWSE ENTERScrolling the list or tuning to a radio station or select
previous/next trackKnob clockwise/anticlockwise turning
Confirmation of the option displayed Brief button press
INFODisplay mode selection (Radio, Media Player) Brief button press
AUDIOAccess to the sound setting and adjustment functions Brief button press
MENUAccess to the Settings menu Brief button press
MEDIASource selection: USB/iPod or AUX Brief button press
RADIOAccess to the Radio mode Brief button press
1-2-3-4-5-6Store current radio station Long button press
Stored radio station recall Brief button press
A-B-CSelection of the group of radio presets or selection of
the desired letter in each listBrief button pressSearch for previous radio station or selection of USB/
iPod previous trackBrief button press
Scan of lower frequencies until released/Fast rewind of
USB/iPod trackLong button pressSearch for next radio station or selection of USB/iPod
next trackBrief button press
Scan of higher frequencies until released/Fast forward
of USB/iPod trackLong button press
194
MULTIMEDIA
15-12-2014 8:23 Pagina 194
Page 198 of 240
Buttons InteractionButton A (left side, behind the steering wheel)
Upper button❒Brief button press: search for next radio station or selection of USB/iPod next track.
❒Long button press: scan of higher frequencies until released/fast forward of USB/
iPod track.
Central buttonWith each press it scrolls through sources AM, FM, USB/iPod, AUX. Only the available
sources will be selected.
Lower button❒Brief button press: search for previous radio station or selection of USB/iPod next
track.
❒Long button press: scan of lower frequencies until released/fast forward of USB/
iPod track.
Button B (right side, behind the steering wheel)
Upper buttonVolume increase
❒Brief button press: single volume increase
❒Long button press: fast volume increase
Central button Activation/deactivation of Mute function
Lower buttonVolume decrease
❒Brief button press: single volume decrease
❒Long button press: fast volume decrease
196
MULTIMEDIA
15-12-2014 8:23 Pagina 196
Page 199 of 240
SWITCHING THE SYSTEM
ON/OFFThe system is switched on/off by
pressing the
button/knob.
Turn the button/knob clockwise to
increase the radio volume or
anticlockwise to decrease it.
RADIO (TUNER) MODEThe system features the following
tuners: AM, FM.Radio mode selectionPress the RADIO button on the front
panel to activate radio mode.Selecting a frequency
bandThe different tuning modes can be
selected by pressing the RADIO button
on the front panel.Indications on displayAfter the desired radio station is
selected on the display, the following
information is shown (INFO mode
activated):
In the upper part: the preset station, the
time and the other active radio settings
are highlighted.
In the central part: the name of the
current station, the frequency and the
radio text information (if any) are
highlighted.
FM station listPress the BROWSE ENTER button/
knob to display the complete list of the
FM stations that can be received.AM/FM radio station
storageThe preset stations are available in all
system modes and are selected by
touching one of the presetting buttons
1-2-3-4-5-6on the front panel.
If you are tuned to a radio station that
you wish to store, hold down the button
on the display which corresponds to
the desired preset until an acoustic
confirmation signal is emitted.AM/FM radio station
selectionTo search for the desired radio station
press the
or
button or use
the wheel of the steering wheel controls
, or turn the "BROWSE ENTER"
knob.
Previous/next radio
station searchPress briefly the
or
button or
use the wheel of the steering wheel
controls
: when the button is
released the previous or next
radio station is displayed.
Previous/next radio
station fast searchHold down the
or
button to
start the fast search: when the button is
released, the first tunable radio is
played.
MEDIA MODEInteraction modes for AUX, USB/iPod
operation.Track change
(next/previous)Briefly press the
button or turn the
BROWSE ENTER button/knob
clockwise to play the next track.
Briefly press thebutton or turn the
BROWSE ENTER button/knob
anticlockwise to return to the beginning
of the selected track or to the beginning
of the previous track (if this has been
played for less than 3 seconds).
Fast forward/rewind
through tracksHold down the
button to fast
forward the selected track.
Hold down thebutton to fast
rewind the track.
197
15-12-2014 8:23 Pagina 197
Page 200 of 240
Track selection
(browse)Use this function to scroll through and
select the tracks on the active device.
The choices available depend on the
device connected.
For example, on an USB/iPod device
you can also scroll through the list
of artists, genres and albums available
depending on the information present
on the tracks using the BROWSE
ENTER button/knob.
Within each alphabetical list, theA-B-C
button on the front panel allows the
user to skip to the desired letter in the
list.
NOTE This button might be disabled for
someApple® devices.
NOTE The BROWSE ENTER button
does not allow any operation on an
AUX device.
Press the BROWSE ENTER button to
activate this function on the source
being played.
Turn the BROWSE ENTER button/knob
to select the desired category and
then press the button/knob to confirm
the selection.
Press the
button to cancel the
function.
Audio source selectionPress theMEDIAbutton to select the
desired audio source among those
available: AUX or USB/iPod.Track information
displayPress theINFObutton to select the
information displayed while playing
(Artist, Album, Genre, Name, Folder,
File name).
Press the
button to exit the screen.
ShufflePress the
button to play the tracks
on USB/iPod in a random order.
Press again to deactivate the function.
RepeatTo listen to the track again, press the
button.
Press again to deactivate the function.
AUX SUPPORTTo activate AUX mode, insert an
appropriate device in the AUX socket
on the vehicle.
Adjust the volume using the
button/
knob on the front panel or using the
volume adjustment control on the
connected device.
For the "Audio source selection"
function, see the "Media mode"
chapter.
IMPORTANTThe functions of the device connected
with the AUX socket are directly
managed by the device itself: it is not
possible to change track/folder/playlist
or control playing start/end/pause
with the controls on the front panel or
on the steering wheel.
Do not leave the cable of your portable
player connected to the AUX socket
after disconnection, to avoid possible
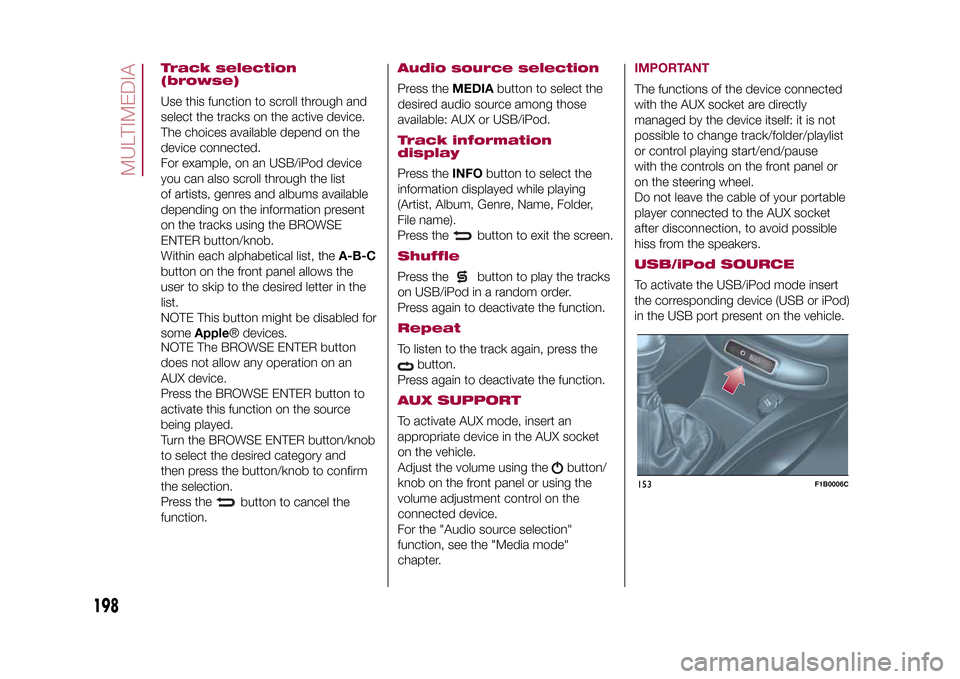
hiss from the speakers.USB/iPod SOURCETo activate the USB/iPod mode insert
the corresponding device (USB or iPod)
in the USB port present on the vehicle.153
F1B0006C
198
MULTIMEDIA
15-12-2014 8:23 Pagina 198