brake FIAT 500X 2017 Owner handbook (in English)
[x] Cancel search | Manufacturer: FIAT, Model Year: 2017, Model line: 500X, Model: FIAT 500X 2017Pages: 284, PDF Size: 11.14 MB
Page 123 of 284
MOVING THE CAR
To move the car, from P press the brake
pedal and, using the button on the gear
lever, move the lever to the desired
position (D, R or "Sequential mode").
The display will show the gear engaged.
When the brake pedal is released, the
car starts moving forwards or
backwards, as soon as the manoeuvre
is activated ("creeping" effect). The
accelerator should not be pressed in
this case.
IMPORTANT The inconsistency
between the speed actually engaged
(shown on the display) and the position
of the gear lever is indicated by the
letter corresponding to the position of
the lever flashing on the trim (also
accompanied by an acoustic signal).
This condition should not be interpreted
as an operational fault, but simply as a
request by the system to repeat the
manoeuvre.
GEAR ENGAGEMENT
INHIBITION
This system prevents you from moving
the gear lever from position P (Park) or
N (Neutral) if the brake pedal has not
been previously depressed.
When the ignition device is in MAR
(engine on or off):
to shift the gear to a position
different from P (Park) or from N to R,
you need to press the brake pedal and
the button A fig. 95 on the knob of the
gear lever;
to shift the lever from position N to
position D, press the brake pedal.
In case of a failure or when the vehicle's
battery is flat, the lever remains locked
in position P. To manually unlock the
lever, see paragraph "Twin clutch
automatic transmission - lever
unlocking" in the "In an emergency"
chapter.
VEHICLE SHUTDOWN
Versions equipped with the Keyless
Go system: this function requires the
gear lever to be positioned at P (Park);
then bring the ignition device to STOP.
Versions equipped with key without
remote control: this function requires
the gear lever to be positioned at P
(Park) before extracting the key from the
ignition device.
If the vehicle battery is flat and the
ignition key is engaged, the latter is
locked in position. To remove the key
manually see paragraph "Twin clutch
automatic transmission - key removal"
in the chapter "In an emergency".
"RECOVERY"
FUNCTIONS
In case of a gear lever failure, the
instrument panel display could show a
dedicated message recommending that
the driver continues driving without
shifting the lever to the P position.
In this case, the transmission will
maintain the forward gear (with reduced
performance) even if the lever is
positioned at R or N.
Once the lever is positioned at P, or
after shutting down the vehicle,
selecting R or any other forward gear
will no longer be possible. In this case,
contact a Fiat Dealership.
WARNING
115)Never use position P (Park) instead of
the electric parking brake. Always engage
the electric parking brake when parking the
vehicle to avoid the accidental movement
of the vehicle.
116)If the P (Park) position is not engaged,
the vehicle could move and injure people.
Before leaving the vehicle, make sure that
the gear lever is in position P and that the
electric parking brake is engaged.
121
Page 124 of 284
117)Do not shift the gear lever to N
(Neutral) and do not stop the engine when
driving on a downhill road. This type of
driving is dangerous and reduces the
possibility of intervening in the case of
variation of the road traffic or surface. You
risk losing control of your vehicle and
causing accidents.
118)Never leave children unattended in
the car. Always remove the ignition key
when leaving the car and take the key with
you.
IMPORTANT
41)Before moving the gear lever from
position P (Park), bring the ignition device
to position MAR and press the brake pedal.
Otherwise, the gear lever may get
damaged.
42)If the car is on a gradient, always
engage the electric parking brake BEFORE
placing the gear lever in P.
43)Engage reverse only with the car
stationary, engine at idling speed and
accelerator pedal fully released.
44)Using the paddles incorrectly (paddles
pushed towards the dashboard ) could
break them.
START&STOP
SYSTEM
The Start&Stop system automatically
stops the engine each time the vehicle
is stationary and starts it again when
the driver wants to move off.
In this way, the vehicle efficiency is
increased, by reducing consumption,
dangerous gas emissions and noise
pollution.
119)
45)
OPERATING MODE
Engine stopping mode
Versions with manual gearbox
With the vehicle stopped, the engine
stops with gearbox in neutral and clutch
pedal released.
Versions with automatic
transmission
With vehicle at a standstill and brake
pedal pressed, the engine switches off
if the gear lever is in a position other
than R.
In the event of stops uphill, engine
switching off is disabled to make the
"Hill Hold Control" function available
(works only with running engine).The
warning light on the instrument
panel switches on to signal that the
engine was stopped.
Engine restarting mode
Versions with manual gearbox
To restart the engine, press the clutch
pedal. If the vehicle does not start when
the clutch is pressed, place the gear
lever in neutral and repeat the
procedure. If the problem persists,
contact a Fiat Dealership.
Versions with automatic
transmission
To restart the engine, release the brake
pedal.
With brake pressed, if the gear lever is
in automatic mode - D (Drive) - the
engine can be restarted by moving the
lever to R (Reverse) or N (Neutral) or
"AutoStick".
With brake pressed, if the gear lever is
in "AutoStick" mode, the engine can be
restarted moving the lever to "+" or "–",
or R (Reverse) or N (Neutral).
When the engine has been stopped
automatically, keeping the brake pedal
pressed, the brake can be released
keeping the engine off by quickly
shifting the gear lever to P (Park).
To restart the engine, just move the
lever out of position P.
122
STARTING AND DRIVING
Page 127 of 284
the accelerator; when you release the
pedal, the vehicle goes back to the
speed stored previously.
When travelling downhill with the device
active, the vehicle speed may slightly
exceed the set one.
IMPORTANT Before pressing the SET +
or SET – buttons, the vehicle must be
travelling at a constant speed on a flat
surface.
SPEED INCREASE
Once the electronic Cruise Control has
been activated, the speed can be
increased by pressing button SET +.
SPEED DECREASE
With the device activated, the speed
can be decreased by pressing button
SET–.
RECALLING THE SPEED
For versions with automatic
transmission operating in D mode (Drive
- automatic), press and release the RES
button to recall the previously set
speed.
For versions with manual gearbox or
automatic transmission in Autostick
(sequential) mode, before recalling the
previously set speed you should
accelerate until getting close to it, then
press and release the RES button.
DEACTIVATING THE
DEVICE
Lightly pressing the brake pedal or
pressing the CANC button deactivates
the electronic Cruise Control without
deleting the stored speed.
The Cruise Control may be deactivated
also by applying the electric parking
brake (EPB) or when the braking
system is operated (e.g. operation of
the ESC system).
DEACTIVATING THE
DEVICE
The electronic Cruise Control is
deactivated by pressing button A
fig. 99 or bringing the ignition device to
STOP.
WARNING
120)When travelling with the device active,
never move the gear lever to neutral.
121)In case of a malfunction or failure of
the device, contact a Fiat Dealership.
122)The electronic Cruise Control can be
dangerous if the system cannot keep a
constant speed. In specific conditions
speed may be excessive, resulting in the
risk of losing control of the vehicle and
causing accidents. Do not use the device
in heavy traffic or on winding, icy, snowy or
slippery roads.
ADAPTIVE CRUISE
CONTROL (ACC)
(where provided)
123) 124) 125) 126) 127) 128)
46) 47) 48) 49) 50) 51) 52)
DESCRIPTION
The Adaptive Cruise Control (ACC) is a
driver assist device which combines the
Cruise Control functions with one for
controlling the distance from the vehicle
ahead.
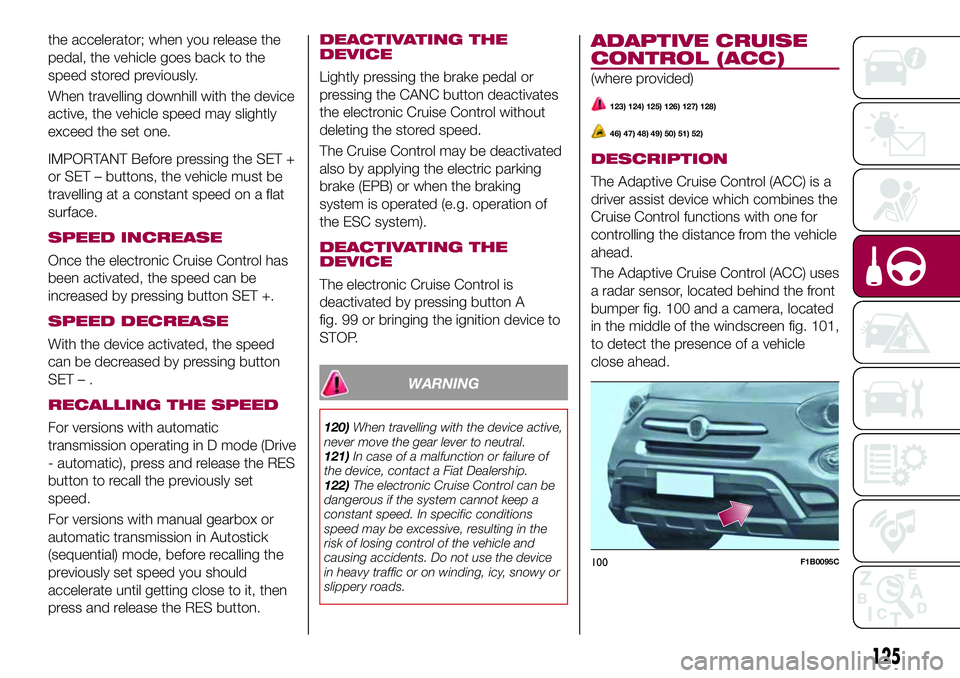
The Adaptive Cruise Control (ACC) uses
a radar sensor, located behind the front
bumper fig. 100 and a camera, located
in the middle of the windscreen fig. 101,
to detect the presence of a vehicle
close ahead.
100F1B0095C
125
Page 128 of 284
There are two operating modes:
“Adaptive Cruise Control”mode
to maintain an adequate distance
between vehicles (the message
“Adaptive Cruise Control” is shown on
the instrument panel display);
electronic “Cruise Control” mode
to hold the vehicle at a constant
preset speed.
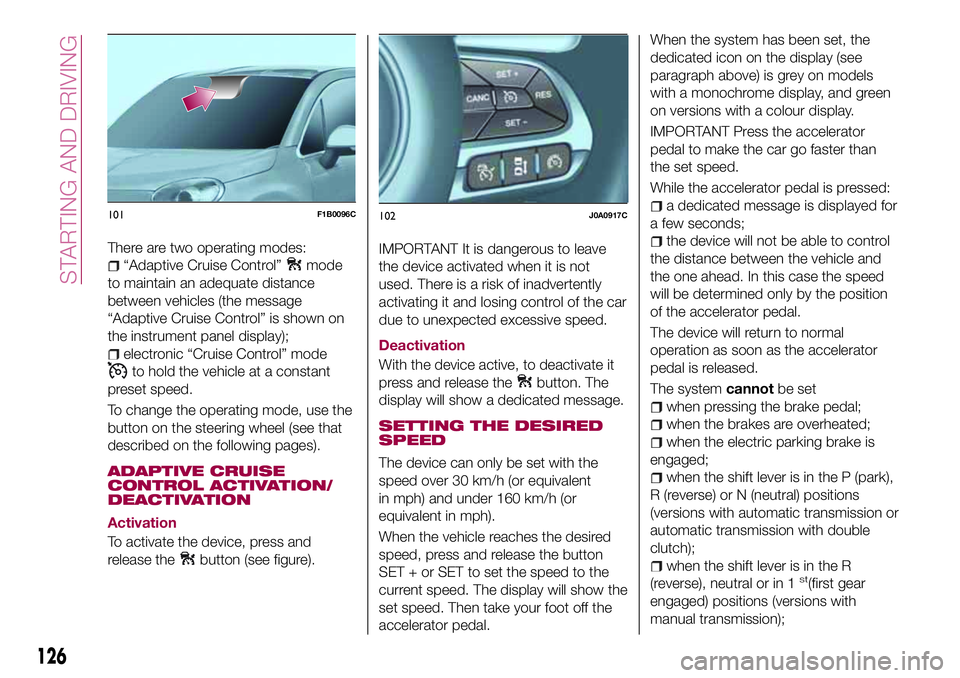
To change the operating mode, use the
button on the steering wheel (see that
described on the following pages).
ADAPTIVE CRUISE
CONTROL ACTIVATION/
DEACTIVATION
Activation
To activate the device, press and
release the
button (see figure).
IMPORTANT It is dangerous to leave
the device activated when it is not
used. There is a risk of inadvertently
activating it and losing control of the car
due to unexpected excessive speed.
Deactivation
With the device active, to deactivate it
press and release the
button. The
display will show a dedicated message.
SETTING THE DESIRED
SPEED
The device can only be set with the
speed over 30 km/h (or equivalent
in mph) and under 160 km/h (or
equivalent in mph).
When the vehicle reaches the desired
speed, press and release the button
SET + or SET to set the speed to the
current speed. The display will show the
set speed. Then take your foot off the
accelerator pedal.When the system has been set, the
dedicated icon on the display (see
paragraph above) is grey on models
with a monochrome display, and green
on versions with a colour display.
IMPORTANT Press the accelerator
pedal to make the car go faster than
the set speed.
While the accelerator pedal is pressed:
a dedicated message is displayed for
a few seconds;
the device will not be able to control
the distance between the vehicle and
the one ahead. In this case the speed
will be determined only by the position
of the accelerator pedal.
The device will return to normal
operation as soon as the accelerator
pedal is released.
The systemcannotbe set
when pressing the brake pedal;
when the brakes are overheated;
when the electric parking brake is
engaged;
when the shift lever is in the P (park),
R (reverse) or N (neutral) positions
(versions with automatic transmission or
automatic transmission with double
clutch);
when the shift lever is in the R
(reverse), neutral or in 1st(first gear
engaged) positions (versions with
manual transmission);
101F1B0096C102J0A0917C
126
STARTING AND DRIVING
Page 129 of 284
when the clutch is pressed (versions
with manual transmission);
when the engine speed exceeds a
maximum threshold (versions with
manual transmission and versions with
automatic transmission/automatic
transmission with double clutch) or
goes below a minimum threshold (only
versions with manual transmission);
when the car speed is not within the
settable speed range;
when the ESC (or ABS or other
stability control systems) are operating
or have just operated;
when the ESC system is off;
during automatic braking by the Full
Brake Control system (where provided);
when the Speed Limiter is active;
when the electronic Cruise Control is
active;
in case of failure of the device;
when the engine is off;
in case of obstruction of the radar
sensor (in this case the bumper area
where it is located must be cleaned).
In case of system set, the conditions
described above also cause a
cancellation or deactivation of the
system with times that may vary
according to the conditions.
IMPORTANT With the device set, it is
possible to reach speeds higher than
those set in the system by pressing theaccelerator pedal. In this condition, the
device does not turn off automatically,
but the device functions are limited: it is
therefore recommended to turn it off.
CHANGING SPEED
Speed increase
After having set the device, the stored
speed can be stored by holding the
SET + button pressed.
Press the SET + button once, the set
speed will increase by 1 km/h (or the
equivalent in mph). Each touch of the
button once will increase the speed by
1 km/h (or the equivalent in mph).
Hold the SET + button down, the set
speed will increase in 10 km/h steps (or
the equivalent in mph) until the button is
released. The set speed increase is
shown on the display.
Decreasing speed
After having set the device, the stored
speed can be reduced by holding the
SET – button pressed.
Press the SET – button once, the set
speed will increase by 1 km/h (or the
equivalent in mph). Each touch of the
button once will reduce the speed by
1 km/h (or the equivalent in mph).
Hold the SET – button down, the set
speed will decrease in 10 km/h steps
(or the equivalent in mph) until thebutton is released. The set speed
decrease is shown on the display.
NOTE If “Sport” mode is chosen on the
Drive Mode selector, the ACC will be
switch to sport mode: the system will
become more reactive in case of
acceleration.
ACCELERATING WHEN
OVERTAKING
When driving with the device active and
following a vehicle, the device provides
additional acceleration to facilitate
overtaking, when travelling over a given
speed and switches on the left direction
indicator (of the right indicator for
right-hand drive versions).
RECALLING THE SPEED
Once the system has been cancelled
but not deactivated, if a speed was
previously set simply press the RES
button and remove your foot from the
accelerator to recall it.
The system will be set to the last stored
speed.
Before returning to the previously set
speed, bring the speed close to that
value, then press the RES button and
release it.
127
Page 130 of 284
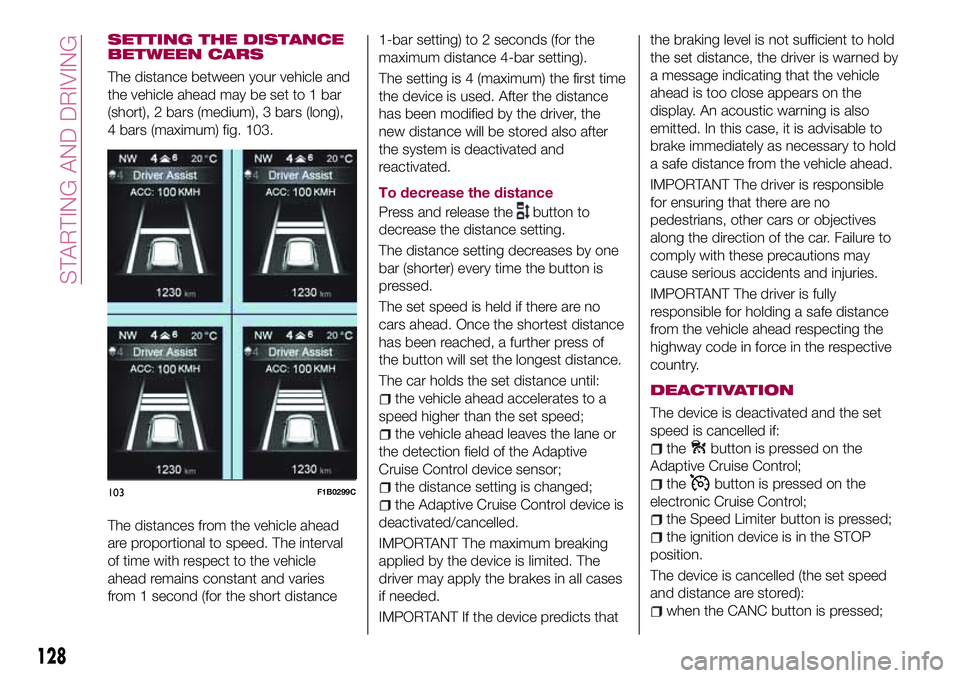
SETTING THE DISTANCE
BETWEEN CARS
The distance between your vehicle and
the vehicle ahead may be set to 1 bar
(short), 2 bars (medium), 3 bars (long),
4 bars (maximum) fig. 103.
The distances from the vehicle ahead
are proportional to speed. The interval
of time with respect to the vehicle
ahead remains constant and varies
from 1 second (for the short distance1-bar setting) to 2 seconds (for the
maximum distance 4-bar setting).
The setting is 4 (maximum) the first time
the device is used. After the distance
has been modified by the driver, the
new distance will be stored also after
the system is deactivated and
reactivated.
To decrease the distance
Press and release the
button to
decrease the distance setting.
The distance setting decreases by one
bar (shorter) every time the button is
pressed.
The set speed is held if there are no
cars ahead. Once the shortest distance
has been reached, a further press of
the button will set the longest distance.
The car holds the set distance until:
the vehicle ahead accelerates to a
speed higher than the set speed;
the vehicle ahead leaves the lane or
the detection field of the Adaptive
Cruise Control device sensor;
the distance setting is changed;
the Adaptive Cruise Control device is
deactivated/cancelled.
IMPORTANT The maximum breaking
applied by the device is limited. The
driver may apply the brakes in all cases
if needed.
IMPORTANT If the device predicts thatthe braking level is not sufficient to hold
the set distance, the driver is warned by
a message indicating that the vehicle
ahead is too close appears on the
display. An acoustic warning is also
emitted. In this case, it is advisable to
brake immediately as necessary to hold
a safe distance from the vehicle ahead.
IMPORTANT The driver is responsible
for ensuring that there are no
pedestrians, other cars or objectives
along the direction of the car. Failure to
comply with these precautions may
cause serious accidents and injuries.
IMPORTANT The driver is fully
responsible for holding a safe distance
from the vehicle ahead respecting the
highway code in force in the respective
country.
DEACTIVATION
The device is deactivated and the set
speed is cancelled if:
thebutton is pressed on the
Adaptive Cruise Control;
thebutton is pressed on the
electronic Cruise Control;
the Speed Limiter button is pressed;
the ignition device is in the STOP
position.
The device is cancelled (the set speed
and distance are stored):
when the CANC button is pressed;
103F1B0299C
128
STARTING AND DRIVING
Page 131 of 284
when the conditions shown in the
“Setting the desired speed” paragraph
occur;
when the car speed drops under the
minimum set speed (e.g. in presence of
slow cars).
If these conditions occur while the
system is decelerating with respect to a
vehicle ahead, the system could
continue the deceleration, if necessary,
also after it is cancelled or deactivated
within the minimum speed settable on
the system.
ELECTRONIC CRUISE
CONTROL MODE
Electronic Cruise Control mode is
available for travelling at constant speed
in addition to the Adaptive Cruise
Control (ACC) mode.
If the Adaptive Cruise Control (ACC)
function is implemented on the vehicle,
the electronic Cruise Control works in
the same manner as the ACC (by
pressing the
button of the Cruise
Control) with the difference that:
it does not hold the distance from the
vehicle ahead;
the device keeps working if the radar
sensor is obstructed.
Before returning to the previously set
speed, bring the speed close to that
value, then press the RES button and
release it.
WARNING
123)Pay the utmost attention while driving
at all times and be always ready to press
the brakes if needed.
124)The system is an aid for the driver,
who must always pay full attention while
driving. The responsibility always rests with
the driver, who must take into account the
traffic conditions in order to drive in
complete safety. The driver must always
maintain a safe distance from the vehicle in
front.
125)The device is not activated in
presence of pedestrians, oncoming
vehicles in the opposite direction of travel
or moving in the crosswise direction and
stationary objects (e.g. a vehicle standing
in a queue or a broken down vehicle).
126)The device cannot take account of
road, traffic and weather conditions, and
conditions of poor visibility (e.g. fog).
127)The device does not always fully
recognise complex driving conditions that
could cause it to determine the safe
distance to be held incorrectly or not at all.
128)The device cannot apply the
maximum braking force: the car will not be
stopped completely.
IMPORTANT
46)The system may have limited or absent
operation due to weather conditions such
as: heavy rain, hail, thick fog, heavy snow.47)The section of the bumper before the
sensor must not be covered with
adhesives, auxiliary headlights or any other
object.
48)Operation can be adversely affected by
any structural change made to the vehicle,
such as a modification to the front
geometry, tyre change, or a heavier load
than the standard load of the vehicle.
49)Incorrect repairs made on the front part
of the car (e.g. bumper, chassis) may alter
the position of the radar sensor, and
adversely affect its operation. Go to a Fiat
Dealership for any operation of this type.
50)Do not tamper with or carry out any
intervention on the radar sensor or on the
camera on the windscreen. In the event of
a sensor fault, contact a Fiat Dealership.
51)Do not wash with high-pressure jets in
the bumper lower area: in particular do not
operate on the system's electrical
connector.
52)Be careful in the case of repairs and
new paintings in the area around the
sensor (panel covering the sensor on the
left side of the bumper). In the event of a
frontal impact the sensor may automatically
deactivate and display a warning to indicate
that the sensor needs to be repaired. Even
without a malfunction warning, deactivate
the system operation if you think that the
position of the radar sensor has changed
(e.g. due to low-speed frontal impact as
during parking manoeuvres). In these
cases, go to a Fiat Dealership to have the
radar sensor realigned or replaced.
129
Page 135 of 284
cause personal injuries or damage to
vehicles or obstacles since, when the
continuous acoustic signal is emitted,
the tow hook ball is already in a position
that is much closer to the obstacle than
the rear bumper.
GENERAL WARNINGS
Some conditions may influence the
performance of the parking system:
reduced sensor sensitivity and a
reduction in the parking assistance
system performance could be due to
the presence of: ice, snow, mud, paint,
etc. on the surface of the sensor;
the sensor may detect a
non-existent obstacle ("echo
interference") due to mechanical
interference, for example when washing
the vehicle, in rain (strong wind), hail;
the signals sent by the sensor can
also be altered by the presence of
ultrasonic systems (e.g. pneumatic
brake systems of trucks or pneumatic
drills) near the vehicle;
Parking assistance system
performance can also be influenced by
the position of the sensors, for example
due to a change in the ride setting
(caused by wear to the shock
absorbers, suspension), or by changing
tyres, overloading the vehicle or fitting
specific trims that require the vehicle to
be lowered;
the presence of a tow hook without
trailer, which may interfere with the
correct operation of the parking
sensors. If you wish to leave the tow
hook fitted without towing a trailer, it is
advisable to contact a Fiat Dealership
for the relevant Park Assist system
update operations because the tow
hook could be detected as an obstacle
by the central sensors.
the presence of adhesives on the
sensors. Therefore, take care not to
place adhesives on the sensors.
WARNING
129)Parking and other potentially
dangerous manoeuvres are, however,
always the driver’s responsibility. When
performing these operations, always make
sure that there are no other people
(especially children) or animals on the route
you want to take. The parking sensors are
an aid for the driver, but the driver must
never allow their attention to lapse during
potentially dangerous manoeuvres, even
those executed at low speeds.
IMPORTANT
53)The sensors must be clean of mud,
dirt, snow or ice in order for the system to
operate correctly. Be careful not to scratch
or damage the sensors while cleaning
them. Avoid using dry, rough or hard
cloths. The sensors should be washed
using clean water with the addition of car
shampoo if necessary. When using special
washing equipment such as high pressure
jets or steam cleaning, clean the sensors
very quickly keeping the jet more than
10 cm away.
54)Have interventions on the bumper in
the area of the sensors carried out only by
a Fiat Dealership. Interventions on the
bumper that are not carried out properly
may compromise the operation of the
parking sensors.
55)Only have the bumpers repainted or
any retouches to the paintwork in the area
of the sensors carried out by a Fiat
Dealership. Incorrect paint application
could affect the operation of the parking
sensors.
56)The sensors may provide a false
indication, interpreting the tow hook ball
assembly and the relevant attachment as
an obstacle in the area behind the vehicle.
133
Page 137 of 284
a suitable distance is kept from the
vehicle in front;
the direction indicator (for leaving the
lane) is not active;
the lane limit lines are perfectly
visible on both sides (for activation of
the tactile warning only).
NOTE The system does not apply the
vibration to the steering wheel every
time a safety system is activated
(brakes, ABS, ASR system, ESC
system, Full Brake Control system,
etc.).
IMPORTANT
57)Projecting loads on the roof of the
vehicle may interfere with the correct
operation of the camera. Before starting
make sure the load is correctly positioned,
in order not to cover the camera operating
range.
58)If the windscreen must be replaced due
to scratches, chipping or breakage, contact
exclusively a Fiat Dealership. Do not
replace the windscreen on your own, risk of
malfunction! It is advisable to replace the
windscreen if it is damaged in the area of
the camera.
59)Do not tamper with nor operate on the
camera. Do not close the openings in the
aesthetic cover located under the interior
rear view mirror. In the event of a failure of
the camera, contact a Fiat Dealership.60)Do not cover the operating range of the
camera with stickers or other objects. Also
pay attention to other objects on the
bonnet (e.g. a layer of snow) and make
sure they do not interfere with the camera.
61)The camera may have limited or absent
operation due to weather conditions such
as: heavy rain, hail, thick fog, heavy snow,
formation of ice layers on the windscreen.
62)Camera operation may also be
compromised by the presence of dust,
condensation, dirt or ice on the
windscreen, by traffic conditions (e.g.
vehicles that are driving not aligned with
yours, vehicle driving in a transverse or
opposite way on the same lane, bend with
a small radius of curvature), by road
surface conditions and by driving
conditions (e.g. off-road driving). Make sure
the windscreen is always clean. Use
specific detergents and clean cloths to
avoid scratching the windscreen. The
camera operation may also be limited or
absent in some driving, traffic and road
surface conditions.
REAR VIEW CAMERA
DESCRIPTION
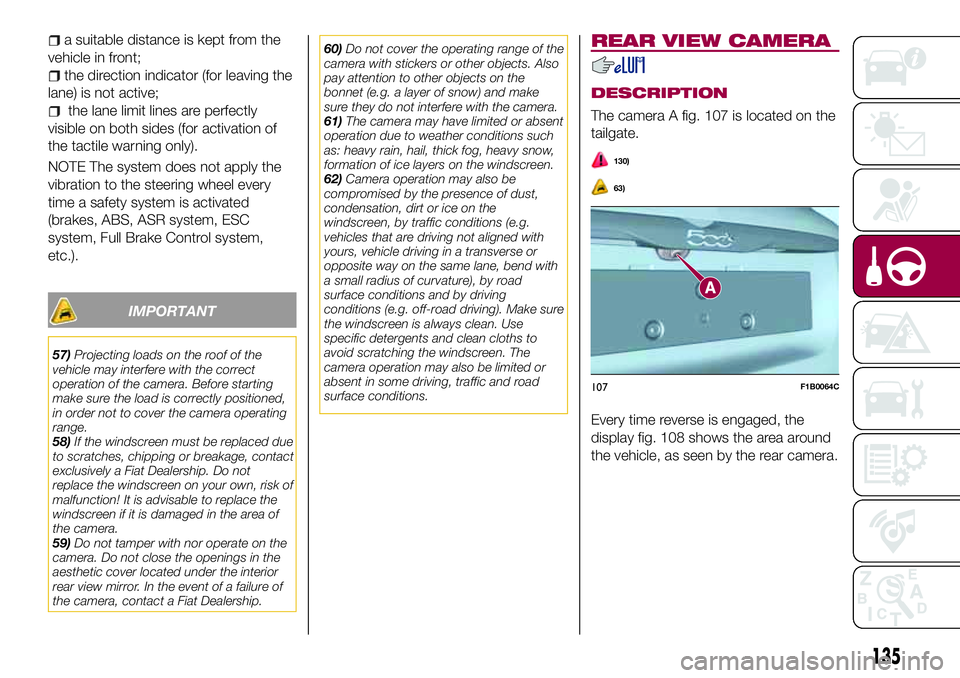
The camera A fig. 107 is located on the
tailgate.
130)
63)
Every time reverse is engaged, the
display fig. 108 shows the area around
the vehicle, as seen by the rear camera.
107F1B0064C
135
Page 138 of 284
SYMBOLS AND
MESSAGES ON THE
DISPLAY
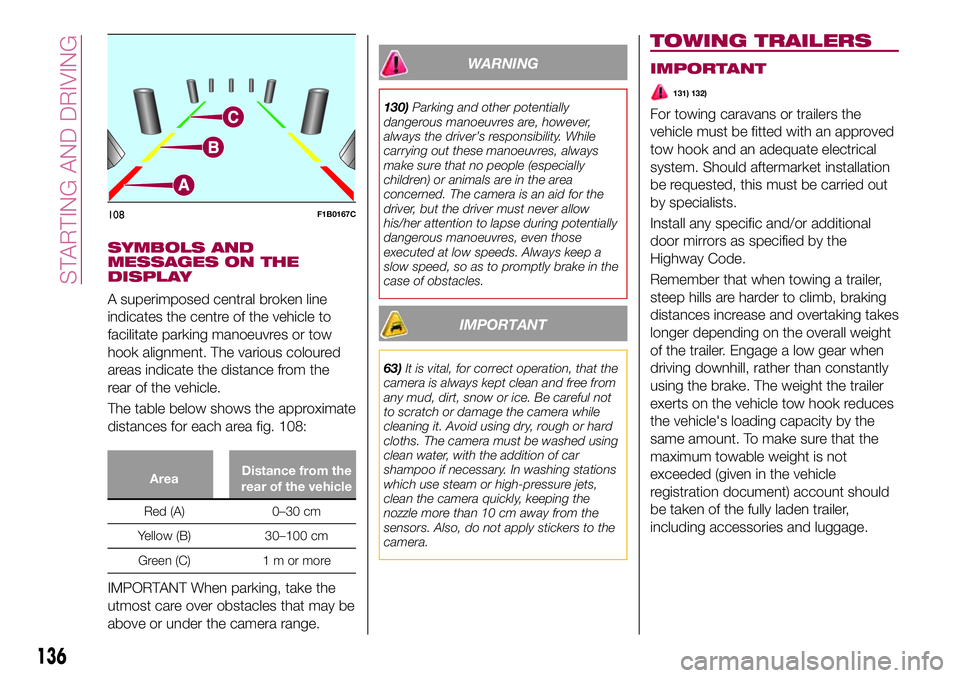
A superimposed central broken line
indicates the centre of the vehicle to
facilitate parking manoeuvres or tow
hook alignment. The various coloured
areas indicate the distance from the
rear of the vehicle.
The table below shows the approximate
distances for each area fig. 108:
AreaDistance from the
rear of the vehicle
Red (A) 0–30 cm
Yellow (B) 30–100 cm
Green (C) 1 m or more
IMPORTANT When parking, take the
utmost care over obstacles that may be
above or under the camera range.
WARNING
130)Parking and other potentially
dangerous manoeuvres are, however,
always the driver’s responsibility. While
carrying out these manoeuvres, always
make sure that no people (especially
children) or animals are in the area
concerned. The camera is an aid for the
driver, but the driver must never allow
his/her attention to lapse during potentially
dangerous manoeuvres, even those
executed at low speeds. Always keep a
slow speed, so as to promptly brake in the
case of obstacles.
IMPORTANT
63)It is vital, for correct operation, that the
camera is always kept clean and free from
any mud, dirt, snow or ice. Be careful not
to scratch or damage the camera while
cleaning it. Avoid using dry, rough or hard
cloths. The camera must be washed using
clean water, with the addition of car
shampoo if necessary. In washing stations
which use steam or high-pressure jets,
clean the camera quickly, keeping the
nozzle more than 10 cm away from the
sensors. Also, do not apply stickers to the
camera.
TOWING TRAILERS
IMPORTANT
131) 132)
For towing caravans or trailers the
vehicle must be fitted with an approved
tow hook and an adequate electrical
system. Should aftermarket installation
be requested, this must be carried out
by specialists.
Install any specific and/or additional
door mirrors as specified by the
Highway Code.
Remember that when towing a trailer,
steep hills are harder to climb, braking
distances increase and overtaking takes
longer depending on the overall weight
of the trailer. Engage a low gear when
driving downhill, rather than constantly
using the brake. The weight the trailer
exerts on the vehicle tow hook reduces
the vehicle's loading capacity by the
same amount. To make sure that the
maximum towable weight is not
exceeded (given in the vehicle
registration document) account should
be taken of the fully laden trailer,
including accessories and luggage.
108F1B0167C
136
STARTING AND DRIVING