sport mode FIAT 500X 2017 Owner handbook (in English)
[x] Cancel search | Manufacturer: FIAT, Model Year: 2017, Model line: 500X, Model: FIAT 500X 2017Pages: 284, PDF Size: 11.14 MB
Page 129 of 284

when the clutch is pressed (versions
with manual transmission);
when the engine speed exceeds a
maximum threshold (versions with
manual transmission and versions with
automatic transmission/automatic
transmission with double clutch) or
goes below a minimum threshold (only
versions with manual transmission);
when the car speed is not within the
settable speed range;
when the ESC (or ABS or other
stability control systems) are operating
or have just operated;
when the ESC system is off;
during automatic braking by the Full
Brake Control system (where provided);
when the Speed Limiter is active;
when the electronic Cruise Control is
active;
in case of failure of the device;
when the engine is off;
in case of obstruction of the radar
sensor (in this case the bumper area
where it is located must be cleaned).
In case of system set, the conditions
described above also cause a
cancellation or deactivation of the
system with times that may vary
according to the conditions.
IMPORTANT With the device set, it is
possible to reach speeds higher than
those set in the system by pressing theaccelerator pedal. In this condition, the
device does not turn off automatically,
but the device functions are limited: it is
therefore recommended to turn it off.
CHANGING SPEED
Speed increase
After having set the device, the stored
speed can be stored by holding the
SET + button pressed.
Press the SET + button once, the set
speed will increase by 1 km/h (or the
equivalent in mph). Each touch of the
button once will increase the speed by
1 km/h (or the equivalent in mph).
Hold the SET + button down, the set
speed will increase in 10 km/h steps (or
the equivalent in mph) until the button is
released. The set speed increase is
shown on the display.
Decreasing speed
After having set the device, the stored
speed can be reduced by holding the
SET – button pressed.
Press the SET – button once, the set
speed will increase by 1 km/h (or the
equivalent in mph). Each touch of the
button once will reduce the speed by
1 km/h (or the equivalent in mph).
Hold the SET – button down, the set
speed will decrease in 10 km/h steps
(or the equivalent in mph) until thebutton is released. The set speed
decrease is shown on the display.
NOTE If “Sport” mode is chosen on the
Drive Mode selector, the ACC will be
switch to sport mode: the system will
become more reactive in case of
acceleration.
ACCELERATING WHEN
OVERTAKING
When driving with the device active and
following a vehicle, the device provides
additional acceleration to facilitate
overtaking, when travelling over a given
speed and switches on the left direction
indicator (of the right indicator for
right-hand drive versions).
RECALLING THE SPEED
Once the system has been cancelled
but not deactivated, if a speed was
previously set simply press the RES
button and remove your foot from the
accelerator to recall it.
The system will be set to the last stored
speed.
Before returning to the previously set
speed, bring the speed close to that
value, then press the RES button and
release it.
127
Page 132 of 284

DRIVE MODE
The device allows the driver to
select three different driving
modes (car response) according to their
needs and to the road and traffic
conditions, by manually adjusting the
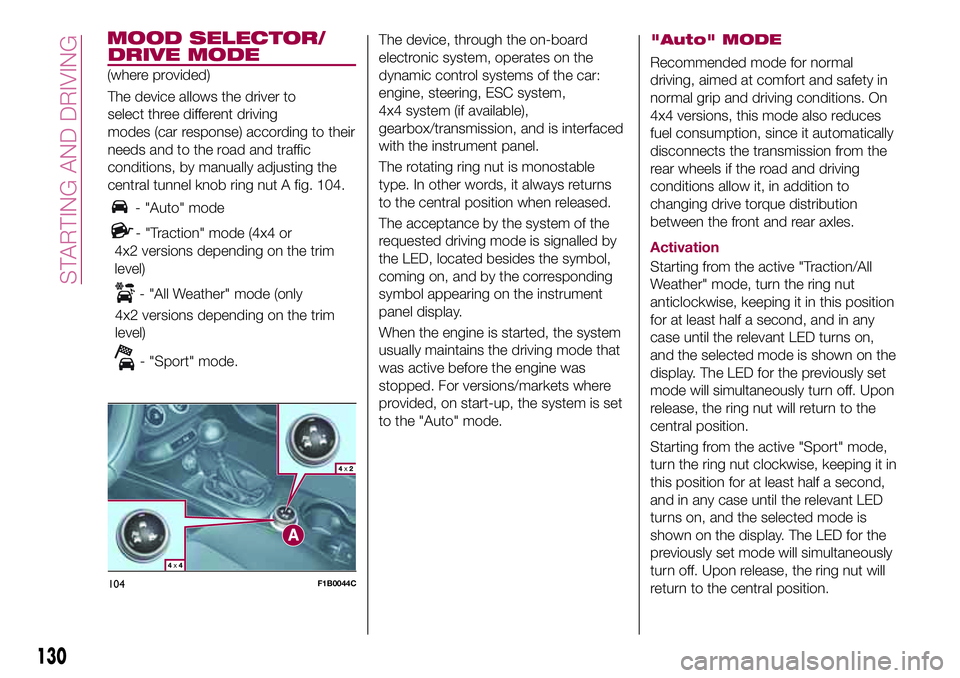
central tunnel knob ring nut A fig. 104.
- "Auto" mode
- "Traction" mode (4x4 or
4x2 versions depending on the trim
level)
- "All Weather" mode (only
4x2 versions depending on the trim
level)
- "Sport" mode.The device, through the on-board
electronic system, operates on the
dynamic control systems of the car:
engine, steering, ESC system,
4x4 system (if available),
gearbox/transmission, and is interfaced
with the instrument panel.
The rotating ring nut is monostable
type. In other words, it always returns
to the central position when released.
The acceptance by the system of the
requested driving mode is signalled by
the LED, located besides the symbol,
coming on, and by the corresponding
symbol appearing on the instrument
panel display.
When the engine is started, the system
usually maintains the driving mode that
was active before the engine was
stopped. For versions/markets where
provided, on start-up, the system is set
to the "Auto" mode.
"Auto" MODE
Recommended mode for normal
driving, aimed at comfort and safety in
normal grip and driving conditions. On
4x4 versions, this mode also reduces
fuel consumption, since it automatically
disconnects the transmission from the
rear wheels if the road and driving
conditions allow it, in addition to
changing drive torque distribution
between the front and rear axles.
Activation
Starting from the active "Traction/All
Weather" mode, turn the ring nut
anticlockwise, keeping it in this position
for at least half a second, and in any
case until the relevant LED turns on,
and the selected mode is shown on the
display. The LED for the previously set
mode will simultaneously turn off. Upon
release, the ring nut will return to the
central position.
Starting from the active "Sport" mode,
turn the ring nut clockwise, keeping it in
this position for at least half a second,
and in any case until the relevant LED
turns on, and the selected mode is
shown on the display. The LED for the
previously set mode will simultaneously
turn off. Upon release, the ring nut will
return to the central position.
104F1B0044C
130
STARTING AND DRIVING
(where provided)
MOOD SELECTOR/
Page 133 of 284

"Traction"/"All Weather"
MODE
It is a driving mode for safety in poor
vehicle grip conditions (wet/slippery
road surface, rain, snow). On the
4x4 versions use is also recommended
on unsurfaced roads or off-road.
Activation
Starting from the active "Auto" mode,
turn the ring nut clockwise, keeping it in
this position for at least half a second,
and in any case until the relevant LED
turns on, and the selected mode is
shown on the display. The LED for the
previously set mode will simultaneously
turn off. Upon release, the ring nut will
return to the central position.
Starting from the active "Sport" mode,
turn the ring nut anticlockwise, keeping
it in this position for at least half a
second, and in any case until the
relevant LED turns on, and the selected
mode is shown on the display. The LED
for the previously set mode will
simultaneously turn off. Upon release,
the ring nut will return to the central
position.
"Sport" MODE
It is the mode that emphasises the
pleasure of sport driving; it increases
fuel consumption however. Traction is
optimised on 4x4 versions, allowing the
vehicle road-hold performance to be
improved, even on bends.
Activation
Starting from the active "Auto" mode,
turn the ring nut anticlockwise, keeping
it in this position for at least half a
second, and in any case until the
relevant LED turns on, and the selected
mode is shown on the display. The LED
for the previously set mode will
simultaneously turn off. Upon release,
the ring nut will return to the central
position.
Starting from the active "Traction/All
Weather" mode, turn the ring nut
clockwise, keeping it in this position for
at least half a second, and in any case
until the relevant LED turns on, and the
selected mode is shown on the display.
The LED for the previously set mode will
simultaneously turn off. Upon release,
the ring nut will return to the central
position.
FAULT INDICATIONS
In the case of system and selector
faults, the mode change option will be
automatically disabled. The system will
automatically set itself to "Auto" mode.
In these cases the display will show a
dedicated warning. Go to a Fiat
Dealership as soon as possible to have
the system checked.
131
Page 230 of 284

TIPS, CONTROLS
AND GENERAL
INFORMATION
ROAD SAFETY
Learn how to use the various system
functions before setting off.
Read the instructions for the system
carefully before setting off.
195) 196)
RECEPTION CONDITIONS
Reception conditions change
constantly while driving. Reception may
be interfered with by the presence of
mountains, buildings or bridges,
especially when you are far away from
the broadcaster.
IMPORTANT The volume may be
increased when receiving traffic alerts
and news.
CARE AND
MAINTENANCE
Observe the following precautions to
ensure the system is fully operational:
the display lens should not come into
contact with pointed or rigid objects
which could damage its surface; use a
soft, dry anti-static cloth to clean and
do not press.
never use alcohol, petrols and
derivatives to clean the display lens.
prevent any liquid from entering the
system: this could damage it beyond
repair.
93) 94)
MULTIMEDIA DEVICES
IMPORTANT Some multimedia players
may not be compatible with the
Uconnect system.
ANTI-THEFT
PROTECTION
The system is equipped with an
anti-theft protection system based on
the exchange of information with the
electronic control unit (Body Computer)
on the vehicle.
This guarantees maximum safety and
prevents the secret code from being
entered after the power supply has
been disconnected.
If the check has a positive outcome, the
system will start to operate, whereas if
the comparison codes are not the same
or if the electronic control unit (Body
Computer) is replaced, the system will
ask the user to enter the secret code
according to the procedure described
in the paragraph below.
Entering the secret code
(Uconnect™Radio Nav 6.5" excluded)
When the system is switched on, if the
code is requested, the display will show"Please enter Anti-Theft Code" followed
by the video page showing a keypad to
enter the secret code.
The secret code is made up of four
digits, from 0 to 9: to insert the first digit
of the code, turn the "BROWSE
ENTER" right knob and press to
confirm.
After inserting the fourth digit, move the
cursor to "OK" and press the
"BROWSE ENTER" right knob: the
system will start to operate.
If an incorrect code is entered, the
system displays "Incorrect Code" to
notify the user of the need to enter the
correct code.
After the 3 available attempts to enter
the code, the system displays
"Incorrect Code. Radio locked. Wait for
30 minutes". Once the text has
disappeared you can start the code
entering procedure again.
Vehicle radio passport
(Uconnect™Radio Nav 6.5" excluded)
This document certifies ownership of
the system. The vehicle radio passport
shows the system model, serial number
and secret code.
In the case of loss of the vehicle radio
passport, contact the Fiat Dealership,
taking an ID document and the vehicle
ownership documents.
228
MULTIMEDIA