USB port FIAT 500X 2018 Owner handbook (in English)
[x] Cancel search | Manufacturer: FIAT, Model Year: 2018, Model line: 500X, Model: FIAT 500X 2018Pages: 276, PDF Size: 7.08 MB
Page 12 of 276
DASHBOARD
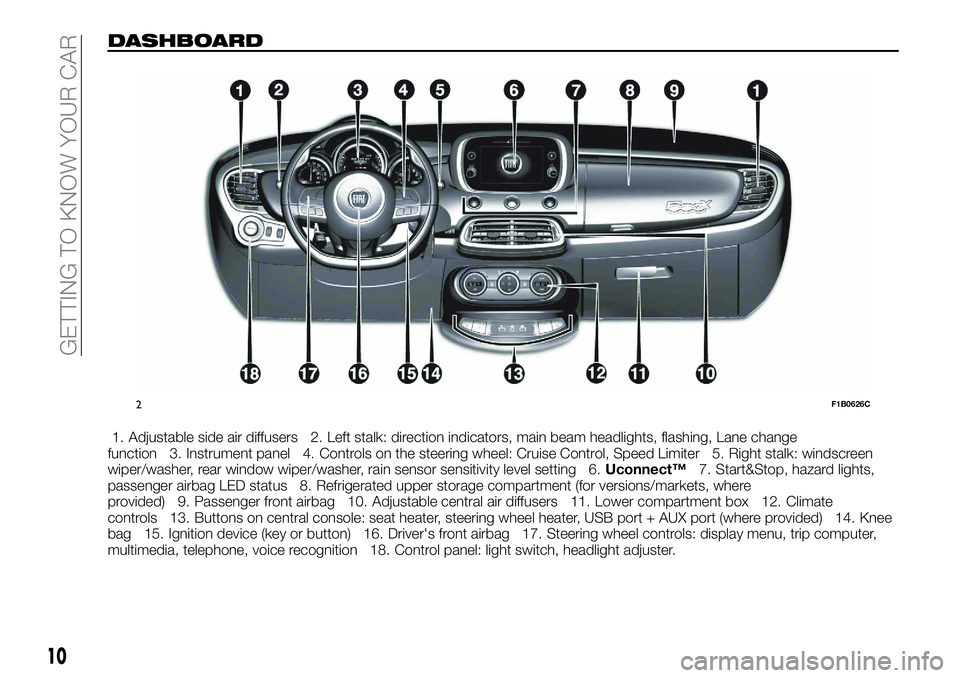
1. Adjustable side air diffusers 2. Left stalk: direction indicators, main beam headlights, flashing, Lane change
function 3. Instrument panel 4. Controls on the steering wheel: Cruise Control, Speed Limiter 5. Right stalk: windscreen
wiper/washer, rear window wiper/washer, rain sensor sensitivity level setting 6. Uconnect™7. Start&Stop, hazard lights,
passenger airbag LED status 8. Refrigerated upper storage compartment (for versions/markets, where
provided) 9. Passenger front airbag 10. Adjustable central air diffusers 11. Lower compartment box 12. Climate
controls 13. Buttons on central console: seat heater, steering wheel heater, USB port + AUX port (where provided) 14. Knee
bag 15. Ignition device (key or button) 16. Driver's front airbag 17. Steering wheel controls: display menu, trip computer,
multimedia, telephone, voice recognition 18. Control panel: light switch, headlight adjuster.
2F1B0626C
10
GETTING TO KNOW YOUR CAR
Page 159 of 276
ENGINE COMPARTMENT FUSE BOX
USERSFUSE AMPERE
Horn F10
10
Power supply for cigar lighter/power socket F8420
DASHBOARD FUSE BOX
USERS FUSE AMPERE
Front electric window (passenger side) F3320
Fr
ont electric window (driver side) F3420
Power supply to Uconnect
™system, Climate Control System,
Rear-view mirror folding system, EOBD system, USB / AUX port,
Rear side roof light (convertible version) F36 15
Dead Lock device (Driver side door unlocking for
versions/markets, where provided)/Door unlocking/Central
locking/Electric tailgate unlocking F38 20
Rear left electric window F47 20
Rear right electric window F48 20
157
Page 235 of 276
TIPS, CONTROLS
AND GENERAL
INFORMATION
ROAD SAFETY
Learn how to use the various system
functions before setting off.
Read the instructions for the system
carefully before setting off.
192) 193)
RECEPTION CONDITIONS
Reception conditions change
constantly while driving. Reception may
be interfered with by the presence of
mountains, buildings or bridges,
especially when you are far away from
the broadcaster.
IMPORTANT The volume may be
increased when receiving traffic alerts
and news.CARE AND
MAINTENANCE
Observe the following precautions to
ensure the system is fully operational:
the display lens should not come into
contact with pointed or rigid objects
which could damage its surface; use a
soft, dry anti-static cloth to clean and
do not press.
never use alcohol, petrols and
derivatives to clean the display lens.
prevent any liquid from entering the
system: this could damage it beyond
repair.
105) 106)
MULTIMEDIA DEVICES
IMPORTANT Some multimedia players
may not be compatible with the
Uconnect™.
Only use devices (e.g. USB flash drives)
from safe sources on the car. Devices
from unknown sources could contain
software infected by viruses which, if
installed on the car, could increase the
vulnerability of the car's electric/
electronic systems to hacking.
ANTITHEFT PROTECTION
The system is equipped with an
anti-theft protection system based on
the exchange of information with the
electronic control unit (Body Computer)
on the vehicle.
This guarantees maximum safety and
prevents the secret code from being
entered after the power supply has
been disconnected.
If the check has a positive outcome, the
system will start to operate, whereas if
the comparison codes are not the same
or if the electronic control unit (Body
Computer) is replaced, the system will
ask the user to enter the secret code
according to the procedure described
in the paragraph below.
Entering the secret code
When the system is switched on, if the
code is requested, the display will show
"Please enter Anti-Theft Code" followed
by the screen showing a keypad to
enter the secret code.
The secret code is made up of four
digits, from 0 to 9: to insert the code,
turn the "BROWSE ENTER" right knob
and press to confirm.
After inserting the fourth digit, move the
cursor to "OK" and press the
"BROWSE ENTER" right knob: the
system will start to operate.
233
Page 243 of 276
SWITCHING THE SYSTEM
ON/OFF
The system is switched on/off by
pressing the
button/knob.
Turn the button/knob clockwise to
increase the radio volume or
anticlockwise to decrease it.
RADIO (TUNER) MODE
The system features the following
tuners: AM, FM.
RADIO MODE SELECTION
Press the RADIO button on the front
panel to activate radio mode.
FREQUENCY BAND
SELECTION
The different tuning modes can be
selected by pressing the RADIO button
on the front panel.
DISPLAYED
INFORMATION
After the desired radio station is
selected on the display, the following
information is shown (INFO mode
activated):
In the upper part: the preset station, the
time and the other active radio settings
are highlighted.
In the central part: the name of the
current station, the frequency and the
radio text information (if any) are
highlighted.
FM station list
Press the BROWSE ENTER
button/knob to display the complete list
of the FM stations that can be received.
SETTING THE PRESETS
The preset stations are available in all
system modes and are selected by
touching one of the presetting buttons
1-2-3-4-5-6 on the front panel.
If you are tuned to a radio station that
you wish to store, hold down the button
on the display which corresponds to
the desired preset until an acoustic
confirmation signal is emitted.
RADIO STATION
SELECTION
To search for the desired radio station
press the
orbutton or use
the wheel of the steering wheel controls
, or turn the "BROWSE ENTER"
knob.
PREVIOUS/NEXT RADIO
STATION SEARCH
Press briefly theorbutton
or use the wheel of the steering wheel
controls
: when the button is
released the previous or next radio
station is displayed.
PREVIOUS/NEXT RADIO
STATION FAST SEARCH
Hold down theorbutton to
start the fast search: when the button is
released, the first tunable radio is
played.
MEDIA MODE
Press the MEDIAbutton to select the
desired audio source among those
available: AUX or USB.
To select and playback music tracks on
the mobile phone CD card (where the
phone allows) press the BROWSE
ENTER button/knob, select Folders
then Card.
IMPORTANT Some multimedia player
devices may not be compatible with the
Uconnect™ system.
TRACK CHANGE
(previous/next)
Briefly press thebutton or turn
the BROWSE ENTER button/knob
clockwise to play the next track.
Briefly press the
button or turn
the BROWSE ENTER button/knob
anticlockwise to return to the beginning
of the selected track or to the beginning
of the previous track (if this has been
played for less than 3 seconds).
241
Page 244 of 276
TRACK FAST FORWARD/
REWIND
Hold down thebutton to fast
forward the selected track.
Hold down the
button to fast
rewind the track.
TRACK SELECTION
(Browse)
Use this function to scroll through and
select the tracks on the active device.
The choices available depend on the
device connected.
For example, on a USB device, you can
also use the BROWSE ENTER
button/knob to scroll through the list of
artists, genres and albums available on
the device, depending on the
information available in the tracks.
Within each alphabetical list, the A-B-C
button on the front panel allows the
user to skip to the desired letter in the
list.
NOTE This button might be disabled for
some
Apple® devices.
NOTE The BROWSE ENTER button
does not allow any operation on an
AUX device.
Press the BROWSE ENTER button to
activate this function on the source
being played. Turn the BROWSE ENTER button/knob
to select the desired category and then
press the button/knob to confirm the
selection.
Press the
button to cancel the
function.
TRACK INFORMATION
DISPLAY
Press the INFObutton to select the
information displayed while playing
(Artist, Album, Genre, Name, Folder, File
name).
Press the
button to exit the
screen.
SHUFFLE
Press thebutton to play the tracks
on USB in a random order.
Press the button again to deactivate the
function.
TRACK REPETITION
To listen to the track again, press the
button.
Press again to deactivate the function.
AUX SUPPORT
To activate AUX mode, insert an
appropriate device in the AUX socket
on the vehicle.
Adjust the volume using the
button/knob on the front panel or
using the volume adjustment control on
the connected device.
For the "Audio source selection"
function, see the "Media mode"
chapter.
IMPORTANT
The functions of the device connected
with the AUX socket are directly
managed by the device itself: it is not
possible to change track/folder/playlist
or control playing start/end/pause with
the controls on the front panel or on the
steering wheel.
Do not leave the cable of your portable
player connected to the AUX socket
after disconnection, to avoid possible
hiss from the speakers.
242
MULTIMEDIA
Page 245 of 276
USB SOURCE
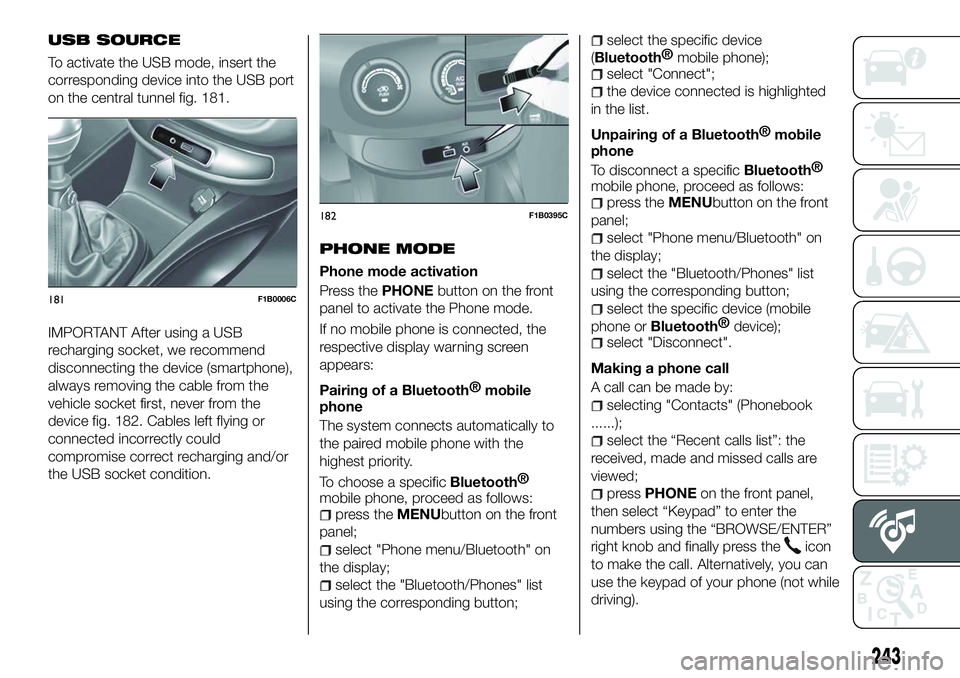
To activate the USB mode, insert the
corresponding device into the USB port
on the central tunnel fig. 181.
IMPORTANT After using a USB
recharging socket, we recommend
disconnecting the device (smartphone),
always removing the cable from the
vehicle socket first, never from the
device fig. 182. Cables left flying or
connected incorrectly could
compromise correct recharging and/or
the USB socket condition.PHONE MODE
Phone mode activation
Press the
PHONEbutton on the front
panel to activate the Phone mode.
If no mobile phone is connected, the
respective display warning screen
appears:
Pairing of a
Bluetooth® mobile
phone
The system connects automatically to
the paired mobile phone with the
highest priority.
To choose a specific
Bluetooth®
mobile phone, proceed as follows:
press the MENUbutton on the front
panel;
select "Phone menu/Bluetooth" on
the display;
select the "Bluetooth/Phones" list
using the corresponding button;
select the specific device
(
Bluetooth® mobile phone);
select "Connect";
the device connected is highlighted
in the list.
Unpairing of a
Bluetooth® mobile
phone
To disconnect a specific
Bluetooth®
mobile phone, proceed as follows:
press the MENUbutton on the front
panel;
select "Phone menu/Bluetooth" on
the display;
select the "Bluetooth/Phones" list
using the corresponding button;
select the specific device (mobile
phone or
Bluetooth® device);
select "Disconnect".
Making a phone call
A call can be made by:
selecting "Contacts" (Phonebook
......);
select the “Recent calls list”: the
received, made and missed calls are
viewed;
press PHONE on the front panel,
then select “Keypad” to enter the
numbers using the “BROWSE/ENTER”
right knob and finally press the
icon
to make the call. Alternatively, you can
use the keypad of your phone (not while
driving).
181F1B0006C
182F1B0395C
243
Page 253 of 276
SWITCHING THE SYSTEM
ON/OFF
The system is switched on/off by
pressing the
button/knob.
Turn the button/knob clockwise to
increase the radio volume or
anticlockwise to decrease it. The
electronic volume adjustment control
rotates continuously (360°) in both
directions, without stop positions.
"TOUCH SCREEN"
FUNCTION
The system uses the "touch screen”
function; to interact with the different
functions, press the "graphic buttons"
displayed.
Confirming a selection: press the
"OK" button.
Return to the previous screen: press
the
(Delete) button or, depending
on the active screen,
/Done.
RADIO MODE
After the desired radio station is
selected, the following information is
shown on the display:
At the top: the list of radio stations
stored (preset) is displayed; the station
currently playing is highlighted.
At the centre: the name of station
being listened too is displayed. On the left side: the "AM", "FM",
"DAB” (for versions/markets, where
provided) buttons to select the desired
frequency band are displayed (the
button corresponding to the selected
band is highlighted);
On the right: display of the following
buttons:
“Info”: additional information on the
source being listened to;
“Map": navigation map view (versions
with Uconnect™ 7" HD Nav LIVE
only).
At the bottom: display of the following
buttons:
“Browse”: list of the radio stations
available;
/selecting previous/next
radio station;
“Tune” : manual radio station tuning;
“Audio”: access to the “Audio
Settings” screen.
Audio menu
To access the "Audio" menu press the
Audio" button located at the bottom of
the display.
The following adjustments can be
carried out using the “Audio” menu:
“Balance & Fader" (left/right and
front/rear audio balance adjustment)
"Equaliser" (for versions/markets,
where provided)
“Speed Adj Volume” (speed-
dependent automatic volume control)
"Loudness" (for versions/markets,
where provided)
“AUX Volume compensation” (only
active if an AUX device is inserted)
(where provided)
“AutoPlay”
“Auto-On Radio”
MEDIA MODE
Press the "Media" button to select the
desired audio source among those
available: USB,
Bluetooth® and AUX
(where provided).
IMPORTANT Applications used on
portable devices may be not
compatible with the Uconnect™
system.
After Media mode is selected, the
following information is shown on the
display.
At the top: information on the track
being played and the following graphic
buttons:
“Repeat”: to repeat the track being
played
“Shuffle”: to play the tracks in
random order
Track progress and duration
In the middle: information on the track
being played.
251
Page 255 of 276
NOTE When modifying the
name-device in the
Bluetooth®
settings of the phone (where provided),
the Radio may change the track being
played if the device is connected via
USB after the
Bluetooth® connection.
After updating the phone software, for
proper operation, it is recommended to
remove the phone from the list of
devices linked to the radio, delete the
previous system pairing also from the
list of
Bluetooth® devices on the
phone and make a new pairing.
IMPORTANT If the Bluetooth®
connection between mobile phone and
system is lost, consult the mobile
phone handbook.
USB SOURCE
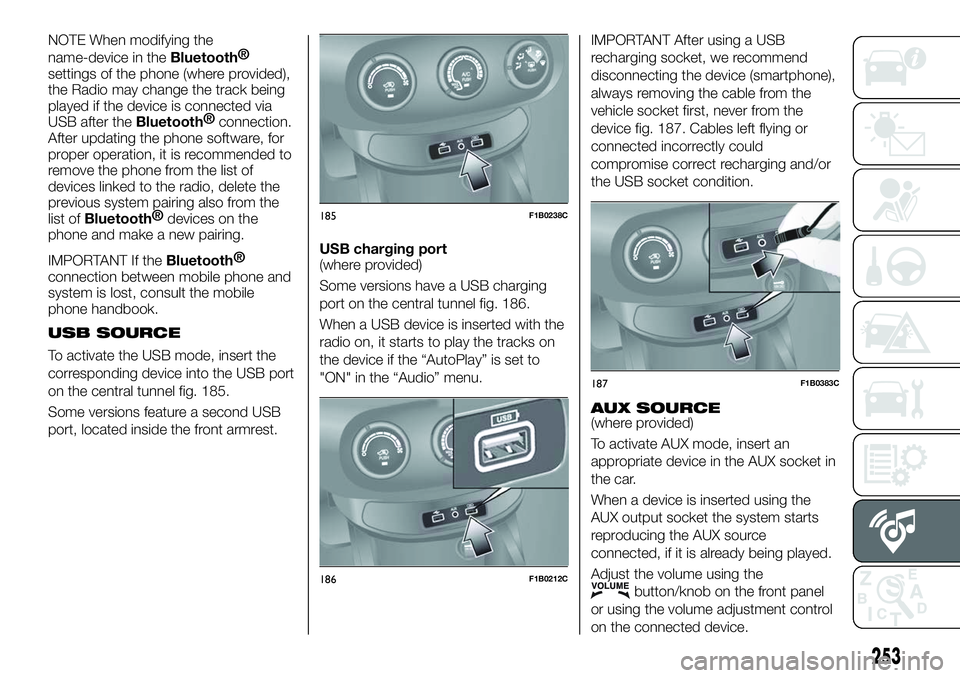
To activate the USB mode, insert the
corresponding device into the USB port
on the central tunnel fig. 185.
Some versions feature a second USB
port, located inside the front armrest. USB charging port
(where provided)
Some versions have a USB charging
port on the central tunnel fig. 186.
When a USB device is inserted with the
radio on, it starts to play the tracks on
the device if the “AutoPlay” is set to
"ON" in the “Audio” menu.
IMPORTANT After using a USB
recharging socket, we recommend
disconnecting the device (smartphone),
always removing the cable from the
vehicle socket first, never from the
device fig. 187. Cables left flying or
connected incorrectly could
compromise correct recharging and/or
the USB socket condition.
AUX SOURCE
(where provided)
To activate AUX mode, insert an
appropriate device in the AUX socket in
the car.
When a device is inserted using the
AUX output socket the system starts
reproducing the AUX source
connected, if it is already being played.
Adjust the volume using the
button/knob on the front panel
or using the volume adjustment control
on the connected device.
185F1B0238C
186F1B0212C
187F1B0383C
253
Page 259 of 276
eco:Drive™
Theeco:Drive™ application allows you
to display your driving behaviour in real
time, in order to help you achieve a
more efficient driving style as far as
consumption and emissions are
concerned.
In addition, the data can be saved on a
USB flash drive, and the data analysis
can be made on your personal
computer thanks to the eco:Drive™
desktop application, available on
www.fiat.it (for Italy) or www.fiat.com
(for other countries) or
www.driveuconnect.eu
Driving style is evaluated by means of
four indices which monitor the following
parameters:
Acceleration
Deceleration
Transmission
Speed
Display of the eco:Drive™
Press the eco:Drive™ button to
interact with the function. A screen will
be displayed showing the 4 indices
described above.
These indices are grey until the system
has enough data to evaluate the driving
style. Once sufficient data are available,
the indices will have 5 colours
depending on the evaluation: dark
green (very good), light green, yellow,
orange and red (very bad). In the event of extended inactivity the
display will show the average of the
indices up to that moment (“Average
index”) then the indices will be coloured
again in real time as soon as the car is
restarted.
Recording and transferring trip data
The trip data can be stored in the
system memory and transferred
through a properly configured USB
memory stick or by the
Uconnect™LIVE App. This allows you
to display the history of the collected
data, showing the complete analysis of
the trip data and of your driving style.
For further information visit the
www.driveuconnect.eu website
IMPORTANT Do not remove the USB
memory stick nor unpair the
smartphone and the
Uconnect™LIVE
App before the system has
downloaded the data, since these
could be lost. During the transfer of
data to the devices, Uconnect™
messages may appear on the display
to guide the user correctly through the
operation; follow these instructions.
These messages are only displayed
with the ignition device at STOP and
when a delay in the Uconnect™
system switching off is set. The data
are automatically transferred to the
devices when the engine is switched off. Transferred data will be deleted
from the system memory in this
manner. You can choose to store the
trip data or not, by pressing the
"Settings" button and by setting the
storage activation and the transfer
mode (USB or Cloud), as required.
When the USB memory stick is full, the
dedicated messages are shown on the
Uconnect™
system display.
When the eco:Drive™ data have not
been transferred to the USB key for a
while, the Uconnect™ system internal
memory could become saturated: in
this case, follow the recommendations
provided by the messages on the
display.
my:Car
my:Car allows you to keep the
condition of your car always under
control. The my:Carapplication is
capable of detecting malfunctioning in
real time and lets the driver know about
the expiry of maintenance coupons, To
interact with the application, press "
my:Car" button: a screen will appear
on the display showing the "care:Index"
section which contains detailed
information on car status. Press the
"Active warnings" button to show the
details of any faults on the car which
caused a warning light to switch on.
257
Page 260 of 276
The car status can be seen both on
www.driveuconnect.eu or through the
Uconnect™LIVEApp.
Apple CarPlay and
Android Auto
(where provided)
The Apple CarPlay and Android Auto
applications allow you to use your
smartphone in the car safely and
intuitively. To enable them, just connect
a compatible smartphone via the USB
port and the phone's contents will be
automatically shown on the
Uconnect™system display.
To check the compatibility of your
smartphone, see the indications on the
websites:
https://www.android.com/intl/it_it/auto/
and http://www.apple.com/it/ios/
carplay/.
If the smartphone is connected
correctly to the car via the USB port,
the Apple CarPlay or Android Auto icon
will be displayed in place of the
button in the main menu. Android Auto APP Setup
Before use, download the Android Auto
application to your smartphone from
Google Play Store.
The application is compatible with
Android 5.0 (Lollipop) and later
versions. To use Android Auto, the
smartphone must be connected to the
car with a USB cable.
On the first connection, you will have to
perform the setup procedure that
appears on the smartphone. You can
only perform this procedure with the
vehicle stationary.
Once connected to the USB port, the
Android Auto application establishes a
parallel
Bluetooth®
connection.
Apple CarPlay App Setup
Apple CarPlay is compatible with the
iPhone 5 or more recent models, with
the iOS 7.1 operating system or later
versions. Before using Apple CarPlay,
enable Siri from Settings > General >
Siri on the smartphone.
To use Apple CarPlay, the smartphone
must be connected to the car with a
USB cable.
NOTE Enabling CarPlay/Android Auto
or some functions could require
interaction on the smartphone. If
necessary, complete the step on your
device (smartphone).
Interaction
After the setup procedure, on
connecting your smartphone to the
car's USB port, the application will run
automatically on the Uconnect™
system.
You can interact with Apple CarPlay
and Android Auto using the steering
wheel button
(long press of the
button), using the SCROLL TUNE
button/knob (to select and confirm) or
using the Uconnect™ system
touchscreen.
Navigation
With the Apple CarPlay and Android
Auto applications, the driver can
choose to use the navigation system on
their smartphone.
If the system “Nav” mode is already
active, or when a device is connected
to the car with a navigation session in
progress, the Uconnect™display
shows a pop-up alert enabling the
driver to choose between system
navigation or navigation using the
smartphone.
The selection can be changed at any
time by accessing the chosen
navigation system and setting a new
destination.
258
MULTIMEDIA