lights FIAT 500X 2018 Owner handbook (in English)
[x] Cancel search | Manufacturer: FIAT, Model Year: 2018, Model line: 500X, Model: FIAT 500X 2018Pages: 276, PDF Size: 7.08 MB
Page 11 of 276
GETTING TO KNOW YOUR CAR
In-depth knowledge of your new vehicle
starts here.
The booklet that you are reading simply
and directly explains how it is made and
how it works.
That’s why we advise you to read it
seated comfortably on board, so that
you can see immediately what is
described here for yourself.DASHBOARD...............10
THE KEYS .................11
IGNITION DEVICE ............12
FIAT CODE .................14
ALARM ...................14
DOORS ...................15
SEATS....................19
HEAD RESTRAINTS ...........21
STEERING WHEEL ............23
REAR VIEW MIRRORS .........23
EXTERIOR LIGHTS ............25
INTERIOR LIGHTS ............29
WINDSCREEN/REAR WINDOW
WIPER ...................29
CLIMATE CONTROL SYSTEM .....33
ELECTRIC WINDOWS ..........37
ELECTRIC SUN ROOF .........38
BONNET ..................40
BOOT ....................41
VERSION WITH LPG SYSTEM ....43
9
Page 12 of 276
DASHBOARD
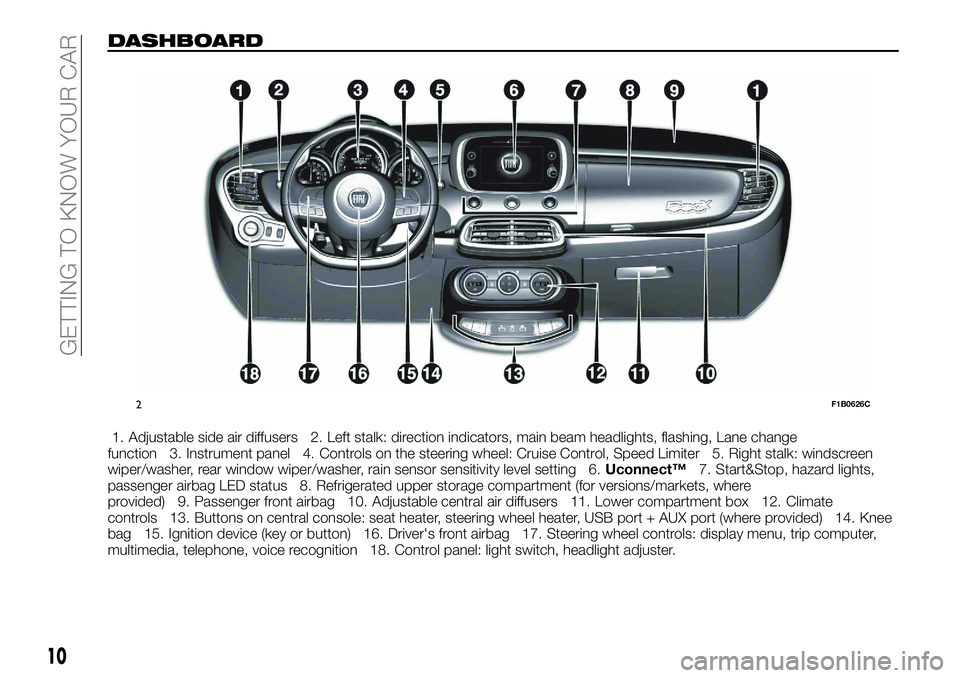
1. Adjustable side air diffusers 2. Left stalk: direction indicators, main beam headlights, flashing, Lane change
function 3. Instrument panel 4. Controls on the steering wheel: Cruise Control, Speed Limiter 5. Right stalk: windscreen
wiper/washer, rear window wiper/washer, rain sensor sensitivity level setting 6. Uconnect™7. Start&Stop, hazard lights,
passenger airbag LED status 8. Refrigerated upper storage compartment (for versions/markets, where
provided) 9. Passenger front airbag 10. Adjustable central air diffusers 11. Lower compartment box 12. Climate
controls 13. Buttons on central console: seat heater, steering wheel heater, USB port + AUX port (where provided) 14. Knee
bag 15. Ignition device (key or button) 16. Driver's front airbag 17. Steering wheel controls: display menu, trip computer,
multimedia, telephone, voice recognition 18. Control panel: light switch, headlight adjuster.
2F1B0626C
10
GETTING TO KNOW YOUR CAR
Page 13 of 276
THE KEYS
KEY WITH REMOTE
CONTROL
1)
1)
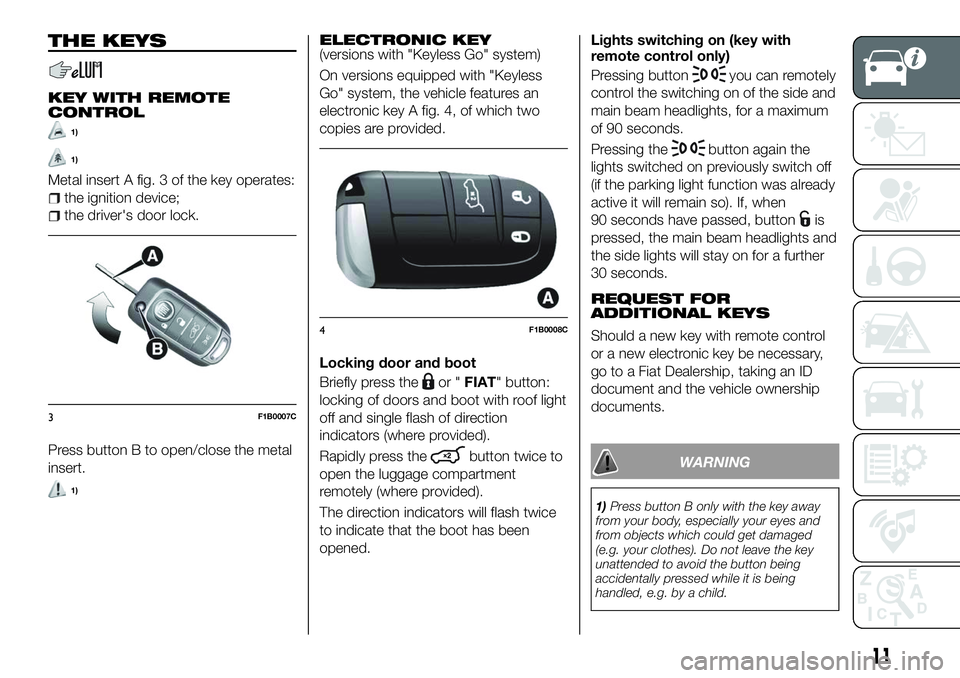
Metal insert A fig. 3 of the key operates:
the ignition device;
the driver's door lock.
Press button B to open/close the metal
insert.
1)
ELECTRONIC KEY(versions with "Keyless Go" system)
On versions equipped with "Keyless
Go" system, the vehicle features an
electronic key A fig. 4, of which two
copies are provided.
Locking door and boot
Briefly press the
or " FIAT" button:
locking of doors and boot with roof light
off and single flash of direction
indicators (where provided).
Rapidly press the
button twice to
open the luggage compartment
remotely (where provided).
The direction indicators will flash twice
to indicate that the boot has been
opened. Lights switching on (key with
remote control only)
Pressing button
you can remotely
control the switching on of the side and
main beam headlights, for a maximum
of 90 seconds.
Pressing the
button again the
lights switched on previously switch off
(if the parking light function was already
active it will remain so). If, when
90 seconds have passed, button
is
pressed, the main beam headlights and
the side lights will stay on for a further
30 seconds.
REQUEST FOR
ADDITIONAL KEYS
Should a new key with remote control
or a new electronic key be necessary,
go to a Fiat Dealership, taking an ID
document and the vehicle ownership
documents.
WARNING
1) Press button B only with the key away
from your body, especially your eyes and
from objects which could get damaged
(e.g. your clothes). Do not leave the key
unattended to avoid the button being
accidentally pressed while it is being
handled, e.g. by a child.
3F1B0007C
4F1B0008C
11
Page 16 of 276
FIAT CODE
The Fiat Code system prevents
unauthorised use of the vehicle,
disabling engine starting.
The system does not need to be
enabled/activated: operation is
automatic, regardless of the fact that
the vehicle's doors are locked or
unlocked.
When the ignition device is set to MAR,
the Fiat Code system identifies the
code transmitted by the key. If the code
is recognised as valid, the Fiat Code
system enables engine starting.
When the ignition device is brought
back to STOP, the Fiat Code system
deactivates the control unit controlling
the engine, thus preventing its starting.
For the correct engine starting
procedures, see the instructions in the
"Starting the engine" paragraph,
"Starting and driving" chapter.IRREGULAR OPERATION
If, during starting, the key code is not
correctly recognised, the
icon is
displayed on the instrument panel (see
the instructions in the "Warning lights
and messages" paragraph, "Knowing
the instrument panel" chapter). This
condition leads to the engine switching
off after 2 seconds. In this case, bring
the ignition device to STOP and then to
MAR; if it is still blocked, try with the
other keys provided. If it is still not
possible to start the engine, contact a
Fiat Dealership.
If the
icon is displayed while
driving, this means that the system is
running a self-diagnosis (e.g. due to a
voltage drop). If the display persists,
contact a Fiat Dealership.
ALARM
Activation of the alarm triggers the
acoustic warning and the direction
indicators.
IMPORTANT The alarm is adapted by
the Manufacturer to meet the
requirements of the various countries
where the vehicle is marketed.
TURNING THE ALARM ON
(where provided)
With the doors, bonnet and tailgate
closed and the ignition device on to
STOP, point the key with remote control
or electronic key towards the vehicle
and press and release the
" FIAT"
button.
For versions with electronic key, the
alarm can also be armed by pressing
the "door lock" button, located on the
door external handle. For more
information, refer to the Keyless Entry
paragraph a few pages further on.
The system emits a visual and acoustic
warning (where provided) and enables
door locking.
With the alarm on, warning light A
fig. 7 flashes on the instrument panel.
14
GETTING TO KNOW YOUR CAR
Page 27 of 276
Mirrors realignment operation
In case one of the door mirrors has
been moved manually it may occur that
the mirror itself does not retain its
position in a stable way while driving.
In that case it is necessary to carry out
the following realignment operation:
manually close the mirror in parking
position, folding it from position 1 to
position 2 (see fig. 28 );
Actuate the mirrors opening control
one or two times C fig. 27 to realign the
system and bring both mirrors in the
driving position.
WARNING
17) As the driver's door mirror is curved, it
may slightly alter the perception of
distance.
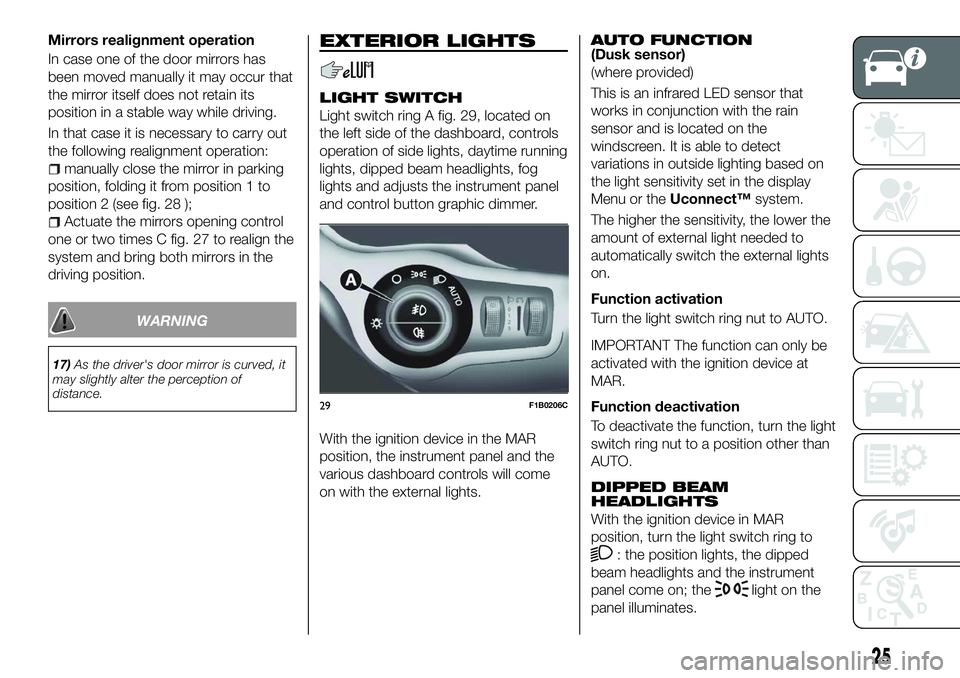
EXTERIOR LIGHTS
LIGHT SWITCH
Light switch ring A fig. 29, located on
the left side of the dashboard, controls
operation of side lights, daytime running
lights, dipped beam headlights, fog
lights and adjusts the instrument panel
and control button graphic dimmer.
With the ignition device in the MAR
position, the instrument panel and the
various dashboard controls will come
on with the external lights.
AUTO FUNCTION(Dusk sensor)
(where provided)
This is an infrared LED sensor that
works in conjunction with the rain
sensor and is located on the
windscreen. It is able to detect
variations in outside lighting based on
the light sensitivity set in the display
Menu or the Uconnect™ system.
The higher the sensitivity, the lower the
amount of external light needed to
automatically switch the external lights
on.
Function activation
Turn the light switch ring nut to AUTO.
IMPORTANT The function can only be
activated with the ignition device at
MAR.
Function deactivation
To deactivate the function, turn the light
switch ring nut to a position other than
AUTO.
DIPPED BEAM
HEADLIGHTS
With the ignition device in MAR
position, turn the light switch ring to
: the position lights, the dipped
beam headlights and the instrument
panel come on; the
light on the
panel illuminates.
29F1B0206C
25
Page 28 of 276
DAYTIME RUNNING
LIGHTS (DRL)
"Daytime Running Lights"
18) 19)
With the ignition device in the MAR
position and the light ring turned to the
Oposition, the daytime running lights
are automatically activated. The other
lights and interior lighting remain off.
The daytime running lights are
temporarily deactivated when the
direction indicators are activated. When
the direction indicators are deactivated,
the daylight running lights are
reactivated.
FOG LIGHTS(where provided)
The fog light switch is integrated with
the light switch.
With the ignition device in the MAR
position and the dipped beam
headlights on, press the
button to
switch on the fog lights.
When the fog lights are on, the position
and number plates lights are on while
the daytime running lights are off.
To switch them off, press the button
again or turn the light switch ring to O.
REAR FOG LIGHT(where provided)
The button which turns the rear fog light
on and off is integrated in the light
switch.
With the ignition device in the MAR
position and the dipped beam
headlights or fog lights on, press the
button to switch on the rear fog
light.
PARKING LIGHTS
These can be turned on by turning the
light switch ring to the
position.
The
warning light switches on in
the instrument panel.
IMPORTANT NOTE Do not select this
light switch position when the car is
moving, but only to indicate that the car
is parked when prescribed by the
regulations in force in the country where
you are driving (Highway Code).
To turn the lights off, turn the light
switch ring to the Oposition
HEADLIGHTS OFF DELAY
(Follow me home)
Activation
With multifunction display and
Uconnect™Radio: turn the ignition
device to STOP. Within 2 minutes, pull
the left stalk to headlight flashing mode:
the headlight off delay is activated for
30 seconds. The function can be activated for 7 times in sequence, i.e.
up to a total of 210 seconds.
With reconfigurable multifunction
display and/orUconnect™7'': the
headlight off delay can be set (from 0,
30, 60 to 90 seconds) in the Menu.
If the headlight off delay is set to
0 seconds, it is possible to turn on the
lights for a predefined time of
30 seconds using the main beam
headlights stalk within 2 minutes after
stopping the engine. It is possible to
turn on the lights 7 times, for a
maximum of 210 seconds.
If the value set on the Menu is different
from 0, the lights can be switched of for
the predetermined time by taking the
ring from position
(with the engine
running) to position O(with the engine
off).
The function can be activated
automatically on versions with dusk
sensor: turn the ring to the AUTO
position with the engine running. The
dipped beam headlights will be turned
on if the sensor detects a low level of
light. The headlights off delay is
activated automatically when the engine
is switched off with the headlights on
for the time selected in the Menu.
26
GETTING TO KNOW YOUR CAR
Page 29 of 276
Deactivation
If the function is activated by using the
left steering wheel stalk, the function
can be deactivated by holding the left
lever in "main beam flashing" mode for
longer than 2 seconds or by waiting for
the deactivation time shown on the
display.
The function cannot be deactivated if it
is activated using the light line. The
headlights will be switched off at the
end of the set time.
Turning the ignition device to the MAR
position will deactivate the function.
MAIN BEAM HEADLIGHTS
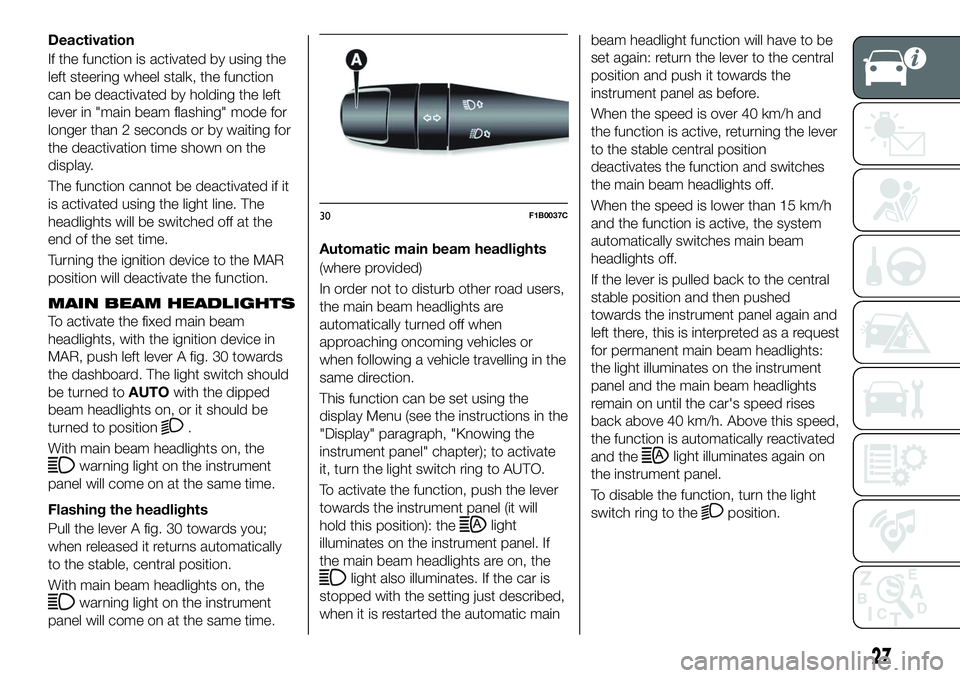
To activate the fixed main beam
headlights, with the ignition device in
MAR, push left lever A fig. 30 towards
the dashboard. The light switch should
be turned toAUTOwith the dipped
beam headlights on, or it should be
turned to position
.
With main beam headlights on, the
warning light on the instrument
panel will come on at the same time.
Flashing the headlights
Pull the lever A fig. 30 towards you;
when released it returns automatically
to the stable, central position.
With main beam headlights on, the
warning light on the instrument
panel will come on at the same time. Automatic main beam headlights
(where provided)
In order not to disturb other road users,
the main beam headlights are
automatically turned off when
approaching oncoming vehicles or
when following a vehicle travelling in the
same direction.
This function can be set using the
display Menu (see the instructions in the
"Display" paragraph, "Knowing the
instrument panel" chapter); to activate
it, turn the light switch ring to AUTO.
To activate the function, push the lever
towards the instrument panel (it will
hold this position): the
light
illuminates on the instrument panel. If
the main beam headlights are on, the
light also illuminates. If the car is
stopped with the setting just described,
when it is restarted the automatic main beam headlight function will have to be
set again: return the lever to the central
position and push it towards the
instrument panel as before.
When the speed is over 40 km/h and
the function is active, returning the lever
to the stable central position
deactivates the function and switches
the main beam headlights off.
When the speed is lower than 15 km/h
and the function is active, the system
automatically switches main beam
headlights off.
If the lever is pulled back to the central
stable position and then pushed
towards the instrument panel again and
left there, this is interpreted as a request
for permanent main beam headlights:
the light illuminates on the instrument
panel and the main beam headlights
remain on until the car's speed rises
back above 40 km/h. Above this speed,
the function is automatically reactivated
and the
light illuminates again on
the instrument panel.
To disable the function, turn the light
switch ring to the
position.
30F1B0037C
27
Page 30 of 276
DIRECTION INDICATORS
Bring left stalk A fig. 30 to the (stable)
position:
upwards: activates the right direction
indicator;
downwards: activates the left direction
indicator.
The
orwarning light respectively
will flash on the instrument panel.
The direction indicators switch off
automatically when the steering wheel
is straightened or when the daytime
running lights (DRL)/parking lights are
activated.
"Lane Change" function
If you wish to signal a lane change while
running, place the left stalk in the
unstable position for less than half a
second.
The direction indicator on the side
selected will flash five times and then
switch off automatically.
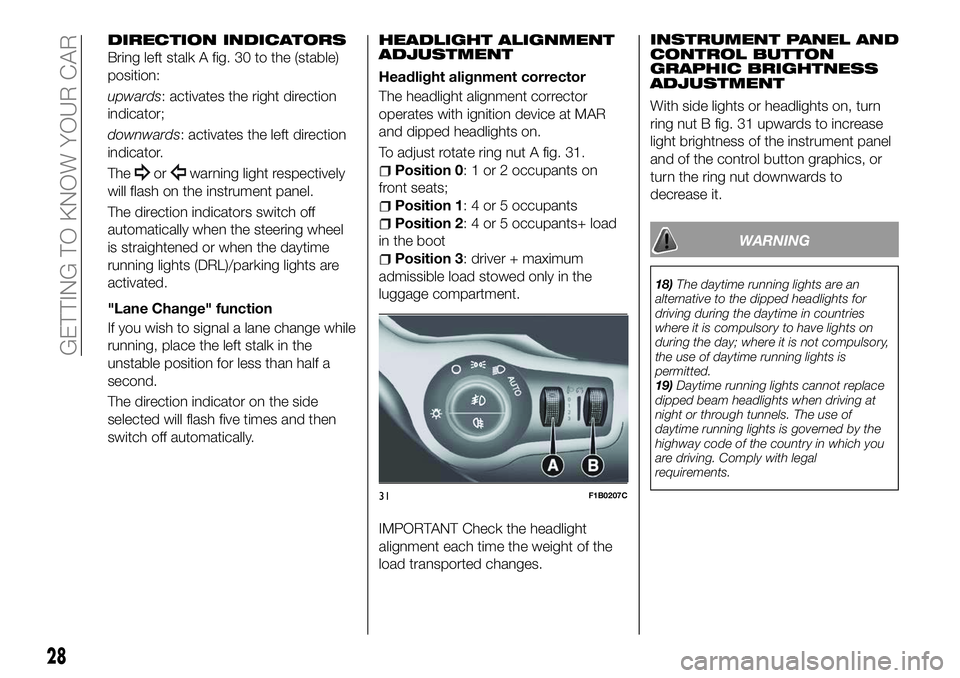
HEADLIGHT ALIGNMENT
ADJUSTMENT
Headlight alignment corrector
The headlight alignment corrector
operates with ignition device at MAR
and dipped headlights on.
To adjust rotate ring nut A fig. 31.
Position 0: 1 or 2 occupants on
front seats;
Position 1: 4 or 5 occupants
Position 2: 4 or 5 occupants+ load
in the boot
Position 3: driver + maximum
admissible load stowed only in the
luggage compartment.
IMPORTANT Check the headlight
alignment each time the weight of the
load transported changes. INSTRUMENT PANEL AND
CONTROL BUTTON
GRAPHIC BRIGHTNESS
ADJUSTMENT
With side lights or headlights on, turn
ring nut B fig. 31 upwards to increase
light brightness of the instrument panel
and of the control button graphics, or
turn the ring nut downwards to
decrease it.
WARNING
18)
The daytime running lights are an
alternative to the dipped headlights for
driving during the daytime in countries
where it is compulsory to have lights on
during the day; where it is not compulsory,
the use of daytime running lights is
permitted.
19) Daytime running lights cannot replace
dipped beam headlights when driving at
night or through tunnels. The use of
daytime running lights is governed by the
highway code of the country in which you
are driving. Comply with legal
requirements.
31F1B0207C
28
GETTING TO KNOW YOUR CAR
Page 31 of 276
INTERIOR LIGHTS
FRONT ROOF LIGHT
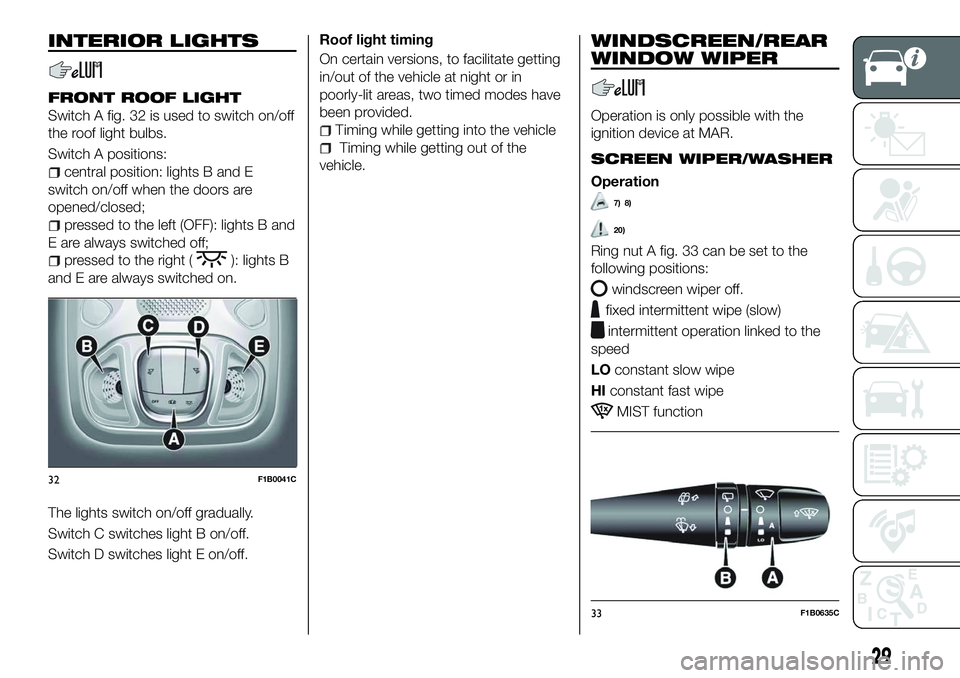
Switch A fig. 32 is used to switch on/off
the roof light bulbs.
Switch A positions:
central position: lights B and E
switch on/off when the doors are
opened/closed;
pressed to the left (OFF): lights B and
E are always switched off;
pressed to the right (): lights B
and E are always switched on.
The lights switch on/off gradually.
Switch C switches light B on/off.
Switch D switches light E on/off. Roof light timing
On certain versions, to facilitate getting
in/out of the vehicle at night or in
poorly-lit areas, two timed modes have
been provided.
Timing while getting into the vehicle
Timing while getting out of the
vehicle.
WINDSCREEN/REAR
WINDOW WIPER
Operation is only possible with the
ignition device at MAR.
SCREEN WIPER/WASHER
Operation
7) 8)
20)
Ring nut A fig. 33 can be set to the
following positions:
windscreen wiper off.
fixed intermittent wipe (slow)
intermittent operation linked to the
speed
LO constant slow wipe
HI constant fast wipe
MIST function
32F1B0041C
33F1B0635C
29
Page 43 of 276
BOOT
The boot unlocking is electrically
operated and is deactivated when the
vehicle is in motion.
OPENING
27)
Opening from the outside
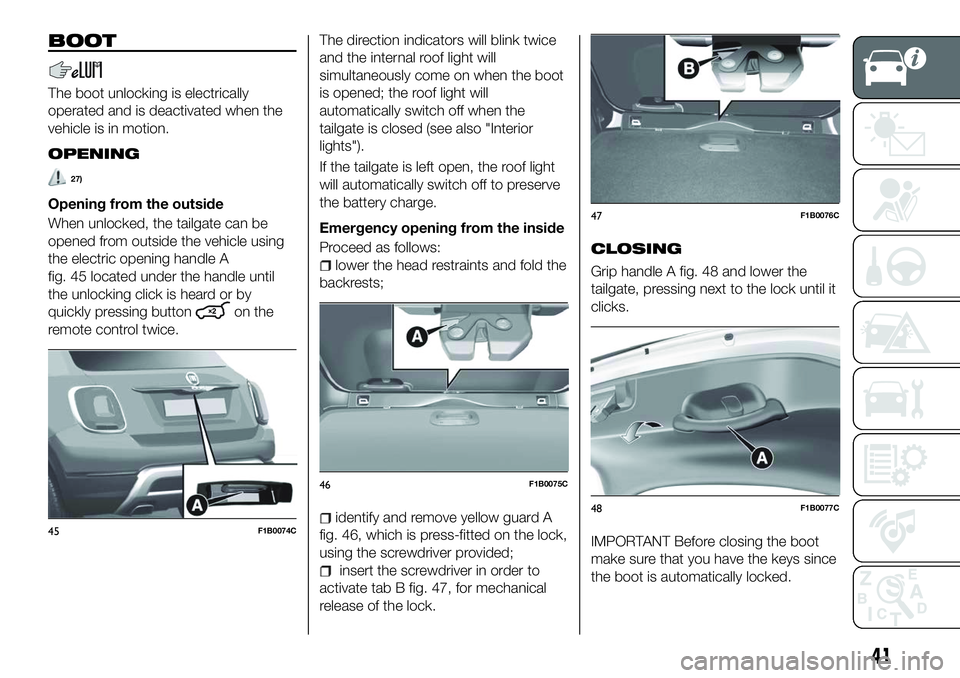
When unlocked, the tailgate can be
opened from outside the vehicle using
the electric opening handle A
fig. 45 located under the handle until
the unlocking click is heard or by
quickly pressing button
on the
remote control twice. The direction indicators will blink twice
and the internal roof light will
simultaneously come on when the boot
is opened; the roof light will
automatically switch off when the
tailgate is closed (see also "Interior
lights").
If the tailgate is left open, the roof light
will automatically switch off to preserve
the battery charge.
Emergency opening from the inside
Proceed as follows:
lower the head restraints and fold the
backrests;
identify and remove yellow guard A
fig. 46, which is press-fitted on the lock,
using the screwdriver provided;
insert the screwdriver in order to
activate tab B fig. 47, for mechanical
release of the lock.
CLOSING
Grip handle A fig. 48 and lower the
tailgate, pressing next to the lock until it
clicks.
IMPORTANT Before closing the boot
make sure that you have the keys since
the boot is automatically locked.45F1B0074C
46F1B0075C
47F1B0076C
48F1B0077C
41