change time FIAT 500X 2018 Owner handbook (in English)
[x] Cancel search | Manufacturer: FIAT, Model Year: 2018, Model line: 500X, Model: FIAT 500X 2018Pages: 276, PDF Size: 7.08 MB
Page 3 of 276
Dear Customer,
We would like to congratulate and thank you for choosing a Fiat.
We have written this handbook to help you get to know all the features of your vehicle and use it in the best possible way.
Here you will find information, advice and important warnings regarding use of your vehicle and how to achieve the best
performance from the technical features of your Fiat 500X.
You are advised to read it right through before taking to the road for the first time, to become familiar with the controls and
above all with those concerning brakes, steering and gearbox; at the same time, you can understand the vehicle behaviour on
different road surfaces.
This document also provides a description of special features and tips, as well as essential information for the safe driving, care
and maintenance of your Fiat 500X over time.
After reading it, you are advised to keep the handbook inside the vehicle, for an easy reference and for making sure it remains
on board the vehicle should it be sold.
In the attached Warranty Booklet you will also find a description of the Services that Fiat offers to its customers, the Warranty
Certificate and the detail of the terms and conditions for maintaining its validity.
We are sure that these will help you to get in touch with and appreciate your new vehicle and the service provided by the
people at Fiat.
Enjoy reading. Happy motoring!
This Owner Handbook describes all Fiat 500X versions. Options, equipment dedicated to specific markets or
versions are not explicitly indicated in the text: as a consequence, you should only consider the information which
is related to the trim level, engine and version that you have purchased. Any content introduced throughout the
production of the model, outside the specific request of options at the time of purchase, will be identified with the
wording(where provided).
All data contained in this publication are intended to help you use your vehicle in the best possible way. FCA Italy
S.p.A. aims at a constant improvement of the vehicles produced. For this reason it reserves the right to make
changes to the model described for technical and/or commercial reasons.
For further information, contact a Fiat Dealership.
Page 4 of 276
READ THIS CAREFULLYREFUELLINGPetrol engines: only refuel with unleaded petrol with octane rating (RON) not less than 95 in compliance with the European specification
EN228. Do not use petrol containing methanol or ethanol E85. Using these mixtures may cause misfiring and driving issues, as well as damage
fundamental components of the supply system.For further details on the use of the correct fuel see the "Refuelling the car" paragraph in the "Starting and driving" chapter.
Diesel engines: refuel only with Diesel fuel motor vehicles conforming to the European specification EN590. The use of other products or
mixtures may damage the engine beyond repair and consequently invalidate the warranty, due to the damage caused.
For further details on the use of the correct fuel see the "Refuelling the car" paragraph in the "Starting and driving" chapter.
LPG engines: refuel only with LPG for motor vehicles conforming to the European specification EN589. The use of other products or mixtures
may damage the engine beyond repair and consequently invalidate the warranty, due to the damage caused. For further details on the use of
the correct fuel see the "Refuelling the car" paragraph in the "Starting and driving" chapter.
STARTING THE ENGINE
Versions with manual gearbox (petrol engines) : make sure that the handbrake is engaged; set the gear lever to neutral, fully depress the
clutch pedal without pressing the accelerator, then turn the ignition key to AVV or press the ignition device button; release the key or the button
as soon as the engine has started. Versions with manual gearbox (diesel engines) : make sure that the handbrake is engaged; set the gear lever to neutral, fully depress the
clutch pedal without pressing the accelerator, then turn the ignition key to MAR and wait for the
warning light to switch off. Bring the ignition
key to AVV or press the ignition device button; release the key or the button as soon as the engine has started.
Versions with automatic transmission: make sure that the handbrake is engaged and that the gear lever is in P (Parking) or N (Neutral),
depress the brake pedal, without pressing the accelerator pedal, then turn the ignition key to AVV or press the ignition device button; release
the key or the button as soon as the engine has started.
PARKING ON FLAMMABLE MATERIAL
The catalytic converter develops high temperatures during operation. Do not park the vehicle on grass, dry leaves, pine needles or other
flammable material: fire hazard.
RESPECTING THE ENVIRONMENT
The vehicle is fitted with a system that carries out a continuous diagnosis of the emission-related components in order to help protect the
environment.
ELECTRICAL ACCESSORIES
If, after buying the vehicle, you decide to add electrical accessories (with the risk of gradually draining the battery), contact a Fiat Dealership.
They can calculate the overall electrical requirement and check that the vehicle's electric system can support the required load.
SCHEDULED SERVICING
Correct maintenance of the vehicle is essential for ensuring that it maintains its performance and its safety features, its environmental
friendliness and low running costs unchanged in time.
Page 12 of 276
DASHBOARD
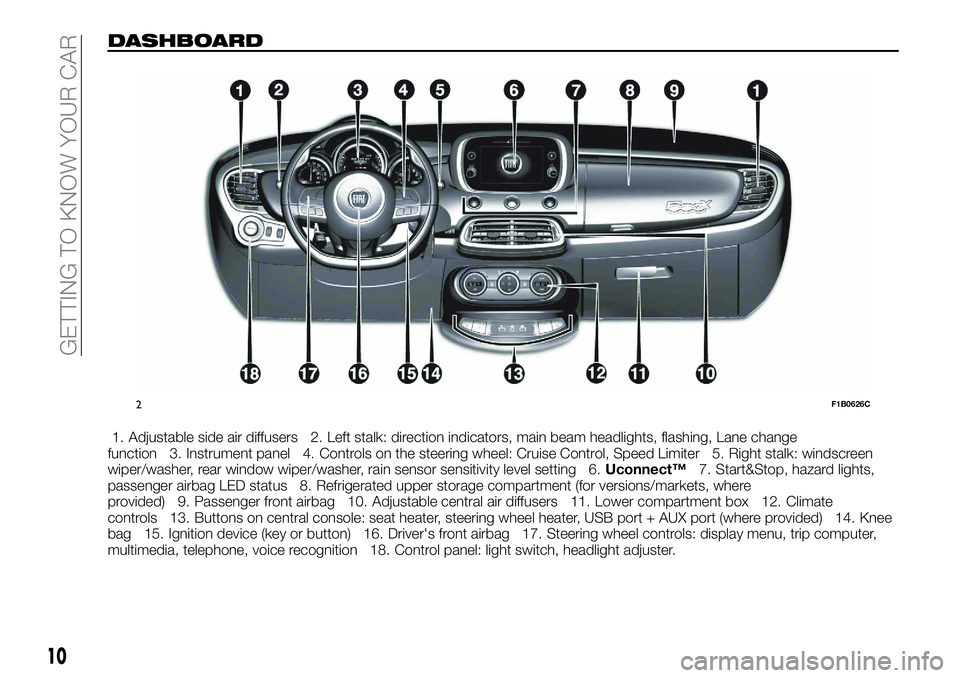
1. Adjustable side air diffusers 2. Left stalk: direction indicators, main beam headlights, flashing, Lane change
function 3. Instrument panel 4. Controls on the steering wheel: Cruise Control, Speed Limiter 5. Right stalk: windscreen
wiper/washer, rear window wiper/washer, rain sensor sensitivity level setting 6. Uconnect™7. Start&Stop, hazard lights,
passenger airbag LED status 8. Refrigerated upper storage compartment (for versions/markets, where
provided) 9. Passenger front airbag 10. Adjustable central air diffusers 11. Lower compartment box 12. Climate
controls 13. Buttons on central console: seat heater, steering wheel heater, USB port + AUX port (where provided) 14. Knee
bag 15. Ignition device (key or button) 16. Driver's front airbag 17. Steering wheel controls: display menu, trip computer,
multimedia, telephone, voice recognition 18. Control panel: light switch, headlight adjuster.
2F1B0626C
10
GETTING TO KNOW YOUR CAR
Page 30 of 276
DIRECTION INDICATORS
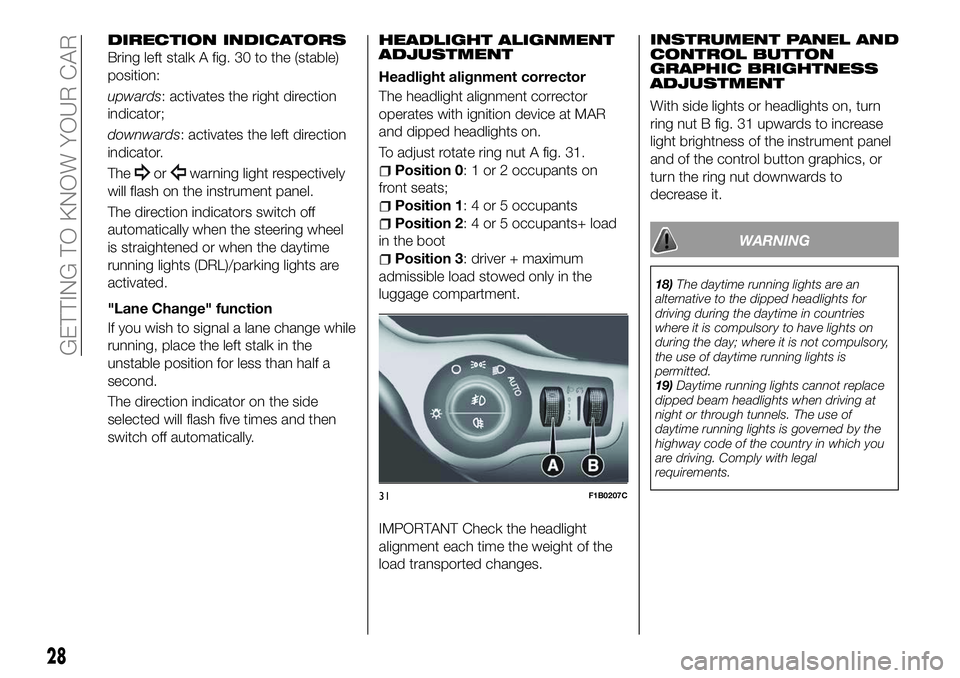
Bring left stalk A fig. 30 to the (stable)
position:
upwards: activates the right direction
indicator;
downwards: activates the left direction
indicator.
The
orwarning light respectively
will flash on the instrument panel.
The direction indicators switch off
automatically when the steering wheel
is straightened or when the daytime
running lights (DRL)/parking lights are
activated.
"Lane Change" function
If you wish to signal a lane change while
running, place the left stalk in the
unstable position for less than half a
second.
The direction indicator on the side
selected will flash five times and then
switch off automatically.
HEADLIGHT ALIGNMENT
ADJUSTMENT
Headlight alignment corrector
The headlight alignment corrector
operates with ignition device at MAR
and dipped headlights on.
To adjust rotate ring nut A fig. 31.
Position 0: 1 or 2 occupants on
front seats;
Position 1: 4 or 5 occupants
Position 2: 4 or 5 occupants+ load
in the boot
Position 3: driver + maximum
admissible load stowed only in the
luggage compartment.
IMPORTANT Check the headlight
alignment each time the weight of the
load transported changes. INSTRUMENT PANEL AND
CONTROL BUTTON
GRAPHIC BRIGHTNESS
ADJUSTMENT
With side lights or headlights on, turn
ring nut B fig. 31 upwards to increase
light brightness of the instrument panel
and of the control button graphics, or
turn the ring nut downwards to
decrease it.
WARNING
18)
The daytime running lights are an
alternative to the dipped headlights for
driving during the daytime in countries
where it is compulsory to have lights on
during the day; where it is not compulsory,
the use of daytime running lights is
permitted.
19) Daytime running lights cannot replace
dipped beam headlights when driving at
night or through tunnels. The use of
daytime running lights is governed by the
highway code of the country in which you
are driving. Comply with legal
requirements.
31F1B0207C
28
GETTING TO KNOW YOUR CAR
Page 46 of 276
LPG TANK
16)
The car has a pressurised tank for
storing LPG in a liquid state. It is
toroidal and is located in the spare
wheel compartment with suitable
protection.
LPG tank certification
The LPG tank is certified in
accordance with the regulations in
force.
In Italy, the tank has a life of
10 years starting from the car
registration date. If the car has
been registered in a country other
than Italy, the duration and the
testing/inspection procedures of
the LPG tank can vary depending
on the national provisions in force
in that country. In all case, when the
time limit for your country has
expired, go to a Fiat Dealer to have
the tank replaced.
LPG/PETROL SWITCH
30)
18) 19) 20)
This engine normally runs on LPG
except during starting when it runs on
petrol.
Switching to LPG is automatic: the
green warning light
on the
instrument panel turns off.
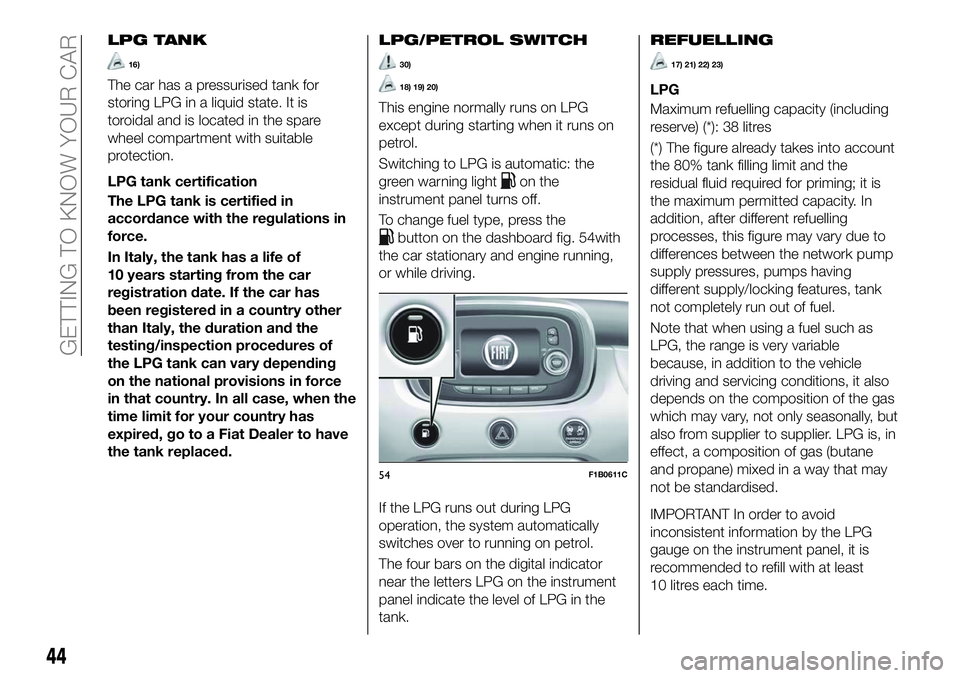
To change fuel type, press the
button on the dashboard fig. 54with
the car stationary and engine running,
or while driving.
If the LPG runs out during LPG
operation, the system automatically
switches over to running on petrol.
The four bars on the digital indicator
near the letters LPG on the instrument
panel indicate the level of LPG in the
tank.
REFUELLING
17) 21) 22) 23)
LPG
Maximum refuelling capacity (including
reserve) (*): 38 litres
(*) The figure already takes into account
the 80% tank filling limit and the
residual fluid required for priming; it is
the maximum permitted capacity. In
addition, after different refuelling
processes, this figure may vary due to
differences between the network pump
supply pressures, pumps having
different supply/locking features, tank
not completely run out of fuel.
Note that when using a fuel such as
LPG, the range is very variable
because, in addition to the vehicle
driving and servicing conditions, it also
depends on the composition of the gas
which may vary, not only seasonally, but
also from supplier to supplier. LPG is, in
effect, a composition of gas (butane
and propane) mixed in a way that may
not be standardised.
IMPORTANT In order to avoid
inconsistent information by the LPG
gauge on the instrument panel, it is
recommended to refill with at least
10 litres each time.
54F1B0611C
44
GETTING TO KNOW YOUR CAR
Page 51 of 276
DISPLAY
DESCRIPTION
The vehicle is equipped with a display
that can show useful information to the
driver while driving.
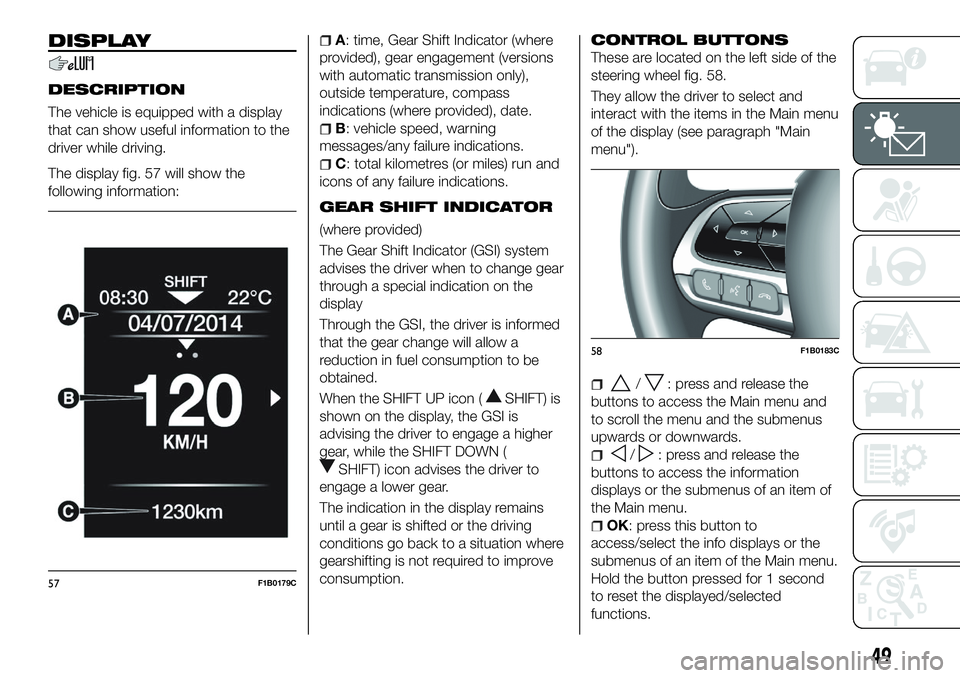
The display fig. 57 will show the
following information:
A: time, Gear Shift Indicator (where
provided), gear engagement (versions
with automatic transmission only),
outside temperature, compass
indications (where provided), date.
B: vehicle speed, warning
messages/any failure indications.
C: total kilometres (or miles) run and
icons of any failure indications.
GEAR SHIFT INDICATOR
(where provided)
The Gear Shift Indicator (GSI) system
advises the driver when to change gear
through a special indication on the
display
Through the GSI, the driver is informed
that the gear change will allow a
reduction in fuel consumption to be
obtained.
When the SHIFT UP icon (
SHIFT) is
shown on the display, the GSI is
advising the driver to engage a higher
gear, while the SHIFT DOWN (
SHIFT) icon advises the driver to
engage a lower gear.
The indication in the display remains
until a gear is shifted or the driving
conditions go back to a situation where
gearshifting is not required to improve
consumption.
CONTROL BUTTONS
These are located on the left side of the
steering wheel fig. 58.
They allow the driver to select and
interact with the items in the Main menu
of the display (see paragraph "Main
menu").
/: press and release the
buttons to access the Main menu and
to scroll the menu and the submenus
upwards or downwards.
/: press and release the
buttons to access the information
displays or the submenus of an item of
the Main menu.
OK: press this button to
access/select the info displays or the
submenus of an item of the Main menu.
Hold the button pressed for 1 second
to reset the displayed/selected
functions.
57F1B0179C
58F1B0183C
49
Page 52 of 276
MAIN MENU
The Menu includes the following items:
TRIP
MOOD SELECTOR (or DRIVE MODE
depending on the market) (where
provided) / GSI
VEHICLE INFO
DRIVER ASSIST
AUDIO
PHONE
NAVIGATION
ALERTS
VEHICLE SET-UP
Vehicle setup (Change car settings)
This menu item allows you to change
the settings for:
"Vehicle off" (where provided);
"Display";
"Units";
"Clock & Date";
"Security"
"Security & Assistance";
"Lights";
"Doors & Locks".
“Vehicle off” (where provided)
This is used to switch off the engine in
the event of a Keyless Enter-N-Go
system fault, following the procedure
described on the display. Display
By selecting item "Display" you can
access the settings/information
regarding: "Language", "See phone",
"See navigation", "Automatic Trip B
reset", "Drive Mode Repeat" (or “Mood
Selector Repeat” depending on the
market) (where provided), "Display
settings".
"Units"
Select item "Units" to choose the unit of
measurement between: "Imperial",
"Metric", "Custom".
"Clock & Date"
Select item "Clock & Date" to make the
following adjustments: "Set time", "Time
format", "Set date".
"Security"
Select item "Security" to make the
following adjustments: "Passenger
AIRBAG", "Speed beep", "Seat belt
buzzer", "Hill Hold Control".
"Passenger AIRBAG" adjustment allows
you to activate/deactivate the
passenger airbag:
Passenger's protection active:
the
ON LED comes on constantly in
the instrument panel dashboard.
Passenger's protection not
active: the
OFF LED comes on
constantly in the instrument panel
dashboard. "Security & Assistance"
For possible adjustments see
paragraph
Uconnect™ in the
dedicated chapter.
"Lights"
Select item "Lights" to make the
following adjustments: "Interior Ambient
lighting", "Headlight sensor", "Follow
me", "Headlights while opening", "Auto
high beams", "Daytime Lights",
"Cornering lights".
"Doors & Locks"
Select item "Doors & Locks" to make
the following adjustments: "Autoclose",
"Aut. unl. on exit", "Flsh.Light w/Lock",
"Horn with Lock", "Horn with remote
start", "Remote unlock", "Door Unlock"
(versions with Keyless Entry), "Keyless
Entry".
NOTE With the Uconnect™system,
some Menu items are shown and
managed on the display of the latter
and not on the instrument panel display
(refer to the Multimedia chapter or to
the supplement available online).
50
KNOWING THE INSTRUMENT PANEL
Page 69 of 276
SymbolWhat it means
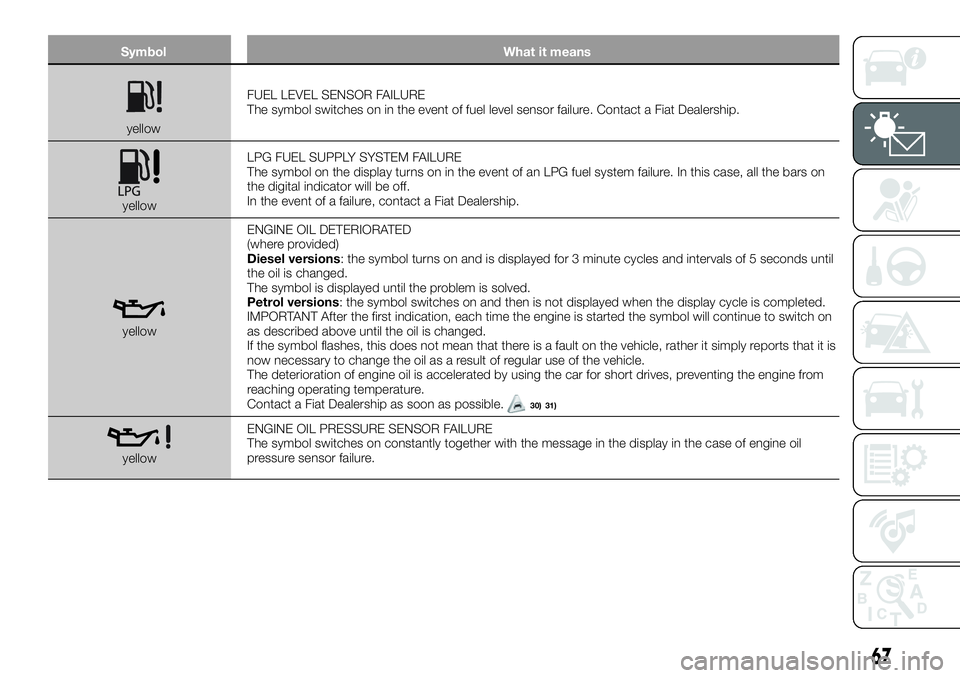
yellowFUEL LEVEL SENSOR FAILURE
The symbol switches on in the event of fuel level sensor failure. Contact a Fiat Dealership.
yellow LPG FUEL SUPPLY SYSTEM FAILURE
The symbol on the display turns on in the event of an LPG fuel system failure. In this case, all the bars on
the digital indicator will be off.
In the event of a failure, contact a Fiat Dealership.
yellowENGINE OIL DETERIORATED
(where provided)
Diesel versions: the symbol turns on and is displayed for 3 minute cycles and intervals of 5 seconds until
the oil is changed.
The symbol is displayed until the problem is solved.
Petrol versions: the symbol switches on and then is not displayed when the display cycle is completed.
IMPORTANT After the first indication, each time the engine is started the symbol will continue to switch on
as described above until the oil is changed.
If the symbol flashes, this does not mean that there is a fault on the vehicle, rather it simply reports that it is
now necessary to change the oil as a result of regular use of the vehicle.
The deterioration of engine oil is accelerated by using the car for short drives, preventing the engine from
reaching operating temperature.
Contact a Fiat Dealership as soon as possible.
30) 31)
yellow
ENGINE OIL PRESSURE SENSOR FAILURE
The symbol switches on constantly together with the message in the display in the case of engine oil
pressure sensor failure.
67
Page 83 of 276
If intervention by the driver on the brake
pedal is detected but not deemed
sufficient, the system may intervene in
order to improve the reaction of the
braking system, therefore reducing
vehicle speed further (additional
assistance in braking stage).
Versions equipped with Start&Stop
system: at the end of the automatic
braking, the Start&Stop system will
activate as described in paragraph
"Start&Stop system" of the "Starting
and driving" chapter.
Versions with manual gearbox:at
the end of the automatic braking the
engine may stall and turn off, unless the
driver presses the clutch pedal.
Versions with automatic
transmission / twin clutch
automatic transmission: at the end
of the braking, the latest stored gear is
engaged: the vehicle may therefore
restart after a few seconds from the
automatic stop.
IMPORTANT Both on versions
equipped with manual gearbox and on
those with automatic transmission, after
the vehicle is stopped the brake
callipers may be stuck for about
2 seconds for safety reasons. Make
sure you press the brake pedal if the
vehicle moves slightly forwards.
Activation/deactivation
The Full Brake Control system can be
deactivated (and then reactivated) via
theUconnect™ system (see the
description in the dedicated
supplement).
The system can be deactivated even
with the ignition device at MAR.
IMPORTANT The system status can be
changed with vehicle at a standstill only.
The Full Brake Control system can be
set to three activation levels through the
Uconnect™ system:
System active: the system (if active),
in addition to the visual and acoustic
warnings, provides limited braking,
automatic braking and additional
assistance in braking stage, where the
driver does not brake sufficiently in the
event of a potential frontal impact;
System partially active: the system (if
active) does not provide limited braking,
but guarantees automatic braking or
additional assistance in braking stage,
where the driver does not brake at all or
not sufficiently in the event of a potential
frontal impact. The visual and acoustic
warnings are deactivated, and will not
be provided;
System deactivated: the system
does not provide visual and acoustic
warnings, limited braking, automatic
braking or additional assistance in
braking stage. The system will therefore
provide no indication of a possible
accident.
Activation/deactivation
If the Full Brake Control system has
been correctly activated with the
Uconnect™ system, this will be active
each time the engine is started.
Following a deactivation, the system will
not warn the driver about the possible
collision with the preceding vehicle,
regardless of the setting selected with
the Uconnect™ system.
The system deactivation status will not
be stored when the engine is switched
off: if the system is deactivated when
the engine is switched off, it will be
active when it is next started.
This function is not active at a speed
lower than 7 km/h or higher than
200 km/h.
The system is only active if:
it is correctly activated via the
Uconnect™ system;
the ignition device is at MAR;
the vehicle speed is between 7 and
200 km/h;
the front seat belts are fastened.
81
Page 84 of 276
Changing the system sensitivity
The sensitivity of the system can be
changed through theUconnect™
system menu, choosing from one of the
following three options: "Near", "Med"
or "Far". See the description in the
Uconnect™ supplement for how to
change the settings.
The pre-set option is "Med". With this
setting, the system warns the driver of a
possible collision with the vehicle in
front when that vehicle is at a standard
distance, between that of the other two
settings.
With the system sensitivity set to "Far",
the system will warn the driver of a
possible collision with the vehicle in
front when that vehicle is at a greater
distance, thus providing the possibility
of acting on the brakes more lightly and
gradually. This setting provides the
drivers with the maximum possible
reaction time to prevent a potential
accident.
With the option set to "Near", the
system will warn the driver of a possible
collision with the vehicle in front when
that vehicle is close. This setting offers
the driver a lower reaction time
compared to the "Med" and "Far"
settings, in the event of a potential
collision, but permits more dynamic
driving of the vehicle. The system sensitivity setting is kept in
the memory when the engine is
switched off.
System limited operation signal
If the dedicated message is displayed,
a condition limiting the system
operation may have occurred. The
possible reasons of this limitation are
something blocking the camera view or
a fault.
If an obstruction is signalled, clean the
area of the windscreen indicated in
fig. 63 and check that the message has
disappeared.
Although the vehicle can still be driven
in normal conditions, the system may
be not completely available.
When the conditions limiting the system
functions end, this will go back to
normal and complete operation. Should
the fault persist, contact a Fiat
Dealership.
System failure signalling
If the system switches off and a
dedicated message is shown on the
display, it means that there is a fault on
the system.
In this case, it is still possible to drive
the vehicle, but you are advised to
contact a Fiat Dealership as soon as
possible.
Radar indication not available
If conditions are such that the radar
cannot detect obstacles correctly, the
system is deactivated and a dedicated
message will be shown on the display.
This generally occurs in the event of
poor visibility, such as when it is
snowing or raining heavily.
The system can also be temporarily
dimmed due to obstructions such as
mud, dirt or ice on the bumper. In such
cases, a dedicated message will be
shown on the display and the system
will be deactivated. This message can
sometimes appear in conditions of high
reflectivity (e.g. tunnels with reflective
tiles or ice or snow). When the
conditions limiting the system
functioning end, it will go back to a
normal and complete operation.
In certain particular cases, this
dedicated message could be displayed
when the radar is not detecting any
vehicle or object within its view range.
If atmospheric conditions are not the
real reason behind this message, check
if the sensor is dirty. It could be
necessary to clean or remove any
obstructions in the area illustrated in
fig. 62.
82
SAFETY