roof FIAT 500X 2018 Owner handbook (in English)
[x] Cancel search | Manufacturer: FIAT, Model Year: 2018, Model line: 500X, Model: FIAT 500X 2018Pages: 276, PDF Size: 7.08 MB
Page 2 of 276
We really know your car because we invented, designed and built it: we really know every single detail.
At Fiat Service authorised workshopsyou can find technicians directly trained by us,
offering quality and professionalism for all service operations.
Fiat workshops are always close to you for the regular servicing operations, season checks
and practical recommendations by our experts.
With Original Parts distributed by MOPAR
®, you maintain the reliability, comfort
and performance features that you bought your new car for over time.
Always ask for Genuine Parts for the components used on our cars; we recommend them because
they come from our steady commitment in research and development of highly innovative technologies.
For all these reasons: rely on Genuine Parts, because they are the only ones designed
by FCA for your car.
SAFETY:
BRAKING SYSTEMENVIRONMENT: PARTICULATE FILTERS,
CLIMATE CONTROL MAINTENANCECOMFORT: SUSPENSION
AND WINDSCREEN WIPERS PERFORMANCE: SPARK PLUGS,
INJECTORS AND BATTERIESLINEACCESSORI
ROOF RACK BARS, WHEEL RIMS
WHY CHOOSING
GENUINE PARTS
This Owner Handbook is intended to show the vehicle's operating conditions.
For the enthusiast user who wants to have insights, curiosities and detailed information about the characteristics and functions
of the vehicle, Fiat gives the opportunity to consult a dedicated section which is available in electronic format.
ONLINE VEHICLE OWNER HANDBOOK
The following symbol is reported within the text of the Owner Handbook, next to the subjects for which details are provided.
Go to the www.mopar.eu/owner
website and access your personal area.
The “Maintenance and care” page includes all the information about your vehicle and the link to access eLUM, where you will find
all the details of the Owner Handbook.
Alternatively, to access this information, go to the Internet website at http://aftersales.fiat.com/elum/
.
The eLUMwebsite is free and will allow you, among many other things, to easily consult the on-board documents
of all the other vehicles of the Group.
Have a nice reading and happy motoring!
Cop 500X LUM GB.qxp_500 UM ITA 02/08/16 12:16 Pagina 2
Page 11 of 276
GETTING TO KNOW YOUR CAR
In-depth knowledge of your new vehicle
starts here.
The booklet that you are reading simply
and directly explains how it is made and
how it works.
That’s why we advise you to read it
seated comfortably on board, so that
you can see immediately what is
described here for yourself.DASHBOARD...............10
THE KEYS .................11
IGNITION DEVICE ............12
FIAT CODE .................14
ALARM ...................14
DOORS ...................15
SEATS....................19
HEAD RESTRAINTS ...........21
STEERING WHEEL ............23
REAR VIEW MIRRORS .........23
EXTERIOR LIGHTS ............25
INTERIOR LIGHTS ............29
WINDSCREEN/REAR WINDOW
WIPER ...................29
CLIMATE CONTROL SYSTEM .....33
ELECTRIC WINDOWS ..........37
ELECTRIC SUN ROOF .........38
BONNET ..................40
BOOT ....................41
VERSION WITH LPG SYSTEM ....43
9
Page 13 of 276
THE KEYS
KEY WITH REMOTE
CONTROL
1)
1)
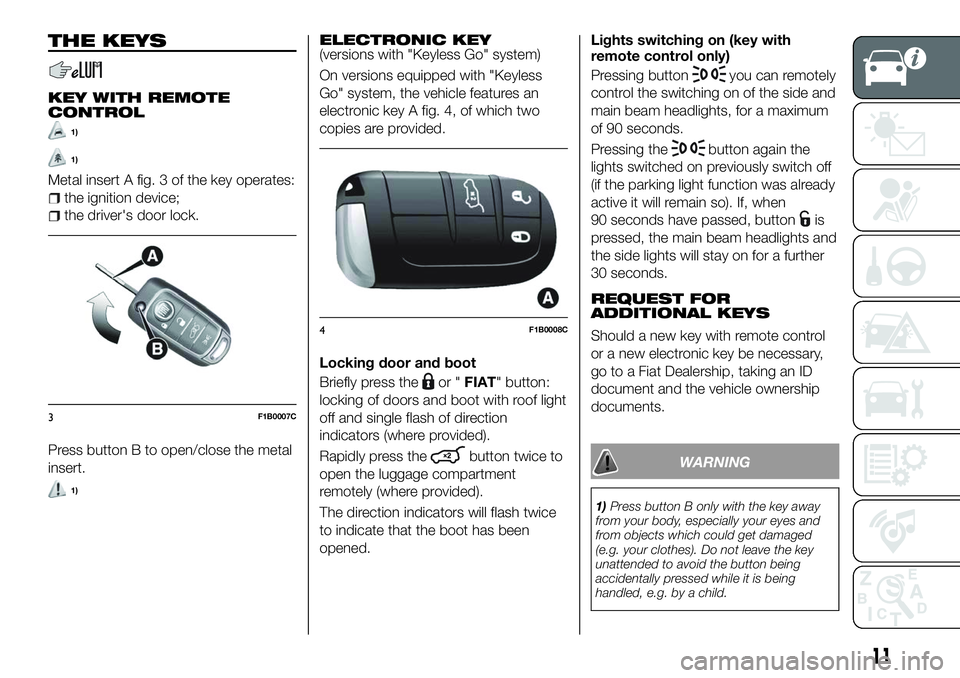
Metal insert A fig. 3 of the key operates:
the ignition device;
the driver's door lock.
Press button B to open/close the metal
insert.
1)
ELECTRONIC KEY(versions with "Keyless Go" system)
On versions equipped with "Keyless
Go" system, the vehicle features an
electronic key A fig. 4, of which two
copies are provided.
Locking door and boot
Briefly press the
or " FIAT" button:
locking of doors and boot with roof light
off and single flash of direction
indicators (where provided).
Rapidly press the
button twice to
open the luggage compartment
remotely (where provided).
The direction indicators will flash twice
to indicate that the boot has been
opened. Lights switching on (key with
remote control only)
Pressing button
you can remotely
control the switching on of the side and
main beam headlights, for a maximum
of 90 seconds.
Pressing the
button again the
lights switched on previously switch off
(if the parking light function was already
active it will remain so). If, when
90 seconds have passed, button
is
pressed, the main beam headlights and
the side lights will stay on for a further
30 seconds.
REQUEST FOR
ADDITIONAL KEYS
Should a new key with remote control
or a new electronic key be necessary,
go to a Fiat Dealership, taking an ID
document and the vehicle ownership
documents.
WARNING
1) Press button B only with the key away
from your body, especially your eyes and
from objects which could get damaged
(e.g. your clothes). Do not leave the key
unattended to avoid the button being
accidentally pressed while it is being
handled, e.g. by a child.
3F1B0007C
4F1B0008C
11
Page 24 of 276
Removal
Proceed as follows to remove the head
restraint:
tilt the backrest (to prevent it from
coming into contact with the roof);
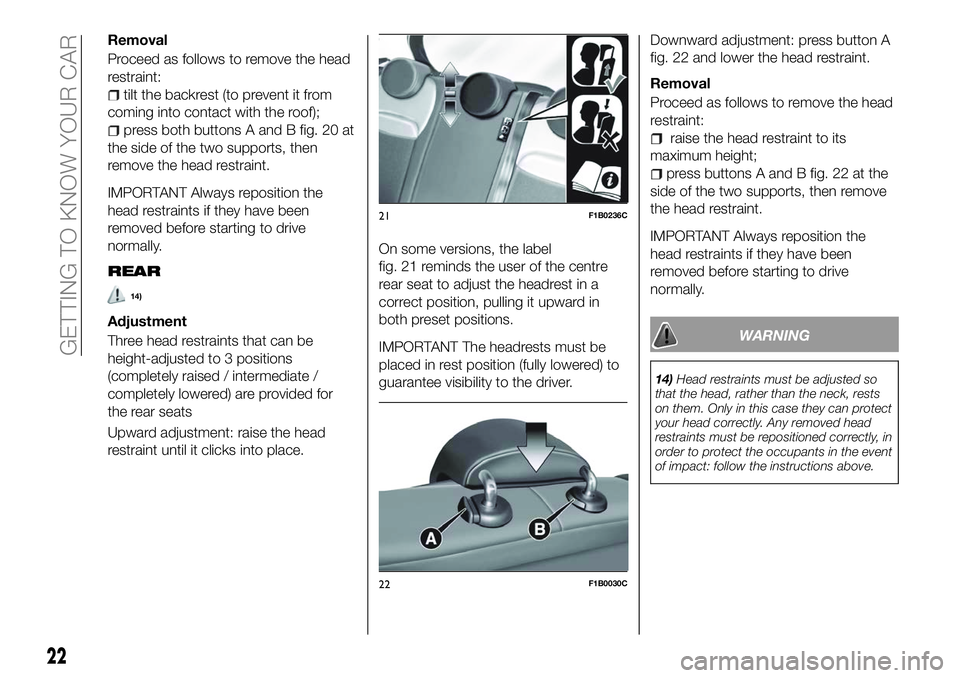
press both buttons A and B fig. 20 at
the side of the two supports, then
remove the head restraint.
IMPORTANT Always reposition the
head restraints if they have been
removed before starting to drive
normally.
REAR
14)
Adjustment
Three head restraints that can be
height-adjusted to 3 positions
(completely raised / intermediate /
completely lowered) are provided for
the rear seats
Upward adjustment: raise the head
restraint until it clicks into place. On some versions, the label
fig. 21 reminds the user of the centre
rear seat to adjust the headrest in a
correct position, pulling it upward in
both preset positions.
IMPORTANT The headrests must be
placed in rest position (fully lowered) to
guarantee visibility to the driver.
Downward adjustment: press button A
fig. 22 and lower the head restraint.
Removal
Proceed as follows to remove the head
restraint:
raise the head restraint to its
maximum height;
press buttons A and B fig. 22 at the
side of the two supports, then remove
the head restraint.
IMPORTANT Always reposition the
head restraints if they have been
removed before starting to drive
normally.
WARNING
14) Head restraints must be adjusted so
that the head, rather than the neck, rests
on them. Only in this case they can protect
your head correctly. Any removed head
restraints must be repositioned correctly, in
order to protect the occupants in the event
of impact: follow the instructions above.
21F1B0236C
22F1B0030C
22
GETTING TO KNOW YOUR CAR
Page 31 of 276
INTERIOR LIGHTS
FRONT ROOF LIGHT
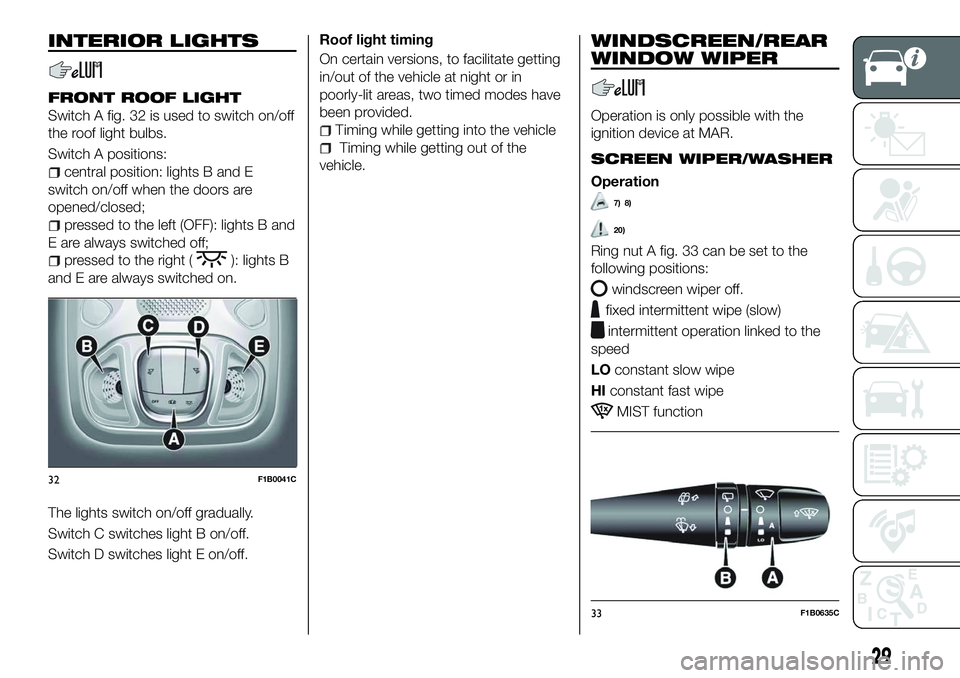
Switch A fig. 32 is used to switch on/off
the roof light bulbs.
Switch A positions:
central position: lights B and E
switch on/off when the doors are
opened/closed;
pressed to the left (OFF): lights B and
E are always switched off;
pressed to the right (): lights B
and E are always switched on.
The lights switch on/off gradually.
Switch C switches light B on/off.
Switch D switches light E on/off. Roof light timing
On certain versions, to facilitate getting
in/out of the vehicle at night or in
poorly-lit areas, two timed modes have
been provided.
Timing while getting into the vehicle
Timing while getting out of the
vehicle.
WINDSCREEN/REAR
WINDOW WIPER
Operation is only possible with the
ignition device at MAR.
SCREEN WIPER/WASHER
Operation
7) 8)
20)
Ring nut A fig. 33 can be set to the
following positions:
windscreen wiper off.
fixed intermittent wipe (slow)
intermittent operation linked to the
speed
LO constant slow wipe
HI constant fast wipe
MIST function
32F1B0041C
33F1B0635C
29
Page 40 of 276
The window is therefore lowered by
about 5 cm from its initial stop position.
The window cannot be operated in any
way during this time.
Electric window system
initialisation
If power supply is interrupted, the
electric window automatic operation
must be reinitialised.
The initialisation procedure described
below must be carried out with the
doors closed and for each door:
close the window by holding down
the button;
once the window has closed
completely, keep holding the button
down for at least a further 3 seconds.
WARNING
21) Incorrect use of the electric windows
may be dangerous. Before and during
operation, always check that nobody is
exposed to the risk of being injured either
directly by the moving window or through
objects getting caught or hit by it. When
leaving the vehicle (equipped with
mechanical key with remote control),
always remove the key from the ignition
device to prevent accidental operation of
the electric windows from being a hazard
for those still on board.
ELECTRIC SUN
ROOF
22)11)
The electric sun roof comprises two
glass panels (the front one is mobile
and the rear one fixed) and is fitted with
two manually operated sun blinds.
Operation of the sun roof is only
possible with the ignition device at
MAR.
OPENING
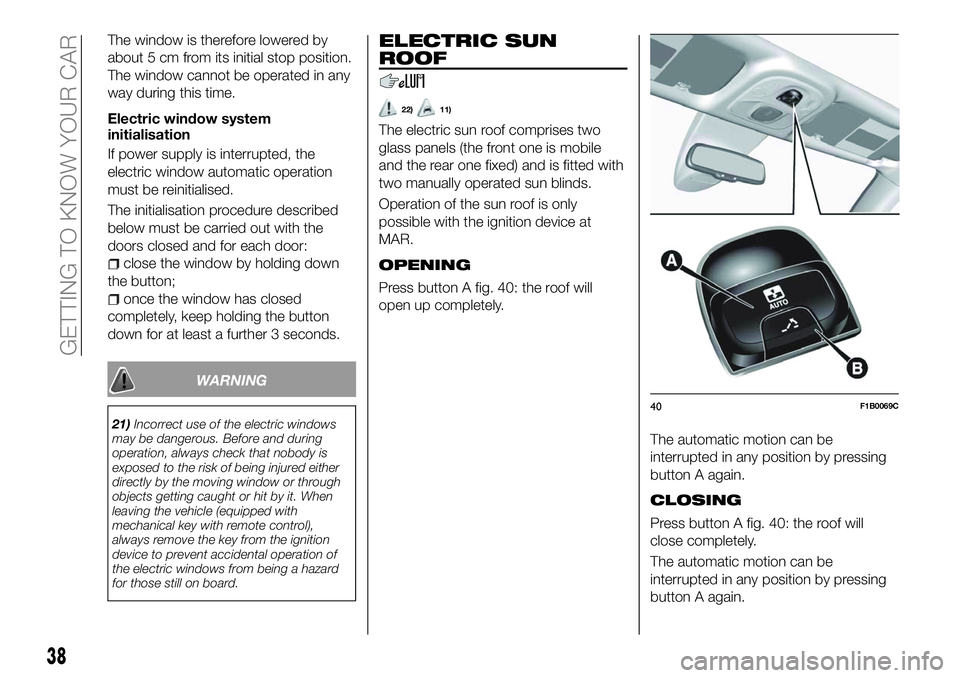
Press button A fig. 40: the roof will
open up completely.
The automatic motion can be
interrupted in any position by pressing
button A again.
CLOSING
Press button A fig. 40: the roof will
close completely.
The automatic motion can be
interrupted in any position by pressing
button A again.
40F1B0069C
38
GETTING TO KNOW YOUR CAR
Page 41 of 276
SWIVEL OPENING
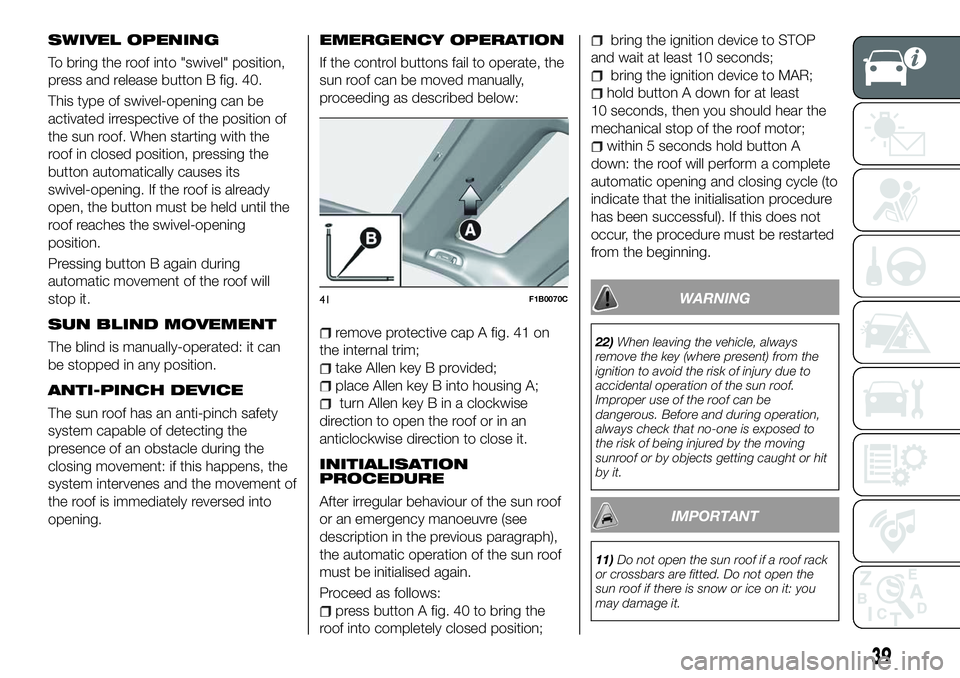
To bring the roof into "swivel" position,
press and release button B fig. 40.
This type of swivel-opening can be
activated irrespective of the position of
the sun roof. When starting with the
roof in closed position, pressing the
button automatically causes its
swivel-opening. If the roof is already
open, the button must be held until the
roof reaches the swivel-opening
position.
Pressing button B again during
automatic movement of the roof will
stop it.
SUN BLIND MOVEMENT
The blind is manually-operated: it can
be stopped in any position.
ANTI-PINCH DEVICE
The sun roof has an anti-pinch safety
system capable of detecting the
presence of an obstacle during the
closing movement: if this happens, the
system intervenes and the movement of
the roof is immediately reversed into
opening.
EMERGENCY OPERATION
If the control buttons fail to operate, the
sun roof can be moved manually,
proceeding as described below:
remove protective cap A fig. 41 on
the internal trim;
take Allen key B provided;
place Allen key B into housing A;
turn Allen key B in a clockwise
direction to open the roof or in an
anticlockwise direction to close it.
INITIALISATION
PROCEDURE
After irregular behaviour of the sun roof
or an emergency manoeuvre (see
description in the previous paragraph),
the automatic operation of the sun roof
must be initialised again.
Proceed as follows:
press button A fig. 40 to bring the
roof into completely closed position;
bring the ignition device to STOP
and wait at least 10 seconds;
bring the ignition device to MAR;
hold button A down for at least
10 seconds, then you should hear the
mechanical stop of the roof motor;
within 5 seconds hold button A
down: the roof will perform a complete
automatic opening and closing cycle (to
indicate that the initialisation procedure
has been successful). If this does not
occur, the procedure must be restarted
from the beginning.
WARNING
22) When leaving the vehicle, always
remove the key (where present) from the
ignition to avoid the risk of injury due to
accidental operation of the sun roof.
Improper use of the roof can be
dangerous. Before and during operation,
always check that no-one is exposed to
the risk of being injured by the moving
sunroof or by objects getting caught or hit
by it.
IMPORTANT
11) Do not open the sun roof if a roof rack
or crossbars are fitted. Do not open the
sun roof if there is snow or ice on it: you
may damage it.
41F1B0070C
39
Page 43 of 276
BOOT
The boot unlocking is electrically
operated and is deactivated when the
vehicle is in motion.
OPENING
27)
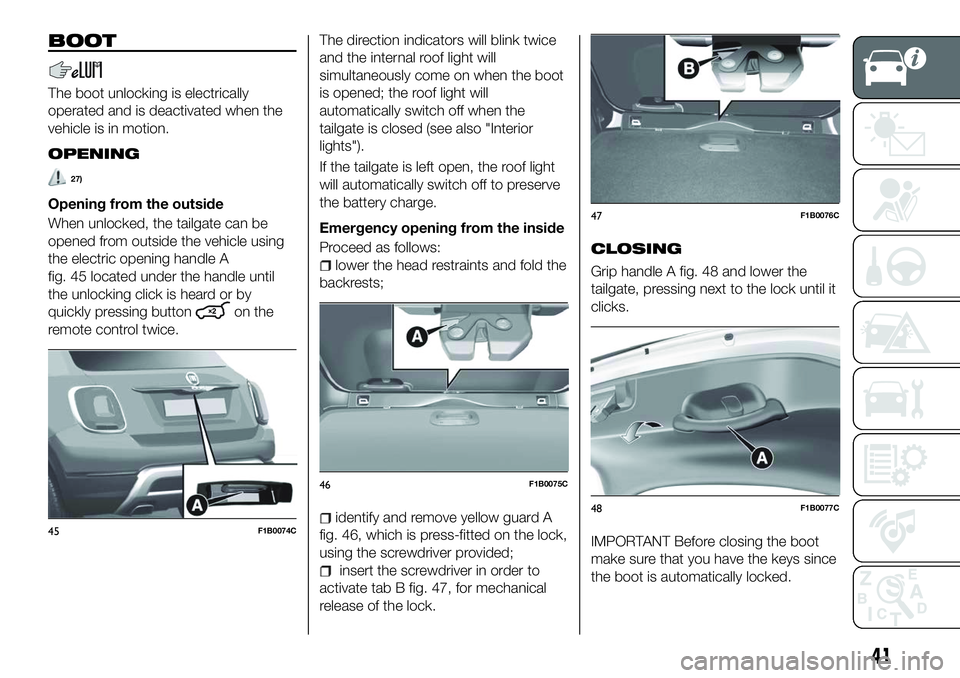
Opening from the outside
When unlocked, the tailgate can be
opened from outside the vehicle using
the electric opening handle A
fig. 45 located under the handle until
the unlocking click is heard or by
quickly pressing button
on the
remote control twice. The direction indicators will blink twice
and the internal roof light will
simultaneously come on when the boot
is opened; the roof light will
automatically switch off when the
tailgate is closed (see also "Interior
lights").
If the tailgate is left open, the roof light
will automatically switch off to preserve
the battery charge.
Emergency opening from the inside
Proceed as follows:
lower the head restraints and fold the
backrests;
identify and remove yellow guard A
fig. 46, which is press-fitted on the lock,
using the screwdriver provided;
insert the screwdriver in order to
activate tab B fig. 47, for mechanical
release of the lock.
CLOSING
Grip handle A fig. 48 and lower the
tailgate, pressing next to the lock until it
clicks.
IMPORTANT Before closing the boot
make sure that you have the keys since
the boot is automatically locked.45F1B0074C
46F1B0075C
47F1B0076C
48F1B0077C
41
Page 112 of 276
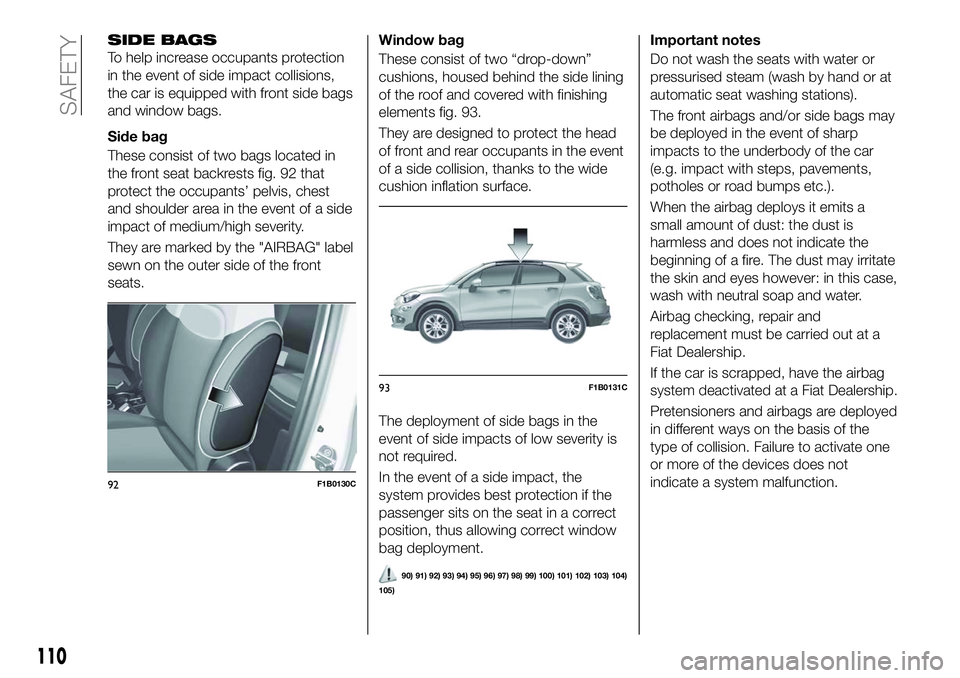
SIDE BAGS
To help increase occupants protection
in the event of side impact collisions,
the car is equipped with front side bags
and window bags.
Side bag
These consist of two bags located in
the front seat backrests fig. 92 that
protect the occupants’ pelvis, chest
and shoulder area in the event of a side
impact of medium/high severity.
They are marked by the "AIRBAG" label
sewn on the outer side of the front
seats.Window bag
These consist of two “drop-down”
cushions, housed behind the side lining
of the roof and covered with finishing
elements fig. 93.
They are designed to protect the head
of front and rear occupants in the event
of a side collision, thanks to the wide
cushion inflation surface.
The deployment of side bags in the
event of side impacts of low severity is
not required.
In the event of a side impact, the
system provides best protection if the
passenger sits on the seat in a correct
position, thus allowing correct window
bag deployment.
90) 91) 92) 93) 94) 95) 96) 97) 98) 99) 100) 101) 102) 103) 104)
105)
Important notes
Do not wash the seats with water or
pressurised steam (wash by hand or at
automatic seat washing stations).
The front airbags and/or side bags may
be deployed in the event of sharp
impacts to the underbody of the car
(e.g. impact with steps, pavements,
potholes or road bumps etc.).
When the airbag deploys it emits a
small amount of dust: the dust is
harmless and does not indicate the
beginning of a fire. The dust may irritate
the skin and eyes however: in this case,
wash with neutral soap and water.
Airbag checking, repair and
replacement must be carried out at a
Fiat Dealership.
If the car is scrapped, have the airbag
system deactivated at a Fiat Dealership.
Pretensioners and airbags are deployed
in different ways on the basis of the
type of collision. Failure to activate one
or more of the devices does not
indicate a system malfunction.
92F1B0130C
93F1B0131C
110
SAFETY
Page 113 of 276
WARNING
90)Do not apply stickers or other objects
on the steering wheel, on the dashboard in
the passenger side airbag area, on side
upholstery on the roof or on the seats.
Never put objects (e.g. mobile phones) on
the passenger side of the dashboard since
they could interfere with correct inflation of
the passenger airbag and also cause
serious injury to the passengers.
91) Always drive with your hands on the
rim of the steering wheel so that the airbag
can inflate freely if required. Do not drive
with your body bent forward. Keep your
back straight against the backrest.
92) When there is an active passenger
airbag, DO NOT install rearward facing
child restraint systems on the front seat.
Deployment of the airbag in an accident
could cause fatal injuries to the child
regardless of the severity of the impact.
Therefore, always deactivate the passenger
side airbag when a rearward facing child
restraint system is installed on the front
passenger seat. The front passenger seat
must also be positioned back as far as
possible in order to prevent the child
restraint system from coming into contact
with the dashboard. Immediately reactivate
the passenger airbag as soon as the child
restraint system has been removed.
93) To deactivate the airbags using the
instrument panel menu, see the description
in the "Knowing the instrument panel"
chapter, "Menu Options" paragraph.
94) Do not affix rigid objects to the
garment hooks or support handles. 95)
Do not rest your head, arms or elbows
on the door, windows or the area in which
the Window bag is located to avoid
possible injury during airbag inflation.
96) Never lean your head, arms or elbows
out of the window.
97) If, when the ignition device is turned to
MAR, the
warning light does not switch
on or stays on whilst driving, a fault may
have occurred in the restraint systems. In
this case the airbags or pretensioners may
not be deployed in an impact or, in a lower
number of cases, they may be deployed
accidentally. Contact a Fiat Dealership
immediately to have the system checked.
98) In some versions, in the event of a LED
OFF failure (located on the dashboard
trim), thewarning light on the
instrument panel turns on and the
passenger side airbags are deactivated. In
some versions, in the event of a LED
ON failure (located on the dashboard
trim), thelight on the console turns on.
99) On cars with side bags, do not cover
the front seat backrests with extra covers.
100) Do not travel carrying objects in your
lap, in front of your chest or between your
lips (pipe, pencils, etc.): they could cause
severe injury if the airbag is deployed.
101) If the car has been stolen or in the
case of attempt to steal it, if it has been
subjected to vandalism or floods, have the
airbag system checked by a Fiat
Dealership. 102)
If the ignition device is at MAR, even if
the engine is switched off, airbags may be
deployed when the vehicle is stationary
and hit by another vehicle. Therefore, even
if the vehicle is stationary, when an active
front passenger airbag is fitted, DO NOT
install rearward facing child restraint
systems on the front passenger seat.
Deployment of the airbag following an
impact could cause fatal injuries to the
child. Therefore, always deactivate the
passenger side airbag when a rearward
facing child restraint system is installed on
the front passenger seat. The front
passenger seat must also be positioned
back as far as possible in order to prevent
the child restraint system from coming into
contact with the dashboard. Immediately
reactivate the passenger airbag as soon as
the child restraint system has been
removed. Also remember that, if the
ignition device is set to STOP, none of the
safety devices (airbags or pretensioners)
will be deployed in the event of collision.
Non-deployment in such cases does not
indicate a system malfunction.
103) Malfunction of the
warning light is
indicated by the activation of an airbag
failure icon and dedicated message on the
instrument panel display. The pyrotechnic
charges are not disabled. Contact a Fiat
Dealership immediately to have the system
checked
104) The airbag deployment threshold is
higher than that of the pretensioners. For
collisions in the range between the two
thresholds, it is normal for only the
pretensioners to be activated.
111