FIAT 500X 2022 Owners Manual
Manufacturer: FIAT, Model Year: 2022, Model line: 500X, Model: FIAT 500X 2022Pages: 312, PDF Size: 13.26 MB
Page 261 of 312
SERVICING AND MAINTENANCE259
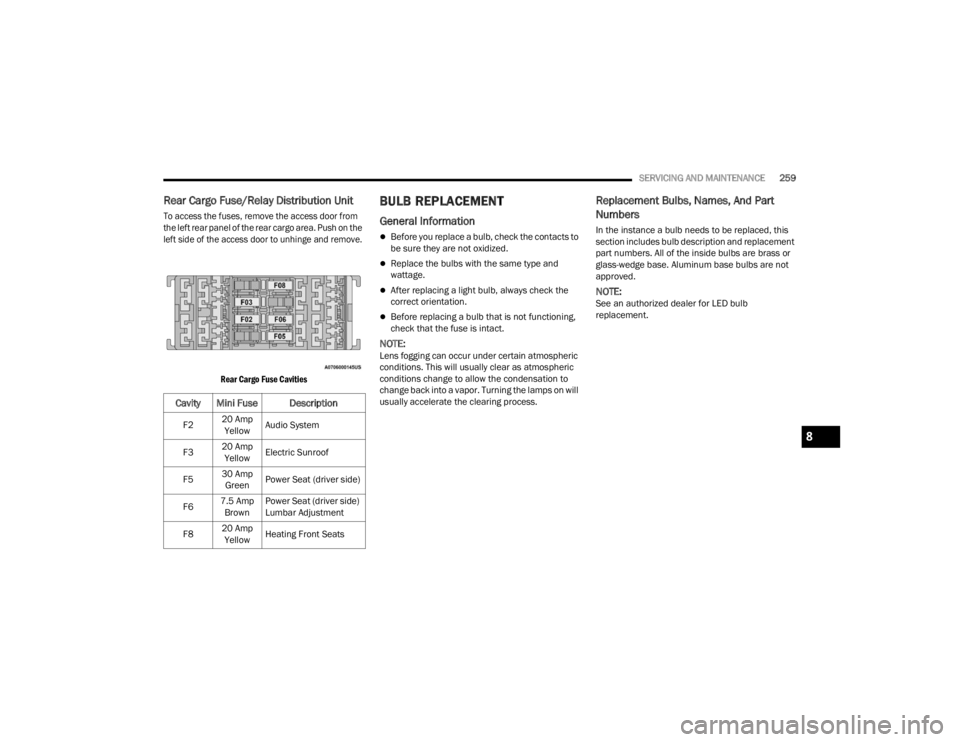
Rear Cargo Fuse/Relay Distribution Unit
To access the fuses, remove the access door from
the left rear panel of the rear cargo area. Push on the
left side of the access door to unhinge and remove.
Rear Cargo Fuse Cavities
BU LB REPLACEMENT
General Information
Before you replace a bulb, check the contacts to
be sure they are not oxidized.
Replace the bulbs with the same type and
wattage.
After replacing a light bulb, always check the
correct orientation.
Before replacing a bulb that is not functioning,
check that the fuse is intact.
NOTE:Lens fogging can occur under certain atmospheric
conditions. This will usually clear as atmospheric
conditions change to allow the condensation to
change back into a vapor. Turning the lamps on will
usually accelerate the clearing process.
Replacement Bulbs, Names, And Part
Numbers
In the instance a bulb needs to be replaced, this
section includes bulb description and replacement
part numbers. All of the inside bulbs are brass or
glass-wedge base. Aluminum base bulbs are not
approved.
NOTE:See an authorized dealer for LED bulb
replacement.
Cavity Mini Fuse Description
F220 Amp
Yellow Audio System
F3 20 Amp
Yellow Electric Sunroof
F5 30 Amp
Green Power Seat (driver side)
F6 7.5 Amp
Brown Power Seat (driver side)
Lumbar Adjustment
F8 20 Amp
Yellow Heating Front Seats
8
22_FD_OM_EN_USC_t.book Page 259
Page 262 of 312
260SERVICING AND MAINTENANCE
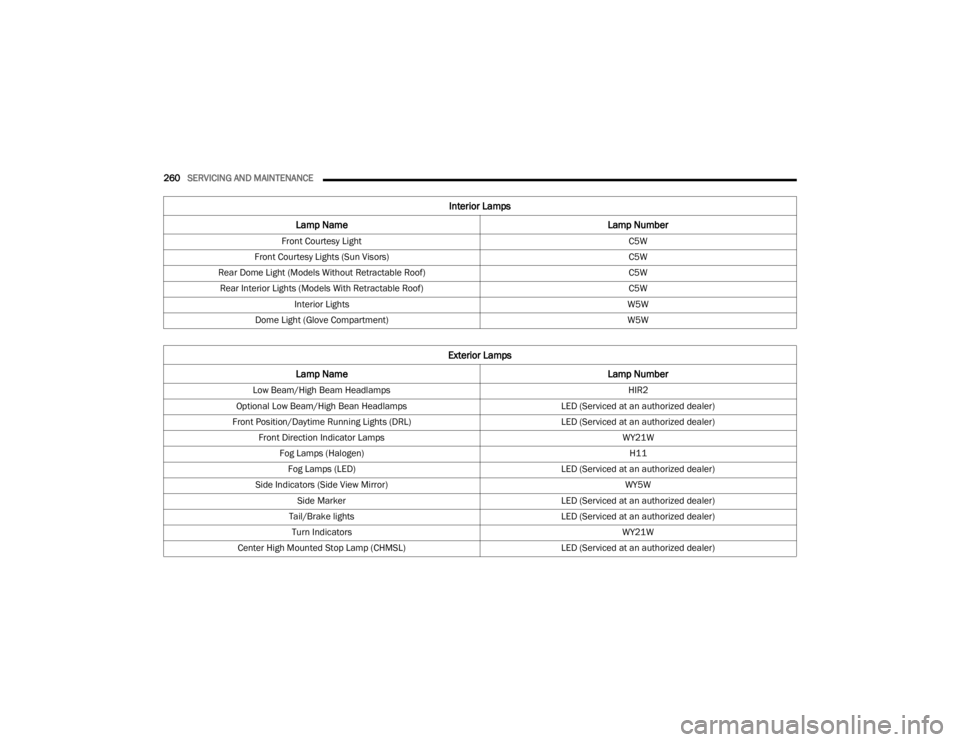
Interior Lamps
Lamp Name Lamp Number
Front Courtesy Light C5W
Front Courtesy Lights (Sun Visors) C5W
Rear Dome Light (Models Without Retractable Roof) C5W
Rear Interior Lights (Models With Retractable Roof) C5W
Interior Lights W5W
Dome Light (Glove Compartment) W5W
Exterior Lamps
Lamp Name Lamp Number
Low Beam/High Beam Headlamps HIR2
Optional Low Beam/High Bean Headlamps LED (Serviced at an authorized dealer)
Front Position/Daytime Running Lights (DRL) LED (Serviced at an authorized dealer)
Front Direction Indicator Lamps WY21W
Fog Lamps (Halogen) H11
Fog Lamps (LED) LED (Serviced at an authorized dealer)
Side Indicators (Side View Mirror) WY5W
Side Marker LED (Serviced at an authorized dealer)
Tail/Brake lights LED (Serviced at an authorized dealer)
Turn Indicators WY21W
Center High Mounted Stop Lamp (CHMSL) LED (Serviced at an authorized dealer)
22_FD_OM_EN_USC_t.book Page 260
Page 263 of 312
SERVICING AND MAINTENANCE261
Replacing Exterior Bulbs
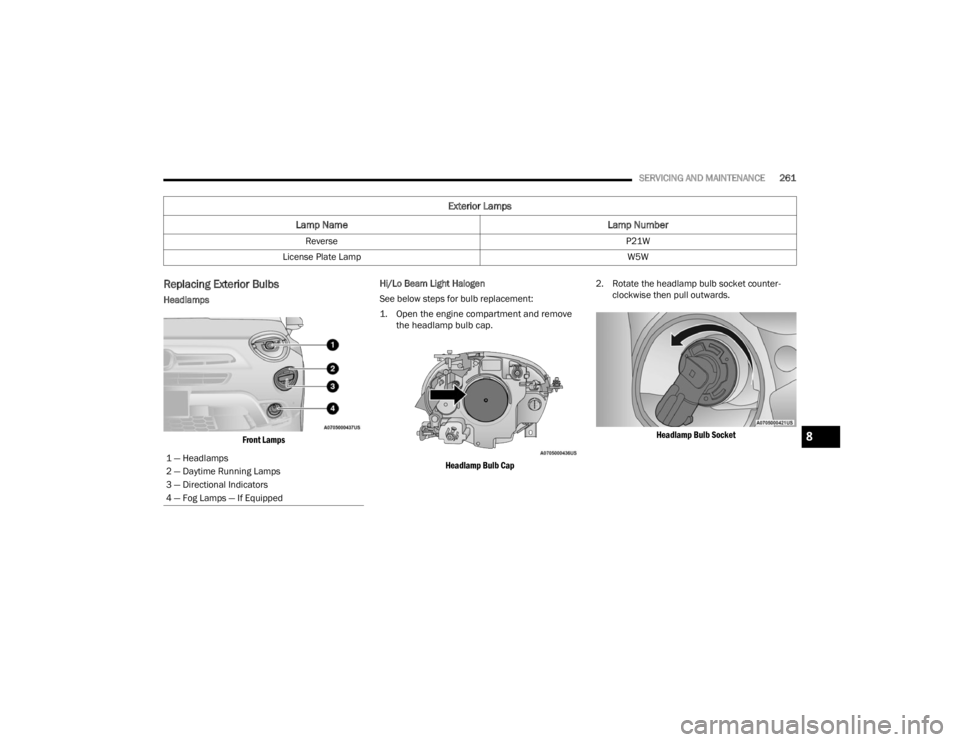
Headlamps
Front Lamps
Hi/Lo Beam Light Halogen
See below steps for bulb replacement:
1. Open the engine compartment and remove
the headlamp bulb cap.
Headlamp Bulb Cap
2. Rotate the headlamp bulb socket counter
-
clockwise then pull outwards.
Headlamp Bulb Socket
Reverse
P21W
License Plate Lamp W5W
Exterior Lamps
Lamp Name Lamp Number
1 — Headlamps
2 — Daytime Running Lamps
3 — Directional Indicators
4 — Fog Lamps — If Equipped
8
22_FD_OM_EN_USC_t.book Page 261
Page 264 of 312
262SERVICING AND MAINTENANCE
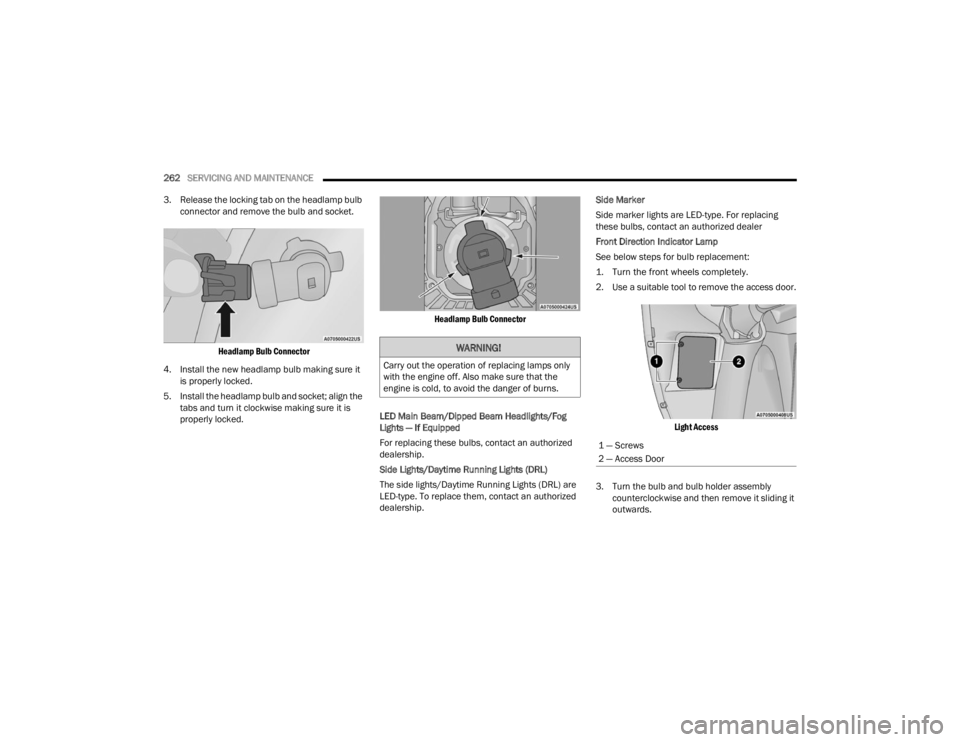
3. Release the locking tab on the headlamp bulb connector and remove the bulb and socket.
Headlamp Bulb Connector
4. Install the new headlamp bulb making sure it is properly locked.
5. Install the headlamp bulb and socket; align the tabs and turn it clockwise making sure it is
properly locked.
Headlamp Bulb Connector
LED Main Beam/Dipped Beam Headlights/Fog
Lights — If Equipped
For replacing these bulbs, contact an authorized
dealership.
Side Lights/Daytime Running Lights (DRL)
The side lights/Daytime Running Lights (DRL) are
LED-type. To replace them, contact an authorized
dealership. Side Marker
Side marker lights are LED-type. For replacing
these bulbs, contact an authorized dealer
Front Direction Indicator Lamp
See below steps for bulb replacement:
1. Turn the front wheels completely.
2. Use a suitable tool to remove the access door.
Light Access
3. Turn the bulb and bulb holder assembly counterclockwise and then remove it sliding it
outwards.
WARNING!
Carry out the operation of replacing lamps only
with the engine off. Also make sure that the
engine is cold, to avoid the danger of burns.
1 — Screws
2 — Access Door
22_FD_OM_EN_USC_t.book Page 262
Page 265 of 312

SERVICING AND MAINTENANCE263
4. Replace the bayonet-fitted bulb.
Bulb Assembly
5. Finally, refit the inspection door, fully tightening fixing screws.
Fog Lights (Halogen)
See below steps for bulb replacement:
1. Turn the front wheels completely.
2. Use a suitable tool to remove the access door.
Fog Light Access
3. Turn the bulb and bulb holder assembly counterclockwise and then remove it sliding it
outwards.
Fog Lamp Bulb Location
4. Replace the bayonet-fitted bulb.
Bulb Assembly
5. Finally, refit the inspection door, fully tightening fixing screws.
Side Indicators on External Rear View Mirrors –
If Equipped
1 — Bulb Holder
2 — Bulb
1 — Screws
2 — Access Door
1 — Bulb Holder
2 — Bulb
CAUTION!
The procedure is described as a guideline. For
the replacement of the lamp it is recommended
that you contact an authorized dealer.
8
22_FD_OM_EN_USC_t.book Page 263
Page 266 of 312
264SERVICING AND MAINTENANCE
See below steps for bulb replacement:
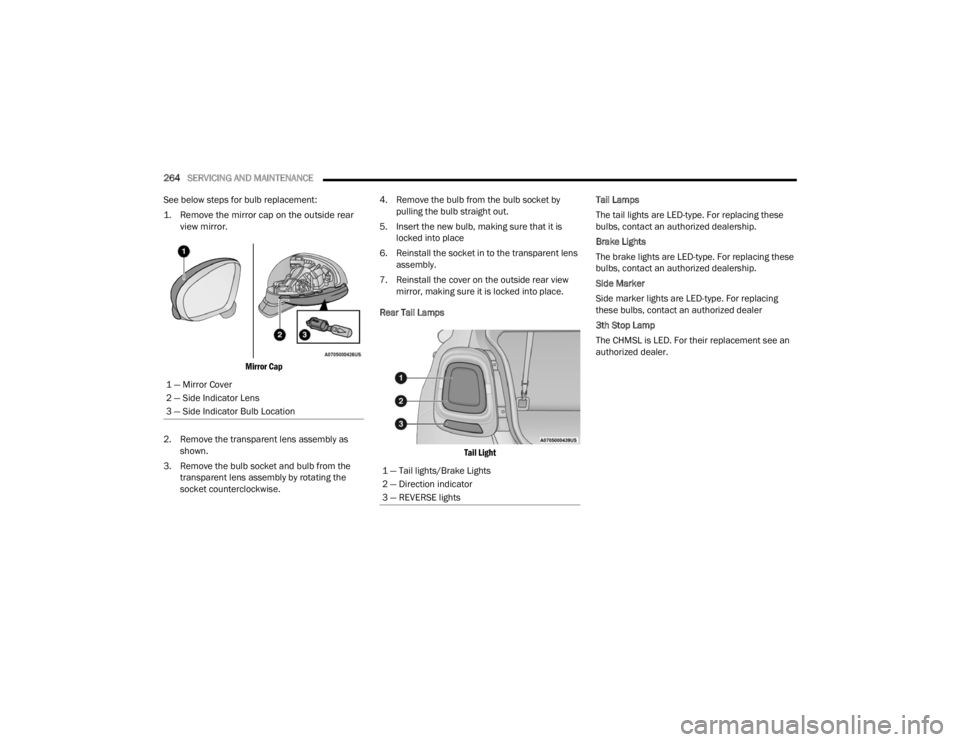
1. Remove the mirror cap on the outside rear view mirror.
Mirror Cap
2. Remove the transparent lens assembly as shown.
3. Remove the bulb socket and bulb from the transparent lens assembly by rotating the
socket counterclockwise. 4. Remove the bulb from the bulb socket by
pulling the bulb straight out.
5. Insert the new bulb, making sure that it is locked into place
6. Reinstall the socket in to the transparent lens assembly.
7. Reinstall the cover on the outside rear view mirror, making sure it is locked into place.
Rear Tail Lamps
Tail Light
Tail Lamps
The tail lights are LED-type. For replacing these
bulbs, contact an authorized dealership.
Brake Lights
The brake lights are LED-type. For replacing these
bulbs, contact an authorized dealership.
Side Marker
Side marker lights are LED-type. For replacing
these bulbs, contact an authorized dealer
3th Stop Lamp
The CHMSL is LED. For their replacement see an
authorized dealer.
1 — Mirror Cover
2 — Side Indicator Lens
3 — Side Indicator Bulb Location
1 — Tail lights/Brake Lights
2 — Direction indicator
3 — REVERSE lights
22_FD_OM_EN_USC_t.book Page 264
Page 267 of 312
SERVICING AND MAINTENANCE265
Reversing Light & Rear Direction Indicators
See below steps for bulb replacement:
1. Open liftgate
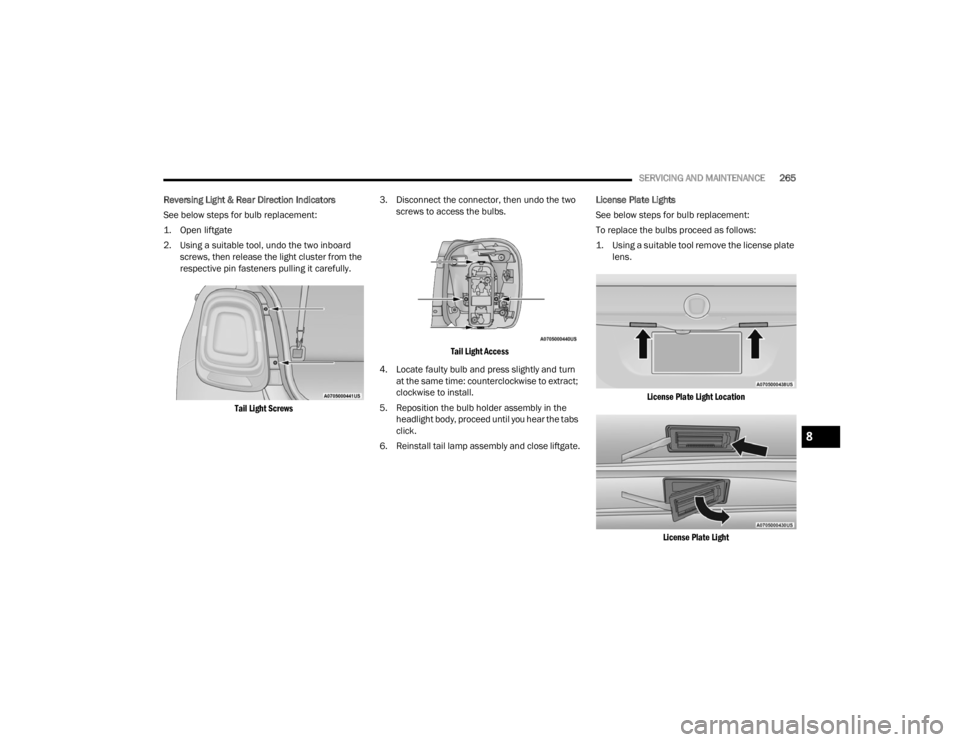
2. Using a suitable tool, undo the two inboard screws, then release the light cluster from the
respective pin fasteners pulling it carefully.
Tail Light Screws
3. Disconnect the connector, then undo the two
screws to access the bulbs.
Tail Light Access
4. Locate faulty bulb and press slightly and turn at the same time: counterclockwise to extract;
clockwise to install.
5. Reposition the bulb holder assembly in the headlight body, proceed until you hear the tabs
click.
6. Reinstall tail lamp assembly and close liftgate. License Plate Lights
See below steps for bulb replacement:
To replace the bulbs proceed as follows:
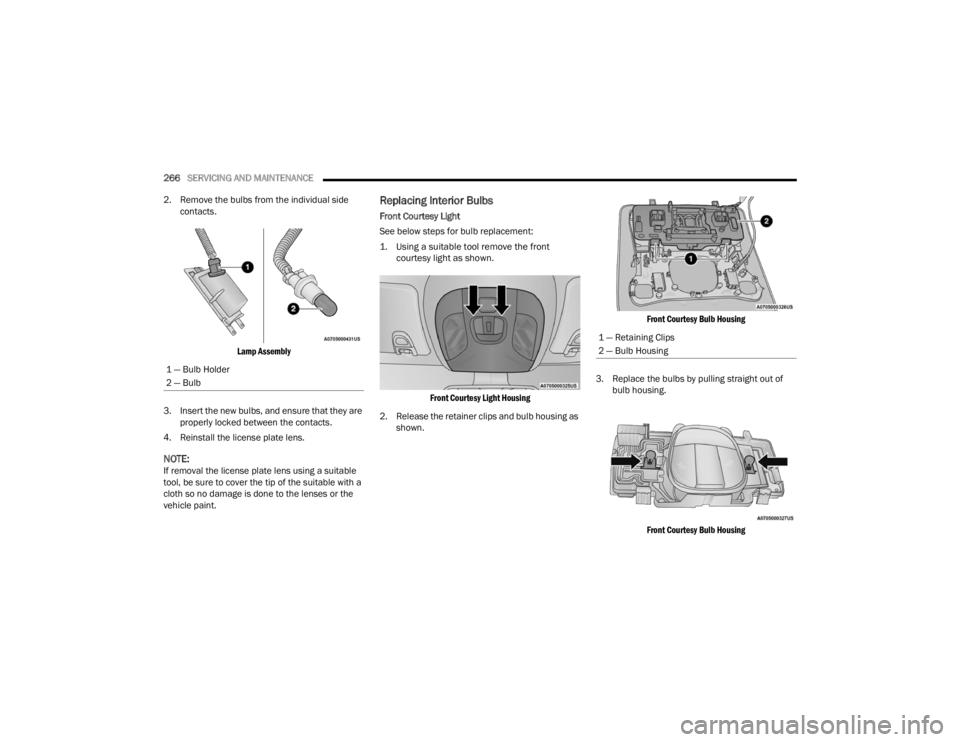
1. Using a suitable tool remove the license plate
lens.
License Plate Light Location
License Plate Light
8
22_FD_OM_EN_USC_t.book Page 265
Page 268 of 312
266SERVICING AND MAINTENANCE
2. Remove the bulbs from the individual side contacts.
Lamp Assembly
3. Insert the new bulbs, and ensure that they are properly locked between the contacts.
4. Reinstall the license plate lens.
NOTE:If removal the license plate lens using a suitable
tool, be sure to cover the tip of the suitable with a
cloth so no damage is done to the lenses or the
vehicle paint.
Replacing Interior Bulbs
Front Courtesy Light
See below steps for bulb replacement:
1. Using a suitable tool remove the front courtesy light as shown.
Front Courtesy Light Housing
2. Release the retainer clips and bulb housing as shown.
Front Courtesy Bulb Housing
3. Replace the bulbs by pulling straight out of bulb housing.
Front Courtesy Bulb Housing
1 — Bulb Holder
2 — Bulb
1 — Retaining Clips
2 — Bulb Housing
22_FD_OM_EN_USC_t.book Page 266
Page 269 of 312

SERVICING AND MAINTENANCE267
4. Insert the new bulbs, making sure that they are properly locked.
5. Reassemble the bulb housing and courtesy light housing making sure that they are
properly locked.
6. Install the front courtesy light making sure that it is properly locked.
Dome Light Vanity Mirror
See below steps for bulb replacement:
1. Lift the cover of the mirror and pull out the visor mirror light cover.
2. Replace the bulb, releasing it from the side contacts, and then insert the new bulb, making
sure that it is properly locked between the
contacts.
Visor Mirror Cover
3. Reinstall the visor mirror light cover making sure that it is properly locked.
4. Finally lower the visor mirror cover to the mirror. Dome Light Glove Compartment
See below steps for bulb replacement:
1. Open the glove compartment.
2. Place your fingers inside the light assembly,
pull the bulb to replace it.
Bulb Removal/Installation
3. Insert the new bulb, making sure it is properly locked.
1 — Visor Mirror Cover
2 — Visor Mirror Light
8
22_FD_OM_EN_USC_t.book Page 267
Page 270 of 312
268SERVICING AND MAINTENANCE
(Continued)
Rear Dome Light — Without Retractable Roof
See below steps for bulb replacement:
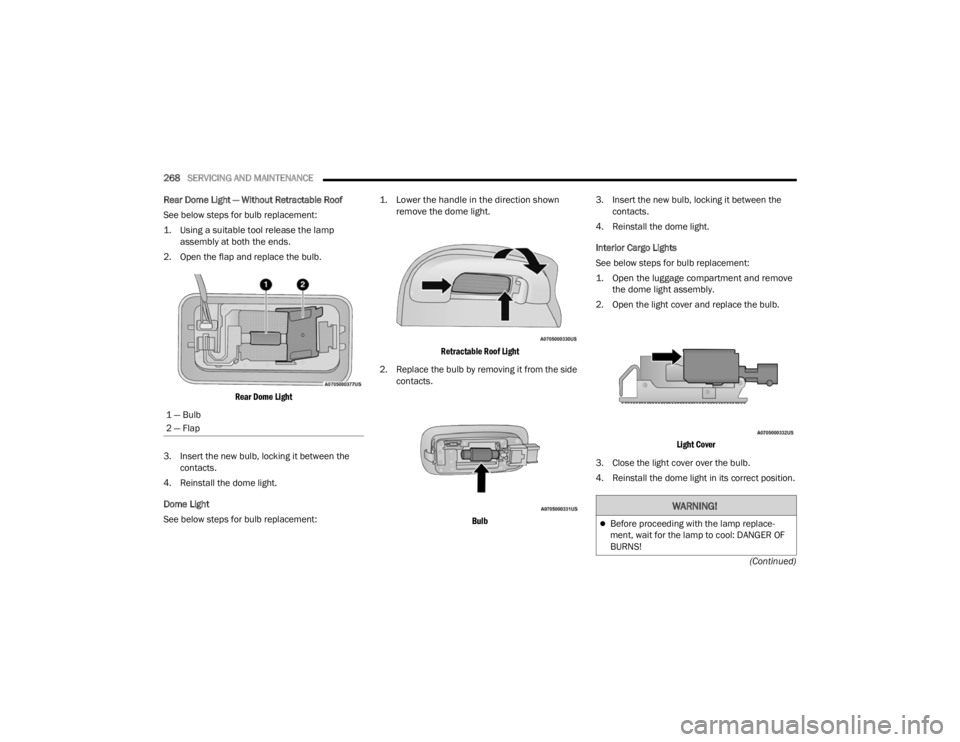
1. Using a suitable tool release the lamp
assembly at both the ends.
2. Open the flap and replace the bulb.
Rear Dome Light
3. Insert the new bulb, locking it between the contacts.
4. Reinstall the dome light.
Dome Light
See below steps for bulb replacement:
1. Lower the handle in the direction shown
remove the dome light.
Retractable Roof Light
2. Replace the bulb by removing it from the side contacts.
Bulb
3. Insert the new bulb, locking it between the
contacts.
4. Reinstall the dome light.
Interior Cargo Lights
See below steps for bulb replacement:
1. Open the luggage compartment and remove the dome light assembly.
2. Open the light cover and replace the bulb.
Light Cover
3. Close the light cover over the bulb.
4. Reinstall the dome light in its correct position.
1 — Bulb
2 — Flap
WARNING!
Before proceeding with the lamp replace
-
ment, wait for the lamp to cool: DANGER OF
BURNS!
22_FD_OM_EN_USC_t.book Page 268