seats FIAT 500X 2022 Owners Manual
[x] Cancel search | Manufacturer: FIAT, Model Year: 2022, Model line: 500X, Model: FIAT 500X 2022Pages: 312, PDF Size: 13.26 MB
Page 4 of 312

2
INTRODUCTION
SYMBOLS KEY ...........................................................8
ROLLOVER WARNING ............................................. 8
VEHICLE MODIFICATIONS/ALTERATIONS .............9
SYMBOL GLOSSARY.................................................9
GETTING TO KNOW YOUR VEHICLE
KEYS ....................................................................... 14 Key Fob .............................................................14
SENTRY KEY ........................................................... 17
IGNITION SWITCH .................................................. 17
Keyless Enter ‘n Go™ Ignition .........................17
REMOTE START — IF EQUIPPED .......................... 18
How To Use Remote Start ................................19
To Exit Remote Start Mode ..............................19
Remote Start Front Defrost Activation —
If Equipped........................................................20
Remote Start Comfort Systems —
If Equipped .......................................................20
Remote Start Windshield Wiper De–Icer
And Rear Defrost Activation — If Equipped.....20
Remote Start Cancel Message —
If Equipped........................................................20
VEHICLE SECURITY SYSTEM — IF EQUIPPED ..... 21
To Arm The System .........................................21
To Disarm The System ....................................21
Disabling ...........................................................21 DOORS .....................................................................22
Manual Door Locks ..........................................22
Power Door Locks ............................................22
Keyless Enter ‘n Go™ — Passive Entry
(If Equipped) .....................................................23
Automatic Door Locks — If Equipped .............24
Child-Protection Door Lock System —
Rear Doors ........................................................24
STEERING WHEEL ..................................................25
Manual Tilt/Telescoping Steering Column .....25
SEATS ......................................................................26
Manual Adjustment (Front Seats) ...................26
Manual Adjustment (Rear Seats) ....................27
Power Adjustment Front Seats —
If Equipped........................................................28
Heated Seats — If Equipped ...........................29
Head Restraints ..............................................30
UCONNECT VOICE RECOGNITION .........................32
Introducing Voice Recognition.........................32
Get Started .......................................................32
Basic Voice Commands ...................................32
Additional Information .....................................32
MIRRORS ...............................................................33
Inside Rearview Mirror .....................................33
Illuminated Vanity Mirrors —
If Equipped .......................................................33
Outside Mirrors ................................................34
Power Mirrors ...................................................34
Folding Mirror ...................................................34
Power Folding Mirrors — If Equipped ..............35
Heated Mirrors — If Equipped..........................35 EXTERIOR LIGHTS.................................................. 36
Headlight Switch ............................................. 36
Daytime Running Lights (DRLs) —
If Equipped ...................................................... 36
High Beams ...................................................... 36
Automatic High Beam Headlamp Control —
If Equipped .......................................................37
Flash-To-Pass ................................................... 37
Automatic Headlights — If Equipped .............. 37
Parking Lights ................................................... 37
Headlight Time Delay ...................................... 37
Front Fog Lights — If Equipped .......................38
Turn Signals...................................................... 38
Lane Change Assist ......................................... 38
Courtesy Lights/Approaching Lights ............... 38
INTERIOR LIGHTS ................................................. 38
Front Courtesy Light......................................... 38
Cargo Area Lights ............................................. 40
WINDSHIELD WIPERS AND WASHERS .............. 40
Windshield Wiper Operation ........................... 40
Rain Sensing Wipers — If Equipped ................41
Rear Window Wiper/Washer ........................... 42
Windshield Wiper De-Icer — If Equipped ........ 42
CLIMATE CONTROLS ............................................ 43
Automatic Climate Control Descriptions And
Functions .......................................................... 43
Manual Climate Control Descriptions And
Functions .......................................................... 46
Automatic Temperature Control (ATC) ........... 48
Climate Voice Recognition............................... 48
Operating Tips .................................................48
22_FD_OM_EN_USC_t.book Page 2
Page 7 of 312
5
OCCUPANT RESTRAINT SYSTEMS .................... 188 Occupant Restraint Systems ........................ 188
Important Safety Precautions....................... 188
Seat Belt Systems ......................................... 189
Supplemental Restraint Systems (SRS) ...... 195
Child Restraints ............................................ 204
SAFETY TIPS ......................................................... 214
Transporting Passengers .............................. 214Transporting Pets .......................................... 215
Safety Checks You Should Make Inside
The Vehicle ................................................... 215Periodic Safety Checks You Should Make
Outside The Vehicle ...................................... 216Exhaust Gas .................................................. 216
Carbon Monoxide Warnings ......................... 217
IN CASE OF EMERGENCY
HAZARD WARNING FLASHERS ......................... 218
JACKING AND TIRE CHANGING ........................ 218
Preparations For Jacking ............................. 218
Jack Location/Spare Tire Stowage —
If Equipped..................................................... 219
Jacking Instructions ...................................... 220
SEMI–AUTO KIT ................................................... 223
Description..................................................... 223
Inflation Procedure........................................ 224
Sealant Cartridge Replacement ................... 226 JUMP STARTING .................................................. 226
Preparations For Jump Start ........................ 227
Jump Starting Procedure .............................. 227
REFUELING IN EMERGENCY .............................. 229
IF YOUR ENGINE OVERHEATS ........................... 229
GEAR SELECTOR OVERRIDE ............................. 230
FREEING A STUCK VEHICLE .............................. 231
TOWING A DISABLED VEHICLE ........................ 232
All Wheel Drive (AWD) Models ...................... 232Tow Eye Usage — If Equipped ...................... 232
ENHANCED ACCIDENT RESPONSE SYSTEM
(EARS) .................................................................. 234
EVENT DATA RECORDER (EDR) ........................ 234
SERVICING AND MAINTENANCE
SCHEDULED MAINTENANCE.............................. 235
Maintenance Plan ......................................... 236
ENGINE COMPARTMENT .................................... 240
1.3L Turbo Engine ......................................... 240
Checking Oil Level ......................................... 241
Adding Washer Fluid ..................................... 241
Maintenance-Free Battery ........................... 241Pressure Washing ......................................... 242
VEHICLE MAINTENANCE..................................... 242
Engine Oil ...................................................... 242
Engine Oil Filter ............................................. 243Engine Air Cleaner Filter ............................... 243
Accessory Drive Belt Inspection ................... 243Air Conditioner Maintenance........................ 244
Body Lubrication ........................................... 244 Windshield Wiper Blades.............................. 245
Exhaust System ............................................ 246
Cooling System.............................................. 247
Brake System ............................................... 250
Automatic Transmission ............................... 251
FUSES ............................................................ 252
BULB REPLACEMENT .................................... 259
TIRES ..................................................................... 269
Tire Safety Information ................................. 269
Tires — General Information ......................... 276
Tire Types....................................................... 279Spare Tires — If Equipped............................. 280Wheel And Wheel Trim Care......................... 282
Snow Traction Devices ................................. 283
Tire Rotation Recommendations ................ 284
DEPARTMENT OF TRANSPORTATION
UNIFORM TIRE QUALITY GRADES .................... 285
Treadwear...................................................... 285
Traction Grades ............................................. 285Temperature Grades..................................... 285
STORING THE VEHICLE ....................................... 286
BODYWORK .......................................................... 286
Protection From Atmospheric Agents .......... 286
Body And Underbody Maintenance ............. 286
Preserving The Bodywork ............................. 286
INTERIORS ........................................................... 287
Seats And Fabric Parts ................................. 287
Plastic And Coated Parts .............................. 287
Leather Surfaces........................................... 288
Glass Surfaces ............................................. 288
22_FD_OM_EN_USC_t.book Page 5
Page 19 of 312
GETTING TO KNOW YOUR VEHICLE17
SENTRY KEY
The Sentry Key Immobilizer system prevents
unauthorized vehicle operation by disabling the
engine. The system does not need to be armed or
activated. Operation is automatic, regardless of
whether the vehicle is locked or unlocked.
The system uses a key fob, keyless push button
ignition and a Radio Frequency (RF) receiver to
prevent unauthorized vehicle operation. Therefore,
only key fobs that are programmed to the vehicle
can be used to start and operate the vehicle. The
system will shut the engine off in two seconds if an
incorrect key fob is used to start the engine.
After placing the ignition switch in the ON/RUN
position, the Vehicle Security Light will turn on for
three seconds for a bulb check. If the light remains
on after the bulb check, it indicates that there is a
problem with the electronics. In addition, if the light
begins to flash after the bulb check, it indicates
that someone used an invalid key fob to start the
engine. Either of these conditions will result in the
engine being shut off after two seconds.
If the Vehicle Security Light turns on during normal
vehicle operation (vehicle running for longer than
10 seconds), it indicates that there is a fault in the
electronics. Should this occur, have the vehicle
serviced as soon as possible by an authorized
dealer. All of the key fobs provided with your new vehicle
have been programmed to the vehicle electronics
Ú
page 297.
IGNITION SWITCH
KEYLESS ENTER ‘N GO™ IGNITION
This feature allows the driver to operate the
ignition switch with the push of a button as long as
the key fob is in the passenger compartment.
The START/STOP ignition button has three
operating positions. These positions are OFF, ON,
and RUN.
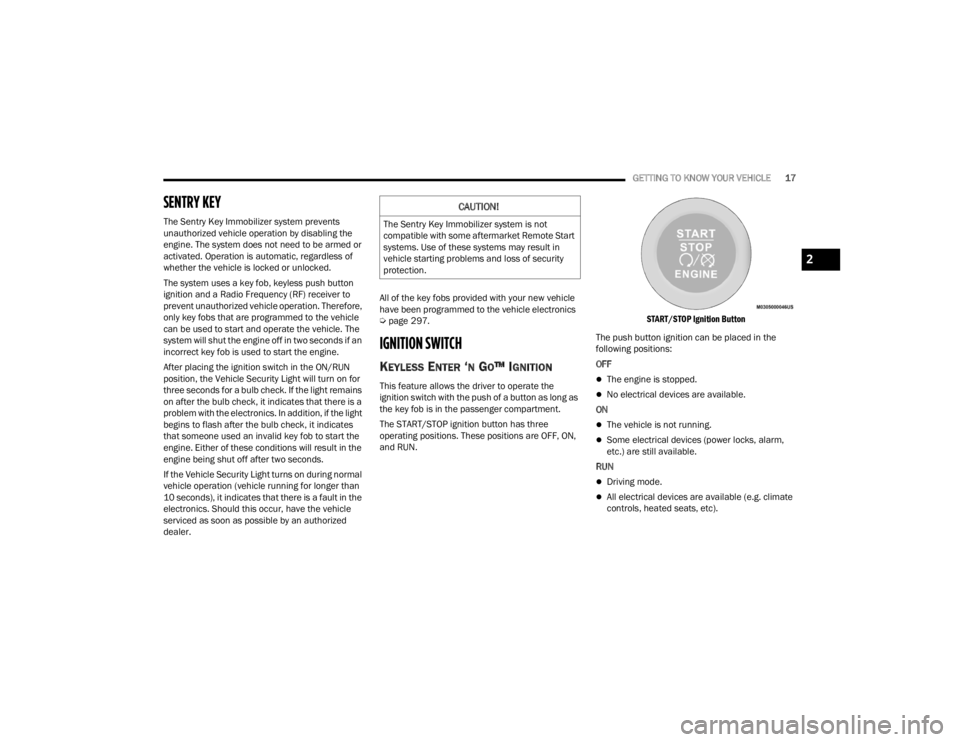
START/STOP Ignition Button
The push button ignition can be placed in the
following positions:
OFFThe engine is stopped.
No electrical devices are available.
ON
The vehicle is not running.
Some electrical devices (power locks, alarm,
etc.) are still available.
RUN
Driving mode.
All electrical devices are available (e.g. climate
controls, heated seats, etc).
CAUTION!
The Sentry Key Immobilizer system is not
compatible with some aftermarket Remote Start
systems. Use of these systems may result in
vehicle starting problems and loss of security
protection.
2
22_FD_OM_EN_USC_t.book Page 17
Page 26 of 312
24GETTING TO KNOW YOUR VEHICLE
detected outside the vehicle. The vehicle will not
unlock the doors when any of the following condi -
tions are met:
The doors are manually locked using the door
lock knobs.
There is a valid Passive Entry key fob outside the
vehicle and within 5 ft (1.5 m) of either Passive
Entry door handle.
To Lock The Vehicle’s Doors And Liftgate
With one of the vehicle’s Passive Entry key fobs
within 5 ft (1.5 m) of either front door handles,
pushing the Passive Entry lock button will lock the
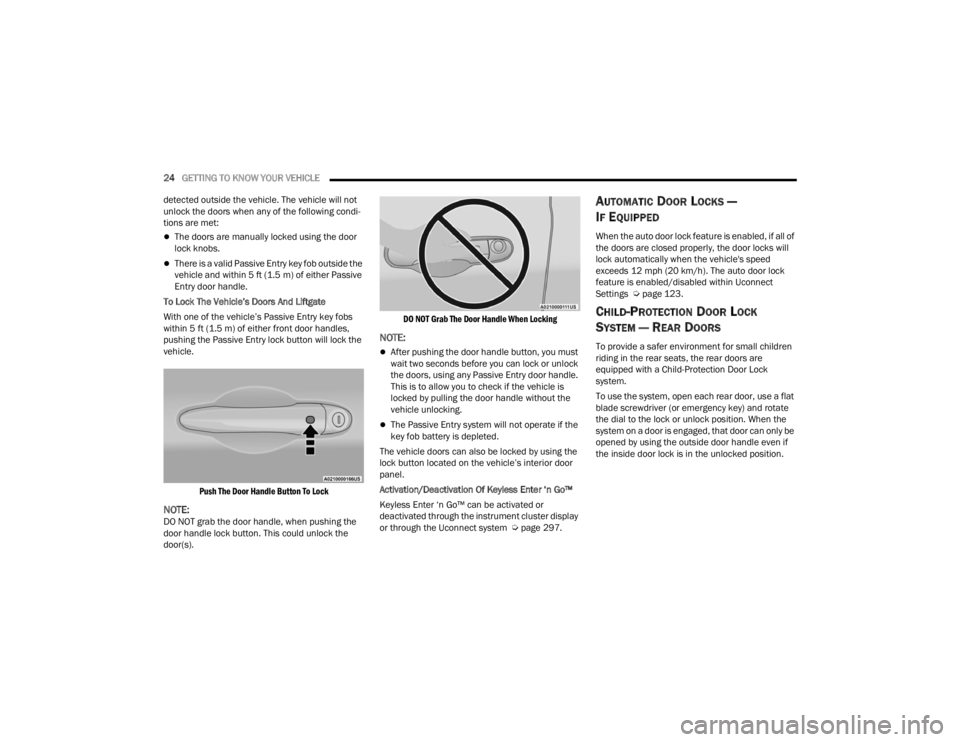
vehicle.
Push The Door Handle Button To Lock
NOTE:DO NOT grab the door handle, when pushing the
door handle lock button. This could unlock the
door(s).
DO NOT Grab The Door Handle When Locking
NOTE:
After pushing the door handle button, you must
wait two seconds before you can lock or unlock
the doors, using any Passive Entry door handle.
This is to allow you to check if the vehicle is
locked by pulling the door handle without the
vehicle unlocking.
The Passive Entry system will not operate if the
key fob battery is depleted.
The vehicle doors can also be locked by using the
lock button located on the vehicle’s interior door
panel.
Activation/Deactivation Of Keyless Enter ‘n Go™
Keyless Enter ‘n Go™ can be activated or
deactivated through the instrument cluster display
or through the Uconnect system Ú page 297.
AUTOMATIC DOOR LOCKS —
I
F EQUIPPED
When the auto door lock feature is enabled, if all of
the doors are closed properly, the door locks will
lock automatically when the vehicle's speed
exceeds 12 mph (20 km/h). The auto door lock
feature is enabled/disabled within Uconnect
Settings Ú page 123.
CHILD-PROTECTION DOOR LOCK
S
YSTEM — REAR DOORS
To provide a safer environment for small children
riding in the rear seats, the rear doors are
equipped with a Child-Protection Door Lock
system.
To use the system, open each rear door, use a flat
blade screwdriver (or emergency key) and rotate
the dial to the lock or unlock position. When the
system on a door is engaged, that door can only be
opened by using the outside door handle even if
the inside door lock is in the unlocked position.
22_FD_OM_EN_USC_t.book Page 24
Page 28 of 312
26GETTING TO KNOW YOUR VEHICLE
(Continued)
SEATS
Seats are a part of the Occupant Restraint system
of the vehicle.
MANUAL ADJUSTMENT (FRONT SEATS)
Manual Front Seat Forward/Rearward
Adjustment
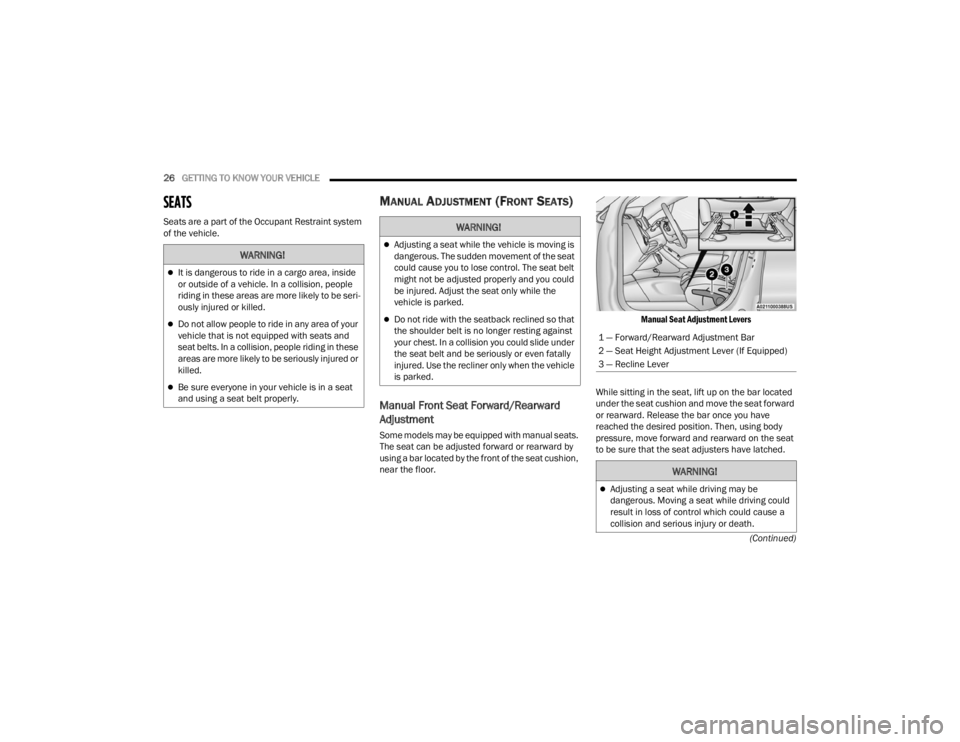
Some models may be equipped with manual seats.
The seat can be adjusted forward or rearward by
using a bar located by the front of the seat cushion,
near the floor.
Manual Seat Adjustment Levers
While sitting in the seat, lift up on the bar located
under the seat cushion and move the seat forward
or rearward. Release the bar once you have
reached the desired position. Then, using body
pressure, move forward and rearward on the seat
to be sure that the seat adjusters have latched.
WARNING!
It is dangerous to ride in a cargo area, inside
or outside of a vehicle. In a collision, people
riding in these areas are more likely to be seri -
ously injured or killed.
Do not allow people to ride in any area of your
vehicle that is not equipped with seats and
seat belts. In a collision, people riding in these
areas are more likely to be seriously injured or
killed.
Be sure everyone in your vehicle is in a seat
and using a seat belt properly.
WARNING!
Adjusting a seat while the vehicle is moving is
dangerous. The sudden movement of the seat
could cause you to lose control. The seat belt
might not be adjusted properly and you could
be injured. Adjust the seat only while the
vehicle is parked.
Do not ride with the seatback reclined so that
the shoulder belt is no longer resting against
your chest. In a collision you could slide under
the seat belt and be seriously or even fatally
injured. Use the recliner only when the vehicle
is parked.
1 — Forward/Rearward Adjustment Bar
2 — Seat Height Adjustment Lever (If Equipped)
3 — Recline Lever
WARNING!
Adjusting a seat while driving may be
dangerous. Moving a seat while driving could
result in loss of control which could cause a
collision and serious injury or death.
22_FD_OM_EN_USC_t.book Page 26
Page 29 of 312

GETTING TO KNOW YOUR VEHICLE27
Height Adjustment — If Equipped
The front driver and passenger seats height can be
raised or lowered by using a lever, located on the
outboard side of the seat. Pull upward on the lever
to raise the seat height or push downward on the
lever to lower the seat height.
Recline Adjustment
To adjust the seatback, lift the lever located on the
outboard side of the seat, lean back to the desired
position and release the lever. To return the
seatback, lift the lever, lean forward and release
the lever.
MANUAL ADJUSTMENT (REAR SEATS)
Manual Folding Second Row Seat
The manual folding split rear seat increases the
storage of the rear cargo area.
NOTE:
Prior to folding the rear seat down, it may be
necessary to position the front seat to its
mid-track position. Be sure that the front seats
are fully upright and positioned forward, this will
allow the rear seat to fold down easily.
You may experience deformation in the seat
cushion from the seat belt buckles if the seats
are left folded for an extended period of time.
This is normal and by simply unfolding the seats
to the open position, over time the seat cushion
will return to its normal shape.
Cargo Area Enlargement
Folding both sides of the rear seat provides
additional storage in the rear cargo area.
Proceed as follows:
1. Remove the rear shelf (if equipped).
2. Fully lower the rear seat head restraints.
3. Move the safety belts to the outboard side of
the seat.
4. Pull the seatback release lever to fold both sides of the rear seatbacks completely
forward.
Partial Enlargement Of The Cargo Area
Enlargement of the left side of the cargo area
allows you to carry a single passenger on the right
side of the rear seat, while the enlargement of the
right side allows you to carry two passengers.
Proceed as follows:
1. Remove the rear shelf (if equipped).
2. Fully lower the rear seat head restraints.
3. Move the safety belts to the outboard side of the seat and rest them on the seat belt guide.
Seats should be adjusted before fastening the
seat belts and while the vehicle is parked.
Serious injury or death could result from a
poorly adjusted seat belt.
WARNING!
Do not pile luggage or cargo higher than the top
of the seatback. This could impair visibility or
become a dangerous projectile in a sudden stop
or collision.
WARNING!
WARNING!
It is extremely dangerous to ride in a cargo
area, inside or outside of a vehicle. In a colli -
sion, people riding in these areas are more
likely to be seriously injured or killed.
Do not allow people to ride in any area of your
vehicle that is not equipped with seats and
seat belts.
Be sure everyone in your vehicle is in a seat
and using a seat belt properly.
2
22_FD_OM_EN_USC_t.book Page 27
Page 30 of 312
28GETTING TO KNOW YOUR VEHICLE
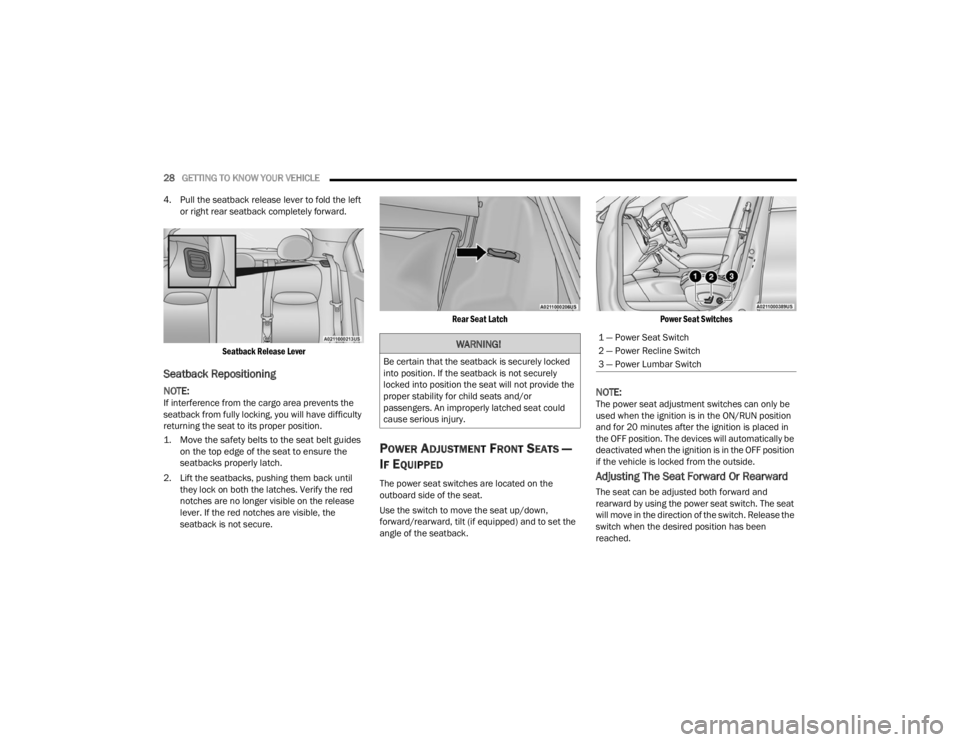
4. Pull the seatback release lever to fold the left or right rear seatback completely forward.
Seatback Release Lever
Seatback Repositioning
NOTE:If interference from the cargo area prevents the
seatback from fully locking, you will have difficulty
returning the seat to its proper position.
1. Move the safety belts to the seat belt guides on the top edge of the seat to ensure the
seatbacks properly latch.
2. Lift the seatbacks, pushing them back until they lock on both the latches. Verify the red
notches are no longer visible on the release
lever. If the red notches are visible, the
seatback is not secure.
Rear Seat Latch
POWER ADJUSTMENT FRONT SEATS —
I
F EQUIPPED
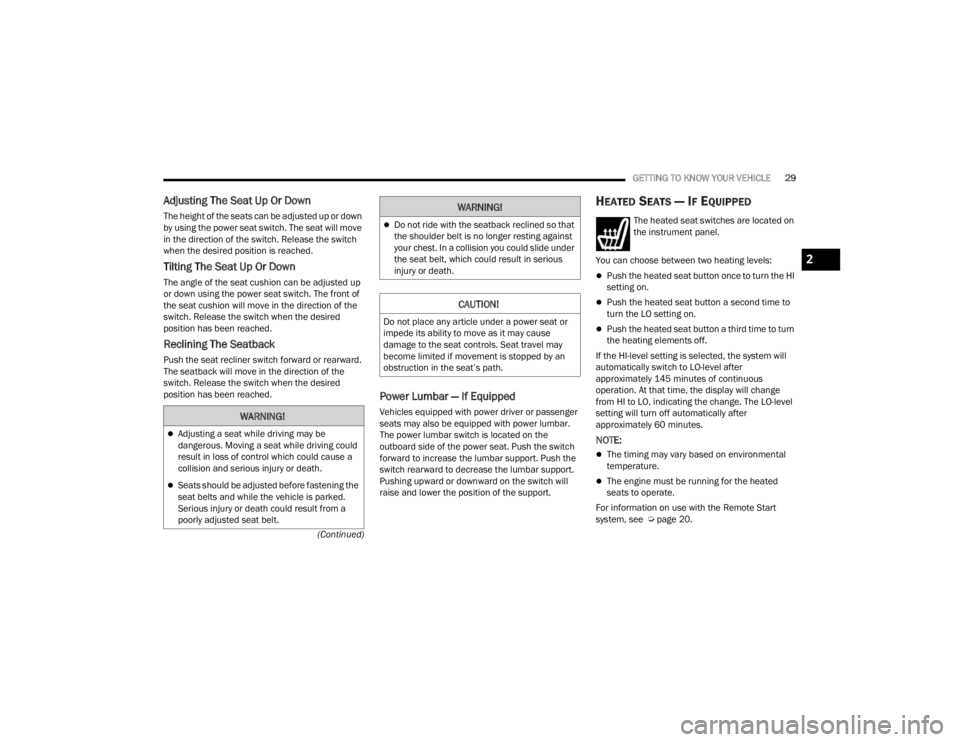
The power seat switches are located on the
outboard side of the seat.
Use the switch to move the seat up/down,
forward/rearward, tilt (if equipped) and to set the
angle of the seatback.
Power Seat Switches
NOTE:The power seat adjustment switches can only be
used when the ignition is in the ON/RUN position
and for 20 minutes after the ignition is placed in
the OFF position. The devices will automatically be
deactivated when the ignition is in the OFF position
if the vehicle is locked from the outside.
Adjusting The Seat Forward Or Rearward
The seat can be adjusted both forward and
rearward by using the power seat switch. The seat
will move in the direction of the switch. Release the
switch when the desired position has been
reached.
WARNING!
Be certain that the seatback is securely locked
into position. If the seatback is not securely
locked into position the seat will not provide the
proper stability for child seats and/or
passengers. An improperly latched seat could
cause serious injury.
1 — Power Seat Switch
2 — Power Recline Switch
3 — Power Lumbar Switch
22_FD_OM_EN_USC_t.book Page 28
Page 31 of 312
GETTING TO KNOW YOUR VEHICLE29
(Continued)
Adjusting The Seat Up Or Down
The height of the seats can be adjusted up or down
by using the power seat switch. The seat will move
in the direction of the switch. Release the switch
when the desired position is reached.
Tilting The Seat Up Or Down
The angle of the seat cushion can be adjusted up
or down using the power seat switch. The front of
the seat cushion will move in the direction of the
switch. Release the switch when the desired
position has been reached.
Reclining The Seatback
Push the seat recliner switch forward or rearward.
The seatback will move in the direction of the
switch. Release the switch when the desired
position has been reached.
Power Lumbar — If Equipped
Vehicles equipped with power driver or passenger
seats may also be equipped with power lumbar.
The power lumbar switch is located on the
outboard side of the power seat. Push the switch
forward to increase the lumbar support. Push the
switch rearward to decrease the lumbar support.
Pushing upward or downward on the switch will
raise and lower the position of the support.
HEATED SEATS — IF EQUIPPED
The heated seat switches are located on
the instrument panel.
You can choose between two heating levels:
Push the heated seat button once to turn the HI
setting on.
Push the heated seat button a second time to
turn the LO setting on.
Push the heated seat button a third time to turn
the heating elements off.
If the HI-level setting is selected, the system will
automatically switch to LO-level after
approximately 145 minutes of continuous
operation. At that time, the display will change
from HI to LO, indicating the change. The LO-level
setting will turn off automatically after
approximately 60 minutes.
NOTE:
The timing may vary based on environmental
temperature.
The engine must be running for the heated
seats to operate.
For information on use with the Remote Start
system, see Ú page 20.
WARNING!
Adjusting a seat while driving may be
dangerous. Moving a seat while driving could
result in loss of control which could cause a
collision and serious injury or death.
Seats should be adjusted before fastening the
seat belts and while the vehicle is parked.
Serious injury or death could result from a
poorly adjusted seat belt.
Do not ride with the seatback reclined so that
the shoulder belt is no longer resting against
your chest. In a collision you could slide under
the seat belt, which could result in serious
injury or death.
CAUTION!
Do not place any article under a power seat or
impede its ability to move as it may cause
damage to the seat controls. Seat travel may
become limited if movement is stopped by an
obstruction in the seat’s path.
WARNING!
2
22_FD_OM_EN_USC_t.book Page 29
Page 50 of 312
48GETTING TO KNOW YOUR VEHICLE
Climate Control OFF
To turn the Climate Controls off, turn the
blower control knob to the OFF (O)
position.
AUTOMATIC TEMPERATURE CONTROL
(ATC)
Automatic Operation
1. Push the AUTO button on the front ATC panel
and the word “AUTO” will illuminate in the
front ATC display, along with two
temperatures for the driver and front
passenger. The system will then automat -
ically regulate the amount of airflow.
2. Adjust the temperature you would like the system to maintain, by adjusting the driver,
and passenger temperatures. Once the
desired temperature is displayed, the system
will achieve and automatically maintain that
comfort level.
3. When the system is set up for your comfort level, it is not necessary to change the
settings. You will experience the greatest
efficiency by simply allowing the system to
function automatically.
NOTE:It is not necessary to move the temperature
settings. The system automatically adjusts the
temperature, mode, and fan speed to provide
comfort as quickly as possible.
To provide you with maximum comfort in the
automatic mode, during cold start-ups, the blower
fan will remain on low until the engine warms up.
The fan will engage immediately if the Defrost
mode is selected, or by changing the front blower
knob setting.
Manual Operation Override
This system offers a full complement of manual
override features. The AUTO symbol in the front
ATC display will be turned off when the system is
being used in the manual mode.
CLIMATE VOICE RECOGNITION
Adjust vehicle temperatures hands-free and keep
everyone comfortable while you keep moving
ahead. (If vehicle is equipped with climate control.)
Push the VR button . After the beep, say one of
the following commands:
“Set the driver temperature to 70 degrees ”
“Set the passenger temperature to 70 degrees ”Did You Know:
Voice Command for Climate may
only be used to adjust the interior temperature of
your vehicle. Voice Command will not work to
adjust the heated seats or steering wheel if
equipped.
OPERATING TIPS
Refer to the chart at the end of this section for
suggested control settings for various weather
conditions.
Summer Operation
The engine cooling system must be protected with
a high-quality antifreeze coolant to provide proper
corrosion protection and to protect against engine
overheating. OAT coolant (conforming to
MS.90032) is recommended.
Winter Operation
To ensure the best possible heater and defroster
performance, make sure the engine cooling
system is functioning properly and the proper
amount, type, and concentration of coolant is
used. Use of the Air Recirculation mode during
Winter months is not recommended, because it
may cause window fogging.
22_FD_OM_EN_USC_t.book Page 48
Page 53 of 312
GETTING TO KNOW YOUR VEHICLE51
Front Armrest
The front armrest is located between the front
seats.
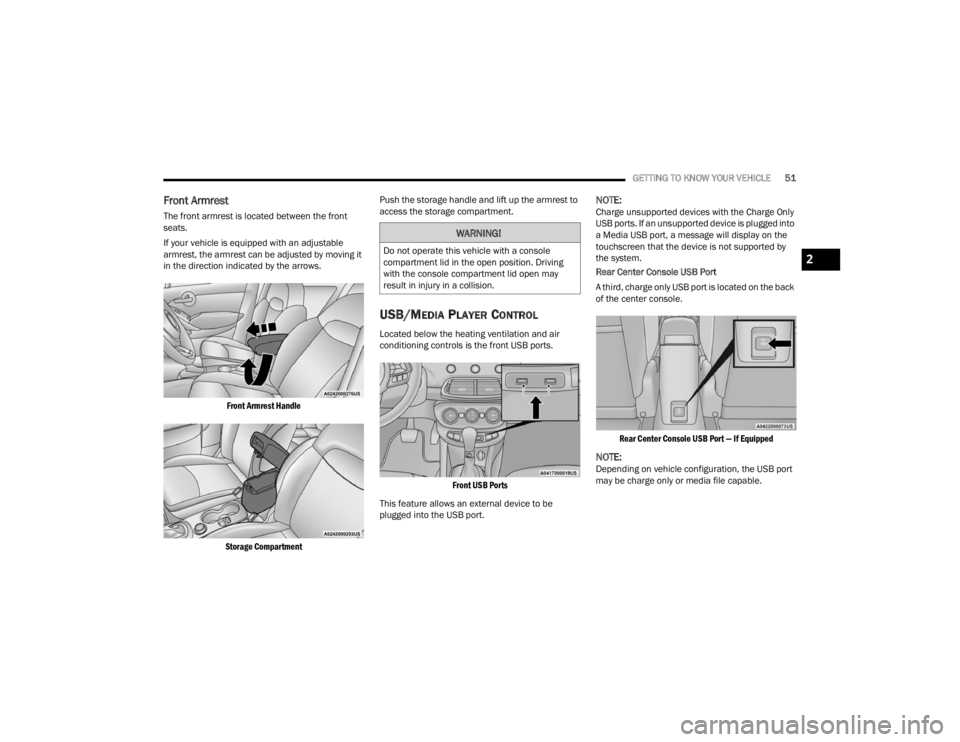
If your vehicle is equipped with an adjustable
armrest, the armrest can be adjusted by moving it
in the direction indicated by the arrows.
Front Armrest Handle
Storage Compartment
Push the storage handle and lift up the armrest to
access the storage compartment.
USB/MEDIA PLAYER CONTROL
Located below the heating ventilation and air
conditioning controls is the front USB ports.
Front USB Ports
This feature allows an external device to be
plugged into the USB port.
NOTE:Charge unsupported devices with the Charge Only
USB ports. If an unsupported device is plugged into
a Media USB port, a message will display on the
touchscreen that the device is not supported by
the system.
Rear Center Console USB Port
A third, charge only USB port is located on the back
of the center console.
Rear Center Console USB Port — If Equipped
NOTE:Depending on vehicle configuration, the USB port
may be charge only or media file capable.
WARNING!
Do not operate this vehicle with a console
compartment lid in the open position. Driving
with the console compartment lid open may
result in injury in a collision.2
22_FD_OM_EN_USC_t.book Page 51