window FIAT BARCHETTA 2003 1.G Owners Manual
[x] Cancel search | Manufacturer: FIAT, Model Year: 2003, Model line: BARCHETTA, Model: FIAT BARCHETTA 2003 1.GPages: 170, PDF Size: 3.55 MB
Page 15 of 170
14
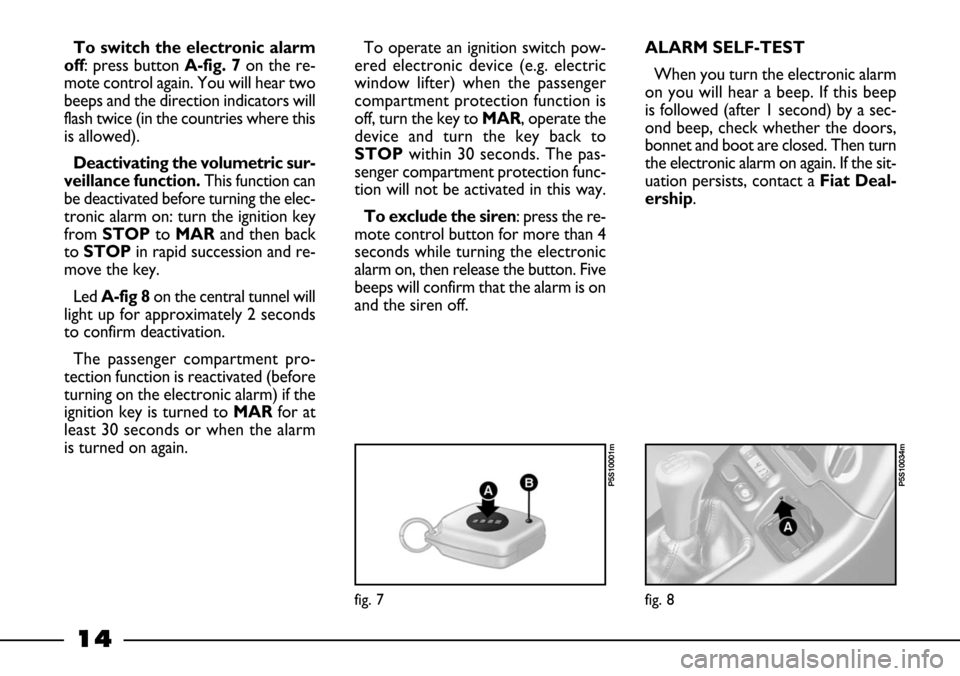
To switch the electronic alarm
off: press button A-fig. 7on the re-
mote control again. You will hear two
beeps and the direction indicators will
flash twice (in the countries where this
is allowed).
Deactivating the volumetric sur-
veillance function. This function can
be deactivated before turning the elec-
tronic alarm on: turn the ignition key
from STOPto MAR and then back
to STOPin rapid succession and re-
move the key.
Led A-fig 8on the central tunnel will
light up for approximately 2 seconds
to confirm deactivation.
The passenger compartment pro-
tection function is reactivated (before
turning on the electronic alarm) if the
ignition key is turned toMARfor at
least 30 seconds or when the alarm
is turned on again.ALARM SELF-TEST
When you turn the electronic alarm
on you will hear a beep. If this beep
is followed (after 1 second) by a sec-
ond beep, check whether the doors,
bonnet and boot are closed. Then turn
the electronic alarm on again. If the sit-
uation persists, contact aFiat Deal-
ership. To operate an ignition switch pow-
ered electronic device (e.g. electric
window lifter) when the passenger
compartment protection function is
off, turn the key to MAR, operate the
device and turn the key back to
STOPwithin 30 seconds. The pas-
senger compartment protection func-
tion will not be activated in this way.
To exclude the siren: press the re-
mote control button for more than 4
seconds while turning the electronic
alarm on, then release the button. Five
beeps will confirm that the alarm is on
and the siren off.
fig. 7
P5S10001m
fig. 8
P5S10034m
Page 36 of 170
35
fig. 33
P5S00642m
fig. 32
P5S00641m
DIRECTIONAL
AND ADJUSTABLE AIR
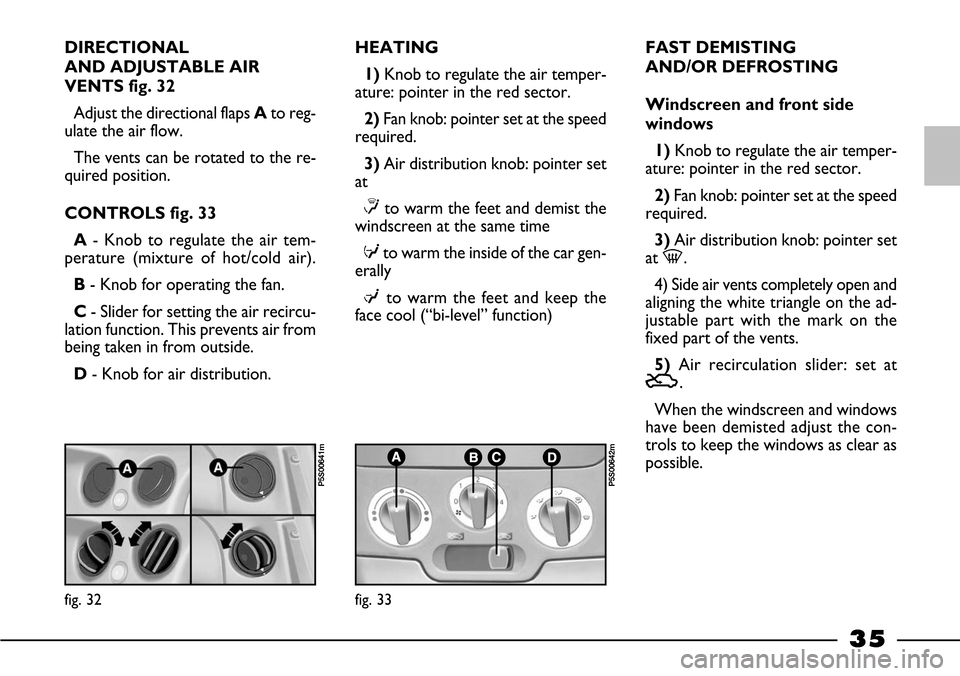
VENTS fig. 32
Adjust the directional flaps Ato reg-
ulate the air flow.
The vents can be rotated to the re-
quired position.
CONTROLS fig. 33
A - Knob to regulate the air tem-
perature (mixture of hot/cold air).
B- Knob for operating the fan.
C- Slider for setting the air recircu-
lation function. This prevents air from
being taken in from outside.
D- Knob for air distribution.HEATING
1)Knob to regulate the air temper-
ature: pointer in the red sector.
2) Fan knob: pointer set at the speed
required.
3)Air distribution knob: pointer set
at
≤to warm the feet and demist the
windscreen at the same time
≥to warm the inside of the car gen-
erally
µto warm the feet and keep the
face cool (“bi-level” function)FAST DEMISTING
AND/OR DEFROSTING
Windscreen and front side
windows
1)Knob to regulate the air temper-
ature: pointer in the red sector.
2) Fan knob: pointer set at the speed
required.
3) Air distribution knob: pointer set
at -.
4) Side air vents completely open and
aligning the white triangle on the ad-
justable part with the mark on the
fixed part of the vents.
5) Air recirculation slider: set at
U.
When the windscreen and windows
have been demisted adjust the con-
trols to keep the windows as clear as
possible.
Page 37 of 170
36
IMPORTANTIf the car has a man-
ual climate control system, you are
recommended to adjust the controls
as described above and press button
√to speed up the demisting process.
VENTILATION
1)Centre and side vents: fully open.
2) Air temperature knob: pointer in
the blue zone.
3) Fan knob: pointer set at the speed
required.
4) Air distribution knob: pointer at
¥
5)Air recirculation slider: pointer set
at U, air is allowed to enter the car
from the outside.RECIRCULATION
When the slider is in position T,
only the inside air is circulated.
IMPORTANTThis function is par-
ticularly useful when the outside air
is heavily polluted (in a traffic jam, tun-
nel etc.). You are advised against using
this facility for long periods.
IMPORTANTDo not use the air
recirculation function when the
weather is wet/cold as this will make
the inside of the windows mist up con-
siderably.MANUAL CLIMATE
CONTROL SYSTEM
(where fitted)
The system uses refrig-
erating fluid R134a as it
will not pollute the envi-
ronment if it accidentally leaks.
Under no circumstances use flu-
id R12, which is incompatible
with the system’s component
parts.
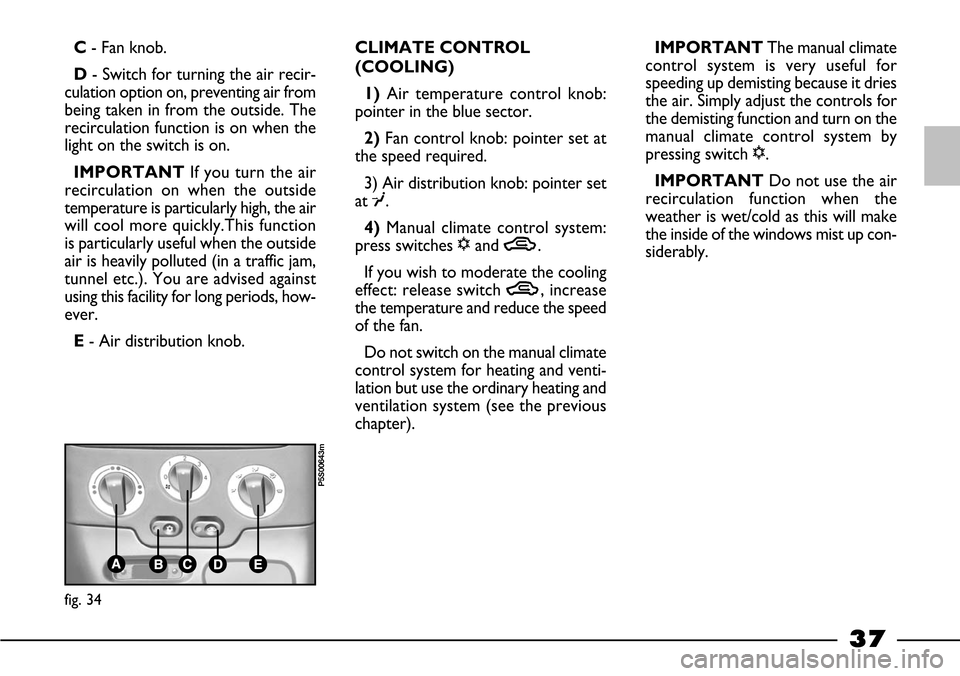
CONTROLS fig. 34
A- Knob for adjusting the air tem-
perature (mixture of warm and cool
air).
B- Switch for turning the manual cli-
mate control system on and off. When
turned on, this switch automatically
turns on the fan at first speed. The sys-
tem is on when the light on the switch
is on.
Page 38 of 170
37
C- Fan knob.
D- Switch for turning the air recir-
culation option on, preventing air from
being taken in from the outside. The
recirculation function is on when the
light on the switch is on.
IMPORTANTIf you turn the air
recirculation on when the outside
temperature is particularly high, the air
will cool more quickly.This function
is particularly useful when the outside
air is heavily polluted (in a traffic jam,
tunnel etc.). You are advised against
using this facility for long periods, how-
ever.
E- Air distribution knob.CLIMATE CONTROL
(COOLING)
1) Air temperature control knob:
pointer in the blue sector.
2)Fan control knob: pointer set at
the speed required.
3) Air distribution knob: pointer set
at ¥.
4)Manual climate control system:
press switches √and T.
If you wish to moderate the cooling
effect: release switch T, increase
the temperature and reduce the speed
of the fan.
Do not switch on the manual climate
control system for heating and venti-
lation but use the ordinary heating and
ventilation system (see the previous
chapter).IMPORTANTThe manual climate
control system is very useful for
speeding up demisting because it dries
the air. Simply adjust the controls for
the demisting function and turn on the
manual climate control system by
pressing switch √.
IMPORTANTDo not use the air
recirculation function when the
weather is wet/cold as this will make
the inside of the windows mist up con-
siderably.
fig. 34
P5S00643m
Page 46 of 170
45
IMPORTANT If one of the doors
is not shut properly or there is a fail-
ure in the system, the central locking
feature will not work and, after some
attempts, the device stops working for
around two minutes. In these two
minutes the doors can be locked or
unlocked manually without the elec-
trical system coming into play. After
the two minutes the control unit is
ready to receive commands once
more.
If the reason for the malfunction has
been removed, the device will start to
work properly again. If not it will cut
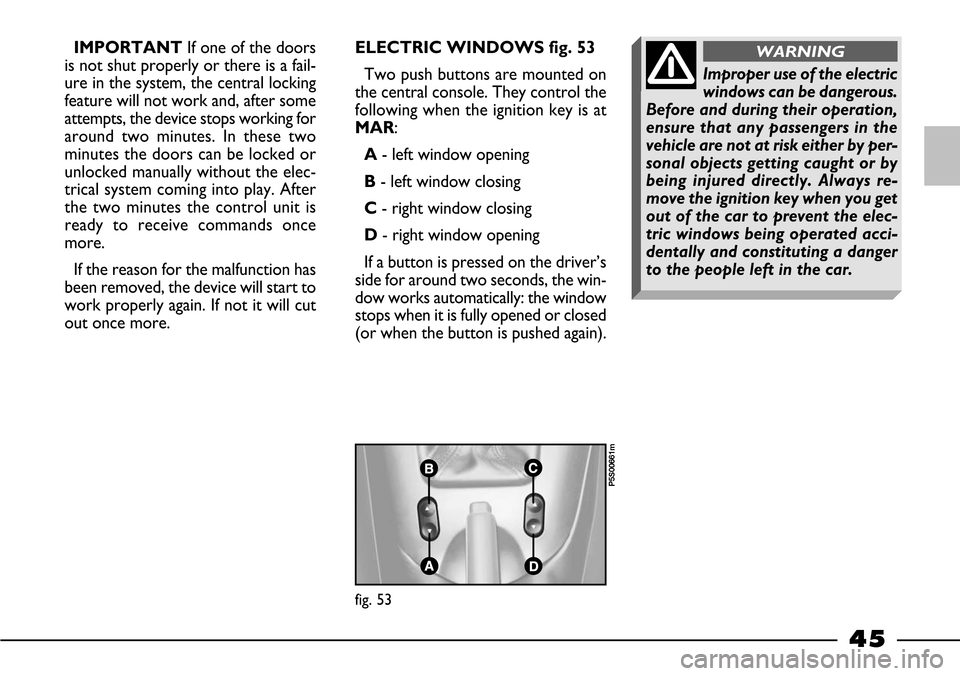
out once more.ELECTRIC WINDOWS fig. 53
Two push buttons are mounted on
the central console. They control the
following when the ignition key is at
MAR:
A- left window opening
B- left window closing
C- right window closing
D- right window opening
If a button is pressed on the driver’s
side for around two seconds, the win-
dow works automatically: the window
stops when it is fully opened or closed
(or when the button is pushed again).
fig. 53
P5S00661m
Improper use of the electric
windows can be dangerous.
Before and during their operation,
ensure that any passengers in the
vehicle are not at risk either by per-
sonal objects getting caught or by
being injured directly. Always re-
move the ignition key when you get
out of the car to prevent the elec-
tric windows being operated acci-
dentally and constituting a danger
to the people left in the car.
WARNING
Page 47 of 170
46
HOOD
USEFUL TIPS
Before opening the hood, make sure
its housing is not obstructed by any-
thing.
To prevent damage to the window
seals, open and close the hood either
with the windows right down or with
the doors open.
Do not fold the hood when it is wet:
it may get damaged if it is left in its
housing for a long period.
Do not rest weights on the open or
closed hood: the canvas and the frame
could get damaged.
Do not open or close the hood
when the outside temperature is very
low.
Snow or ice must be removed with
objects that do not leave scratches.
Take the car to a Fiat Dealership
for any repairs or maintenance.OPENING
1) Lower the sun visors.
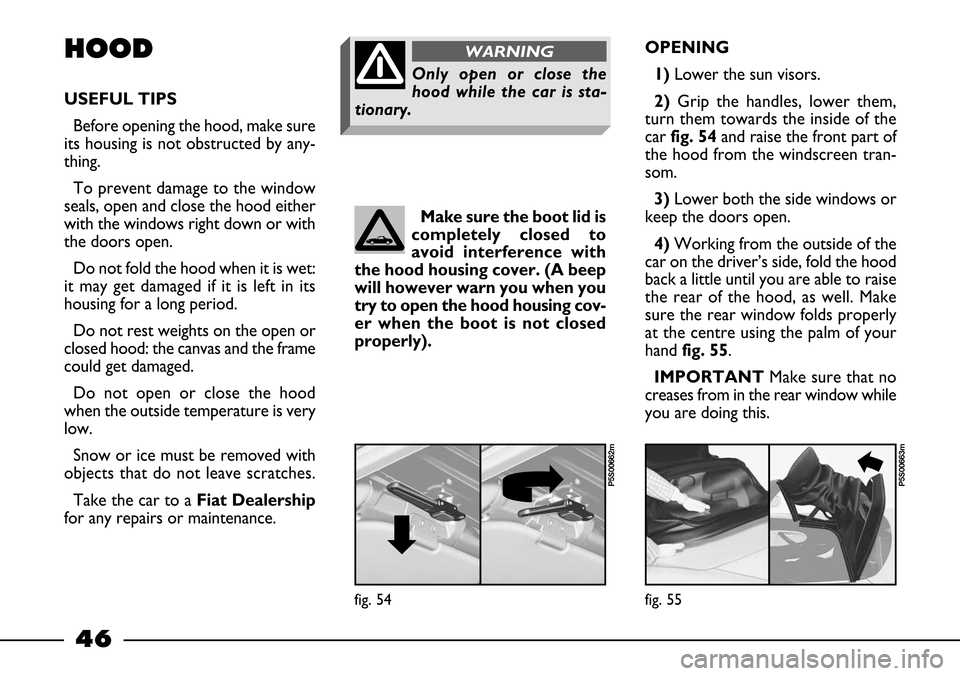
2) Grip the handles, lower them,
turn them towards the inside of the
car fig. 54and raise the front part of
the hood from the windscreen tran-
som.
3)Lower both the side windows or
keep the doors open.
4) Working from the outside of the
car on the driver’s side, fold the hood
back a little until you are able to raise
the rear of the hood, as well. Make
sure the rear window folds properly
at the centre using the palm of your
hand fig. 55.
IMPORTANTMake sure that no
creases from in the rear window while
you are doing this. Make sure the boot lid is
completely closed to
avoid interference with
the hood housing cover. (A beep
will however warn you when you
try to open the hood housing cov-
er when the boot is not closed
properly).
Only open or close the
hood while the car is sta-
tionary.
WARNING
fig. 55
P5S00663m
fig. 54
P5S00662m
Page 48 of 170
47
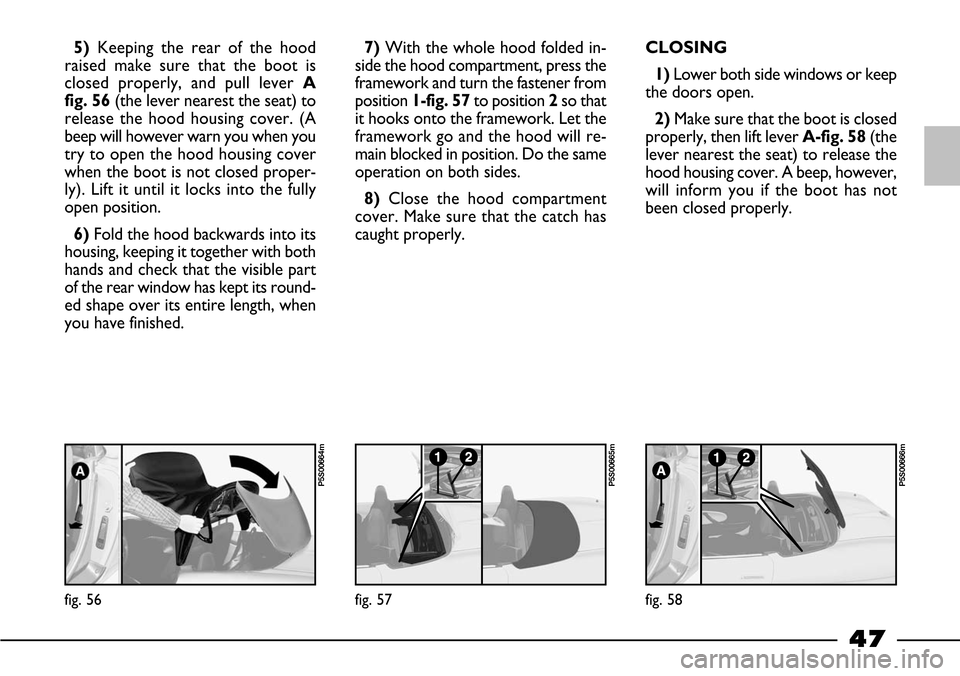
5)Keeping the rear of the hood
raised make sure that the boot is
closed properly, and pull lever A
fig. 56(the lever nearest the seat) to
release the hood housing cover. (A
beep will however warn you when you
try to open the hood housing cover
when the boot is not closed proper-
ly). Lift it until it locks into the fully
open position.
6) Fold the hood backwards into its
housing, keeping it together with both
hands and check that the visible part
of the rear window has kept its round-
ed shape over its entire length, when
you have finished.7) With the whole hood folded in-
side the hood compartment, press the
framework and turn the fastener from
position 1-fig. 57to position 2so that
it hooks onto the framework. Let the
framework go and the hood will re-
main blocked in position. Do the same
operation on both sides.
8)Close the hood compartment
cover. Make sure that the catch has
caught properly.CLOSING
1) Lower both side windows or keep
the doors open.
2)Make sure that the boot is closed
properly, then lift lever A-fig. 58(the
lever nearest the seat) to release the
hood housing cover. A beep, however,
will inform you if the boot has not
been closed properly.
fig. 56
P5S00664m
fig. 57
P5S00665m
fig. 58
P5S00666m
Page 50 of 170
49
HARD TOP
(where fitted)
The hard top is fitted with a heated
rear window and should be used in-
stead of the hood during the winter.
USEFUL TIPS
Before fitting the hard top, fold the
hood into its housing properly and an-
chor the hood housing cover to its
safety devices.
Remove the seat belts from the slots
in the seat backs and tip the seat backs
forward.
Position and remove the hard top
with the side windows fully lowered
or the doors open. Get another per-
son to help you to support the hard
top on the right and left.
If repairs or maintenance are neces-
sary, take the car to a Fiat Dealer-
ship.FITTING
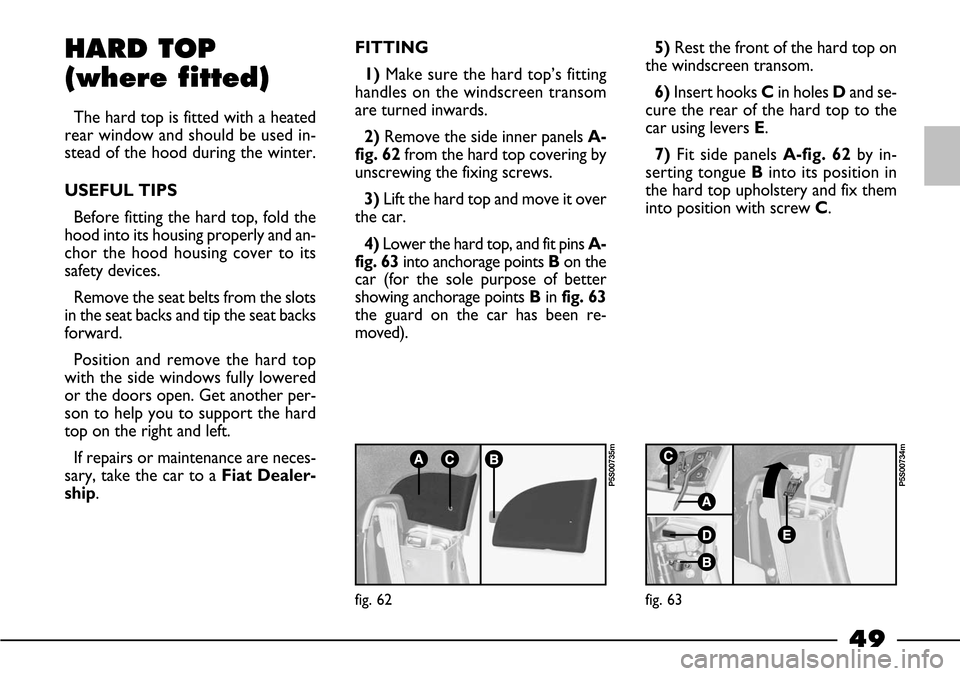
1)Make sure the hard top’s fitting
handles on the windscreen transom
are turned inwards.
2)Remove the side inner panels A-
fig. 62from the hard top covering by
unscrewing the fixing screws.
3) Lift the hard top and move it over
the car.
4) Lower the hard top, and fit pins A-
fig. 63into anchorage points Bon the
car (for the sole purpose of better
showing anchorage points Bin fig. 63
the guard on the car has been re-
moved).5)Rest the front of the hard top on
the windscreen transom.
6)Insert hooks Cin holes Dand se-
cure the rear of the hard top to the
car using levers E.
7)Fit side panels A-fig. 62by in-
serting tongue Binto its position in
the hard top upholstery and fix them
into position with screw C.
fig. 63
P5S00734m
fig. 62
P5S00735m
Page 51 of 170
50
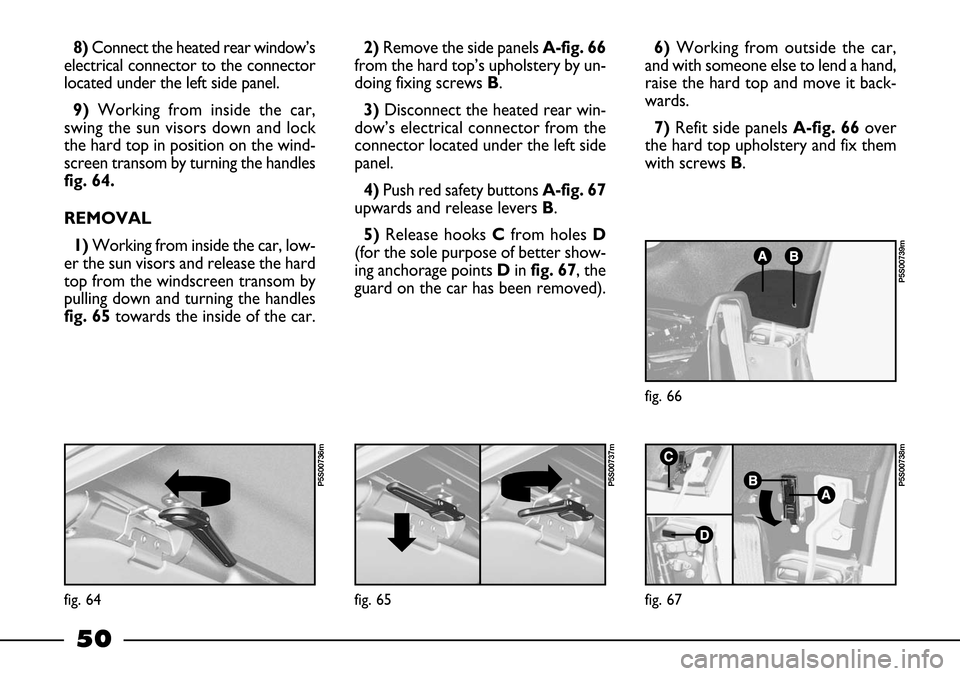
8) Connect the heated rear window’s
electrical connector to the connector
located under the left side panel.
9) Working from inside the car,
swing the sun visors down and lock
the hard top in position on the wind-
screen transom by turning the handles
fig. 64.
REMOVAL
1)Working from inside the car, low-
er the sun visors and release the hard
top from the windscreen transom by
pulling down and turning the handles
fig. 65towards the inside of the car.2)Remove the side panels A-fig. 66
from the hard top’s upholstery by un-
doing fixing screws B.
3) Disconnect the heated rear win-
dow’s electrical connector from the
connector located under the left side
panel.
4) Push red safety buttons A-fig. 67
upwards and release levers B.
5)Release hooks Cfrom holes D
(for the sole purpose of better show-
ing anchorage points Din fig. 67, the
guard on the car has been removed).6) Working from outside the car,
and with someone else to lend a hand,
raise the hard top and move it back-
wards.
7) Refit side panels A-fig. 66over
the hard top upholstery and fix them
with screws B.
fig. 64
P5S00736m
fig. 65
P5S00737m
fig. 67
P5S00738m
fig. 66
P5S00739m
Page 52 of 170
51
STORAGE
1)Place the hard top on a suitable
rack if possible.
2) Clean and protect the painted
parts by applying protective wax.
3)Sprinkle talcum powder on the
rubber weather-stripping.
4) Clean the interior upholstery, re-
moving dust with a soft brush or vac-
uum cleaner.
5)Cover the hard top with a fabric
or perforated plastic cover. Do not
use imperforated plastic as it will not
allow any moisture on the hard top to
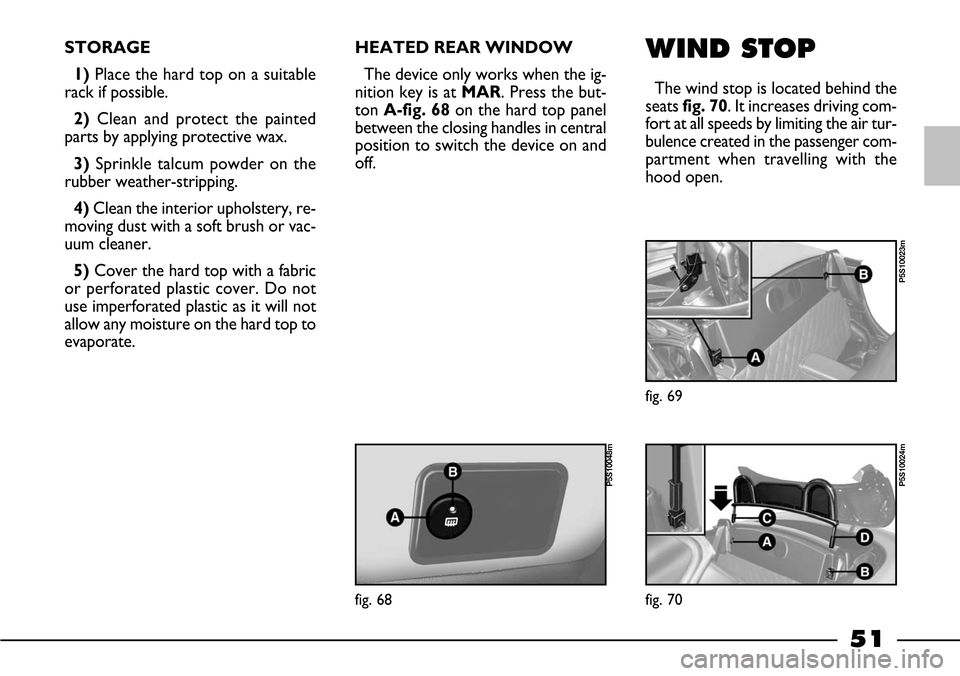
evaporate.HEATED REAR WINDOW
The device only works when the ig-
nition key is at MAR. Press the but-
ton A-fig. 68 on the hard top panel
between the closing handles in central
position to switch the device on and
off. WIND STOP
The wind stop is located behind the
seatsfig. 70. It increases driving com-
fort at all speeds by limiting the air tur-
bulence created in the passenger com-
partment when travelling with the
hood open.
fig. 69
P5S10023m
fig. 68
P5S10048m
fig. 70
P5S10024m