Sound FIAT BRAVO 2008 2.G Owners Manual
[x] Cancel search | Manufacturer: FIAT, Model Year: 2008, Model line: BRAVO, Model: FIAT BRAVO 2008 2.GPages: 246, PDF Size: 4.01 MB
Page 5 of 246
4
SAFETY
DEVICES
CORRECT USE
OF THE CAR
WARNING
LIGHTS AND
MESSAGES
IN AN
EMERGENCY
CAR
MAINTENANCE
TECHNICAL
SPECIFICATIONS
INDEX
DASHBOARD
AND CONTROLSDASHBOARD ...................................................................... 5
INSTRUMENT PANEL ........................................................ 6
SYMBOLS ............................................................................... 8
THE FIAT CODE SYSTEM.................................................. 8
THE KEYS .............................................................................. 10
ALARM ................................................................................... 16
IGNITION DEVICE.............................................................. 19
INSTRUMENTS..................................................................... 20
MULTIFUNCTION DISPLAY ............................................ 22
RECONFIGURABLE MULTIFUNCTION DISPLAY ..... 23
DISPLAY FUNCTIONS........................................................ 28
TRIP COMPUTER ................................................................ 35
SEATS ...................................................................................... 37
HEAD RESTRAINTS............................................................. 39
STEERING WHEEL .............................................................. 40
REARVIEW MIRRORS......................................................... 40
HEATING/CLIMATE CONTROL SYSTEM ................... 42
HEATING AND VENTILATION...................................... 44
MANUAL CLIMATE CONTROL SYSTEM .................... 46
AUTOMATIC TWO-ZONE
CLIMATE CONTROL SYSTEM ........................................ 49
EXTERNAL LIGHTS............................................................. 55
WINDOW WASHING....................................................... 57CRUISE CONTROL ............................................................ 61
CEILING LIGHTS.................................................................. 63
CONTROLS........................................................................... 65
INTERIOR FITTINGS........................................................... 67
SUNROOF.............................................................................. 72
DOORS .................................................................................. 75
POWER WINDOWS ......................................................... 77
BOOT ...................................................................................... 79
BONNET................................................................................. 83
ROOF RACK/SKI RACK .................................................... 84
HEADLIGHTS........................................................................ 85
ABS SYSTEM ......................................................................... 86
ESP SYSTEM .......................................................................... 88
EOBD SYSTEM ..................................................................... 91
SOUND SYSTEM.................................................................. 92
INSTALLATION OF ELECTRIC /
ELECTRONIC DEVICES...................................................... 93
“DUALDRIVE” ELECTRIC POWER
STEERING SYSTEM ............................................................. 94
TYRE PRESSURE MONITORING SYSTEM
(T.P.M.S.).................................................................................. 96
PARKING SENSORS ........................................................... 99
AT THE FILLING STATION ............................................. 102
PROTECTING THE ENVIRONMENT ........................... 104
DD D
A A
S S
H H
B B
O O
A A
R R
D D
A A
N N
D D
C C
O O
N N
T T
R R
O O
L L
S S
001-022 BRAVO GB 29-10-2008 12:36 Pagina 4
Page 6 of 246
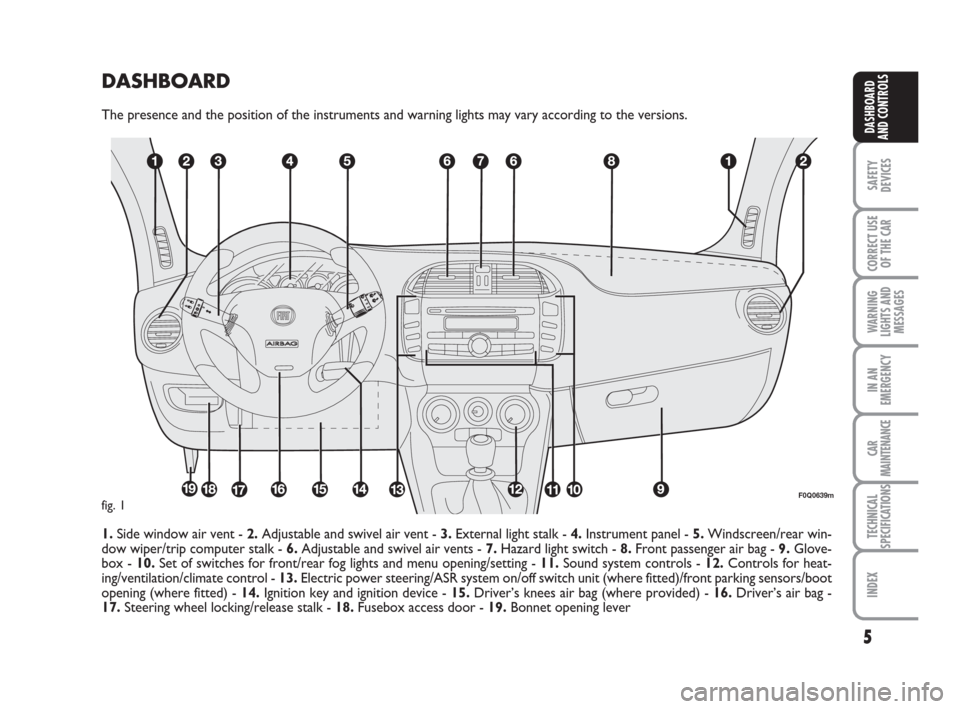
DASHBOARD
The presence and the position of the instruments and warning lights may vary according to the versions.
1.Side window air vent - 2.Adjustable and swivel air vent - 3.External light stalk - 4.Instrument panel - 5.Windscreen/rear win-
dow wiper/trip computer stalk - 6.Adjustable and swivel air vents - 7.Hazard light switch - 8.Front passenger air bag - 9.Glove-
box - 10.Set of switches for front/rear fog lights and menu opening/setting - 11.Sound system controls - 12.Controls for heat-
ing/ventilation/climate control - 13.Electric power steering/ASR system on/off switch unit (where fitted)/front parking sensors/boot
opening (where fitted) - 14.Ignition key and ignition device - 15.Driver’s knees air bag (where provided) - 16.Driver’s air bag -
17.Steering wheel locking/release stalk - 18.Fusebox access door - 19.Bonnet opening lever
5
SAFETY
DEVICES
CORRECT USE
OF THE CAR
WARNING
LIGHTS AND
MESSAGES
IN AN
EMERGENCY
CAR
MAINTENANCE
TECHNICAL
SPECIFICATIONS
INDEX
DASHBOARD
AND CONTROLS
F0Q0639mfig. 1
001-022 BRAVO GB 29-10-2008 12:36 Pagina 5
Page 17 of 246
16
SAFETY
DEVICES
CORRECT USE
OF THE CAR
WARNING
LIGHTS AND
MESSAGES
IN AN
EMERGENCY
CAR
MAINTENANCE
TECHNICAL
SPECIFICATIONS
INDEX
DASHBOARD
AND CONTROLS
ALARM
(where provided)
The alarm function is provided in addition
to all remote control functions previous-
ly described and it is controlled by the re-
ceiver located under the dashboard, next
to the fuse box.WHEN THE ALARM
IS TRIGGERED
The alarm comes into action in the fol-
lowing cases:
❒unlawful opening of one of the doors,
bonnet or boot (perimetral protec-
tion);
❒attempt to start the engine (turning the
ignition key to MAR);
❒battery cable cutting;
❒presence of moving bodies in the pas-
senger’s compartment (volumetric pro-
tection);
❒abnormal raising/sloping of the car. Depending on the markets, the cutting in
of the alarm causes operation of the siren
and direction indicators (for about 26 sec-
onds). The ways of operating and the num-
ber of cycles may vary depending on the
markets.
A maximum number of sound/sight cycles
is however envisaged.
The volume sensing and anti-lift protec-
tions may be turned off by operating the
control on the front courtesy light (see
“Volume-sensing/anti-lift protection” para-
graph).
IMPORTANT The engine immobiliser
function is guaranteed by the Fiat CODE
system, which is automatically activated
when the ignition key is removed.
001-022 BRAVO GB 29-10-2008 12:36 Pagina 16
Page 18 of 246
17
SAFETY
DEVICES
CORRECT USE
OF THE CAR
WARNING
LIGHTS AND
MESSAGES
IN AN
EMERGENCY
CAR
MAINTENANCE
TECHNICAL
SPECIFICATIONS
INDEX
DASHBOARD
AND CONTROLS
HOW TO ACTIVATE THE ALARM
With the doors, bonnet and boot shut and
the ignition key in the STOPposition or
with the key removed, point the key with
remote control in the direction of the car,
then press and release the button
Á.
With the exception of certain markets,
the system sounds a “beep” and the doors
are locked.
Engagement of the alarm is preceded by
a self-diagnostic test. If a fault is detected
the system sounds a further warning
“beep” and the display shows the relevant
message (see section “Warning lights and
messages”).
In this case, switch the alarm system off by
pressing button
Ë, check that the doors,
bonnet and tailgate are properly shut, then
switch the alarm on again by pressing but-
ton
Á.
Otherwise, the door, bonnet or tailgate
that is not shut properly will be excluded
from the alarm system control.If the doors, bonnet and boot are shut
correctly and the control signal is repeat-
ed, the system self-diagnostics has de-
tected a system operating fault. It is there-
fore necessary to contact Fiat Dealership.
IMPORTANT When operating the cen-
tral door locking with the metal insert of
the key, the alarm is not activated.
IMPORTANT The electronic alarm is built
in compliance with the law and regulations
of the different countries.HOW TO DEACTIVATE
THE ALARM
Press button
Ëof the key with remote
control.
The system will react as follows (with the
exception of certain markets):
❒two brief flashes of the direction indi-
cators;
❒two brief “beeps”;
❒door unlocking.
IMPORTANT Operating the central door
locking with the metal insert of the key
will not deactivate the alarm.
001-022 BRAVO GB 29-10-2008 12:36 Pagina 17
Page 20 of 246
19
SAFETY
DEVICES
CORRECT USE
OF THE CAR
WARNING
LIGHTS AND
MESSAGES
IN AN
EMERGENCY
CAR
MAINTENANCE
TECHNICAL
SPECIFICATIONS
INDEX
DASHBOARD
AND CONTROLS
IGNITION SWITCH
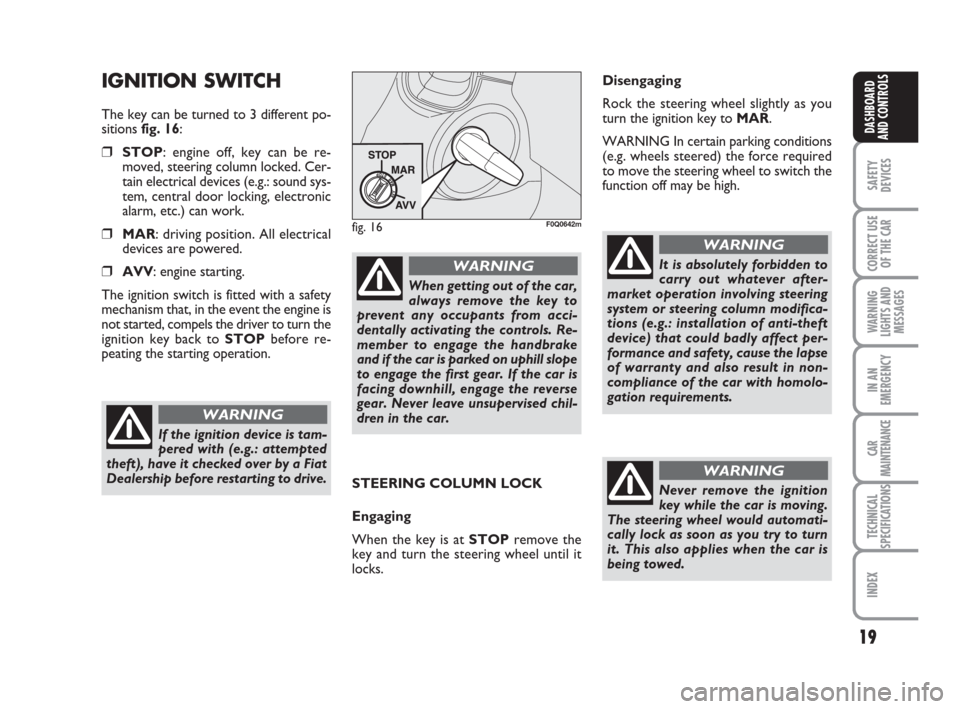
The key can be turned to 3 different po-
sitions fig. 16:
❒STOP: engine off, key can be re-
moved, steering column locked. Cer-
tain electrical devices (e.g.: sound sys-
tem, central door locking, electronic
alarm, etc.) can work.
❒MAR: driving position. All electrical
devices are powered.
❒AVV: engine starting.
The ignition switch is fitted with a safety
mechanism that, in the event the engine is
not started, compels the driver to turn the
ignition key back to STOPbefore re-
peating the starting operation.
STEERING COLUMN LOCK
Engaging
When the key is at STOPremove the
key and turn the steering wheel until it
locks.
fig. 16F0Q0642m
If the ignition device is tam-
pered with (e.g.: attempted
theft), have it checked over by a Fiat
Dealership before restarting to drive.
WARNING
When getting out of the car,
always remove the key to
prevent any occupants from acci-
dentally activating the controls. Re-
member to engage the handbrake
and if the car is parked on uphill slope
to engage the first gear. If the car is
facing downhill, engage the reverse
gear. Never leave unsupervised chil-
dren in the car.
WARNINGIt is absolutely forbidden to
carry out whatever after-
market operation involving steering
system or steering column modifica-
tions (e.g.: installation of anti-theft
device) that could badly affect per-
formance and safety, cause the lapse
of warranty and also result in non-
compliance of the car with homolo-
gation requirements.
WARNING
Never remove the ignition
key while the car is moving.
The steering wheel would automati-
cally lock as soon as you try to turn
it. This also applies when the car is
being towed.
WARNING
Disengaging
Rock the steering wheel slightly as you
turn the ignition key to MAR.
WARNING In certain parking conditions
(e.g. wheels steered) the force required
to move the steering wheel to switch the
function off may be high.
001-022 BRAVO GB 29-10-2008 12:36 Pagina 19
Page 29 of 246
28
SAFETY
DEVICES
CORRECT USE
OF THE CAR
WARNING
LIGHTS AND
MESSAGES
IN AN
EMERGENCY
CAR
MAINTENANCE
TECHNICAL
SPECIFICATIONS
INDEX
DASHBOARD
AND CONTROLS
Speed Beep (Speed limit)
With this function it is possible to set the
car speed limit (km/h or mph); when this
limit is exceeded the driver is immediate-
ly alerted (see section “Warning lights and
messages”).
To set the speed limit, proceed as follows:
– briefly press button MODE, the display
will show wording (Speed Beep);
– press button
Õor Ôto select activa-
tion (On) or deactivation (Off) of the
speed limit;
– if selecting (On), press button
Õor Ôto select the required speed limit and then
press MODEto confirm.
NoteThe possible setting is between 30
and 200 km/h, or between 20 and 125
mph depending on the unit set previous-
ly (see “Distance unit (Dist. Unit)” para-
graph described later. Every press on but-
ton
Õ/Ôincreases/decreases by 5 units.
Keeping the button Õ/Ôpressed obtains
the automatic fast increase or decrease.
When you are near the required setting
complete adjustment by single presses.– briefly press button MODEto go back
to the menu screen or press the button
for long to go back to the standard screen
without storing settings.
To cancel the setting, proceed as follows:
– briefly press button MODE: (On) will
flash on the display;
– press button
Ô: (Off) will flash on the
display;
– briefly press button MODEto go back
to the menu screen or press the button
for long to go back to the standard screen
without storing settings. Dimmer (Passenger compartment
control light rheostat)
(only with side/taillights on)
With this function it is possible to adjust
brightness of the instrument panel and of
buttons and controls of sound system and
automatic climate control system (where
provided) according to 8 levels (with
side/taillights on).
To adjust brightness proceed as follows:
– briefly press button MODE, the previ-
ously set level will flash on the display;
– press button
Õor Ôto adjust the
brightness level;
– briefly press button MODEto go back
to the menu screen or press the button
for long to go back to the standard screen
without storing settings.
DISPLAY FUNCTIONS
(see Multifunctional Display or Reconfigurable Multifunctional Display)
023-036 BRAVO GB 29-10-2008 12:36 Pagina 28
Page 32 of 246
31
SAFETY
DEVICES
CORRECT USE
OF THE CAR
WARNING
LIGHTS AND
MESSAGES
IN AN
EMERGENCY
CAR
MAINTENANCE
TECHNICAL
SPECIFICATIONS
INDEX
DASHBOARD
AND CONTROLS
See radio (Audio repetition)
With this function the display repeats in-
formation relevant to the sound system.
– Radio: selected radio station frequency
or RDS message, automatic tuning acti-
vation or AutoSTore;
– audio CD, MP3 CD: track number;
– CD Changer: CD number and track
number;
To activate (On) or to deactivate (Off)
sound system info displaying proceed as
follows:
– briefly press button MODE: On or Off
will flash on the display according to pre-
vious setting;
– press button
Õor Ôto select the re-
quired level;
– briefly press button MODEto go back
to the menu screen or press the button
for long to go back to the standard screen
without storing settings.Autoclose (Automatic central
door locking when travelling)
When activated (On), this function locks
automatically the doors when the car
speed exceeds 20 km/h.
To activate or to deactivate this function
proceed as follows:
– briefly press button MODEto display
the submenu;
– briefly press button MODE: On or Off
will flash on the display according to pre-
vious setting;
– press button
Õor Ôto select the re-
quired level;
– briefly press button MODEto go back
to the menu screen or press the button
for long to go back to the standard screen
without storing settings;
– Press again button MODEfor long to
go back to the standard screen or to the
main menu according to the current menu
level.Units (Setting units)
With this function it is possible to set the
units through three submenus: “Dis-
tances”, “Consumption” and “Tempera-
ture”.
To set the required unit proceed as fol-
lows:
– briefly press button MODE, the display
will show the three submenus;
– press button
Õor Ôto scroll the three
submenus;
– select the required submenu and then
press briefly button MODE;
– if selecting “Distances”: pressing button
MODEbriefly, the display will show “km”
or “mi” according to previous setting;
– press button
Õor Ôto select the re-
quired level;
– if selecting “Consumption”: briefly press
button MODEthe display will show
“km/l”, “l/100km” or “mpg” according to
previous setting;
023-036 BRAVO GB 29-10-2008 12:36 Pagina 31
Page 93 of 246
92
SAFETY
DEVICES
CORRECT USE
OF THE CAR
WARNING
LIGHTS AND
MESSAGES
IN AN
EMERGENCY
CAR
MAINTENANCE
TECHNICAL
SPECIFICATIONS
INDEX
DASHBOARD
AND CONTROLS
SOUND SYSTEM
(where provided)
For the operation of the radio with CD/
MP3 CD player (where provided), read
the instructions for use given in the Sup-
plement attached to this Owner Hand-
book.
fig. 102F0Q0691m
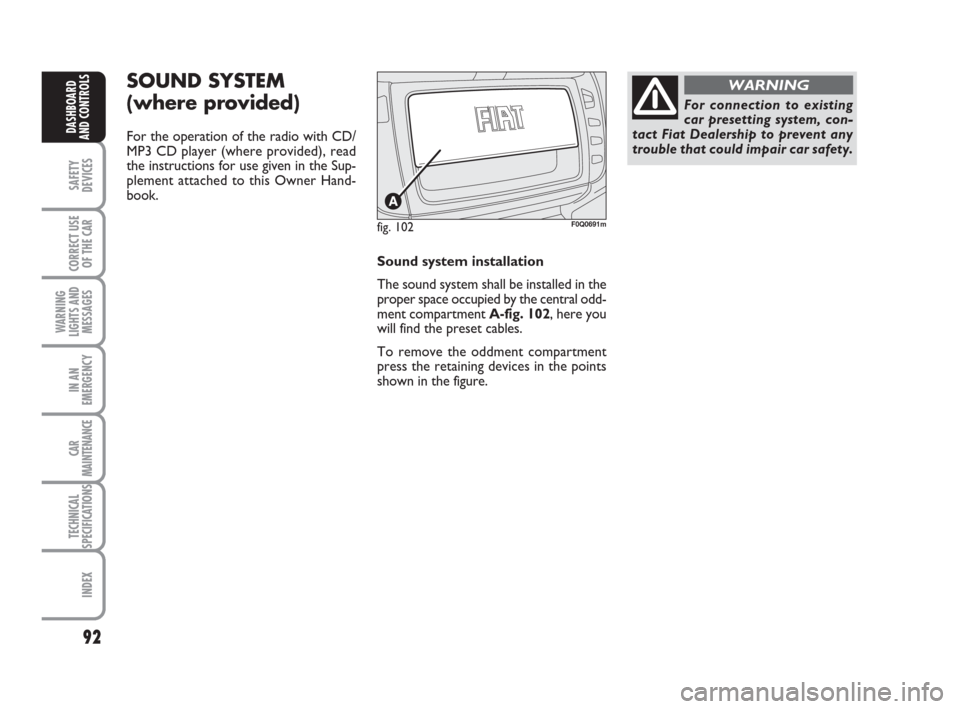
Sound system installation
The sound system shall be installed in the
proper space occupied by the central odd-
ment compartment A-fig. 102, here you
will find the preset cables.
To remove the oddment compartment
press the retaining devices in the points
shown in the figure.
For connection to existing
car presetting system, con-
tact Fiat Dealership to prevent any
trouble that could impair car safety.
WARNING
083-104 BRAVO GB 29-10-2008 12:37 Pagina 92
Page 100 of 246
PARKING SENSORS
(where provided)
Parking sensors inform the driver about
the presence of obstacles behind the car
(versions fitted with 4 rear sensors) or be-
hind and in front of the car (versions fit-
ted with 4 rear sensors and 4 front sen-
sors).
This system is therefore an aid for the dri-
ver when parking the car since it detects
obstacles out of the driver’s sight range.
The driver is warned of the presence and
distance from the obstacle by an inter-
mittent buzzer (the sound of the buzzer
becomes more frequent as the reduction
of distance between the car and the ob-
stacle decreases).
SENSORS
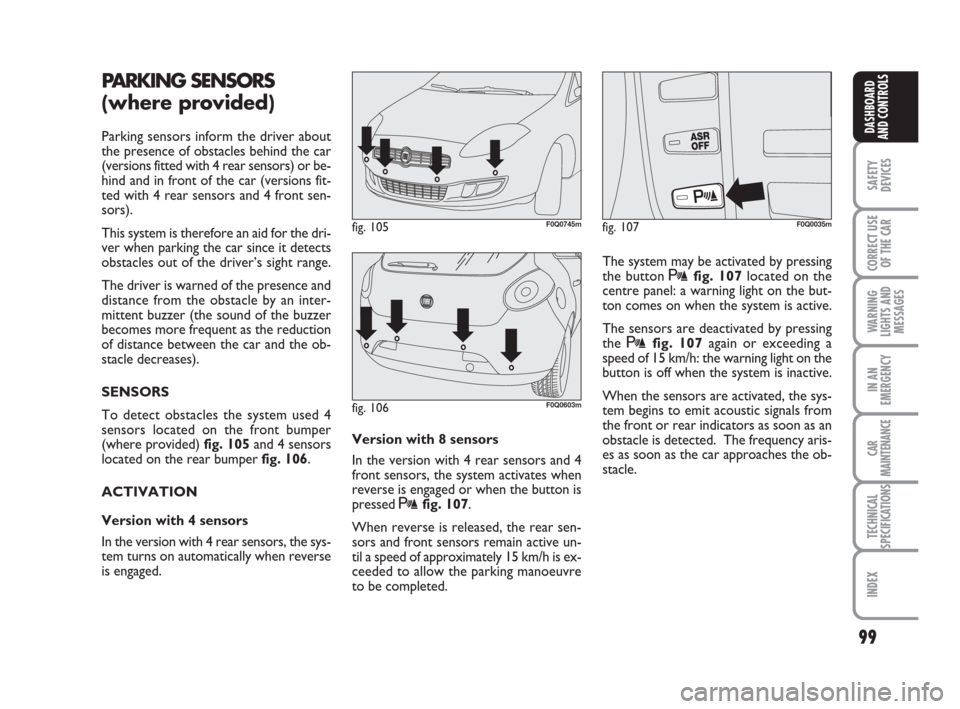
To detect obstacles the system used 4
sensors located on the front bumper
(where provided) fig. 105and 4 sensors
located on the rear bumper fig. 106.
ACTIVATION
Version with 4 sensors
In the version with 4 rear sensors, the sys-
tem turns on automatically when reverse
is engaged.
99
SAFETY
DEVICES
CORRECT USE
OF THE CAR
WARNING
LIGHTS AND
MESSAGES
IN AN
EMERGENCY
CAR
MAINTENANCE
TECHNICAL
SPECIFICATIONS
INDEX
DASHBOARD
AND CONTROLS
Version with 8 sensors
In the version with 4 rear sensors and 4
front sensors, the system activates when
reverse is engaged or when the button is
pressed tfig. 107.
When reverse is released, the rear sen-
sors and front sensors remain active un-
til a speed of approximately 15 km/h is ex-
ceeded to allow the parking manoeuvre
to be completed.The system may be activated by pressing
the button tfig. 107located on the
centre panel: a warning light on the but-
ton comes on when the system is active.
The sensors are deactivated by pressing
the tfig. 107again or exceeding a
speed of 15 km/h: the warning light on the
button is off when the system is inactive.
When the sensors are activated, the sys-
tem begins to emit acoustic signals from
the front or rear indicators as soon as an
obstacle is detected. The frequency aris-
es as soon as the car approaches the ob-
stacle.
fig. 105F0Q0745m
fig. 106F0Q0603m
fig. 107F0Q0035m
083-104 BRAVO GB 29-10-2008 12:37 Pagina 99
Page 101 of 246
100
SAFETY
DEVICES
CORRECT USE
OF THE CAR
WARNING
LIGHTS AND
MESSAGES
IN AN
EMERGENCY
CAR
MAINTENANCE
TECHNICAL
SPECIFICATIONS
INDEX
DASHBOARD
AND CONTROLS
BUZZER WARNINGS
The driver is warned of the presence and
distance from the obstacle by the buzzers
installed in the passenger compartment:
❒in versions with 4 rear sensors, a
buzzer located in the front dashboard
area warns of the presence of rear ob-
stacles;
❒In versions with 8 rear sensors (4 front
and 4 rear) a front buzzer warns of the
presence of front obstacles and a
buzzer at the rear warns of the pres-
ence of rear obstacles. This feature
gives the driver a sense of directional-
ity (front/rear) about the presence of
obstacles.
When the reverse gear is engaged an in-
termittent acoustic signal is automatically
activated.
The acoustic signal:
❒becomes louder as the reduction of
distance between the car and the ob-
stacle decreases;
❒becomes continuous when the distance
between the car and the obstacle is less
that 30 cm and stops immediately if the
distance raises;
❒is constant if the distance is unvaried. If
this situation takes place for side sen-
sors, the signal is stopped after about
3 seconds to prevent sound indications
when performing manoeuvres near
walls.
For proper operation, the
parking sensors set on the
bumpers shall be clean from
mud, dirt, snow or ice. When
cleaning the sensors, take the utmost
care to prevent their damaging; do not
use therefore dry or rough clothes. Sen-
sors shall be washed with clean water
and car detergent, if required. In wash-
ing stations, clean sensors quickly keep-
ing the vapour jet/high pressure wash-
ing nozzles at 10 cm at least from the
sensors.
Any repainting of bumpers or
touch/up in sensor areas shall
be carried out at Fiat Dealer-
ship only. Improper painting
could impair the regular operation of
parking sensors.
Parking manoeuvres howev-
er are always under the dri-
ver’s responsibility that shall always
check the absence of people (special-
ly children) or animals in the ma-
noeuvre space. This system is just a
help for the driver but she/he shall nev-
er reduce attention during dangerous
manoeuvres even if performed at low
speed.
WARNING
When the obstacle is located at a distance
of less than 30 cm, the device emits a con-
tinuous sound. Depending on the position
of the obstacle (in front or behind) the
sound is emitted by the corresponding
acoustic indicators (front or rear). The ob-
stacle closest to the vehicle is indicated
in all cases.
The beep will stop immediately if the dis-
tance raises. Beep tone is constant if the
distance detected by central sensors is un-
varied. If this situation takes place for side
sensors, the signal is stopped after about
3 seconds to prevent sound indications
when performing manoeuvres near walls.
083-104 BRAVO GB 29-10-2008 12:37 Pagina 100