sensor FIAT BRAVO 2012 2.G User Guide
[x] Cancel search | Manufacturer: FIAT, Model Year: 2012, Model line: BRAVO, Model: FIAT BRAVO 2012 2.GPages: 299, PDF Size: 5.81 MB
Page 102 of 299
The light will stay on for about 15 minutes after
turning the key to STOP: if during this time, a door
or the tailgate is opened, the light will switch on
again for 15 minutes.
Opening the tailgate using the key with
remote control
Press button
even with the alarm on (for
versions/markets, where provided). Luggage
compartment opening is indicated by the double
flashing of the direction indicators; tailgate closing is
indicated by single flashing (only with the alarm
switched on). If the tailgate is opened when the
alarm is fitted, the system will:
❒switch off the volume sensing protection;
❒switch off the anti-lift protection;
❒switch off the tailgate control sensor.
When the tailgate is closed again, all the functions
are restored.
CLOSING
Lower the tailgate, pressing near the lock until you
hear it click into place.
Do not fit additional objects onto the
rear parcel shelf or tailgate (speakers,
spoilers, etc .), except when contemplated
by the manufacturer, to ensure the correct
operation of the side gas shock absorbers of the
tailgate itself.
WARNING
Never exceed the maximum allowed
load in the luggage compar tment (see
the "Technical data" chapter). Also make sure
that the objects you placed in the luggage
compar tment have been properly secured, to
avoid them from being projected forward
following sudden braking, causing injury to
passengers.
WARNING
When travelling, do not put any object
on the rear parcel shelf because they
can injure passengers in the event of an
accident or sudden braking.
EXTENDING THE LUGGAGE
COMPARTMENT
The luggage compartment can be partially (1/3 or
2/3) or totally extended by splitting the rear seat.
Partial extension (1/3 or 2/3) Fig. fig. 88-
fig. 89
Extending the luggage compartment on the right
side makes it possible to carry two passengers
on the left part of the rear seat. Extending the left
98GETTING TO
KNOW YOUR CAR
SAFETY
STARTING AND
DRIVING
WARNING LIGHTS
AND MESSAGES
IN AN EMERGENCY
SERVICING AND
MAINTENANCE
TECHNICAL
SPECIFICATIONS
INDEX
Page 118 of 299
❒engine stopping by Start&Stop system for over 3
minutes;
❒for versions equipped with automatic climate
control (for versions/markets where provided),
to enable suitable thermal comfort or with
MAX-DEF activation.
If a gear in engaged during stopping with
Start&Stop, the automatic restarting of the engine
is only permitted by fully depressing the clutch
pedal.
The driver is informed by a message on the display
and - for versions/markets, where provided - by
the flashing of the
symbol.
If the clutch is not pressed, about 3 minutes after
the engine stops, the engine can be restarted
only using the ignition key.
In cases of undesired engine stops, due for example
to the clutch pedal being released abruptly with a
gear engaged, if the Start&Stop system is activated,
the engine can be restarted by fully depressing
the clutch pedal.
SAFETY FUNCTIONS
When the engine is stopped by the Start&Stop
system, if the driver releases his/her seat belt and
opens the driver's or passenger's door, the engine
can be restarted only using the ignition key.
The driver is informed by a buzzer and by the
flashing of the symbol
on the display; on some
versions, a message is displayed as well."ENERGY SAVING" FUNCTION
(for versions/markets, where provided)
If, after automatic engine restarting, the driver does
not carry out any action on the car for an
extended period (about 3 minutes), the Start&Stop
system stops the engine definitively, to prevent
fuel consumption. In these cases, the engine can
only be restarted using the ignition key.
NoteIn any case, it is possible to keep the engine
running by deactivating the Start&Stop system.
IRREGULAR OPERATION
In the event of malfunction, the Start&Stop system
is deactivated. The driver is informed of the fault
by the flashing symbol
(versions with
multifunction display) or symbol
(versions with
reconfigurable multifunction display). For
versions/markets, where provided, a warning
message is also displayed. In this case, contact a Fiat
Dealership.
CAR INACTIVITY
In the event of car inactivity, special attention must
be paid to the disconnection of the battery power
supply.
Proceed as follows: detach the connector A (by
pressing button B) from sensor C for monitoring
the status of the battery installed on the negative
114GETTING TO
KNOW YOUR CAR
SAFETY
STARTING AND
DRIVING
WARNING LIGHTS
AND MESSAGES
IN AN EMERGENCY
SERVICING AND
MAINTENANCE
TECHNICAL
SPECIFICATIONS
INDEX
Page 119 of 299
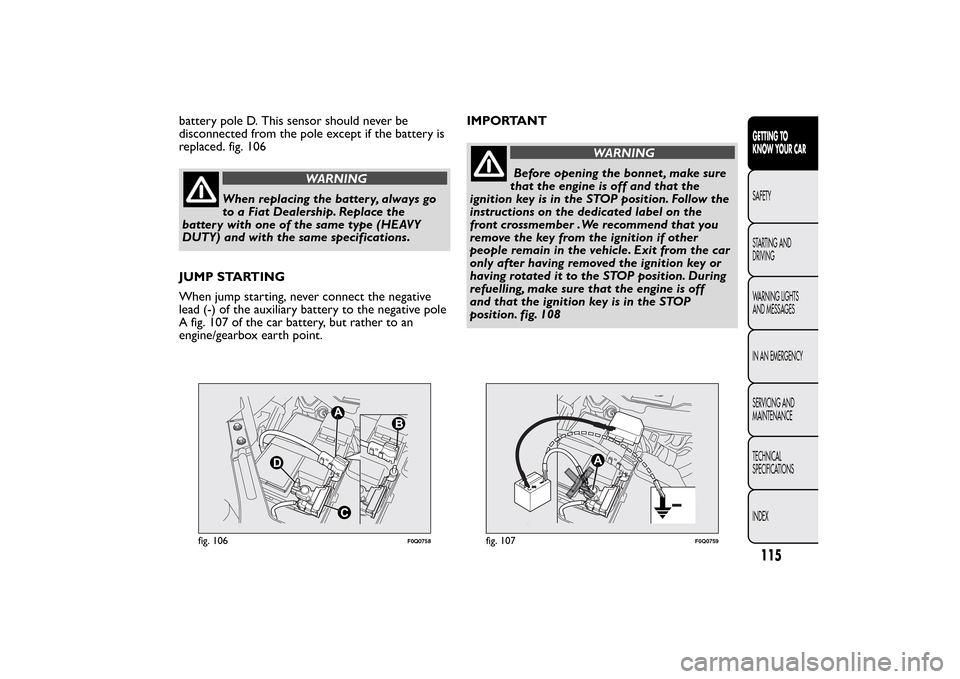
battery pole D. This sensor should never be
disconnected from the pole except if the battery is
replaced. fig. 106
WARNING
When replacing the batter y, always go
to a Fiat Dealership. Replace the
battery with one of the same type (HEAVY
DUTY) and with the same specifications.
JUMP STARTING
When jump starting, never connect the negative
lead (-) of the auxiliary battery to the negative pole
A fig. 107 of the car battery, but rather to an
engine/gearbox earth point.IMPORTANT
WARNING
Before opening the bonnet , make sure
thattheengineisoffandthatthe
ignition key is in the STOP position. Follow the
instructions on the dedicated label on the
front crossmember .We recommend that you
remove the key from the ignition if other
people remain in the vehicle. Exit from the car
only after having removed the ignition key or
having rotated it to the STOP position. During
refuelling, make sure that the engine is off
and that the ignition key is in the STOP
position. fig. 108
fig. 106
F0Q0758
fig. 107
F0Q0759
115GETTING TO
KNOW YOUR CARSAFETY
STARTING AND
DRIVING
WARNING LIGHTS
AND MESSAGES
IN AN EMERGENCY
SERVICING AND
MAINTENANCE
TECHNICAL
SPECIFICATIONS
INDEX
Page 125 of 299
WARNING
Before starting any servicing operation,
stop the engine and remove the key
from the ignition switch to operate the
steering lock, particularly when the wheels do
not touch the ground. If this is not possible
(for example if the key needs to be turned to
MAR-ON or the engine must be running),
remove the main fuse that protects the
electric power steering.
TYRE PRESSURE MONITORING
SYSTEM TPMS(Tyre Pressure Monitoring System)
(for versions/markets, where provided)
The car may be fitted with a tyre pressure
monitoring system (TPMS), which informs the
driver of the tyre inflation status via the "Check
tyre pressure" and "Low tyre pressure" messages
on the display. For a detailed description of the two
messages, see "Warning lights and messages"
chapter. This system comprises a radio frequency
transmitter fitted to each wheel (on the wheel rim
inside the tyre), which is able to send information
on the tyre inflation pressure of each wheel to
the control unit.
WARNING
The presence of TPMS does not
exonerate the driver from regularly
checking the pressure of the tyres and the
spare wheel (see "Wheels" in the
"Maintenance and care" chapter).
WARNING
Sensor malfunctioning fault indications are not
stored and will therefore not be displayed after the
engine has been switched off and then on again. If
the fault conditions persist, the control unit will
121GETTING TO
KNOW YOUR CARSAFETY
STARTING AND
DRIVING
WARNING LIGHTS
AND MESSAGES
IN AN EMERGENCY
SERVICING AND
MAINTENANCE
TECHNICAL
SPECIFICATIONS
INDEX
Page 126 of 299
send the relative indications to the instrument
panel only after the vehicle has been in motion for a
short time.
Tyre pressure must be checked with tyres rested
and cold. Should it become necessary for whatever
reason to check pressure with warm tyres, do
not reduce pressure even though it is higher than
the prescribed value, but repeat the check when
tyres are cold (see "Wheels" in the "Technical data"
chapter).
The TPMS cannot indicate sudden tyre pressure
drops (for example when a tyre bursts). In this
case, stop the car, braking with caution and avoiding
abrupt steering.
Strong radio-frequency interference could inhibit
the correct operation of the TPMS. This condition
is indicated to the driver by the
warning light
or the symbol lighting up on the instrument panel
together with a message on the display. The
message will disappear automatically as soon as the
interference ceases to affect the system.
The TPMS requires the use of specific equipment.
Contact a Fiat Dealership to find out which
accessories are compatible with the system
(wheels, hub caps, etc.). Using other accessories
may hinder the normal operation of the system.
Given the valve unique specifications, only use
Fiat-approved sealers to repair the tyres. The use of
other sealers may affect the normal operation of
the system.If the vehicle is fitted with TPMS, when a tyre is
removed, it is advisable to replace the rubber
gasket for the valve as well as the ring nut fixing the
sensor. Have this operation performed at a Fiat
Dealership.
If the "punctured tyre" indication persists on the
instrument panel after the initial conditions have
been restored using the Fix&Go Automatic tyre
repair kit, contact a Fiat Dealership.
Changes in outside temperature may cause tyre
pressures to vary. The TPMS may temporarily
indicate insufficient pressure. In this case, check the
tyre pressure when cold and, if necessary, restore
the inflation values.
If the vehicle is fitted with TPMS, tyre and/or rims
fitting/removal operations require specific
precautions. To avoid damaging the sensors or
fitting them incorrectly, tyre and/or rims
fitting/removal operations should be carried out
only by specialists. Contact a Fiat Dealership.
122GETTING TO
KNOW YOUR CAR
SAFETY
STARTING AND
DRIVING
WARNING LIGHTS
AND MESSAGES
IN AN EMERGENCY
SERVICING AND
MAINTENANCE
TECHNICAL
SPECIFICATIONS
INDEX
Page 127 of 299
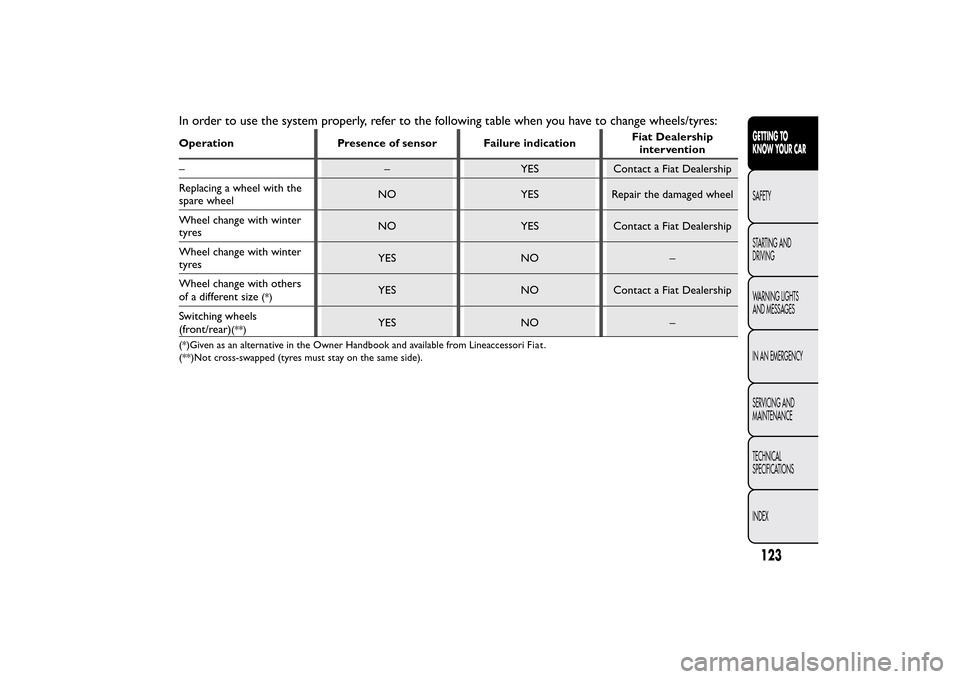
In order to use the system properly, refer to the following table when you have to change wheels/tyres:Operation Presence of sensor Failure indicationFiat Dealership
intervention
– – YES Contact a Fiat Dealership
Replacing a wheel with the
spare wheelNO YES Repair the damaged wheel
Wheel change with winter
tyresNO YES Contact a Fiat Dealership
Wheel change with winter
tyresYES NO –
Wheel change with others
of a different size
(*)
YES NO Contact a Fiat Dealership
Switching wheels
(front/rear)
(**)
YES NO –
(*)Given as an alternative in the Owner Handbook and available from LineaccessoriFiat.
(**)Not cross-swapped (tyres must stay on the same side).
123GETTING TO
KNOW YOUR CARSAFETY
STARTING AND
DRIVING
WARNING LIGHTS
AND MESSAGES
IN AN EMERGENCY
SERVICING AND
MAINTENANCE
TECHNICAL
SPECIFICATIONS
INDEX
Page 128 of 299
PARKING SENSORS(for versions/markets, where provided)
Parking sensors provide the driver with information
on the distance when approaching obstacles
behind the vehicle (versions with 4 rear sensors) or
in front of and behind the vehicle (versions with 4
front and 4 rear sensors).
The system therefore provides a further aid during
parking manoeuvres because it allows the
identification of obstacles outside of the driver's
field of vision.
The driver is notified of the presence and distance
of the obstacle from the vehicle by an acoustic
signal which varies depending on the distance from
the obstacle (as the distance from the obstacle
decreases the frequency of the acoustic signal
increases).
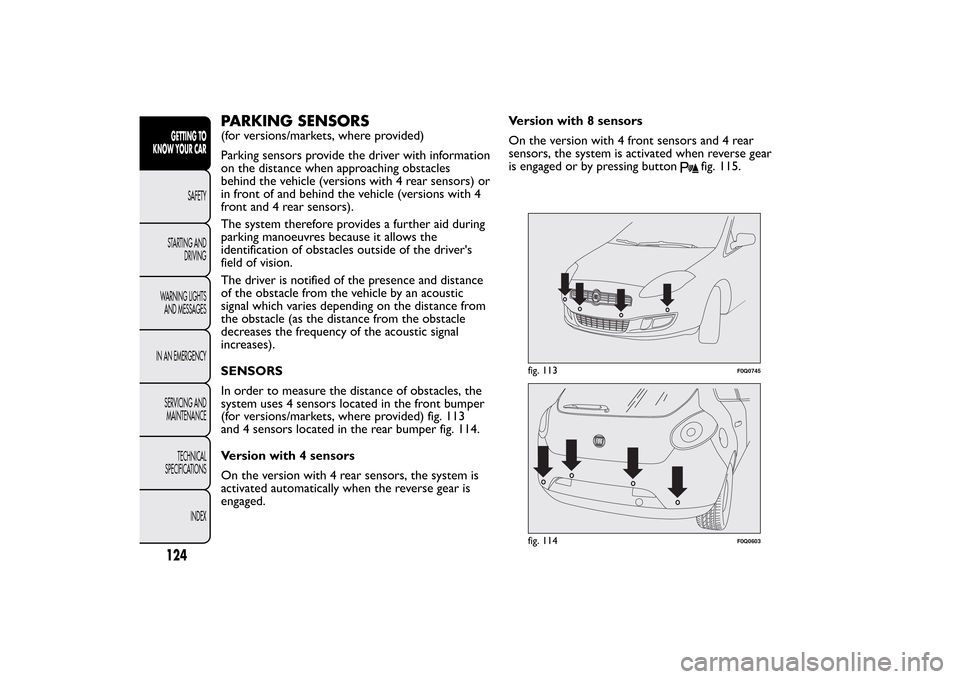
SENSORS
In order to measure the distance of obstacles, the
system uses 4 sensors located in the front bumper
(for versions/markets, where provided) fig. 113
and 4 sensors located in the rear bumper fig. 114.
Version with 4 sensors
On the version with 4 rear sensors, the system is
activated automatically when the reverse gear is
engaged.Version with 8 sensors
On the version with 4 front sensors and 4 rear
sensors, the system is activated when reverse gear
is engaged or by pressing button
fig. 115.
fig. 113
F0Q0745
fig. 114
F0Q0603
124GETTING TO
KNOW YOUR CAR
SAFETY
STARTING AND
DRIVING
WARNING LIGHTS
AND MESSAGES
IN AN EMERGENCY
SERVICING AND
MAINTENANCE
TECHNICAL
SPECIFICATIONS
INDEX
Page 129 of 299
When reverse gear is released, the front and rear
sensors remain activated until a speed of around 15
km/h is exceeded to allow the parking manoeuvre
to be completed.
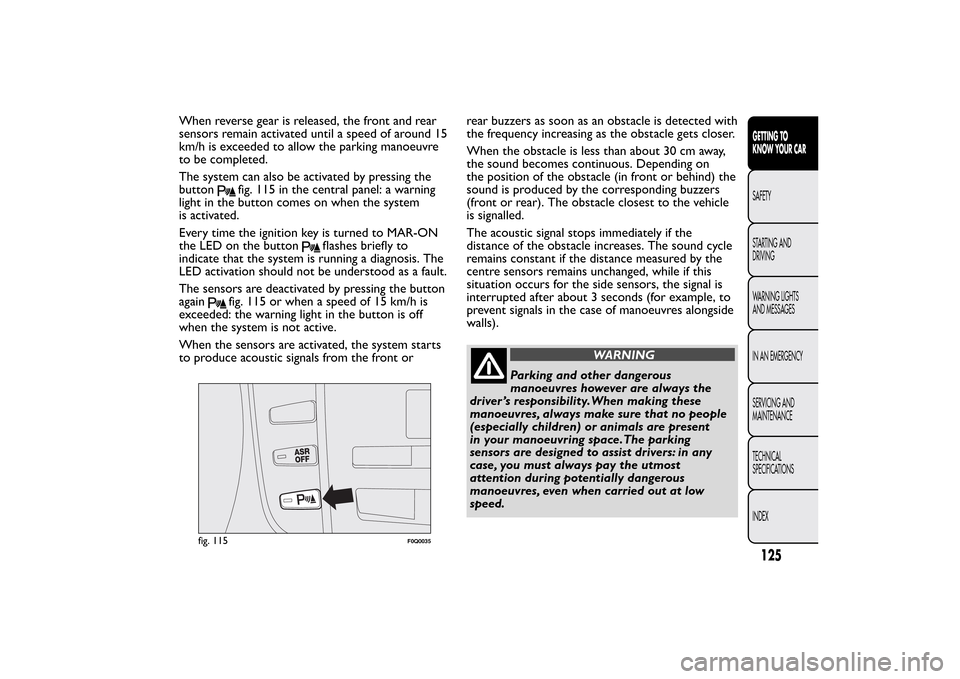
The system can also be activated by pressing the
button
fig. 115 in the central panel: a warning
light in the button comes on when the system
is activated.
Every time the ignition key is turned to MAR-ON
the LED on the button
flashes briefly to
indicate that the system is running a diagnosis. The
LED activation should not be understood as a fault.
The sensors are deactivated by pressing the button
again
fig. 115 or when a speed of 15 km/h is
exceeded: the warning light in the button is off
when the system is not active.
When the sensors are activated, the system starts
to produce acoustic signals from the front orrear buzzers as soon as an obstacle is detected with
the frequency increasing as the obstacle gets closer.
When the obstacle is less than about 30 cm away,
the sound becomes continuous. Depending on
the position of the obstacle (in front or behind) the
sound is produced by the corresponding buzzers
(front or rear). The obstacle closest to the vehicle
is signalled.
The acoustic signal stops immediately if the
distance of the obstacle increases. The sound cycle
remains constant if the distance measured by the
centre sensors remains unchanged, while if this
situation occurs for the side sensors, the signal is
interrupted after about 3 seconds (for example, to
prevent signals in the case of manoeuvres alongside
walls).
WARNING
Parking and other dangerous
manoeuvres however are always the
driver ’s responsibility.When making these
manoeuvres, always make sure that no people
(especially children) or animals are present
in your manoeuvring space.The parking
sensors are designed to assist drivers: in any
case, you must always pay the utmost
attention during potentially dangerous
manoeuvres, even when carried out at low
speed.
fig. 115
F0Q0035
125GETTING TO
KNOW YOUR CARSAFETY
STARTING AND
DRIVING
WARNING LIGHTS
AND MESSAGES
IN AN EMERGENCY
SERVICING AND
MAINTENANCE
TECHNICAL
SPECIFICATIONS
INDEX
Page 130 of 299
ACOUSTIC SIGNAL
The information concerning the presence and
distance of an obstacle from the vehicle is
transmitted by means of acoustic signals from
buzzers installed in the passenger compartment:
❒in the versions with 4 rear sensors, a buzzer
in the front dashboard area warns of the
presence of rear obstacles;
❒in the versions with 8 sensors (4 front and 4 rear
sensors), a front buzzer warns of the presence of
obstacles at the front and a buzzer located at
the rear warns of the presence of obstacles
at the rear. This notifies the driver of the
direction (front/rear) of the obstacles.
When reverse gear is engaged an intermittent
acoustic signal is automatically activated.
The acoustic signal:
❒increases as the distance between the car and the
obstacle decreases;
❒becomes continuous when the distance between
the car and the obstacle is less than 30 cm and
stops immediately if the distance increases;
❒remains constant if the distance remains
unchanged; if this situation concerns the side
sensors, the buzzer will stop after about 3
seconds to avoid, for example, warning
indications in the event of manoeuvres along
walls.
WARNING
For correct operation, sensors must
always be clean from mud, dir t , snow
or ice. Be careful not to scratch or damage the
sensors while cleaning them. Avoid using dr y,
rough or hard cloths.The sensors should be
washed using clean water with the addition of
car shampoo if necessary. In washing stations,
clean sensors quickly keeping the vapour
jet/high pressure washing nozzles at 10 cm at
least from the sensors.
WARNING
Only have the bumpers repainted or
any retouches to the paintwork in the
area of the sensors carried out by a Fiat
Dealership. Incorrect paint application could
affect the operation of the parking sensors.
SENSOR OPERATING RANGE
The sensors allow the system to check the front
part (version with 8 sensors) and rear part of the
vehicle.
Their position covers the middle and side areas of
the front and rear of the vehicle.
126GETTING TO
KNOW YOUR CAR
SAFETY
STARTING AND
DRIVING
WARNING LIGHTS
AND MESSAGES
IN AN EMERGENCY
SERVICING AND
MAINTENANCE
TECHNICAL
SPECIFICATIONS
INDEX
Page 131 of 299
If an obstacle is located in a middle area, it is
detected when the distance is less than about 0.9 m
(front) and 1.40 m (rear).
If the obstacle is located at the side, it is detected
at distances of less than 0.6 m.
OPERATION WITH TRAILER
The operation of the sensors is automatically
deactivated when the trailer's electric cable plug is
inserted in the car's tow hook socket.
The sensors are automatically enabled again when
the trailer's cable plug is removed.
IMPORTANT If you wish to leave the tow hook
fitted when there is no trailer, it is advisable to
contact a Fiat Dealership to have the system
updated because the tow hook could be detected
as an obstacle by the central sensors.
FAILURE INDICATIONS
Any failures in the parking sensor system are
signalled, when reverse gear is engaged, by the
warning light
in the instrument panel lighting up
or by the symbol
together with a message in
the display (see "Warning lights and messages"
chapter).GENERAL WARNINGS
During parking manoeuvres, pay the utmost
attention to any obstacles that could be located
above or below the sensors.
Under certain circumstances close objects located
in front of or behind the car may not be detected
and could therefore cause damage to the car or be
damaged themselves.
The following conditions may influence the
performance of the parking sensor system:
❒Reduced sensor sensitivity and a reduction in the
parking assistance system performance could be
due to the presence on the surface of the sensor
of: ice, snow, mud, thick paint.
❒The sensors may detect a non-existent obstacle
(echo interference) due to mechanical
interference, for example when washing the car,
in rain (strong wind), hail.
❒The signals sent by the sensors can also be
altered by the presence of ultrasonic systems
(e.g. pneumatic brake systems or pneumatic
drills) near the vehicle.
127GETTING TO
KNOW YOUR CARSAFETY
STARTING AND
DRIVING
WARNING LIGHTS
AND MESSAGES
IN AN EMERGENCY
SERVICING AND
MAINTENANCE
TECHNICAL
SPECIFICATIONS
INDEX