tailgate FIAT CROMA 2006 2.G Owners Manual
[x] Cancel search | Manufacturer: FIAT, Model Year: 2006, Model line: CROMA, Model: FIAT CROMA 2006 2.GPages: 240, PDF Size: 7.41 MB
Page 9 of 240
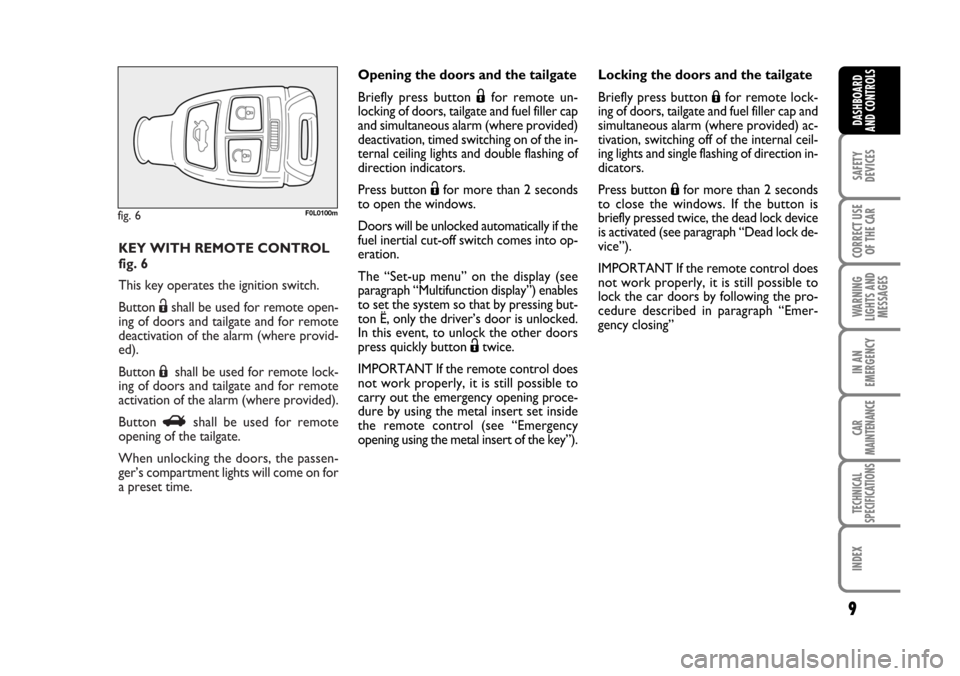
KEY WITH REMOTE CONTROL
fig. 6
This key operates the ignition switch.
Button Ëshall be used for remote open-
ing of doors and tailgate and for remote
deactivation of the alarm (where provid-
ed).
Button Áshall be used for remote lock-
ing of doors and tailgate and for remote
activation of the alarm (where provided).
Button Rshall be used for remote
opening of the tailgate.
When unlocking the doors, the passen-
ger’s compartment lights will come on for
a preset time.
fig. 6F0L0100m
9
SAFETY
DEVICES
CORRECT USE
OF THE CAR
WARNING
LIGHTS AND
MESSAGES
IN AN
EMERGENCY
CAR
MAINTENANCE
TECHNICAL
SPECIFICATIONS
INDEX
DASHBOARD
AND CONTROLS
Opening the doors and the tailgate
Briefly press button Ëfor remote un-
locking of doors, tailgate and fuel filler cap
and simultaneous alarm (where provided)
deactivation, timed switching on of the in-
ternal ceiling lights and double flashing of
direction indicators.
Press button Ëfor more than 2 seconds
to open the windows.
Doors will be unlocked automatically if the
fuel inertial cut-off switch comes into op-
eration.
The “Set-up menu” on the display (see
paragraph “Multifunction display”) enables
to set the system so that by pressing but-
ton Ë, only the driver’s door is unlocked.
In this event, to unlock the other doors
press quickly button Ëtwice.
IMPORTANT If the remote control does
not work properly, it is still possible to
carry out the emergency opening proce-
dure by using the metal insert set inside
the remote control (see “Emergency
opening using the metal insert of the key”).Locking the doors and the tailgate
Briefly press button Áfor remote lock-
ing of doors, tailgate and fuel filler cap and
simultaneous alarm (where provided) ac-
tivation, switching off of the internal ceil-
ing lights and single flashing of direction in-
dicators.
Press button Áfor more than 2 seconds
to close the windows. If the button is
briefly pressed twice, the dead lock device
is activated (see paragraph “Dead lock de-
vice”).
IMPORTANT If the remote control does
not work properly, it is still possible to
lock the car doors by following the pro-
cedure described in paragraph “Emer-
gency closing”
001-030 Croma TRW GB 20-11-2006 14:58 Pagina 9
Page 10 of 240
Used batteries are harmful to
the environment. They should
be disposed of as specified by
law in the special containers
provided, or take them to a Fiat Deal-
ership, which will deal with their dis-
posal.
10
SAFETY
DEVICES
CORRECT USE
OF THE CAR
WARNING
LIGHTS AND
MESSAGES
IN AN
EMERGENCY
CAR
MAINTENANCE
TECHNICAL
SPECIFICATIONS
INDEX
DASHBOARD
AND CONTROLS
Opening the tailgate
by the remote control
Press button
Rto open the tailgate by
remote control even if the alarm (where
provided) is on.
Opening the tailgate is accompanied by the
direction indicators flashing twice; clos-
ing is accompanied by a single flash (only
if the alarm is on).
If the alarm is on, when the tailgate is
opened the alarm system switches off vol-
umetric protection and the tailgate
perimetral protection sensor.
When closing the tailgate again, volumet-
ric and perimetral protection sensors are
restored.
IMPORTANT If the remote control does
not work properly, it is however possi-
ble to open the tailgate through the me-
chanical lever set on the lock inside the
boot (see paragraph “Boot” in this sec-
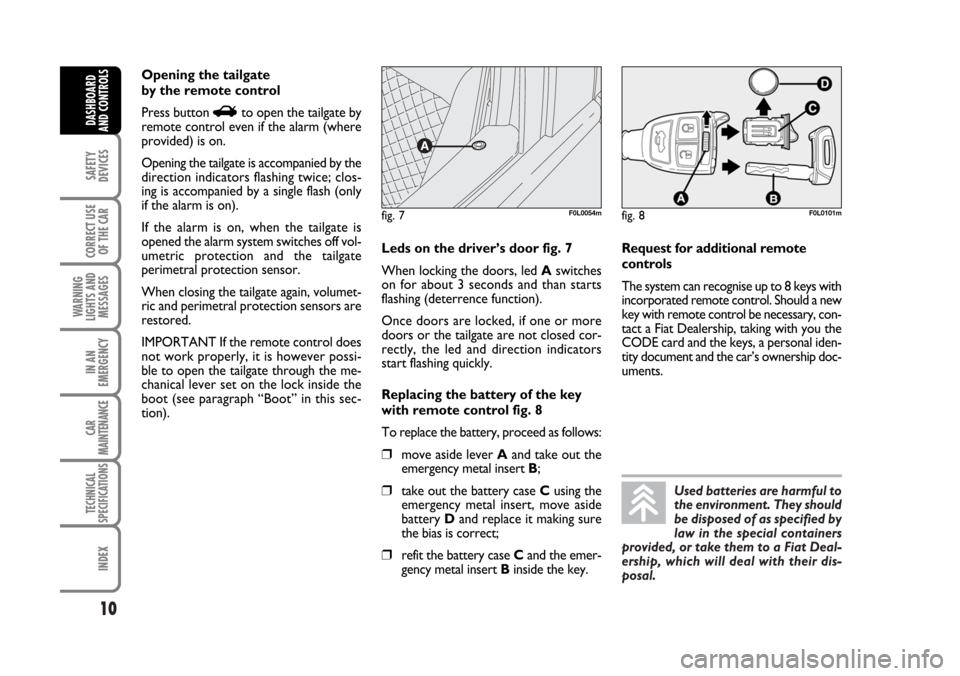
tion).Leds on the driver’s door fig. 7
When locking the doors, led Aswitches
on for about 3 seconds and than starts
flashing (deterrence function).
Once doors are locked, if one or more
doors or the tailgate are not closed cor-
rectly, the led and direction indicators
start flashing quickly.
Replacing the battery of the key
with remote control fig. 8
To replace the battery, proceed as follows:
❒move aside lever Aand take out the
emergency metal insert B;
❒take out the battery case Cusing the
emergency metal insert, move aside
battery Dand replace it making sure
the bias is correct;
❒refit the battery case Cand the emer-
gency metal insert Binside the key.Request for additional remote
controls
The system can recognise up to 8 keys with
incorporated remote control. Should a new
key with remote control be necessary, con-
tact a Fiat Dealership, taking with you the
CODE card and the keys, a personal iden-
tity document and the car’s ownership doc-
uments.
fig. 7F0L0054mfig. 8F0L0101m
001-030 Croma TRW GB 20-11-2006 14:58 Pagina 10
Page 12 of 240
ALARM
(where provided)
WHEN THE ALARM
IS TRIGGERED
The alarm comes into action in the fol-
lowing cases:
❒unlawful opening of one of the doors,
bonnet or boot (perimetral protec-
tion);
❒attempt to start the engine with unau-
thorised key;
❒battery cable cutting;
❒presence of moving bodies in the pas-
senger’s compartment (volumetric
protection);
❒abnormal raising/sloping of the car.
Depending on the markets, the cutting in
of the alarm causes operation of the siren
and direction indicators (for about 26 sec-
onds). The ways of operating and the num-
ber of cycles may vary depending on the
markets.
A maximum number of sound/sight cycles
is however envisaged.
12
SAFETY
DEVICES
CORRECT USE
OF THE CAR
WARNING
LIGHTS AND
MESSAGES
IN AN
EMERGENCY
CAR
MAINTENANCE
TECHNICAL
SPECIFICATIONS
INDEX
DASHBOARD
AND CONTROLS
Volumetric and anti-raising protections
can be cut off by operating the front ceil-
ing light controls (see paragraphs “Volu-
metric protection sensors” and “Anti-rais-
ing sensor” on the following pages).
IMPORTANT The engine immobiliser
function is guaranteed by the Fiat CODE
system, which is automatically activated
when the ignition key is removed.
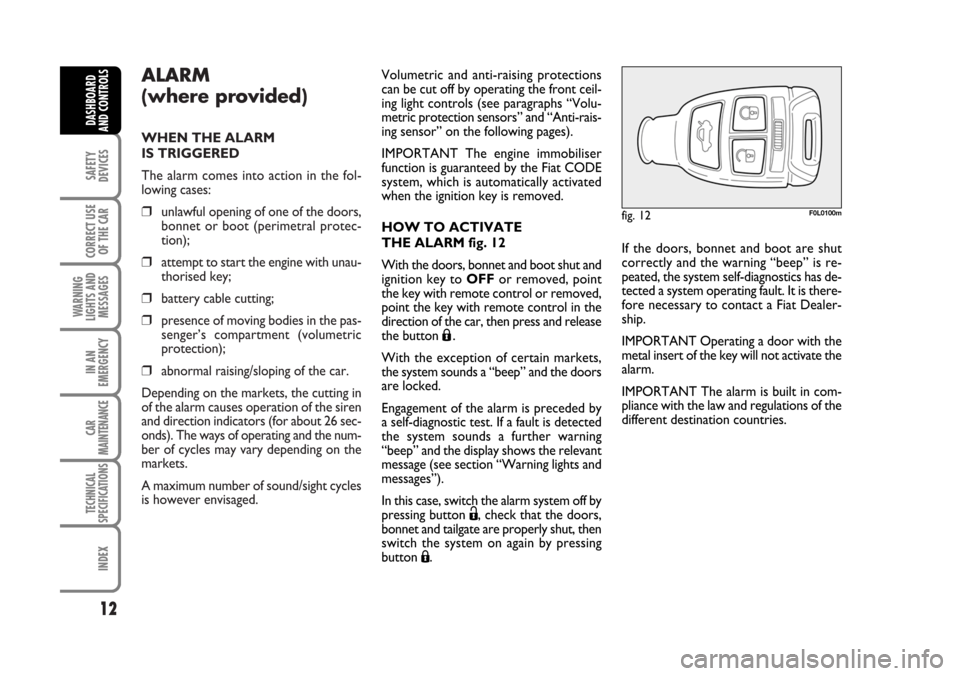
HOW TO ACTIVATE
THE ALARM fig. 12
With the doors, bonnet and boot shut and
ignition key to OFFor removed, point
the key with remote control or removed,
point the key with remote control in the
direction of the car, then press and release
the button
Á.
With the exception of certain markets,
the system sounds a “beep” and the doors
are locked.
Engagement of the alarm is preceded by
a self-diagnostic test. If a fault is detected
the system sounds a further warning
“beep” and the display shows the relevant
message (see section “Warning lights and
messages”).
In this case, switch the alarm system off by
pressing button Ë, check that the doors,
bonnet and tailgate are properly shut, then
switch the system on again by pressing
button Á.
fig. 12F0L0100m
If the doors, bonnet and boot are shut
correctly and the warning “beep” is re-
peated, the system self-diagnostics has de-
tected a system operating fault. It is there-
fore necessary to contact a Fiat Dealer-
ship.
IMPORTANT Operating a door with the
metal insert of the key will not activate the
alarm.
IMPORTANT The alarm is built in com-
pliance with the law and regulations of the
different destination countries.
001-030 Croma TRW GB 20-11-2006 14:58 Pagina 12
Page 16 of 240
16
SAFETY
DEVICES
CORRECT USE
OF THE CAR
WARNING
LIGHTS AND
MESSAGES
IN AN
EMERGENCY
CAR
MAINTENANCE
TECHNICAL
SPECIFICATIONS
INDEX
DASHBOARD
AND CONTROLS
Key with
remote control
Emergency
metal
insert
Direction
indicators
flashing (only
with key with
remote control)
Led on
driver’s door
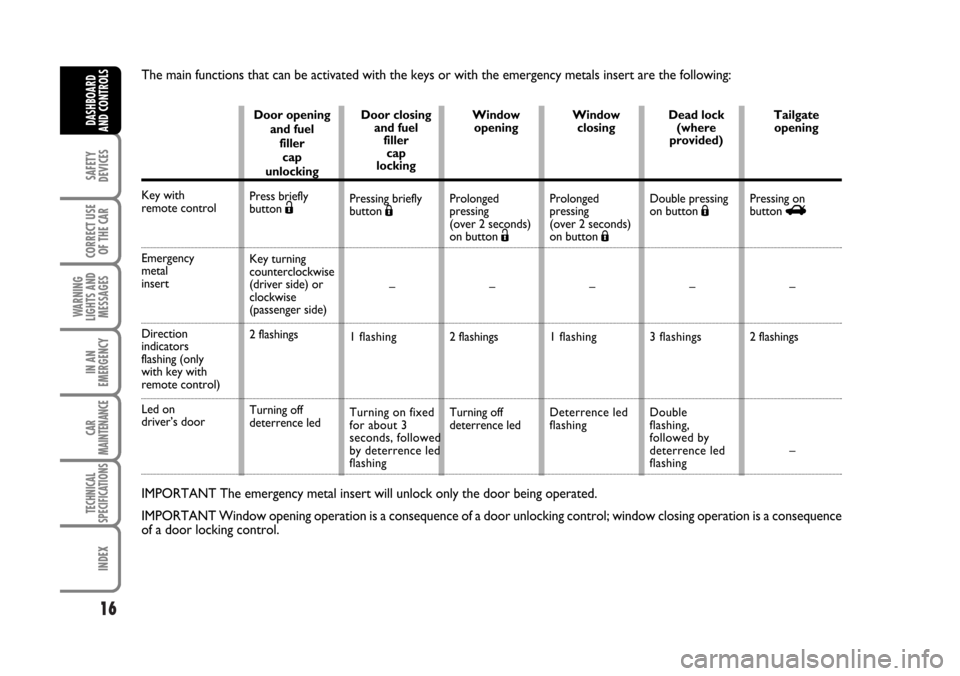
IMPORTANT The emergency metal insert will unlock only the door being operated.
IMPORTANT Window opening operation is a consequence of a door unlocking control; window closing operation is a consequence
of a door locking control.
Door opening
and fuel
filler
cap
unlocking
Press briefly
button
Ë
Key turning
counterclockwise
(driver side) or
clockwise
(passenger side)
2 flashings
Turning off
deterrence ledDoor closing
and fuel
filler
cap
locking
Pressing briefly
button Á
–
1 flashing
Turning on fixed
for about 3
seconds, followed
by deterrence led
flashingWindow
opening
Prolonged
pressing
(over 2 seconds)
on button Ë
–
2 flashings
Turning off
deterrence ledWindow
closing
Prolonged
pressing
(over 2 seconds)
on button Á
–
1 flashing
Deterrence led
flashingDead lock
(where
provided)
Double pressing
on button Á
–
3 flashings
Double
flashing,
followed by
deterrence led
flashingTailgate
opening
Pressing on
button R
–
2 flashings
–
The main functions that can be activated with the keys or with the emergency metals insert are the following:
001-030 Croma TRW GB 20-11-2006 14:58 Pagina 16
Page 25 of 240

25
SAFETY
DEVICES
CORRECT USE
OF THE CAR
WARNING
LIGHTS AND
MESSAGES
IN AN
EMERGENCY
CAR
MAINTENANCE
TECHNICAL
SPECIFICATIONS
INDEX
DASHBOARD
AND CONTROLS
Audio info repetition (See Radio)
With this function the display repeats in-
formation relevant to the sound system.
– Radio: selected radio station frequency
or RDS message, automatic tuning acti-
vation or AutoSTore;
– audio CD, MP3 CD: track number;
– CD Changer: CD number and track
number;
– Tape: operating mode.
To activate (On) or to deactivate (Off)
sound system info displaying proceed as
follows:
– briefly press button MODE: (On) or
(Off)will flash on the display (according to
previous setting);
– press button +or –for setting;
– briefly press button MODEto go back
to the menu screen or press the button
for long to go back to the standard screen
without storing settings.Selecting door unlocking
With this function it is possible to decide
the door opening mode by selecting one
of the following options:
– open doors: to unlock all doors, except
the tailgate
– open driver’s door (op. drv. door): to
unlock just the driver’s door (where pro-
vided)
– open all: to unlock every door includ-
ing the tailgate
The car is delivered with this function in
“Open all” mode.
Proceed as follows:
– briefly press button MODE, the previ-
ous setting will flash on the display;
– press button +or –for setting;
– briefly press button MODEto go back
to the menu screen or press the button
for long to go back to the standard screen
without storing settings.Automatic central door locking
when travelling (Autoclose)
When activated (On), this function locks
automatically the doors when the car
speed exceeds 20 km/h.
To activate (On) or to deactivate (Off) this
function proceed as follows:
– briefly press button MODE: On or Off
will flash on the display (according to pre-
vious setting);
– press button +or –for setting;
– briefly press button MODEto go back
to the menu screen or press the button
for long to go back to the standard screen
without storing settings.
Units - “Distances” and
“Consumption”
With this function it is possible to set the
units for distance covered (km or mi).
To set the required unit proceed as fol-
lows:
– briefly press button MODE: km or mi
will flash on the display (according to pre-
vious setting);
001-030 Croma TRW GB 20-11-2006 14:58 Pagina 25
Page 76 of 240
76
SAFETY
DEVICES
CORRECT USE
OF THE CAR
WARNING
LIGHTS AND
MESSAGES
IN AN
EMERGENCY
CAR
MAINTENANCE
TECHNICAL
SPECIFICATIONS
INDEX
DASHBOARD
AND CONTROLS
BOOT
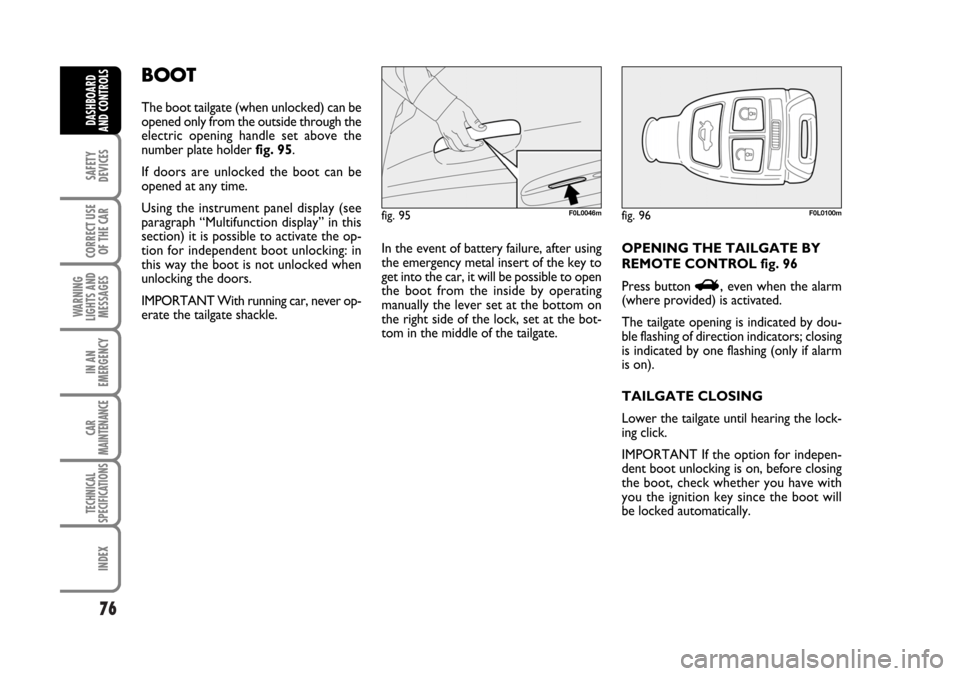
The boot tailgate (when unlocked) can be
opened only from the outside through the
electric opening handle set above the
number plate holder fig. 95.
If doors are unlocked the boot can be
opened at any time.
Using the instrument panel display (see
paragraph “Multifunction display” in this
section) it is possible to activate the op-
tion for independent boot unlocking: in
this way the boot is not unlocked when
unlocking the doors.
IMPORTANT With running car, never op-
erate the tailgate shackle.In the event of battery failure, after using
the emergency metal insert of the key to
get into the car, it will be possible to open
the boot from the inside by operating
manually the lever set at the bottom on
the right side of the lock, set at the bot-
tom in the middle of the tailgate. OPENING THE TAILGATE BY
REMOTE CONTROL fig. 96
Press button
R, even when the alarm
(where provided) is activated.
The tailgate opening is indicated by dou-
ble flashing of direction indicators; closing
is indicated by one flashing (only if alarm
is on).
TAILGATE CLOSING
Lower the tailgate until hearing the lock-
ing click.
IMPORTANT If the option for indepen-
dent boot unlocking is on, before closing
the boot, check whether you have with
you the ignition key since the boot will
be locked automatically.
fig. 95F0L0046mfig. 96F0L0100m
062-098 Croma TRW GB 20-11-2006 15:01 Pagina 76
Page 77 of 240
77
SAFETY
DEVICES
CORRECT USE
OF THE CAR
WARNING
LIGHTS AND
MESSAGES
IN AN
EMERGENCY
CAR
MAINTENANCE
TECHNICAL
SPECIFICATIONS
INDEX
DASHBOARD
AND CONTROLS
EXTENDING THE BOOT
Partial extension (1/3 or 2/3)
The boot can be partially (1/3 or 2/3) or
totally extended splitting the rear seat.
To make use of the maximum loading vol-
ume, remove the luggage compartment
cover following the instructions given in
paragraph “Luggage compartment cover”
and lower the loading surface as described
previously.
Proceed as follows:
❒lower completely the rear seat head
restraints;
❒check that the seat belt is not twisted;
❒lift handle Aor B-fig. 98to unlock re-
spectively the left or right section of the
backrest and then guide the backrest
onto the cushion. The addition of objects
(speakers, spoilers, etc.) on the
rear shelf or boot lid, except
those envisaged by the man-
ufacturer, may prevent the gas filled
struts at the sides of the boot from
working properly.
Never travel with objects on
the rear shelf to prevent
them being thrown forwards and in-
juring passengers in case of accident
or sharp braking.
WARNING
When using the boot, make
sure the loads do not exceed
the permitted weight (see section
“Technical specifications”). Also
make sure the items in the boot are
arranged properly to prevent them
being thrown forwards and injuring
passengers should you brake sharply.
WARNING
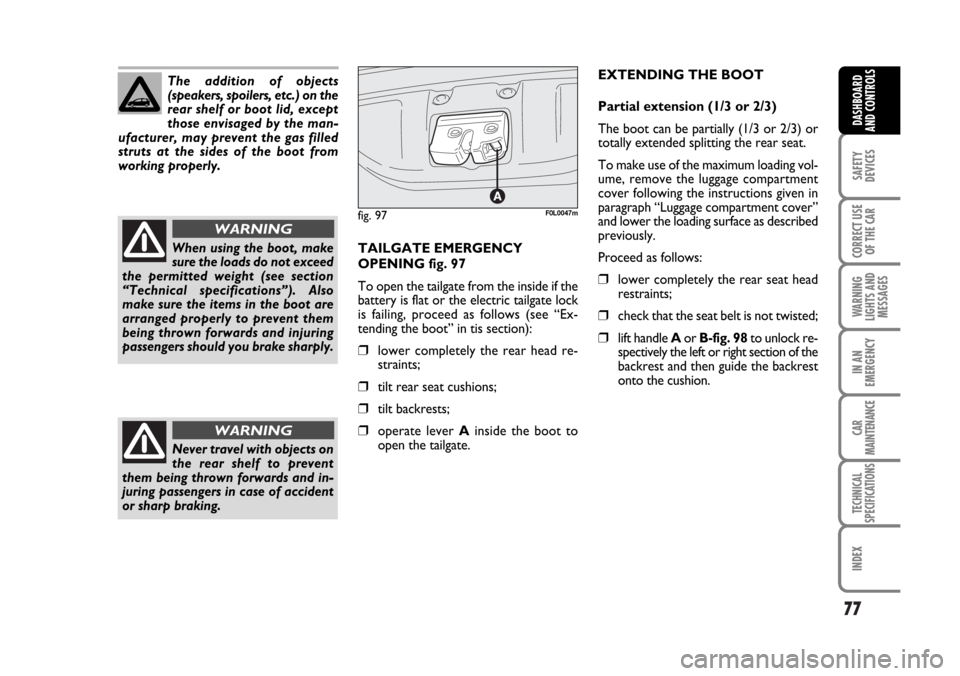
TAILGATE EMERGENCY
OPENING fig. 97
To open the tailgate from the inside if the
battery is flat or the electric tailgate lock
is failing, proceed as follows (see “Ex-
tending the boot” in tis section):
❒lower completely the rear head re-
straints;
❒tilt rear seat cushions;
❒tilt backrests;
❒operate lever Ainside the boot to
open the tailgate.
fig. 97F0L0047m
062-098 Croma TRW GB 20-11-2006 15:01 Pagina 77
Page 84 of 240
84
SAFETY
DEVICES
CORRECT USE
OF THE CAR
WARNING
LIGHTS AND
MESSAGES
IN AN
EMERGENCY
CAR
MAINTENANCE
TECHNICAL
SPECIFICATIONS
INDEX
DASHBOARD
AND CONTROLS
ROOF RACK/
SKI RACK
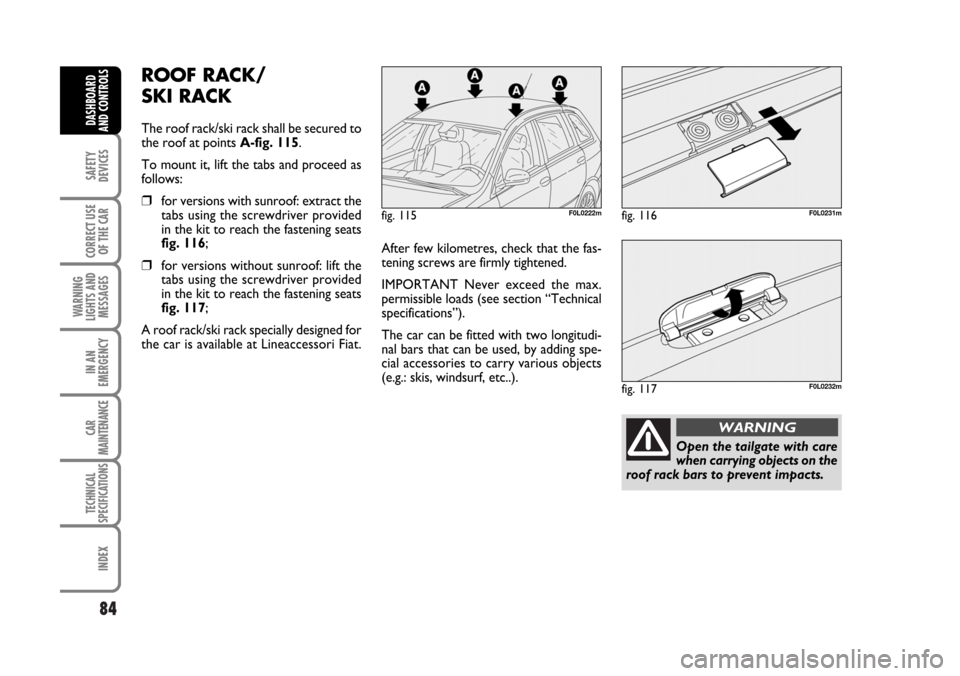
The roof rack/ski rack shall be secured to
the roof at points A-fig. 115.
To mount it, lift the tabs and proceed as
follows:
❒for versions with sunroof: extract the
tabs using the screwdriver provided
in the kit to reach the fastening seats
fig. 116;
❒for versions without sunroof: lift the
tabs using the screwdriver provided
in the kit to reach the fastening seats
fig. 117;
A roof rack/ski rack specially designed for
the car is available at Lineaccessori Fiat.After few kilometres, check that the fas-
tening screws are firmly tightened.
IMPORTANT Never exceed the max.
permissible loads (see section “Technical
specifications”).
The car can be fitted with two longitudi-
nal bars that can be used, by adding spe-
cial accessories to carry various objects
(e.g.: skis, windsurf, etc..).
fig. 115F0L0222mfig. 116F0L0231m
fig. 117F0L0232m
Open the tailgate with care
when carrying objects on the
roof rack bars to prevent impacts.
WARNING
062-098 Croma TRW GB 20-11-2006 15:01 Pagina 84
Page 164 of 240
164
WARNING
LIGHTS AND
MESSAGES
CAR
MAINTENANCE
TECHNICAL
SPECIFICATIONS
INDEX
DASHBOARD
AND CONTROLS
SAFETY
DEVICES
CORRECT USE
OF THE CAR
IN AN
EMERGENCY
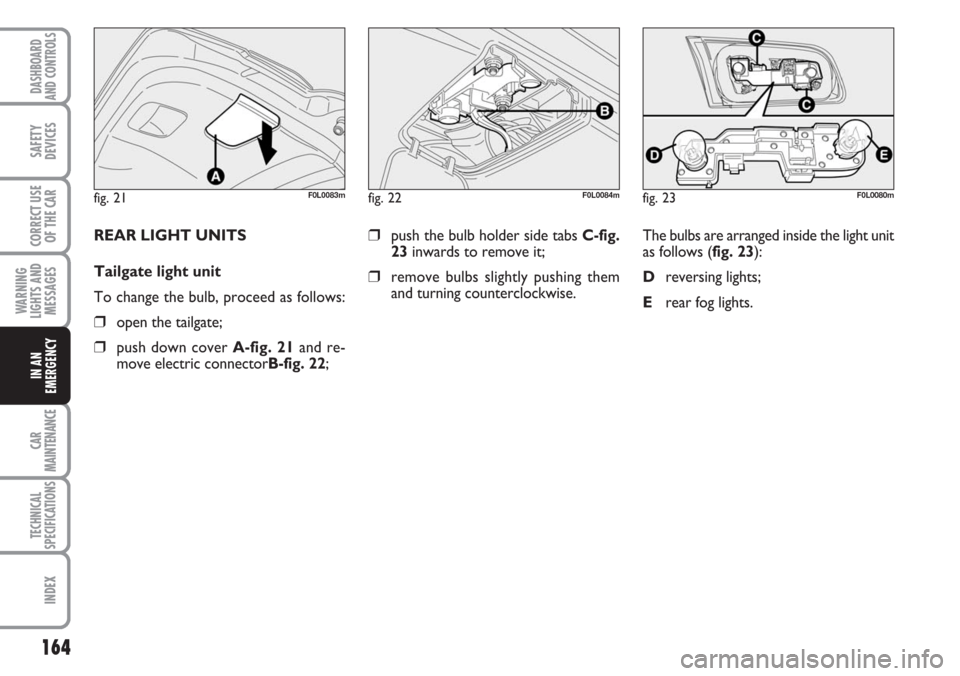
❒push the bulb holder side tabs C-fig.
23inwards to remove it;
❒remove bulbs slightly pushing them
and turning counterclockwise.The bulbs are arranged inside the light unit
as follows (fig. 23):
Dreversing lights;
Erear fog lights. REAR LIGHT UNITS
Tailgate light unit
To change the bulb, proceed as follows:
❒open the tailgate;
❒push down cover A-fig. 21and re-
move electric connectorB-fig. 22;
fig. 21F0L0083mfig. 22F0L0084mfig. 23F0L0080m
Page 165 of 240
165
WARNING
LIGHTS AND
MESSAGES
CAR
MAINTENANCE
TECHNICAL
SPECIFICATIONS
INDEX
DASHBOARD
AND CONTROLS
SAFETY
DEVICES
CORRECT USE
OF THE CAR
IN AN
EMERGENCY
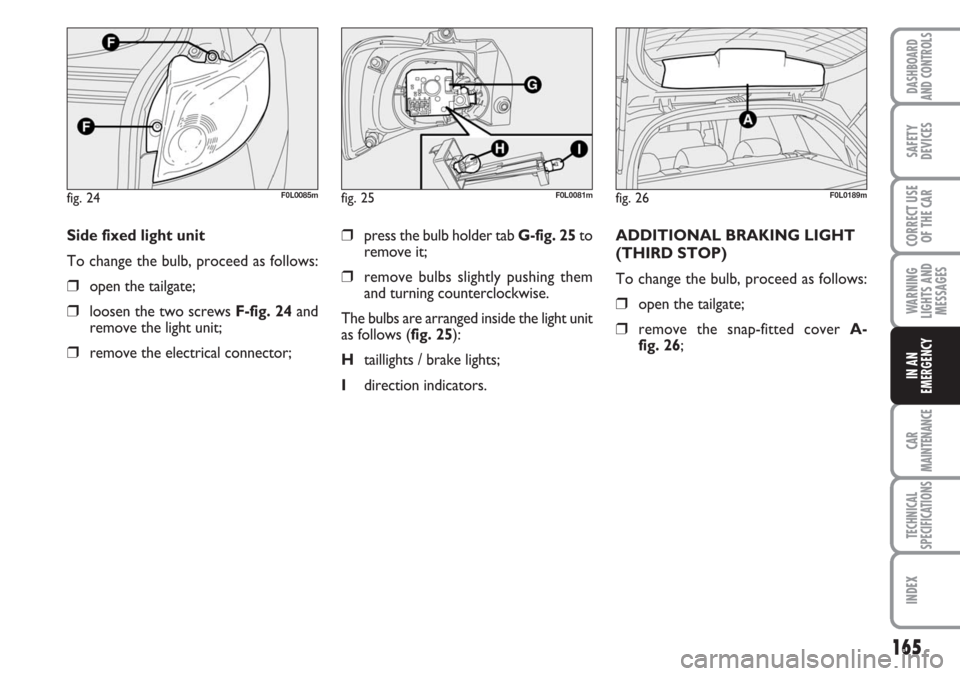
❒press the bulb holder tab G-fig. 25to
remove it;
❒remove bulbs slightly pushing them
and turning counterclockwise.
The bulbs are arranged inside the light unit
as follows (fig. 25):
Htaillights / brake lights;
Idirection indicators.ADDITIONAL BRAKING LIGHT
(THIRD STOP)
To change the bulb, proceed as follows:
❒open the tailgate;
❒remove the snap-fitted cover A-
fig. 26; Side fixed light unit
To change the bulb, proceed as follows:
❒open the tailgate;
❒loosen the two screws F-fig. 24and
remove the light unit;
❒remove the electrical connector;
fig. 24F0L0085mfig. 25F0L0081mfig. 26F0L0189m