warning lights FIAT DOBLO COMBI 2011 Owner handbook (in English)
[x] Cancel search | Manufacturer: FIAT, Model Year: 2011, Model line: DOBLO COMBI, Model: FIAT DOBLO COMBI 2011Pages: 274, PDF Size: 5.96 MB
Page 23 of 274
22
KNOW
YOUR
VEHICLE
SAFETY
STAR
TING
AND
DRIVING
WARNING
LIGHTS AND
MESSAGES
IN AN
EMERGENCY
SERVICING
AND
MAINTENANCE
TECHNICAL
SPECIFICATIONS
INDEX
– press ▲or ▼to select;
– press the SET ESC button to go back to the menu screen
or hold the button down to go back to the standard screen
without saving.
Setting the time (Clock)
This function allows you to set the clock through two sub-
menus: “Time” and “Mode”.
To carry out the adjustment, proceed as follows:
– press SET ESC: the display shows the two submenus
“Time” and “Mode”;
– press ▲or ▼to move between the two submenus;
– once you have selected a submenu, press SET ESC; – if the function is on, press ▲or ▼to select the required
speed limit and then press SET ESC to confirm;
N.B. The speed may be set anywhere between 30 and
200 km/h or 20 and 125 mph, depending on the previously
chosen unit (see “Setting the unit of measurement (Unit)”).
The setting will increase/decrease by five units each time
button ▲/▼is pressed. Hold down button ▲/▼to in-
crease/decrease the setting rapidly. Complete the setting
with single presses of the button when you approach the
required setting.
– press the SET ESC button to go back to the menu screen
or hold the button down to go back to the standard screen
without saving.
To cancel the setting, proceed as follows:
– press the SET ESC button: ON flashes in the display;
– press button ▼: OFF flashes in the display;
– press the SET ESC button to go back to the menu screen
or hold the button down to go back to the standard screen
without saving.
Trip B data (Activating Trip B)
This function may be used to activate (On) or deactivate
(Off) the Trip B display (partial trip).
For more information see the „Trip computer” section.
For activation/deactivation, proceed as follows:
– press the SET ESC button again: the display flashes On
or Off depending on what was previously set;
Page 24 of 274
23
KNOW
YOUR
VEHICLE
SAFETY
STAR
TING
AND
DRIVING
WARNING
LIGHTS AND
MESSAGES
IN AN
EMERGENCY
SERVICING
AND
MAINTENANCE
TECHNICAL
SPECIFICATIONS
INDEX
Set date (Setting the date)
Using this function it is possible to change the date (day
– month – year).
To update, proceed as follows:
– press SET ESC: the year flashes on the display;
– press ▲or ▼to adjust the value;
– press SET ESC: the month flashes in the display;
– press ▲or ▼to adjust the value;
– press SET ESC: the day flashes in the display;
– press ▲or ▼to adjust the value.
N.B. The setting will increase or decrease by one unit each
time ▲or ▼is pressed. Hold the button down to in-
crease/decrease the setting rapidly. Complete the setting
with single presses of the button when you approach the
required setting.
– press the SET ESC button to go back to the menu screen
or hold the button down to go back to the standard screen
without saving. – when you select “Time”, pressing SET ESC makes the
hours flash on the display;
– press ▲or ▼to adjust the value;
– press SET ESC: the minutes flash in the display;
– press ▲or ▼to adjust the value.
N.B. The setting will increase or decrease by one unit each
time ▲or ▼is pressed. Hold the button down to in-
crease/decrease the setting rapidly. Complete the setting
with single presses of the button when you approach the
required setting.
– when you select “Mode”, pressing SET ESC makes the
mode flash on the display;
– press ▲or ▼to select 24h or 12h.
When you have made the required adjustments, press SET
ESC to go back to the submenu screen or hold the but-
ton down to go back to the main menu screen without
saving.
– hold down SET ESC again to go back to the standard
screen or main menu, depending on which point in the
menu you have reached.
Page 25 of 274
24
KNOW
YOUR
VEHICLE
SAFETY
STAR
TING
AND
DRIVING
WARNING
LIGHTS AND
MESSAGES
IN AN
EMERGENCY
SERVICING
AND
MAINTENANCE
TECHNICAL
SPECIFICATIONS
INDEX
– press the SET ESC button again: the display flashes On
or Off depending on the previous setting;
– press ▲or ▼to select;
– press the SET ESC button to return to the submenu
screen or hold the button down to return to the main
menu screen without saving;
– hold down SET ESC again to go back to the standard
screen or main menu, depending on which point in the
menu you have reached.
Unit of measurement (Setting the unit
of measurement)
With this function it is possible to set the measurement
units through three submenus: “Distance”, “Consumption”
and “Temperature”.
To set the desired measurement unit, proceed as follows:
– press SET ESC to display the three submenus;
– press ▲or ▼to move between the three submenus;
– once you have selected a submenu, press SET ESC;
– when you select “Distance”, pressing SET ESC makes
km or mi appear in the display (depending on the previous
setting); Radio info (Display audio information)
With this function the display shows information relevant
to the radio.
– Radio: selected radio station frequency or RDS message,
automatic tuning activation or AutoSTore;
– Audio CD, CD MP3: track number;
To show the radio information in the display (On) or clear
it (Off), proceed as follows:
– press the SET ESC button: the display flashes On or Off
depending on the previous setting;
– press ▲or ▼to select;
– press the SET ESC button to go back to the menu screen
or hold the button down to go back to the standard screen
without saving.
Autoclose (Automatic central locking with the
vehicle in motion)
(for versions/markets where provided)
When activated (On), this function automatically locks the
doors when the car speed exceeds 20 km/h.
Proceed as follows to switch this function on or off:
– press the SET ESC button: the display shows a submenu;
Page 26 of 274
25
KNOW
YOUR
VEHICLE
SAFETY
STAR
TING
AND
DRIVING
WARNING
LIGHTS AND
MESSAGES
IN AN
EMERGENCY
SERVICING
AND
MAINTENANCE
TECHNICAL
SPECIFICATIONS
INDEX
Language (Selecting the language)
Display messages can be shown in different languages: Ital-
ian, English, German, Portuguese, Spanish, French, Dutch,
Polish and Turkish.
To set the required language, proceed as follows:
– press SET ESC: the previously set language flashes in
the display;
– press ▲or ▼to select;
– press the SET ESC button to go back to the menu screen
or hold the button down to go back to the standard screen
without saving.
Warning volume (Adjusting the failure/warning
buzzer volume)
This function allows the volume of the buzzer which ac-
companies the display of failures/warnings to be adjusted
(over 8 levels).
To set the desired volume, proceed as follows:
– press SET ESC: the previously set volume level flashes in
the display;
– press ▲or ▼to adjust the value;
– press the SET ESC button to go back to the menu screen
or hold the button down to go back to the standard screen
without saving. – press ▲or ▼to choose;
– when you select “Consumption”, pressing SET ESC
makes km/l, l/100km or mpg appear on the display de-
pending on the previous setting;
If the set distance unit is “km”, you can set the fuel con-
sumption unit to km/l or l/100km depending on the
amount of fuel consumed.
If the distance unit is set to mi, fuel consumption is dis-
played in mpg.
– press ▲or ▼to select;
– when you select “Temperature”, pressing SET ESC
makes °C or °F appear on the display depending on the
previous setting;
– press ▲or ▼to select;
When you have made the required adjustments, briefly
press MENU ESC to go back to the submenu screen or
hold the button down to go back to the main menu screen
without saving.
– hold down SET ESC again to go back to the standard
screen or main menu, depending on which point in the
menu you have reached.
Page 27 of 274
26
KNOW
YOUR
VEHICLE
SAFETY
STAR
TING
AND
DRIVING
WARNING
LIGHTS AND
MESSAGES
IN AN
EMERGENCY
SERVICING
AND
MAINTENANCE
TECHNICAL
SPECIFICATIONS
INDEX
Service (Programmed maintenance)
Through this function it is possible to display information
related to regular maintenance intervals.
This information can be consulted as follows:
– press SET ESC: the service intervals appear in the dis-
play in km or mi, depending on the previous setting (see
“Unit of distance” paragraph);
– press the SET ESC button to return to the menu screen
or hold the button down to return to the standard screen.
N.B. The „Scheduled Servicing Plan” provides for the ve-
hicle to be serviced every 30,000 km/35,000 km (depending
on the version) (or the equivalent in miles). This is auto-
matically displayed, when the ignition key is at MAR, from
2,000 km (or the equivalent in miles) and reappears every
200 km (or the equivalent in miles). Below 200 km the
reminders become more frequent. The indication will ap-
pear in kilometres or miles depending on the measure-
ment unit settings. When the next scheduled service is ap-
proaching, the message „Service” will appear on the dis-
play, followed by the number of kilometres or miles left,
when the key is turned to MAR. Go to the Fiat Service
Network, where the „Planned Maintenance Programme”
operations will be performed and the message will be re-
set. Button volume (Adjusting the button volume)
This function allows you to adjust (over 8 levels) the vol-
ume of the buzzer that can be heard when the SET ESC,
▲and ▼buttons are pressed.
To set the desired volume, proceed as follows:
– press SET ESC: the previously set volume level flashes in
the display;
– press ▲or ▼to adjust the value;
– press the SET ESC button to go back to the menu screen
or hold the button down to go back to the standard screen
without saving.
Seat belt buzzer
(Reactivating buzzer for SBR indication)
This function can only be displayed after the Fiat Service
Network has deactivated the SBR system (see “SBR sys-
tem” in the “Safety” section).
Page 28 of 274
27
KNOW
YOUR
VEHICLE
SAFETY
STAR
TING
AND
DRIVING
WARNING
LIGHTS AND
MESSAGES
IN AN
EMERGENCY
SERVICING
AND
MAINTENANCE
TECHNICAL
SPECIFICATIONS
INDEX
Daytime Running Lights (DRL)
This function allows you to activate/deactivate the daytime
running lights.
Proceed as follows to switch this function on or off:
– press the SET ESC button to display a submenu;
– press the SET ESC button again: the display flashes On
or Off depending on what was previously set;
– press ▲or ▼to select;
– press the SET ESC button to return to the submenu
screen or hold the button down to return to the main
menu screen without saving;
– hold down SET ESC again to go back to the standard
screen or main menu, depending on which point in the
menu you have reached.
Exit menu
This function closes the settings listed on the menu screen.
Press SET ESC to go back to the standard screen with-
out saving.
Press ▼to return to the first menu option (Speed beep). Activating/deactivating passenger front and side
airbags
(for versions/markets where provided)
This function is used to activate/deactivate the front and
side passenger airbags (for versions/markets where pro-
vided).
Proceed as follows:
– press SET ESC and, after the message Bag pass: Off (to
deactivate) or Bag pass On (to activate) is displayed by
pressing buttons ▲or ▼, press SET ESC again;
– the confirmation request message appears in the display;
– press ▲or ▼to select Yes (confirming activa-
tion/deactivation) or No (to cancel);
– press SET ESC to confirm the setting and go back to
the menu screen or hold the button down to go back to
the standard screen without saving.
Page 29 of 274
28
KNOW
YOUR
VEHICLE
SAFETY
STAR
TING
AND
DRIVING
WARNING
LIGHTS AND
MESSAGES
IN AN
EMERGENCY
SERVICING
AND
MAINTENANCE
TECHNICAL
SPECIFICATIONS
INDEX
Values displayed
Range
Shows the approximate distance the vehicle can travel with
the amount of fuel left in the tank. The display will show
the reading “----” when the following events take place:
– range is lower than 50 km (or 30 mi)
– vehicle is left parked with the engine running for a long
time.
WARNING The range can be affected by several factors:
driving style (see “Driving style” in the “Starting and dri-
ving” section), type of route (motorway, towns and cities,
mountain roads, etc.), conditions of use (load, tyre pres-
sures, etc.). Trip planning must therefore take the above
into account.
Distance travelled
Shows the distance covered since the start of the new jour-
ney.
Average consumption
Shows the approximate average fuel consumption since
the start of the new journey.
Current consumption
Shows the constantly updated fuel consumption. The read-
ing “----” appears on the display if the vehicle is parked with
the engine running.
Average speed
Shows the average speed of the vehicle by using the over-
all time elapsed since the start of a new journey.TRIP COMPUTER
General information
The Trip computer is used to display information on ve-
hicle operation when the ignition key is turned to MAR.
This function allows you to define two separate trips, called
“Trip A” and “Trip B”, for monitoring the vehicle’s „com-
plete mission” (journey) in a reciprocally independent man-
ner. Both functions can be reset (reset – start of a new
journey).
“Trip A” is used to display the figures relating to:
– Range
– Distance travelled
– Average consumption
– Instant consumption
– Average speed
– Travel time (driving time).
“Trip B”, available on multifunction display only, is used to
display the figures relating to:
– Distance travelled B
– Average consumption B
– Average speed B
– Travel time B (driving time).
N.B. “Trip B” may be disabled (see “Activating Trip B”).
“Range” and “Instant consumption” parameters cannot be
reset.
Page 30 of 274
29
KNOW
YOUR
VEHICLE
SAFETY
STAR
TING
AND
DRIVING
WARNING
LIGHTS AND
MESSAGES
IN AN
EMERGENCY
SERVICING
AND
MAINTENANCE
TECHNICAL
SPECIFICATIONS
INDEX
F0V0010mfig. 18
WARNING The reset operation when “Trip A” details
are being displayed only resets the information associat-
ed with this function.
WARNING The reset operation when “Trip B” details are
being displayed only resets the information associated with
this function.
Start trip procedure
With the ignition key at MAR, reset by pressing the TRIP
button and holding it down for more than two seconds.
Exit Trip
To quit the Trip function, hold down SET ESC for more
than two seconds. Journey time
Shows the time elapsed since the start of a new journey.
WARNING If information is not available, the reading
“----” appears instead of the Trip computer values. Count-
ing the different values will resume regularly when normal
operation condition is restored. This will not reset any
of the values displayed before the failure or start a new
journey.
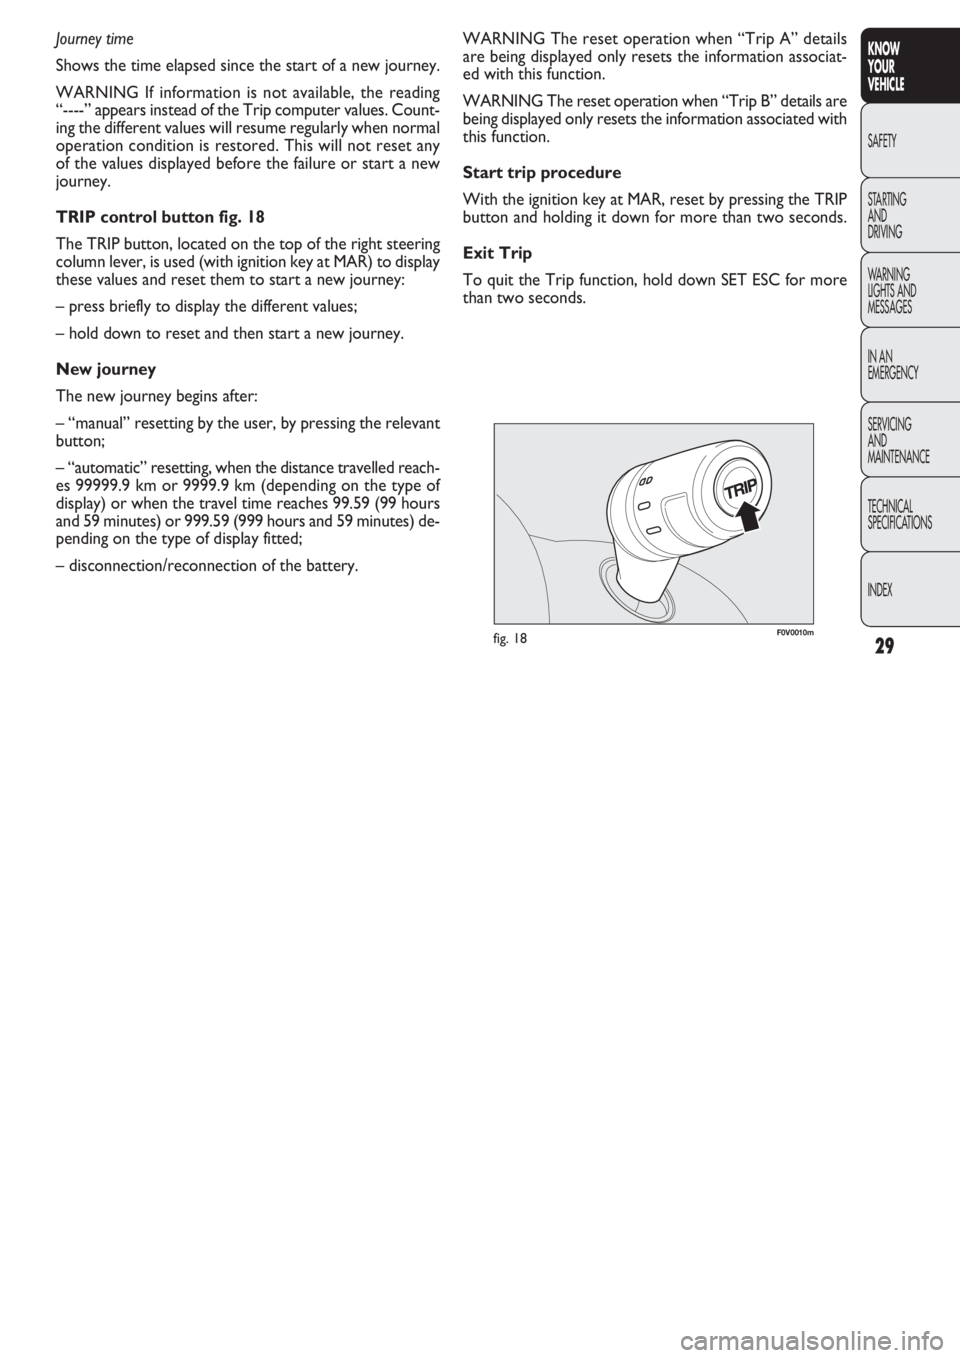
TRIP control button fig. 18
The TRIP button, located on the top of the right steering
column lever, is used (with ignition key at MAR) to display
these values and reset them to start a new journey:
– press briefly to display the different values;
– hold down to reset and then start a new journey.
New journey
The new journey begins after:
– “manual” resetting by the user, by pressing the relevant
button;
– “automatic” resetting, when the distance travelled reach-
es 99999.9 km or 9999.9 km (depending on the type of
display) or when the travel time reaches 99.59 (99 hours
and 59 minutes) or 999.59 (999 hours and 59 minutes) de-
pending on the type of display fitted;
– disconnection/reconnection of the battery.
Page 31 of 274
30
KNOW
YOUR
VEHICLE
SAFETY
STAR
TING
AND
DRIVING
WARNING
LIGHTS AND
MESSAGES
IN AN
EMERGENCY
SERVICING
AND
MAINTENANCE
TECHNICAL
SPECIFICATIONS
INDEX
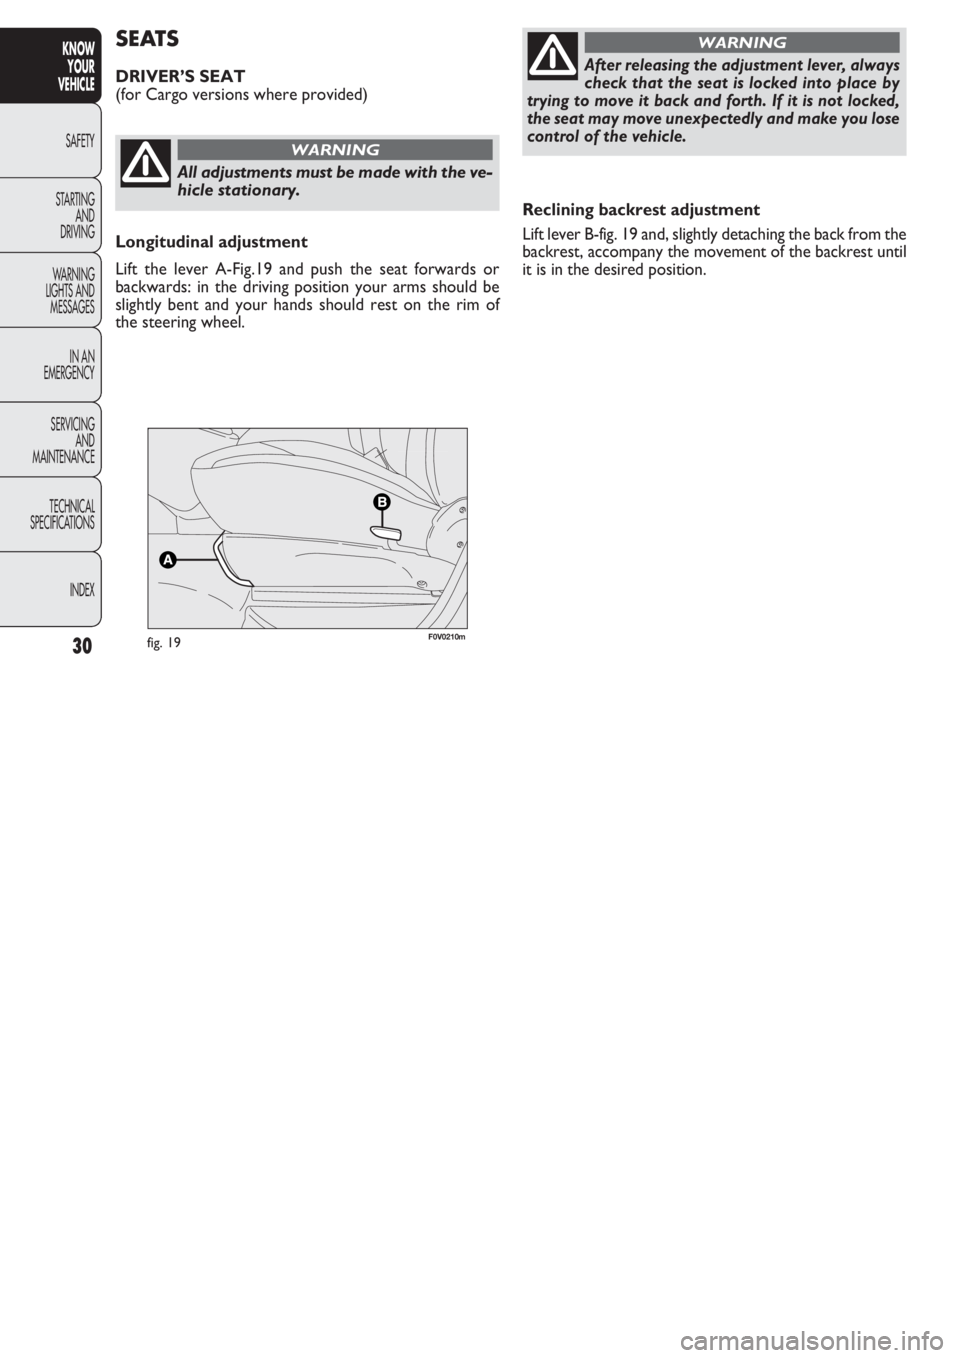
Reclining backrest adjustment
Lift lever B-fig. 19 and, slightly detaching the back from the
backrest, accompany the movement of the backrest until
it is in the desired position.
SEATS
DRIVER’S SEAT
(for Cargo versions where provided)
All adjustments must be made with the ve-
hicle stationary.
WARNING
After releasing the adjustment lever, always
check that the seat is locked into place by
trying to move it back and forth. If it is not locked,
the seat may move unexpectedly and make you lose
control of the vehicle.
WARNING
Longitudinal adjustment
Lift the lever A-Fig.19 and push the seat forwards or
backwards: in the driving position your arms should be
slightly bent and your hands should rest on the rim of
the steering wheel.
fig. 19F0V0210m
Page 32 of 274
31
KNOW
YOUR
VEHICLE
SAFETY
STAR
TING
AND
DRIVING
WARNING
LIGHTS AND
MESSAGES
IN AN
EMERGENCY
SERVICING
AND
MAINTENANCE
TECHNICAL
SPECIFICATIONS
INDEX
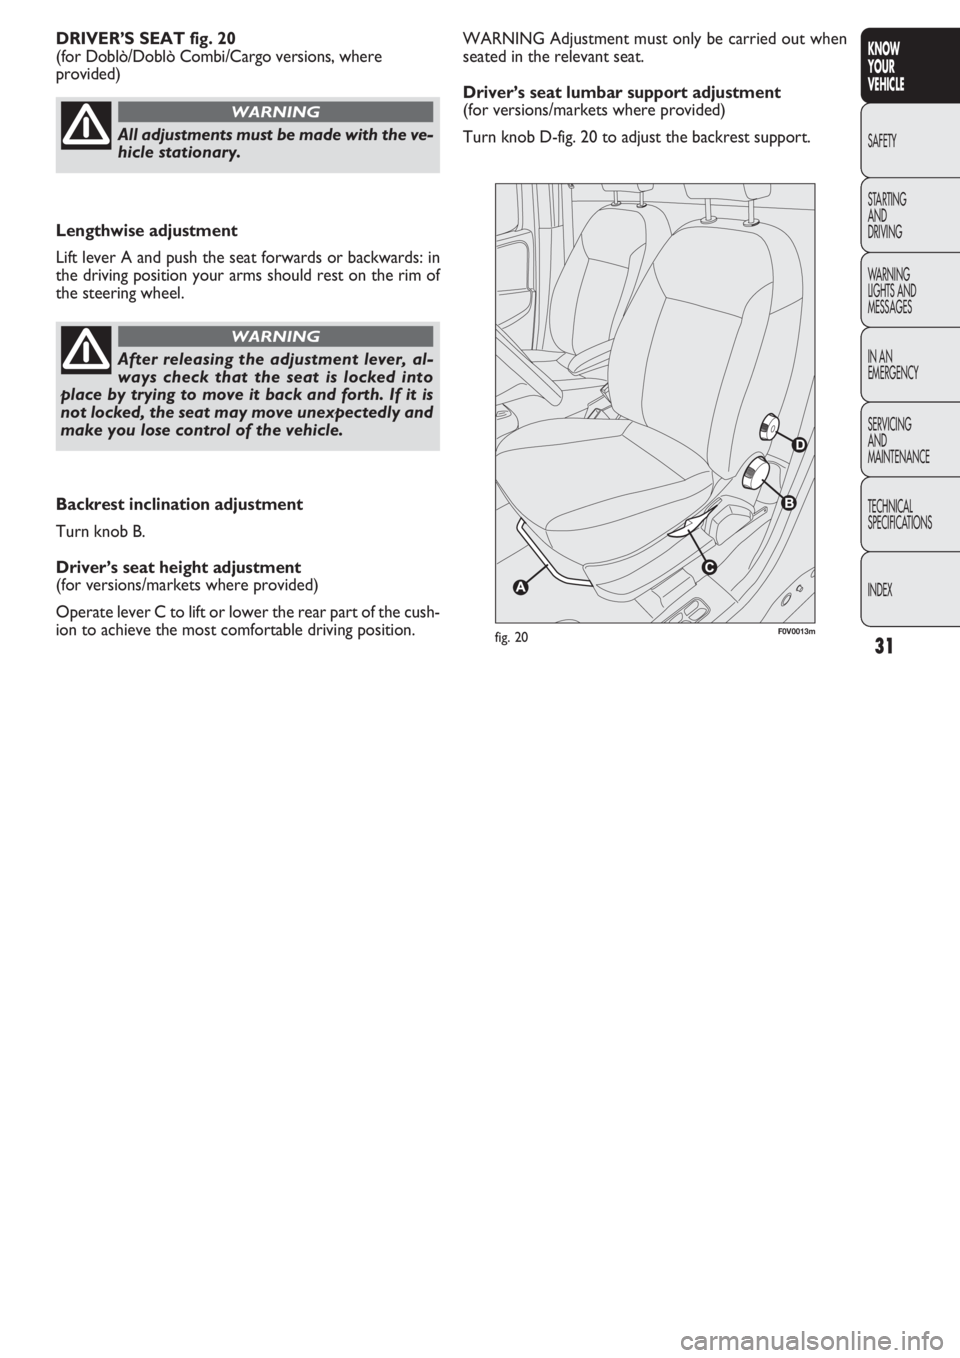
WARNING Adjustment must only be carried out when
seated in the relevant seat.
Driver’s seat lumbar support adjustment
(for versions/markets where provided)
Turn knob D-fig. 20 to adjust the backrest support. DRIVER’S SEAT fig. 20
(for Doblò/Doblò Combi/Cargo versions, where
provided)
F0V0013mfig. 20
All adjustments must be made with the ve-
hicle stationary.
WARNING
Lengthwise adjustment
Lift lever A and push the seat forwards or backwards: in
the driving position your arms should rest on the rim of
the steering wheel.
After releasing the adjustment lever, al-
ways check that the seat is locked into
place by trying to move it back and forth. If it is
not locked, the seat may move unexpectedly and
make you lose control of the vehicle.
WARNING
Backrest inclination adjustment
Turn knob B.
Driver’s seat height adjustment
(for versions/markets where provided)
Operate lever C to lift or lower the rear part of the cush-
ion to achieve the most comfortable driving position.