Index FIAT DOBLO COMBI 2012 Owner handbook (in English)
[x] Cancel search | Manufacturer: FIAT, Model Year: 2012, Model line: DOBLO COMBI, Model: FIAT DOBLO COMBI 2012Pages: 283, PDF Size: 6.31 MB
Page 187 of 283
183
KNOW
YOUR
VEHICLE
SAFETY
STARTING
AND
DRIVING
WARNING
LIGHTS AND
MESSAGES
IN AN
EMERGENCY
SERVICING
AND
MAINTENANCE
TECHNICAL
SPECIFICATIONS
INDEXPROTECTED DEVICE FUSE FUSE AMPS FIGURE
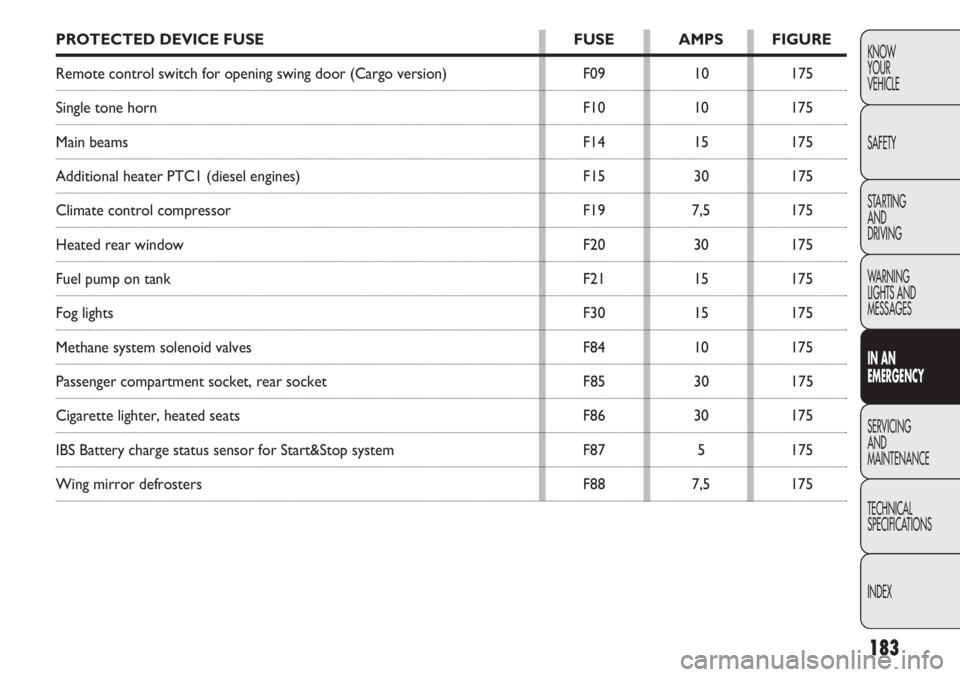
Remote control switch for opening swing door (Cargo version) F0910175
Single tone horn F1010175
Main beams F1415175
Additional heater PTC1 (diesel engines) F1530175
Climate control compressor F197,5175
Heated rear window F2030175
Fuel pump on tank F2115175
Fog lights F3015175
Methane system solenoid valves F8410175
Passenger compartment socket, rear socket F8530175
Cigarette lighter, heated seats F8630175
IBS Battery charge status sensor for Start&Stop system F875175
Wing mirror defrosters F887,5175
Page 188 of 283
184
KNOWYOUR
VEHICLE
SAFETY
STARTING AND
DRIVING
WARNING
LIGHTS AND MESSAGES
IN AN
EMERGENCY
SERVICING AND
MAINTENANCE
TECHNICAL
SPECIFICA TIONS
INDEX
F0V0082mfig. 176F0V0083mfig. 177
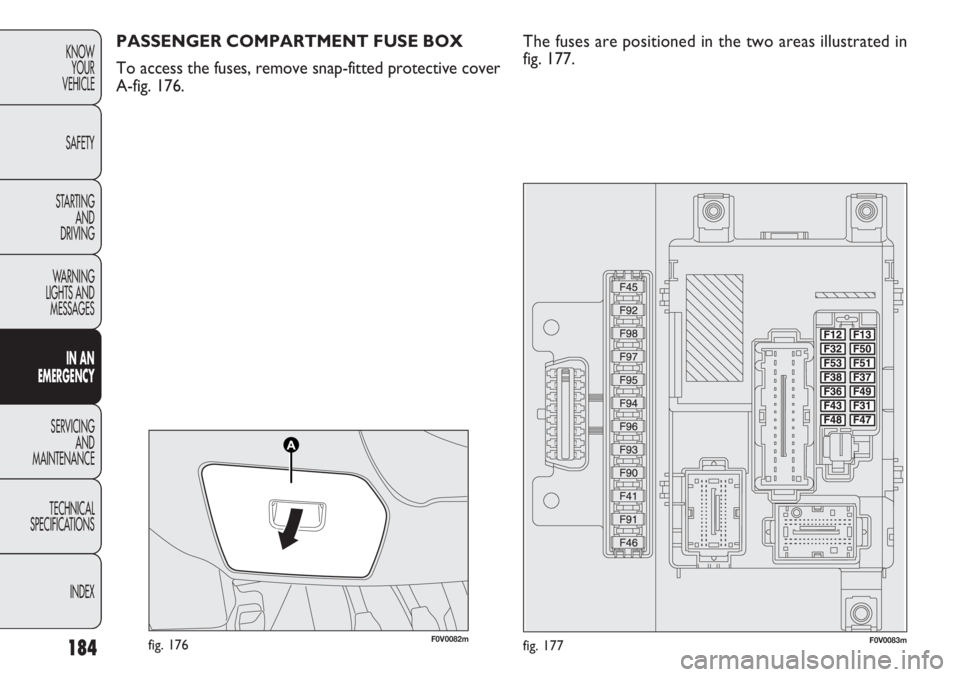
PASSENGER COMPARTMENT FUSE BOX
To access the fuses, remove snap-fitted protective cover
A-fig. 176. The fuses are positioned in the two areas illustrated in
fig. 177.
Page 189 of 283
185
KNOW
YOUR
VEHICLE
SAFETY
STARTING
AND
DRIVING
WARNING
LIGHTS AND
MESSAGES
IN AN
EMERGENCY
SERVICING
AND
MAINTENANCE
TECHNICAL
SPECIFICATIONS
INDEXPROTECTED DEVICE FUSE FUSE AMPS FIGURE
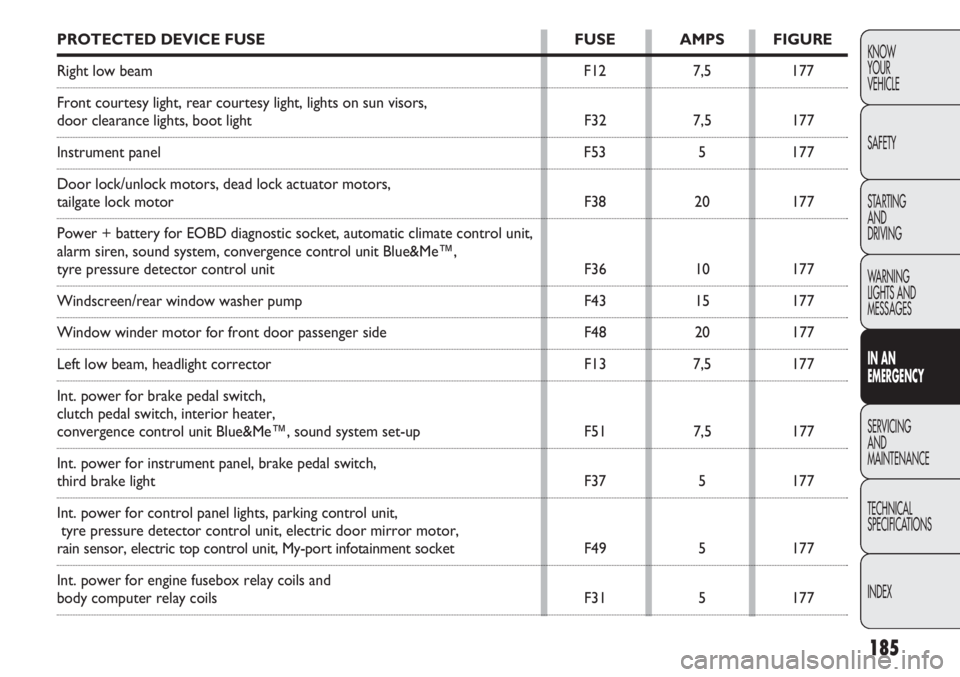
Right low beam F127,5177
Front courtesy light, rear courtesy light, lights on sun visors,
door clearance lights, boot light F327,5177
Instrument panel F535177
Door lock/unlock motors, dead lock actuator motors,
tailgate lock motor F3820177
Power + battery for EOBD diagnostic socket, automatic climate control un\
it,
alarm siren, sound system, convergence control unit Blue&Me™,
tyre pressure detector control unit F3610177
Windscreen/rear window washer pump F4315177
Window winder motor for front door passenger side F4820177
Left low beam, headlight corrector F137,5177
Int. power for brake pedal switch,
clutch pedal switch, interior heater,
convergence control unit Blue&Me™, sound system set-up F517,5177
Int. power for instrument panel, brake pedal switch,
third brake light F375177
Int. power for control panel lights, parking control unit, tyre pressure detector control unit, electric door mirror motor,
rain sensor, electric top control unit, My-port infotainment socket F495177
Int. power for engine fusebox relay coils and
body computer relay coils F315177
Page 190 of 283
186
KNOWYOUR
VEHICLE
SAFETY
STARTING AND
DRIVING
WARNING
LIGHTS AND MESSAGES
IN AN
EMERGENCY
SERVICING AND
MAINTENANCE
TECHNICAL
SPECIFICA TIONS
INDEXPROTECTED DEVICE FUSE FUSE AMPS FIGURE
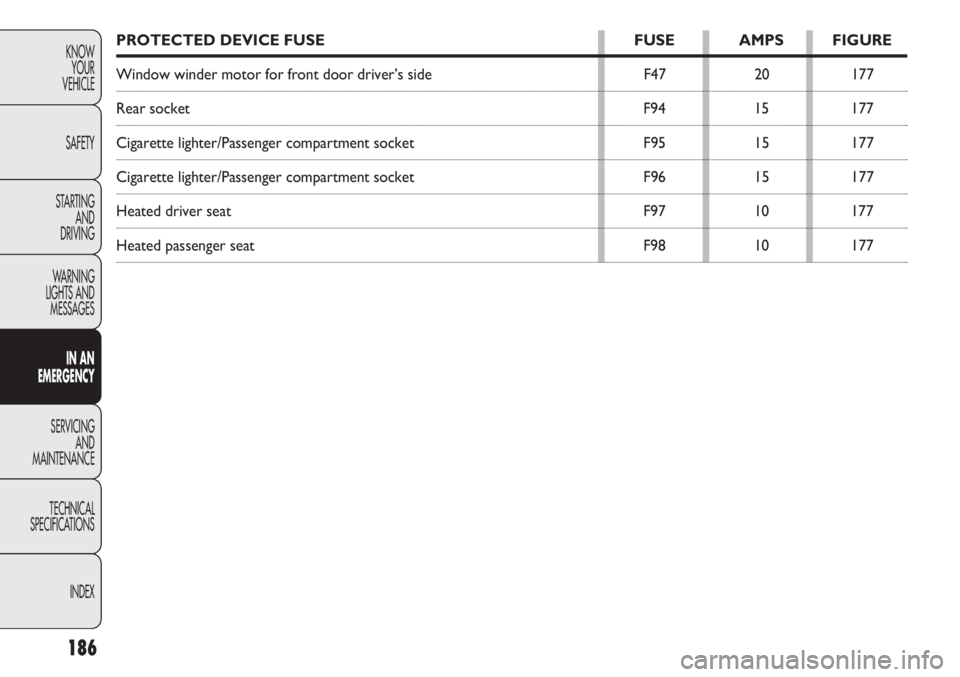
Window winder motor for front door driver’s side F4720177
Rear socket F9415177
Cigarette lighter/Passenger compartment socket F9515177
Cigarette lighter/Passenger compartment socket F9615177
Heated driver seat F9710177
Heated passenger seat F9810177
Page 191 of 283
187
KNOW
YOUR
VEHICLE
SAFETY
STARTING
AND
DRIVING
WARNING
LIGHTS AND
MESSAGES
IN AN
EMERGENCY
SERVICING
AND
MAINTENANCE
TECHNICAL
SPECIFICATIONS
INDEXRECHARGING THE BAT T ERY
IMPORTANT The battery recharging procedure is pro-
vided for information purposes only. You are recom-
mended to go to a Fiat Dealership to have this operation
performed.
We recommend recharging the battery slowly for ap-
proximately 24 hours at low amperage. A prolonged
recharge might damage the battery.
Charge the battery as follows:
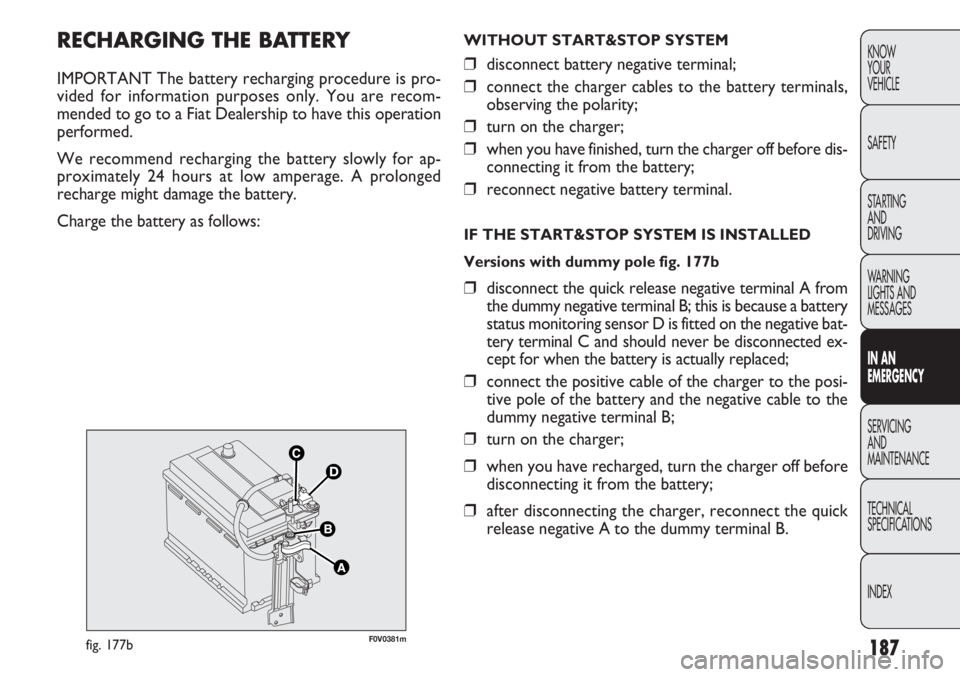
F0V0381mfig. 177b
WITHOUT START&STOP SYSTEM
❒disconnect battery negative terminal;
❒ connect the charger cables to the battery terminals,
observing the polarity;
❒ turn on the charger;
❒ when you have finished, turn the charger off before dis-
connecting it from the battery;
❒ reconnect negative battery terminal.
IF THE START&STOP SYSTEM IS INSTALLED
Versions with dummy pole fig. 177b
❒disconnect the quick release negative terminal A from
the dummy negative terminal B; this is because a battery
status monitoring sensor D is fitted on the negative bat-
tery terminal C and should never be disconnected ex-
cept for when the battery is actually replaced;
❒ connect the positive cable of the charger to the posi-
tive pole of the battery and the negative cable to the
dummy negative terminal B;
❒ turn on the charger;
❒ when you have recharged, turn the charger off before
disconnecting it from the battery;
❒ after disconnecting the charger, reconnect the quick
release negative A to the dummy terminal B.
Page 192 of 283
188
KNOWYOUR
VEHICLE
SAFETY
STARTING AND
DRIVING
WARNING
LIGHTS AND MESSAGES
IN AN
EMERGENCY
SERVICING AND
MAINTENANCE
TECHNICAL
SPECIFICA TIONS
INDEXBattery fluid is poisonous and corrosive:
avoid contact with your skin and eyes. The
battery recharging operation must be performed
in a ventilated place, away from naked flames or
possible sources of sparks to avoid the risk of ex-
plosion and fire.
WARNING
Don’t try to recharge a frozen battery: de-
frost it first or it might explode. If the bat-
tery was frozen, have it inspected by specialised
personnel before recharging to check that the in-
ternal elements are not damaged and that the cas-
ing is not cracked, which could cause poisonous,
corrosive acid to leak.
WARNING
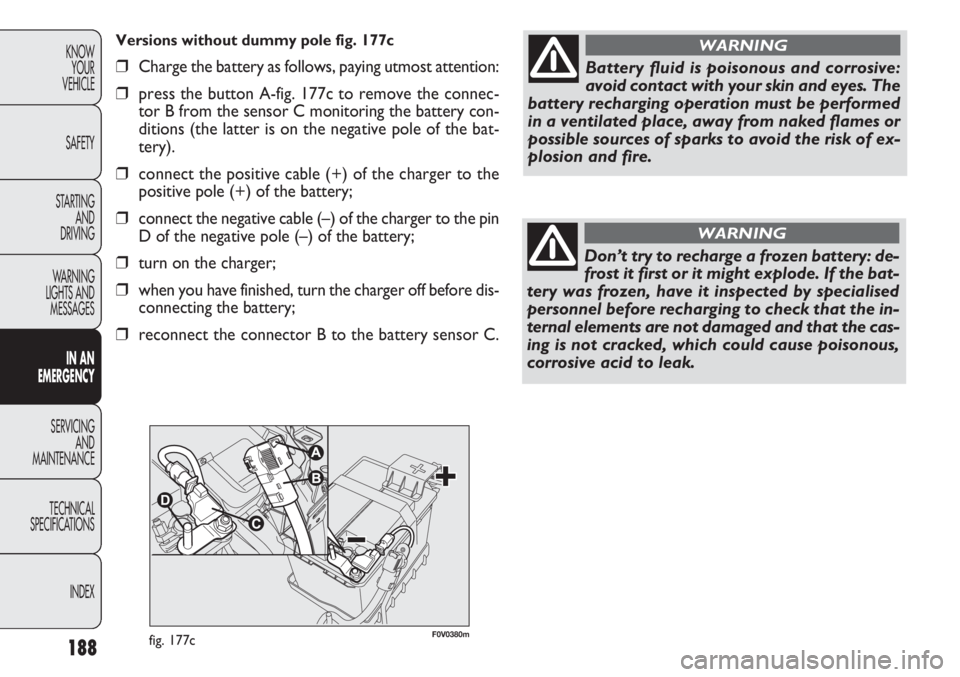
F0V0380mfig. 177c
Versions without dummy pole fig. 177c
❒ Charge the battery as follows, paying utmost attention:
❒ press the button A-fig. 177c to remove the connec-
tor B from the sensor C monitoring the battery con-
ditions (the latter is on the negative pole of the bat-
tery).
❒ connect the positive cable (+) of the charger to the
positive pole (+) of the battery;
❒ connect the negative cable (–) of the charger to the pin
D of the negative pole (–) of the battery;
❒ turn on the charger;
❒ when you have finished, turn the charger off before dis-
connecting the battery;
❒ reconnect the connector B to the battery sensor C.
Page 193 of 283
189
KNOW
YOUR
VEHICLE
SAFETY
STARTING
AND
DRIVING
WARNING
LIGHTS AND
MESSAGES
IN AN
EMERGENCY
SERVICING
AND
MAINTENANCE
TECHNICAL
SPECIFICATIONS
INDEXTOWING THE VEHICLE
The tow ring supplied with the vehicle is located in the
tool box located either behind the left seat backrest (Car-
go versions) or in the boot (Doblò / Doblò Combi ver-
sions).
FASTENING THE TOW RING
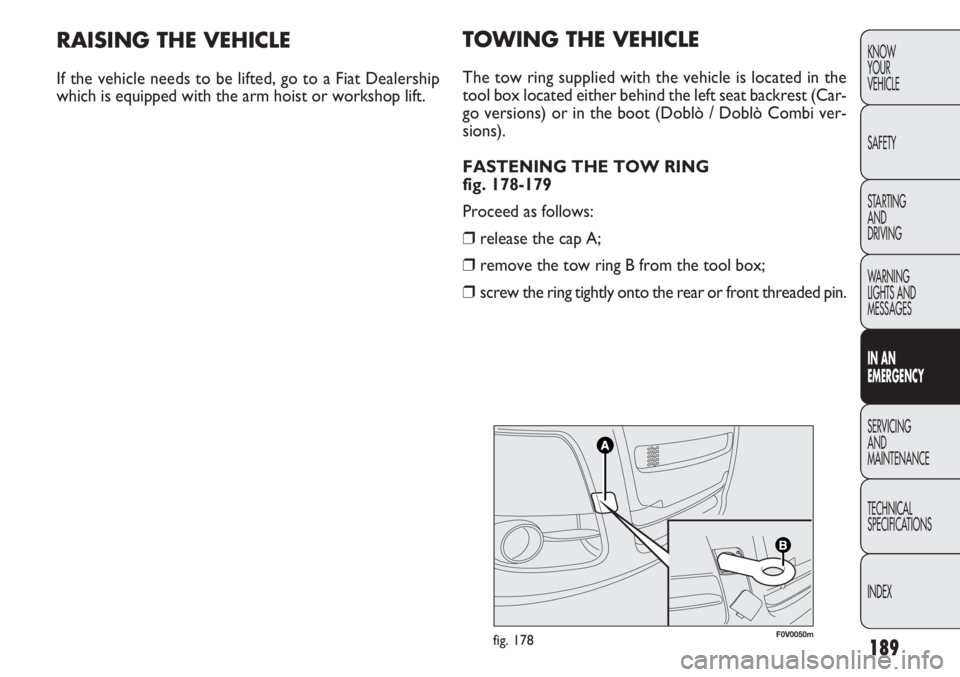
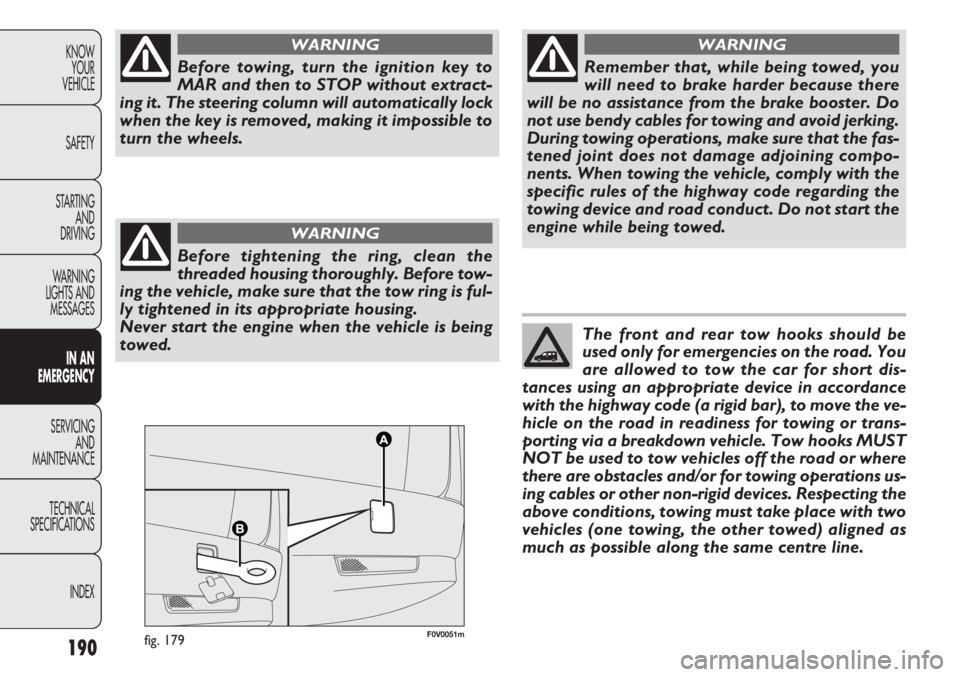
fig. 178-179
Proceed as follows:
❒ release the cap A;
❒ remove the tow ring B from the tool box;
❒ screw the ring tightly onto the rear or front threaded pin.
F0V0050mfig. 178
RAISING THE VEHICLE
If the vehicle needs to be lifted, go to a Fiat Dealership
which is equipped with the arm hoist or workshop lift.
Page 194 of 283
190
KNOWYOUR
VEHICLE
SAFETY
STARTING AND
DRIVING
WARNING
LIGHTS AND MESSAGES
IN AN
EMERGENCY
SERVICING AND
MAINTENANCE
TECHNICAL
SPECIFICA TIONS
INDEX
F0V0051mfig. 179
Before towing, turn the ignition key to
MAR and then to STOP without extract-
ing it. The steering column will automatically lock
when the key is removed, making it impossible to
turn the wheels.
WARNING
Before tightening the ring, clean the
threaded housing thoroughly. Before tow-
ing the vehicle, make sure that the tow ring is ful-
ly tightened in its appropriate housing.
Never start the engine when the vehicle is being
towed.
WARNING
Remember that, while being towed, you
will need to brake harder because there
will be no assistance from the brake booster. Do
not use bendy cables for towing and avoid jerking.
During towing operations, make sure that the fas-
tened joint does not damage adjoining compo-
nents. When towing the vehicle, comply with the
specific rules of the highway code regarding the
towing device and road conduct. Do not start the
engine while being towed.
WARNING
The front and rear tow hooks should be
used only for emergencies on the road. You
are allowed to tow the car for short dis-
tances using an appropriate device in accordance
with the highway code (a rigid bar), to move the ve-
hicle on the road in readiness for towing or trans-
porting via a breakdown vehicle. Tow hooks MUST
NOT be used to tow vehicles off the road or where
there are obstacles and/or for towing operations us-
ing cables or other non-rigid devices. Respecting the
above conditions, towing must take place with two
vehicles (one towing, the other towed) aligned as
much as possible along the same centre line.
Page 195 of 283
191
KNOW
YOUR
VEHICLE
SAFETY
STARTING
AND
DRIVING
WARNING
LIGHTS AND
MESSAGES
IN AN
EMERGENCY
SERVIC
ING
AND
MAINTENANCE
TECHNICAL
SPECIFICA TIONS
INDEX
SERVICING AND MAINTENANCE
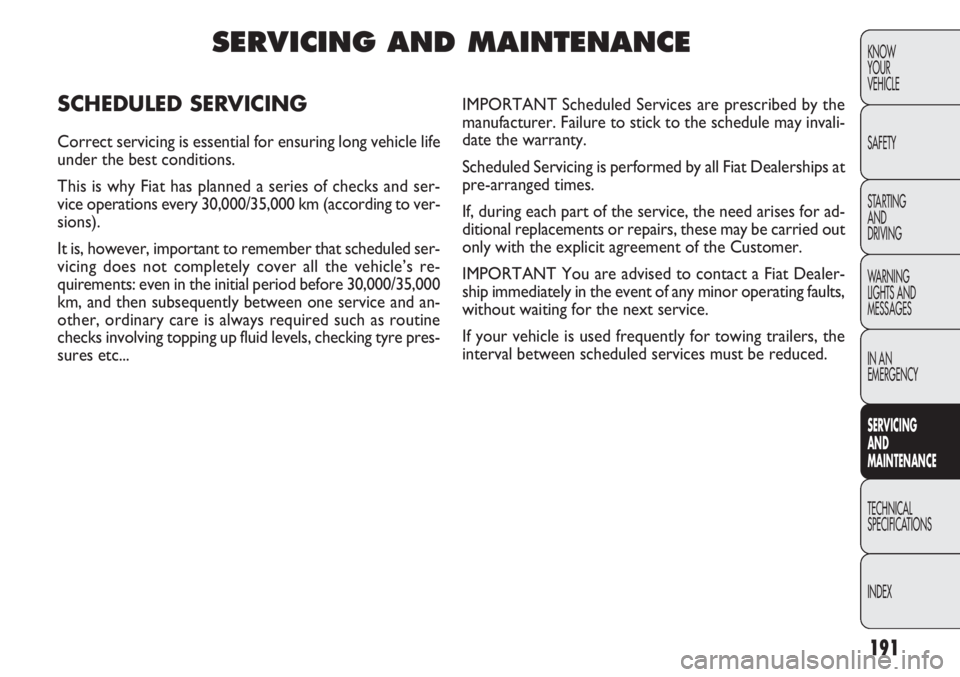
SCHEDULED SERVI CING
Correct servicing is essential for ensuring long vehicle life
under the best conditions.
This is why Fiat has planned a series of checks and ser-
vice operations every 30,000/35,000 km (according to ver-
sions).
It is, however, important to remember that scheduled ser-
vicing does not completely cover all the vehicle’s re-
quirements: even in the initial period before 30,000/35,000
km, and then subsequently between one service and an-
other, ordinary care is always required such as routine
checks involving topping up fluid levels, checking tyre pres-
sures etc... IMPORTANT Scheduled Services are prescribed by the
manufacturer. Failure to stick to the schedule may invali-
date the warranty.
Scheduled Servicing is performed by all Fiat Dealerships at
pre-arranged times.
If, during each part of the service, the need arises for ad-
ditional replacements or repairs, these may be carried out
only with the explicit agreement of the Customer.
IMPORTANT You are advised to contact a Fiat Dealer-
ship immediately in the event of any minor operating faults,
without waiting for the next service.
If your vehicle is used frequently for towing trailers, the
interval between scheduled services must be reduced.
Page 196 of 283
192
KNOWYOUR
VEHICLE
SAFETY
STARTING AND
DRIVING
WARNING
LIGHTS AND MESSAGES
IN AN
EMERGENCY
SERV IC
ING
AND
MAINTENANCE
TECHNICAL
SPECIFICA TIONS
INDEX
●●●●●●
●●●●●●
●●●●●●
●●●●●●
●●●●●●
●●●●●● ●●●
●●●●●●
●●●●●● ●●
●●
●●●●●●
●●●●●●
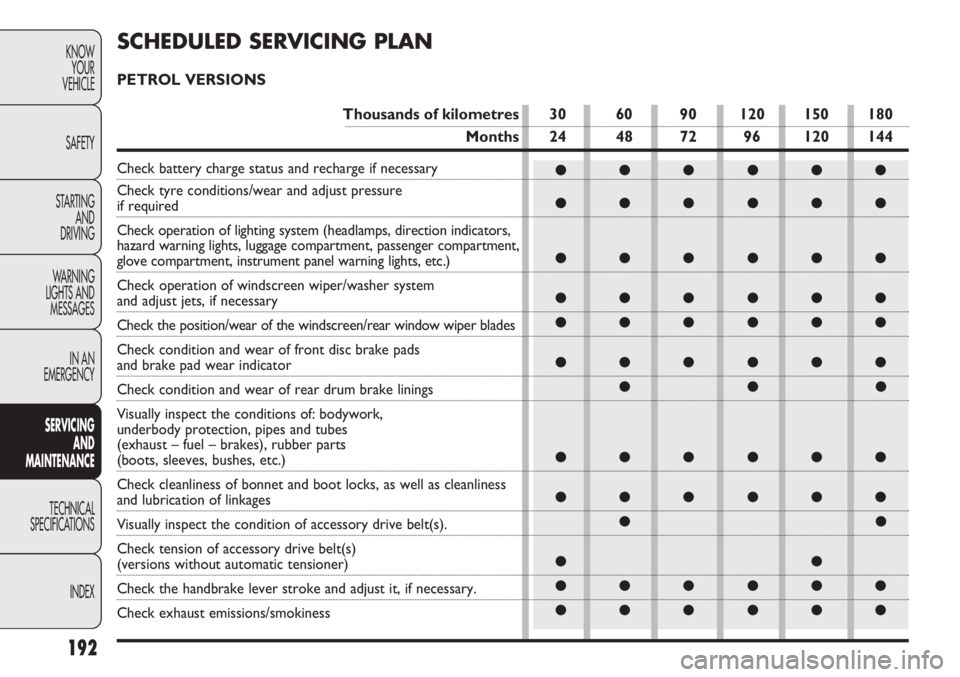
SCHEDULED SERVI CING PLAN
PETROL VERSIONS
Thousands of kilometres 30 60 90 120 150 180
Months 24 48 72 96 120 144
Check battery charge status and recharge if necessary
Check tyre conditions/wear and adjust pressure
if required
Check operation of lighting system (headlamps, direction indicators,
hazard warning lights, luggage compartment, passenger compartment,
glove compartment, instrument panel warning lights, etc.)
Check operation of windscreen wiper/washer system
and adjust jets, if necessary
Check the position/wear of the windscreen/rear window wiper blades
Check condition and wear of front disc brake pads
and brake pad wear indicator
Check condition and wear of rear drum brake linings
Visually inspect the conditions of: bodywork,
underbody protection, pipes and tubes
(exhaust – fuel – brakes), rubber parts
(boots, sleeves, bushes, etc.)
Check cleanliness of bonnet and boot locks, as well as cleanliness
and lubrication of linkages
Visually inspect the condition of accessory drive belt(s).
Check tension of accessory drive belt(s)
(versions without automatic tensioner)
Check the handbrake lever stroke and adjust it, if necessary.
Check exhaust emissions/smokiness