ESP FIAT DOBLO COMBI 2014 Owner handbook (in English)
[x] Cancel search | Manufacturer: FIAT, Model Year: 2014, Model line: DOBLO COMBI, Model: FIAT DOBLO COMBI 2014Pages: 283, PDF Size: 6.31 MB
Page 150 of 283
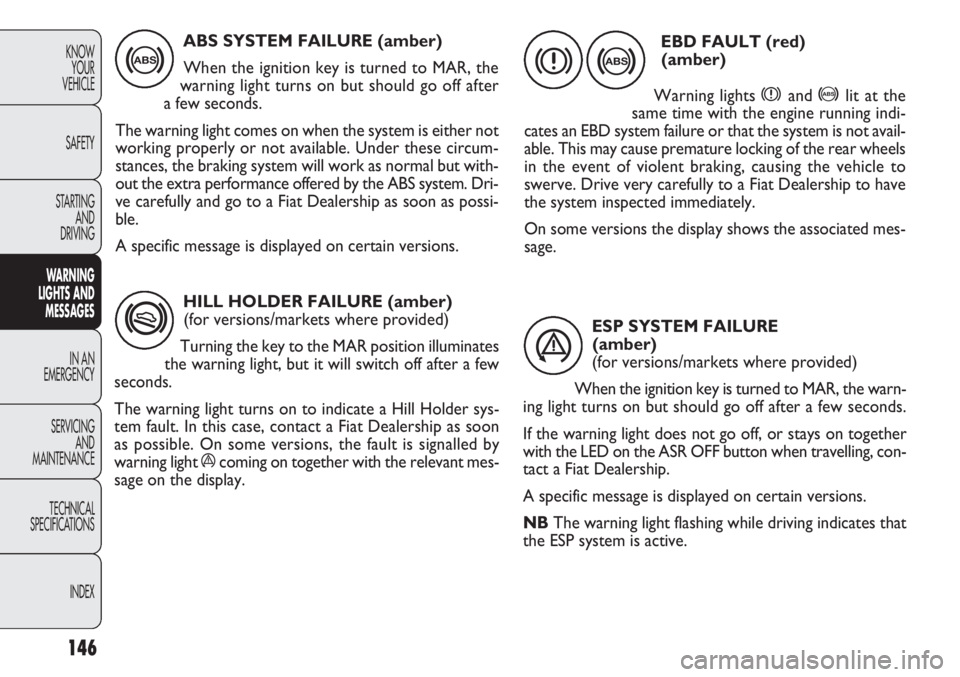
HILL HOLDER FAILURE (amber)(for versions/markets where provided)
Turning the key to the MAR position illuminates
the warning light, but it will switch off after a few
seconds.
The warning light turns on to indicate a Hill Holder sys-
tem fault. In this case, contact a Fiat Dealership as soon
as possible. On some versions, the fault is signalled by
warning light á coming on together with the relevant mes-
sage on the display.
*
ABS SYSTEM FAILURE (amber)
When the ignition key is turned to MAR, the
warning light turns on but should go off after
a few seconds.
The warning light comes on when the system is either not
working properly or not available. Under these circum-
stances, the braking system will work as normal but with-
out the extra performance offered by the ABS system. Dri-
ve carefully and go to a Fiat Dealership as soon as possi-
ble.
A specific message is displayed on certain versions.
146
KNOW YOUR
VEHICLE
SAFETY
STARTING AND
DRIVING
WARNING
LIGHTS AND MESSAGES
IN AN
EMERGENCY
SERVICING AND
MAINTENANCE
TECHNICAL
SPECIFICA TIONS
INDEX>
EBD FAULT (red) (amber)
Warning lights
xand >lit at the
same time with the engine running indi-
cates an EBD system failure or that the system is not avail-
able. This may cause premature locking of the rear wheels
in the event of violent braking, causing the vehicle to
swerve. Drive very carefully to a Fiat Dealership to have
the system inspected immediately.
On some versions the display shows the associated mes-
sage.
>
x
ESP SYSTEM FAILURE
(amber)
(for versions/markets where provided)
When the ignition key is turned to MAR, the warn-
ing light turns on but should go off after a few seconds.
If the warning light does not go off, or stays on together
with the LED on the ASR OFF button when travelling, con-
tact a Fiat Dealership.
A specific message is displayed on certain versions.
NB The warning light flashing while driving indicates that
the ESP system is active.
á
Page 153 of 283
149
KNOW
YOUR
VEHICLE
SAFETY
STARTING
AND
DRIVING
WA R N I NG
LIGHTS AND
MESSAGES
IN AN
EMERGENCY
SERVICING
AND
MAINTENANCE
TECHNICAL
SPECIFICA TIONS
INDEXA specific message is displayed on certain versions.
Under these conditions, the vehicle can continue trav-
elling at moderate speed without demanding excessive
effort from the engine. Prolonged use of the vehicle
with the warning light on may cause damage. Go to a
Fiat Dealership as soon as possible.
The warning light goes out after the fault disappears,
but the notification is stored in the system.
❒ flashing: this indicates possible damage to the catalytic
converter (see “EOBD system” in the “Dashboard and
controls” section).
If the light flashes, come off the accelerator pedal to re-
duce engine revs until the warning light stops flashing;
continue the journey at moderate speed, trying to avoid
driving conditions that may cause further flashing, and
get to a Fiat Dealership as soon as possible.
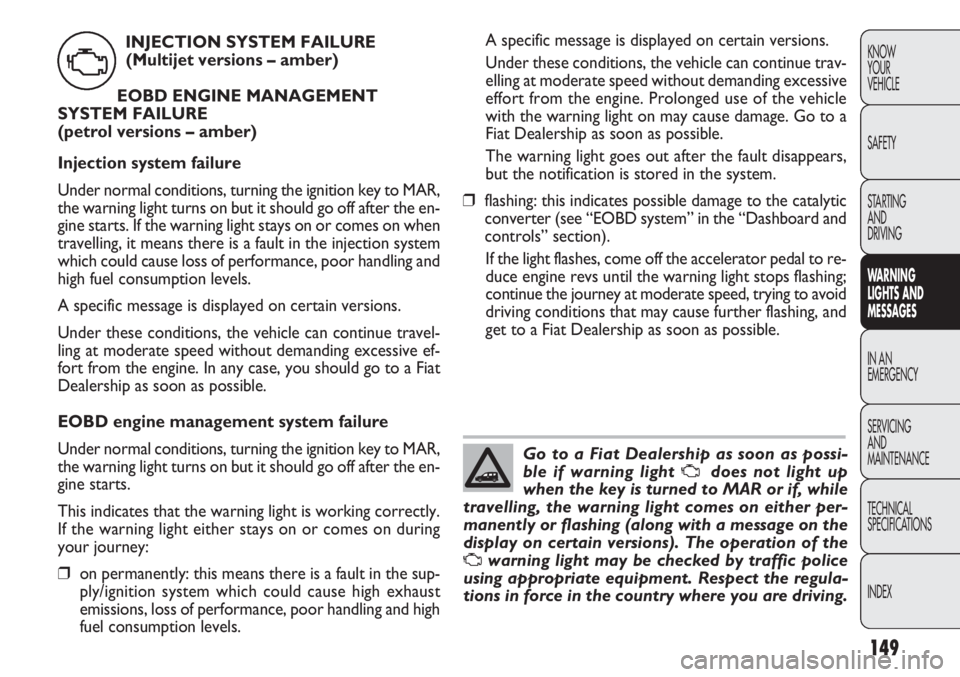
INJECTION SYSTEM FAILURE
(Multijet versions – amber)
EOBD ENGINE MANAGEMENT
SYSTEM FAILURE
(petrol versions – amber)
Injection system failure
Under normal conditions, turning the ignition key to MAR,
the warning light turns on but it should go off after the en-
gine starts. If the warning light stays on or comes on when
travelling, it means there is a fault in the injection system
which could cause loss of performance, poor handling and
high fuel consumption levels.
A specific message is displayed on certain versions.
Under these conditions, the vehicle can continue travel-
ling at moderate speed without demanding excessive ef-
fort from the engine. In any case, you should go to a Fiat
Dealership as soon as possible.
EOBD engine management system failure
Under normal conditions, turning the ignition key to MAR,
the warning light turns on but it should go off after the en-
gine starts.
This indicates that the warning light is working correctly.
If the warning light either stays on or comes on during
your journey:
❒ on permanently: this means there is a fault in the sup-
ply/ignition system which could cause high exhaust
emissions, loss of performance, poor handling and high
fuel consumption levels.
U
Go to a Fiat Dealership as soon as possi-
ble if warning light
Udoes not light up
when the key is turned to MAR or if, while
travelling, the warning light comes on either per-
manently or flashing (along with a message on the
display on certain versions). The operation of the
Uwarning light may be checked by traffic police
using appropriate equipment. Respect the regula-
tions in force in the country where you are driving.
Page 173 of 283
169
KNOW
YOUR
VEHICLE
SAFETY
STARTING
AND
DRIVING
WARNING
LIGHTS AND
MESSAGES
IN AN
EMERGENCY
SERVICING
AND
MAINTENANCE
TECHNICAL
SPECIFICATIONS
INDEXCHANGING A BULB
GENERAL INSTRUCTIONS
❒ Before changing a bulb, check the contacts for rusting;
❒ burnt-out bulbs must be replaced by others of the same
type and wattage;
❒ always check the direction of the beam after changing
a headlight bulb;
❒ when a light is not working, check that the corre-
sponding fuse is intact before changing the bulb. For the
location of fuses, refer to the “Changing a fuse” para-
graph in this section.
Changes or repairs to the electrical system
carried out incorrectly and without due
consideration for the technical specifications of
the system can lead to malfunctioning and gen-
erate a fire hazard.
WARNING
Halogen lamps contain pressurised gas. If
they break, glass fragments could fly every-
where.
WARNING
Touch only the metal part of a halogen
lamp. Touching the transparent part of the
bulb with your fingers may reduce the in-
tensity of the emitted light and even reduce the
lifespan of the bulb. If you do touch it accidental-
ly, rub the bulb with an alcohol-soaked cloth and
leave to dry.
If possible, we recommend that you let
a Fiat Dealership replace the bulbs. Prop-
er operation and orientation of the exter-
nal lights are essential for driving safety and com-
plying with the law.
IMPORTANT The internal surface of the light may appear
slightly misty: this does not indicate a fault, and is actually
caused by low temperature and the degree of humidity
in the air. Misting will rapidly disappear when the head-
lights are switched on. The presence of drops inside the
headlights indicates infiltration of water. Go to a Fiat Deal-
ership.
Page 185 of 283
181
KNOW
YOUR
VEHICLE
SAFETY
STARTING
AND
DRIVING
WARNING
LIGHTS AND
MESSAGES
IN AN
EMERGENCY
SERVICING
AND
MAINTENANCE
TECHNICAL
SPECIFICATIONS
INDEX
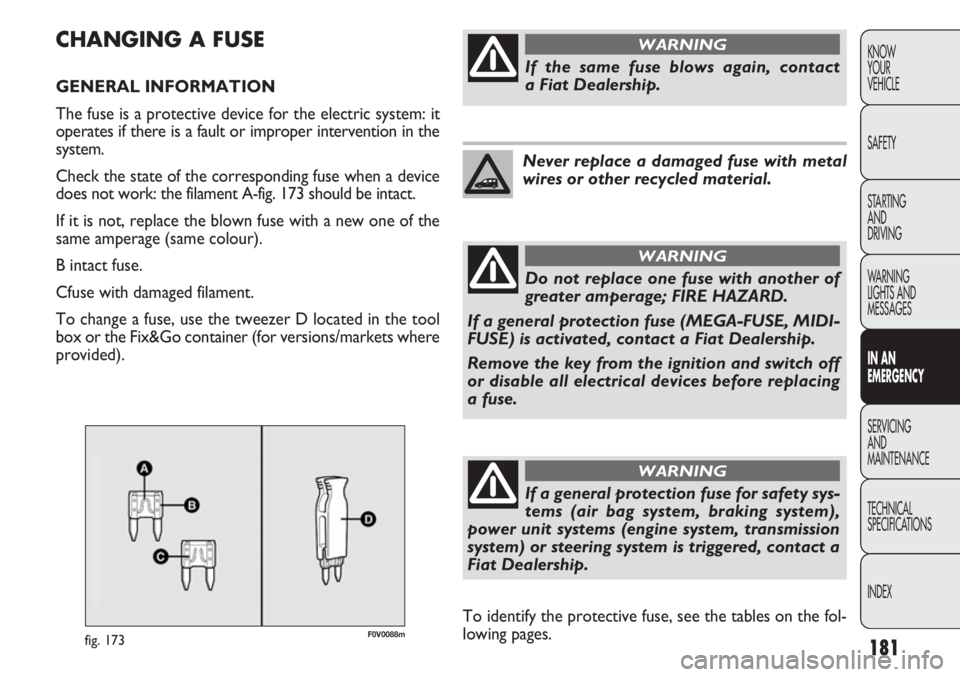
F0V0088mfig. 173
CHANGING A FUSE
GENERAL INFORMATION
The fuse is a protective device for the electric system: it
operates if there is a fault or improper intervention in the
system.
Check the state of the corresponding fuse when a device
does not work: the filament A-fig. 173 should be intact.
If it is not, replace the blown fuse with a new one of the
same amperage (same colour).
B intact fuse.
Cfuse with damaged filament.
To change a fuse, use the tweezer D located in the tool
box or the Fix&Go container (for versions/markets where
provided).
If the same fuse blows again, contact
a Fiat Dealership.
WARNING
Never replace a damaged fuse with metal
wires or other recycled material.
Do not replace one fuse with another of
greater amperage; FIRE HAZARD.
If a general protection fuse (MEGA-FUSE, MIDI-
FUSE) is activated, contact a Fiat Dealership.
Remove the key from the ignition and switch off
or disable all electrical devices before replacing
a fuse.
WARNING
To identify the protective fuse, see the tables on the fol-
lowing pages.
If a general protection fuse for safety sys-
tems (air bag system, braking system),
power unit systems (engine system, transmission
system) or steering system is triggered, contact a
Fiat Dealership.
WARNING
Page 194 of 283
190
KNOWYOUR
VEHICLE
SAFETY
STARTING AND
DRIVING
WARNING
LIGHTS AND MESSAGES
IN AN
EMERGENCY
SERVICING AND
MAINTENANCE
TECHNICAL
SPECIFICA TIONS
INDEX
F0V0051mfig. 179
Before towing, turn the ignition key to
MAR and then to STOP without extract-
ing it. The steering column will automatically lock
when the key is removed, making it impossible to
turn the wheels.
WARNING
Before tightening the ring, clean the
threaded housing thoroughly. Before tow-
ing the vehicle, make sure that the tow ring is ful-
ly tightened in its appropriate housing.
Never start the engine when the vehicle is being
towed.
WARNING
Remember that, while being towed, you
will need to brake harder because there
will be no assistance from the brake booster. Do
not use bendy cables for towing and avoid jerking.
During towing operations, make sure that the fas-
tened joint does not damage adjoining compo-
nents. When towing the vehicle, comply with the
specific rules of the highway code regarding the
towing device and road conduct. Do not start the
engine while being towed.
WARNING
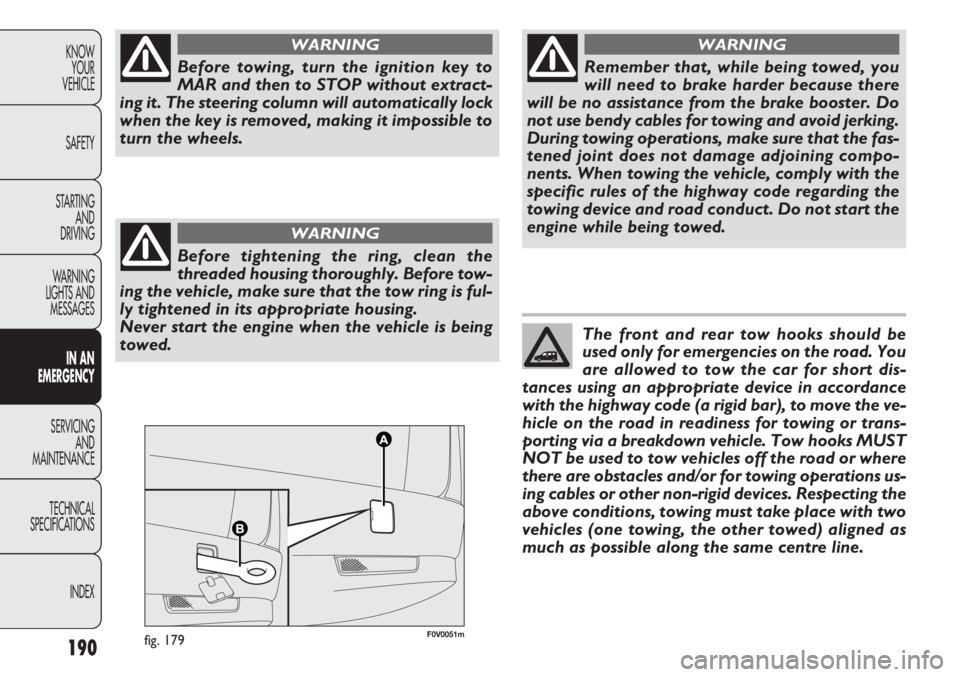
The front and rear tow hooks should be
used only for emergencies on the road. You
are allowed to tow the car for short dis-
tances using an appropriate device in accordance
with the highway code (a rigid bar), to move the ve-
hicle on the road in readiness for towing or trans-
porting via a breakdown vehicle. Tow hooks MUST
NOT be used to tow vehicles off the road or where
there are obstacles and/or for towing operations us-
ing cables or other non-rigid devices. Respecting the
above conditions, towing must take place with two
vehicles (one towing, the other towed) aligned as
much as possible along the same centre line.
Page 206 of 283
ENGINE OIL fig. 180-181-182-183-184-185
Check the oil level a few minutes after stopping the engine
(about 5 minutes) with the vehicle parked on level ground.
The oil level should be between the MIN and MAX marks
on the dipstick B.
The gap between the MIN and MAX marks corresponds
to about one litre of oil.
If the oil level is near or under the MIN line, add oil through
the filler A until it reaches the MAX line.
The oil level should never exceed the MAX line.
Engine oil consumption
The maximum engine oil consumption is usually 400 grams
every 1,000 km.
The engine needs to run in when the vehicle is new, and
therefore the engine oil consumption can only be consid-
ered stabilised after the first 5,000 – 6,000 km.
IMPORTANT Oil consumption depends on driving style
and conditions of use of the vehicle.
IMPORTANT After adding or changing the oil, let the en-
gine turn over for a few seconds and wait a few minutes
after turning it off before you check the level.
202
KNOWYOUR
VEHICLE
SAFETY
STARTING AND
DRIVING
WARNING
LIGHTS AND MESSAGES
IN AN
EMERGENCY
SERV IC
ING
AND
MAINTENANCE
TECHNICAL
SPECIFICA TIONS
INDEX
Be very careful working in the engine com-
partment when the engine is hot: you may
get burned. Remember that the fan may start up
if the engine is hot: this could injure you. Make
sure that scarves, ties and other items of loose-fit-
ting clothing do not get caught up in moving com-
ponents.
WARNING
Do not add oil with different characteris-
tics from those of the existing engine oil.
The used engine oil and the replaced oil fil-
ter contain substances that are harmful to
the environment. It is advisable to have oil
and filters changed by a Fiat Dealership, where they
will be disposed of properly and in accordance with
the law.
Page 219 of 283
215
KNOW
YOUR
VEHICLE
SAFETY
STARTING
AND
DRIVING
WARNING
LIGHTS AND
MESSAGES
IN AN
EMERGENCY
SERVIC
ING
AND
MAINTENANCE
TECHNICAL
SPECIFICA TIONS
INDEX
To wash the vehicle properly, proceed as follows:
❒wash the body using a low-pressure jet of water;
❒use a sponge to wipe a slightly soapy solution over the
bodywork, frequently rinsing the sponge;
❒rinse with plenty of water and dry with a jet of air or
a chamois leather.
Observe the following recommendations for washing the
vehicle in an automatic carwash:
– remove the aerial from the roof so it does not get dam-
aged;
– the car wash should use water added to a soapy solu-
tion;
– rinse thoroughly to avoid soap marks staying on the
bodywork or less visible parts.
Some car washes with old-style blades
and/or in a poor state of repair can dam-
age the paintwork, facilitating the forma-
tion of lines that give the paint a dull/misty ap-
pearance, especially on dark colours. If this hap-
pens, lightly polish the paintwork with appropriate
products.
Dry the less visible parts particularly carefully, such as the
door frames, bonnet and the headlight frames, where wa-
ter may stagnate more easily. It is a good idea to leave
the vehicle outdoors for a while after washing it to give
water time to evaporate.
Do not wash the vehicle after it has been left in the sun or
with the bonnet hot: this may alter the shine of the paint-
work.
Exterior plastic parts should be cleaned in the same way
as the rest of the vehicle. Where possible, do not park the
vehicle under trees; the resinous substances released by
many species give the paint a dull appearance and increase
the possibility of rust.
IMPORTANT Bird droppings should be washed off im-
mediately and thoroughly as the acid they contain is par-
ticularly aggressive.
Detergents cause water pollution. The ve-
hicle should be washed in areas equipped
for collecting and purifying the liquid used
in the washing process.
Page 224 of 283
220
KNOWYOUR
VEHICLE
SAFETY
STARTING AND
DRIVING
WARNING
LIGHTS AND MESSAGES
IN AN
EMERGENCY
SERVICING AND
MAINTENANCE
TECHNICAL
SPECIFICAT IO
NS
INDEX
F0V0118mfig. 192F0V0117mfig. 194
F0V0116mfig. 193
ENGINE MARKING
This is printed onto the cylinder block and shows the type
and production serial number.
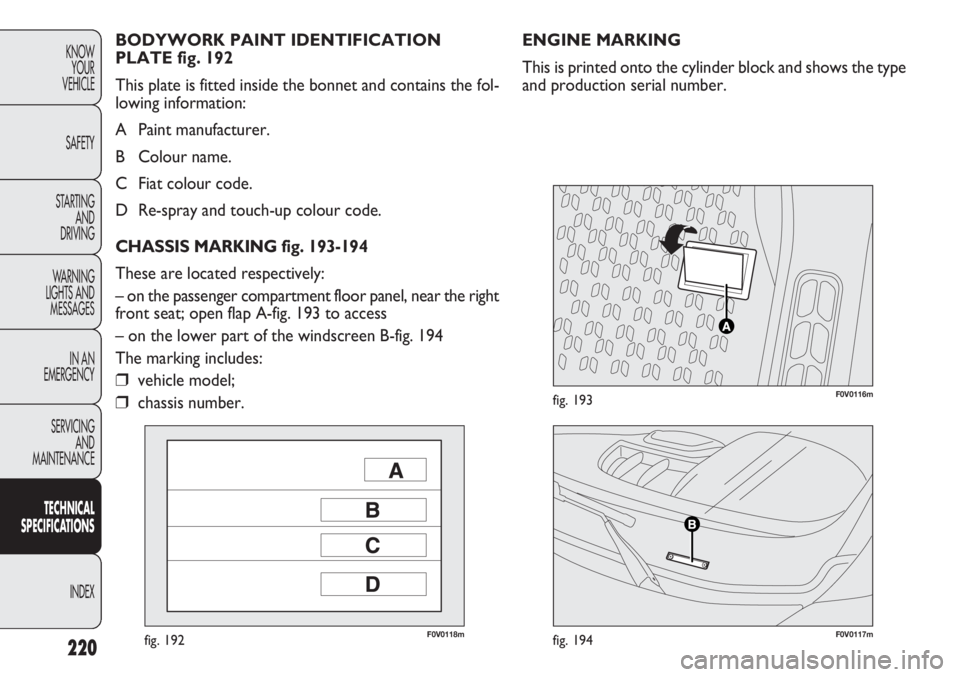
BODYWORK PAINT IDENTIFICATION
PLATE fig. 192
This plate is fitted inside the bonnet and contains the fol-
lowing information:
A Paint manufacturer.
B Colour name.
C Fiat colour code.
D Re-spray and touch-up colour code.
CHASSIS MARKING fig. 193-194
These are located respectively:
– on the passenger compartment floor panel, near the right
front seat; open flap A-fig. 193 to access
– on the lower part of the windscreen B-fig. 194
The marking includes:
❒vehicle model;
❒chassis number.
Page 227 of 283
223
KNOW
YOUR
VEHICLE
SAFETY
STARTING
AND
DRIVING
WARNING
LIGHTS AND
MESSAGES
IN AN
EMERGENCY
SERVICING
AND
MAINTENANCE
TECHNICAL
SPECIFICATIO
NS
INDEX
1.6
Multijet
198A3000/
263A3000/
263A4000
Diesel
4 in line
79.5x80.5 1598
16.5:1
77/74/66
105/100/90
4000
290
29.6
1500 –
Diesel for
motor vehicles (EN 590
specification)
2.0
Multijet
263A1000
Diesel
4 in line
83x90.5 1956
16.5:1
99
135
3500
320
32.6
1500 –
Diesel for
motor vehicles (EN 590
specification)
1.4 T-JET
198A4000
Otto
4 in line
72x841368
9,8±0,2
88
120
5000
20621
3000
NGK IKR9F8
Petrol 95 RON
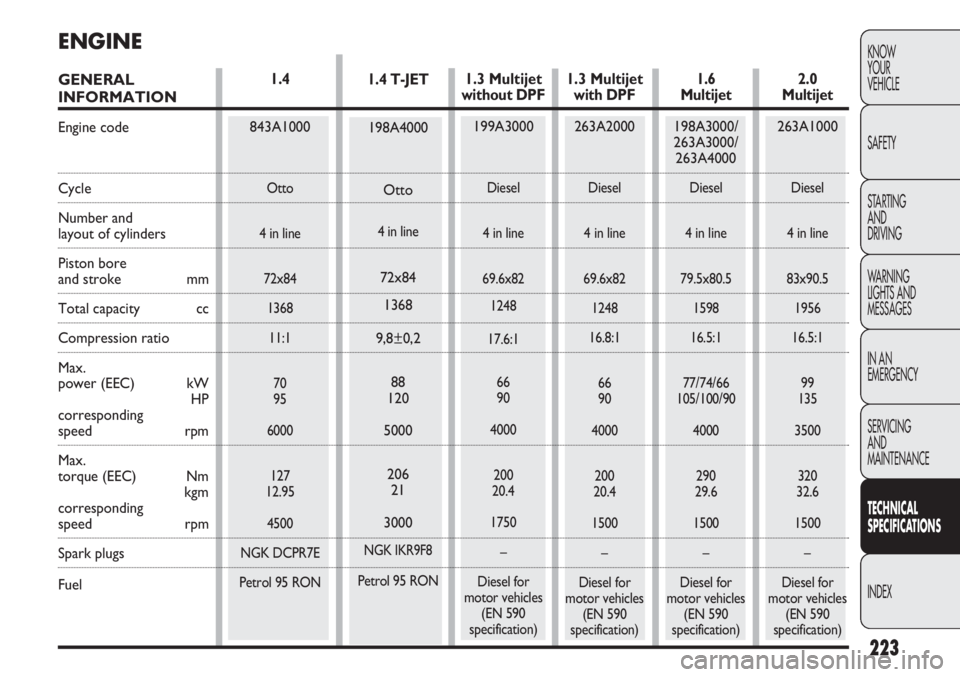
ENGINE
GENERAL
INFORMATION
Engine code
Cycle
Number and
layout of cylinders
Piston bore
and stroke mm
Total capacity cc
Compression ratio
Max.
power (EEC) kW HP
corresponding
speed rpm
Max.
torque (EEC) Nm kgm
corresponding
speed rpm
Spark plugs
Fuel
1.4
843A1000
Otto
4 in line 72x84136811:1
70
95
6000
127
12.95
4500
NGK DCPR7E
Petrol 95 RON
1.3 Multijet
without DPF
199A3000
Diesel
4 in line
69.6x82 1248
17.6:1
66
90
4000
200
20.4
1750 –
Diesel for
motor vehicles (EN 590
specification)
1.3 Multijet with DPF
263A2000
Diesel
4 in line
69.6x82 1248
16.8:1
66
90
4000
200
20.4
1500 –
Diesel for
motor vehicles (EN 590
specification)
Page 231 of 283
227
KNOW
YOUR
VEHICLE
SAFETY
STARTING
AND
DRIVING
WARNING
LIGHTS AND
MESSAGES
IN AN
EMERGENCY
SERVICING
AND
MAINTENANCE
TECHNICAL
SPECIFICATIO
NS
INDEX
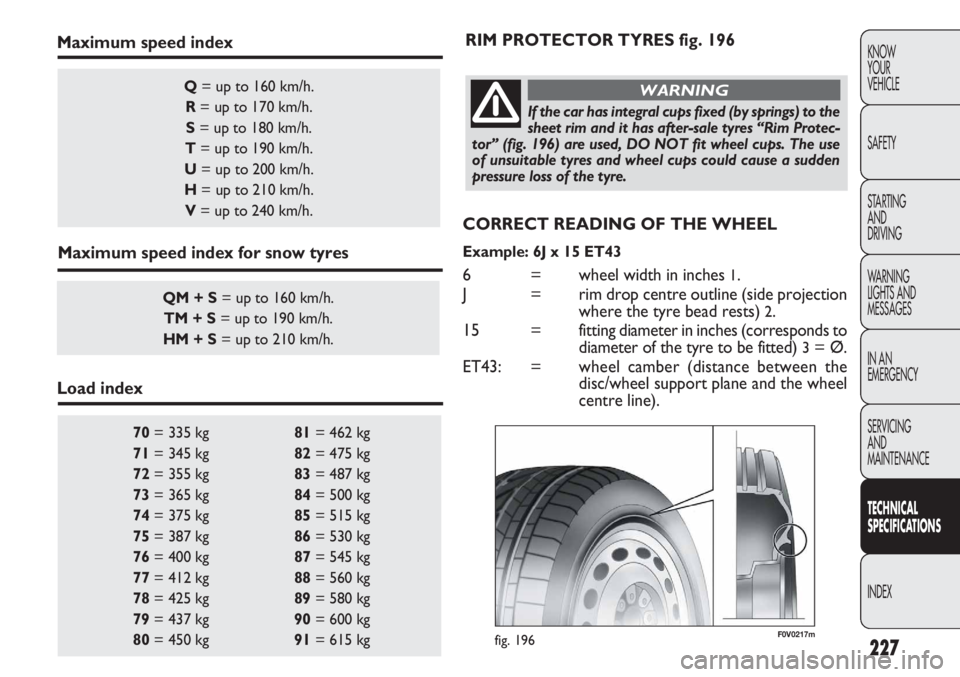
70 = 335 kg 81= 462 kg
71 = 345 kg 82= 475 kg
72 = 355 kg 83= 487 kg
73 = 365 kg 84= 500 kg
74 = 375 kg 85= 515 kg
75 = 387 kg 86= 530 kg
76 = 400 kg 87= 545 kg
77 = 412 kg 88= 560 kg
78 = 425 kg 89= 580 kg
79 = 437 kg 90= 600 kg
80 = 450 kg 91= 615 kg
Q= up to 160 km/h.
R = up to 170 km/h.
S = up to 180 km/h.
T = up to 190 km/h.
U = up to 200 km/h.
H = up to 210 km/h.
V = up to 240 km/h.
QM + S = up to 160 km/h.
TM + S = up to 190 km/h.
HM + S = up to 210 km/h.
Maximum speed index
Maximum speed index for snow tyres
Load index RIM PROTECTOR TYRES fig. 196
If the car has integral cups fixed (by springs) to the
sheet rim and it has after-sale tyres “Rim Protec-
tor” (fig. 196) are used, DO NOT fit wheel cups. The use
of unsuitable tyres and wheel cups could cause a sudden
pressure loss of the tyre.
WARNING
F0V0217mfig. 196
CORRECT READING OF THE WHEEL
Example: 6J x 15 ET43
6 = wheel width in inches 1.
J = rim drop centre outline (side projection where the tyre bead rests)
2.
15 = fitting diameter in inches (corresponds to diameter of the tyre to be fitted)
3= Ø.
ET43: = wheel camber (di stance between the
disc/wheel support plane and the wheel
centre line).