engine FIAT DOBLO COMBI 2014 Owner handbook (in English)
[x] Cancel search | Manufacturer: FIAT, Model Year: 2014, Model line: DOBLO COMBI, Model: FIAT DOBLO COMBI 2014Pages: 283, PDF Size: 6.31 MB
Page 162 of 283
F0V0148mfig. 130
F0V0149mfig. 129
158
KNOWYOUR
VEHICLE
SAFETY
STARTING AND
DRIVING
WARNING
LIGHTS AND MESSAGES
IN AN
EMERGENCY
SERVICING AND
MAINTENANCE
TECHNICAL
SPECIFICA TIONS
INDEXImportant notes:
❒ the jack weighs 4 kg;
❒ the jack requires no adjustment;
❒ the jack cannot be repaired; if it breaks, it must be re-
placed with a new one of the same type;
❒ no tool other than the cranking handle may be fitted on
the jack.
To change a tyre, proceed as follows:
❒ stop the vehicle in a position where it is not a danger
for other traffic and where you can replace the wheel
safely. The ground should be flat and solid;
❒ turn the engine off and engage the handbrake;
❒ engage first gear or reverse;
❒ wear the reflective safety jacket (compulsory by law)
before getting out of the vehicle;
❒ indicate that the vehicle is parked up by using the de-
vices required by law in the country in which you are
travelling (e.g. warning triangle, hazard lights etc.);
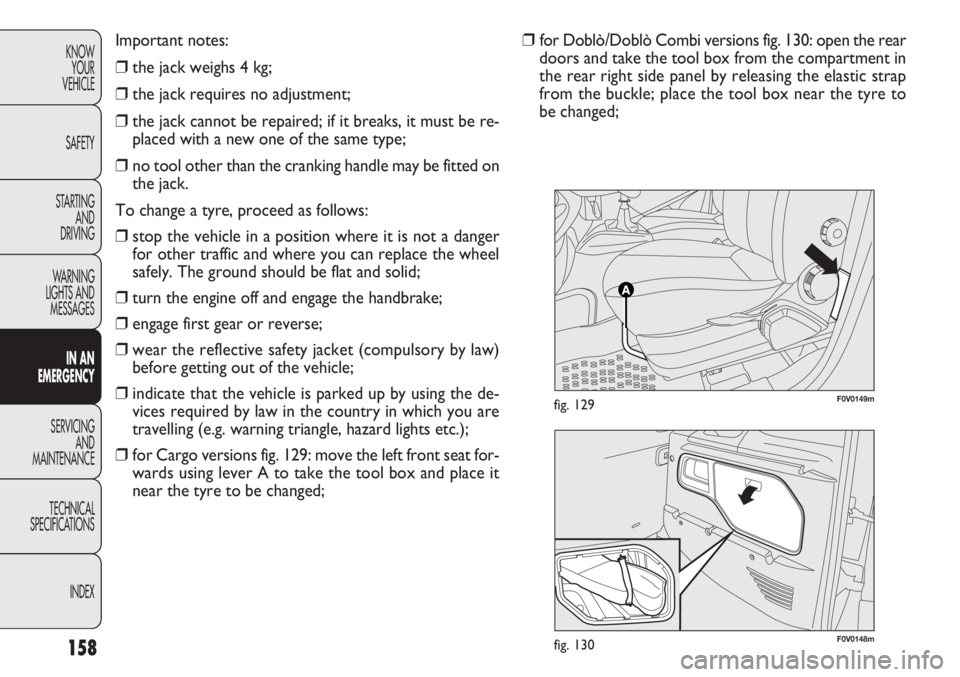
❒ for Cargo versions fig. 129: move the left front seat for-
wards using lever A to take the tool box and place it
near the tyre to be changed; ❒
for Doblò/Doblò Combi versions fig. 130: open the rear
doors and take the tool box from the compartment in
the rear right side panel by releasing the elastic strap
from the buckle; place the tool box near the tyre to
be changed;
Page 170 of 283
166
KNOWYOUR
VEHICLE
SAFETY
STARTING AND
DRIVING
WARNING
LIGHTS AND MESSAGES
IN AN
EMERGENCY
SERVICING AND
MAINTENANCE
TECHNICAL
SPECIFICA TIONS
INDEX
F0V0096mfig. 144F0V0097mfig. 145
❒ if in this case a pressure of at least 1.8 bar is not reached
within five minutes of switching on the compressor, do
not continue driving because the tyre is too damaged
and the hold cannot be guaranteed. Contact
a Fiat Dealership
❒ if you do reach the tyre pressure specified in the “Cold
tyre pressures” paragraph of the “Technical specifica-
tions” section, continue your journey immediately;
❒
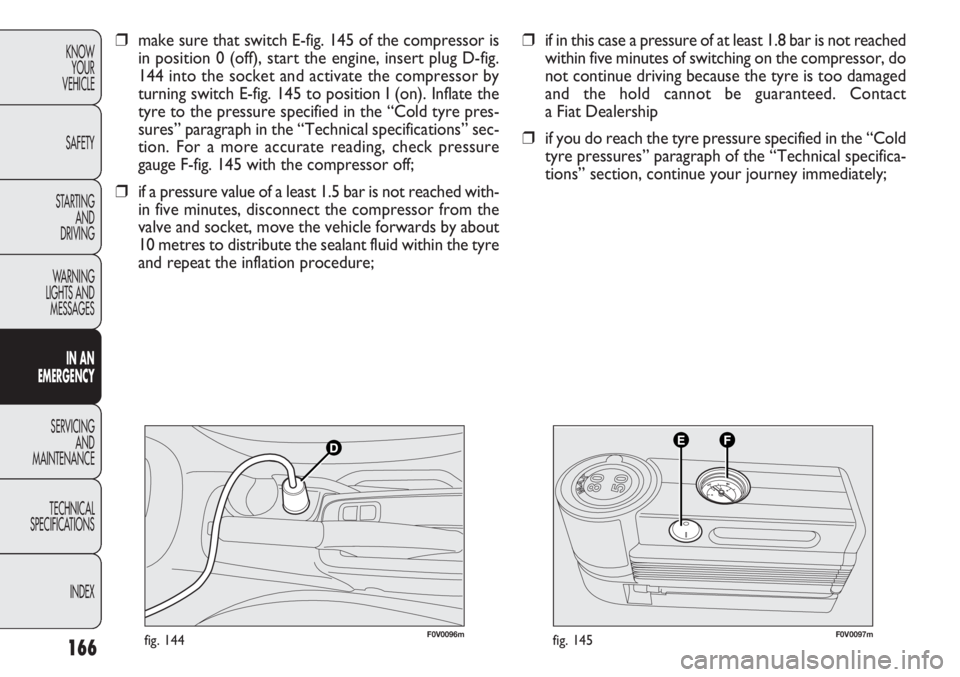
make sure that switch E-fig. 145 of the compressor is
in position 0 (off), start the engine, insert plug D-fig.
144 into the socket and activate the compressor by
turning switch E-fig. 145 to position I (on). Inflate the
tyre to the pressure specified in the “Cold tyre pres-
sures” paragraph in the “Technical specifications” sec-
tion. For a more accurate reading, check pressure
gauge F-fig. 145 with the compressor off;
❒ if a pressure value of a least 1.5 bar is not reached with-
in five minutes, disconnect the compressor from the
valve and socket, move the vehicle forwards by about
10 metres to distribute the sealant fluid within the tyre
and repeat the inflation procedure;
Page 171 of 283
167
KNOW
YOUR
VEHICLE
SAFETY
STARTING
AND
DRIVING
WARNING
LIGHTS AND
MESSAGES
IN AN
EMERGENCY
SERVICING
AND
MAINTENANCE
TECHNICAL
SPECIFICATIONS
INDEX
F0V0098mfig. 146
❒ If you get a pressure reading of at least 1.8 bar, restore
the proper pressure (with engine running and handbrake
on) and continue your journey.
❒ drive with the utmost care to the nearest Fiat Dealer-
ship.
❒
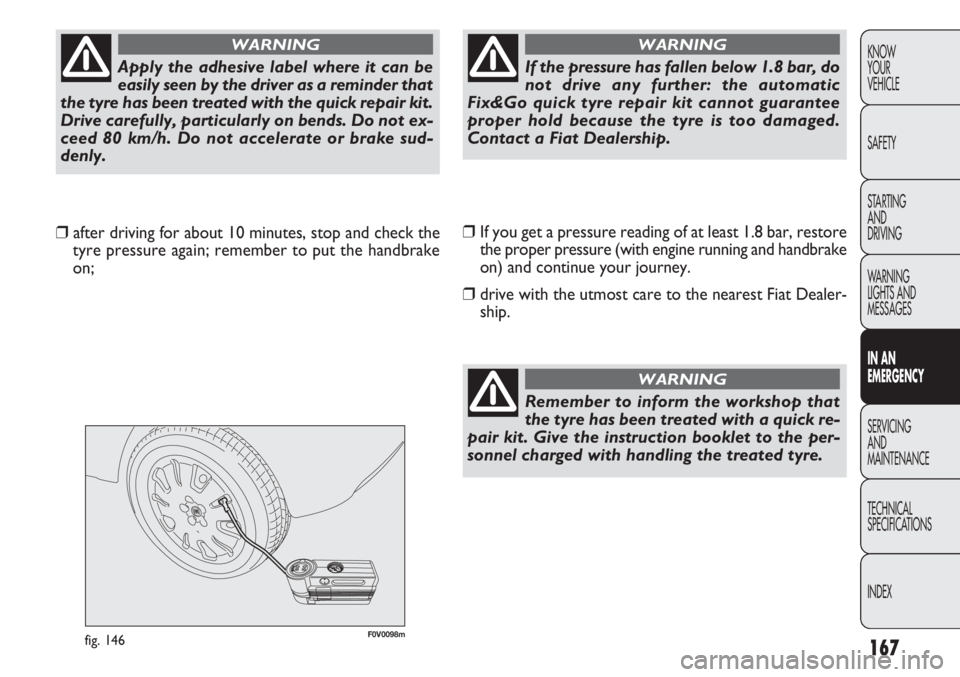
after driving for about 10 minutes, stop and check the
tyre pressure again; remember to put the handbrake
on;
Apply the adhesive label where it can be
easily seen by the driver as a reminder that
the tyre has been treated with the quick repair kit.
Drive carefully, particularly on bends. Do not ex-
ceed 80 km/h. Do not accelerate or brake sud-
denly.
WARNING
If the pressure has fallen below 1.8 bar, do
not drive any further: the automatic
Fix&Go quick tyre repair kit cannot guarantee
proper hold because the tyre is too damaged.
Contact a Fiat Dealership.
WARNING
Remember to inform the workshop that
the tyre has been treated with a quick re-
pair kit. Give the instruction booklet to the per-
sonnel charged with handling the treated tyre.
WARNING
Page 185 of 283
181
KNOW
YOUR
VEHICLE
SAFETY
STARTING
AND
DRIVING
WARNING
LIGHTS AND
MESSAGES
IN AN
EMERGENCY
SERVICING
AND
MAINTENANCE
TECHNICAL
SPECIFICATIONS
INDEX
F0V0088mfig. 173
CHANGING A FUSE
GENERAL INFORMATION
The fuse is a protective device for the electric system: it
operates if there is a fault or improper intervention in the
system.
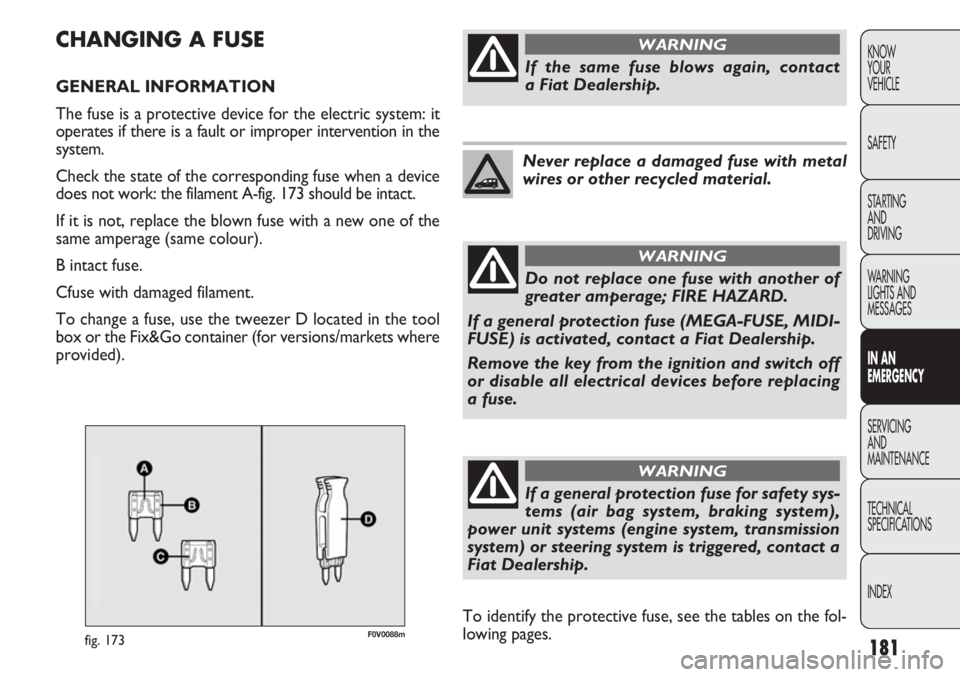
Check the state of the corresponding fuse when a device
does not work: the filament A-fig. 173 should be intact.
If it is not, replace the blown fuse with a new one of the
same amperage (same colour).
B intact fuse.
Cfuse with damaged filament.
To change a fuse, use the tweezer D located in the tool
box or the Fix&Go container (for versions/markets where
provided).
If the same fuse blows again, contact
a Fiat Dealership.
WARNING
Never replace a damaged fuse with metal
wires or other recycled material.
Do not replace one fuse with another of
greater amperage; FIRE HAZARD.
If a general protection fuse (MEGA-FUSE, MIDI-
FUSE) is activated, contact a Fiat Dealership.
Remove the key from the ignition and switch off
or disable all electrical devices before replacing
a fuse.
WARNING
To identify the protective fuse, see the tables on the fol-
lowing pages.
If a general protection fuse for safety sys-
tems (air bag system, braking system),
power unit systems (engine system, transmission
system) or steering system is triggered, contact a
Fiat Dealership.
WARNING
Page 186 of 283
182
KNOWYOUR
VEHICLE
SAFETY
STARTING AND
DRIVING
WARNING
LIGHTS AND MESSAGES
IN AN
EMERGENCY
SERVICING AND
MAINTENANCE
TECHNICAL
SPECIFICA TIONS
INDEX
F0V0081mfig. 174F0V0089mfig. 175
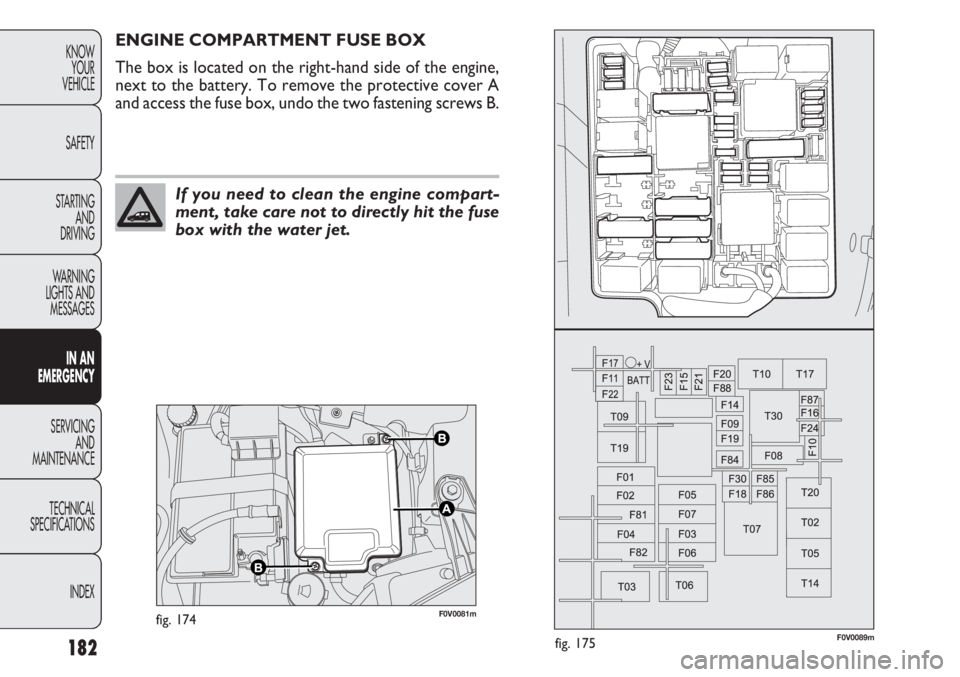
ENGINE COMPARTMENT FUSE BOX
The box is located on the right-hand side of the engine,
next to the battery. To remove the protective cover A
and access the fuse box, undo the two fastening screws B.
If you need to clean the engine compart-
ment, take care not to directly hit the fuse
box with the water jet.
Page 187 of 283
183
KNOW
YOUR
VEHICLE
SAFETY
STARTING
AND
DRIVING
WARNING
LIGHTS AND
MESSAGES
IN AN
EMERGENCY
SERVICING
AND
MAINTENANCE
TECHNICAL
SPECIFICATIONS
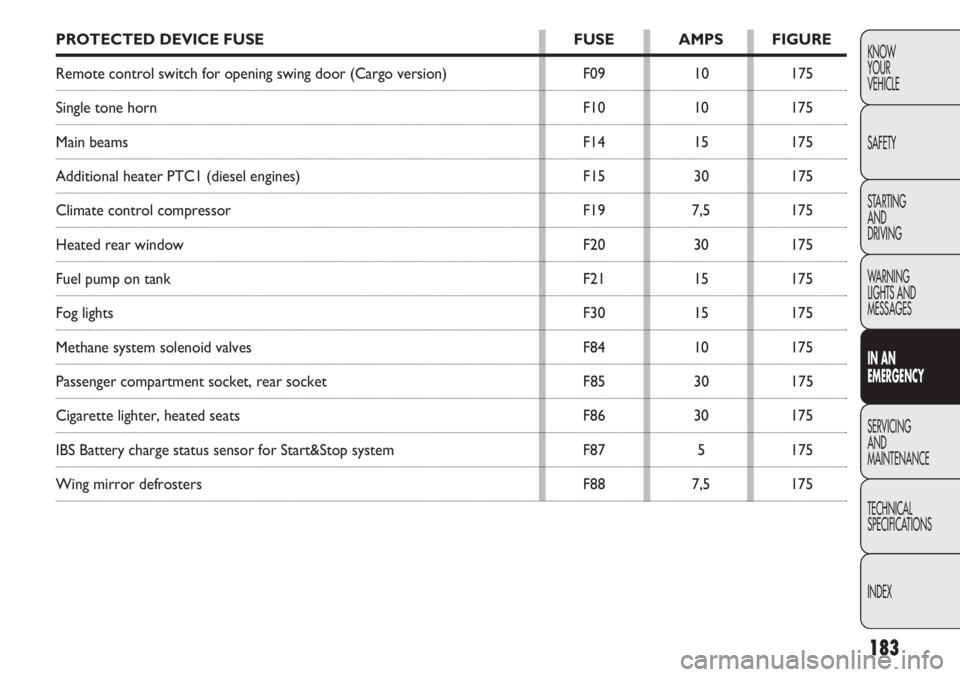
INDEXPROTECTED DEVICE FUSE FUSE AMPS FIGURE
Remote control switch for opening swing door (Cargo version) F0910175
Single tone horn F1010175
Main beams F1415175
Additional heater PTC1 (diesel engines) F1530175
Climate control compressor F197,5175
Heated rear window F2030175
Fuel pump on tank F2115175
Fog lights F3015175
Methane system solenoid valves F8410175
Passenger compartment socket, rear socket F8530175
Cigarette lighter, heated seats F8630175
IBS Battery charge status sensor for Start&Stop system F875175
Wing mirror defrosters F887,5175
Page 189 of 283
185
KNOW
YOUR
VEHICLE
SAFETY
STARTING
AND
DRIVING
WARNING
LIGHTS AND
MESSAGES
IN AN
EMERGENCY
SERVICING
AND
MAINTENANCE
TECHNICAL
SPECIFICATIONS
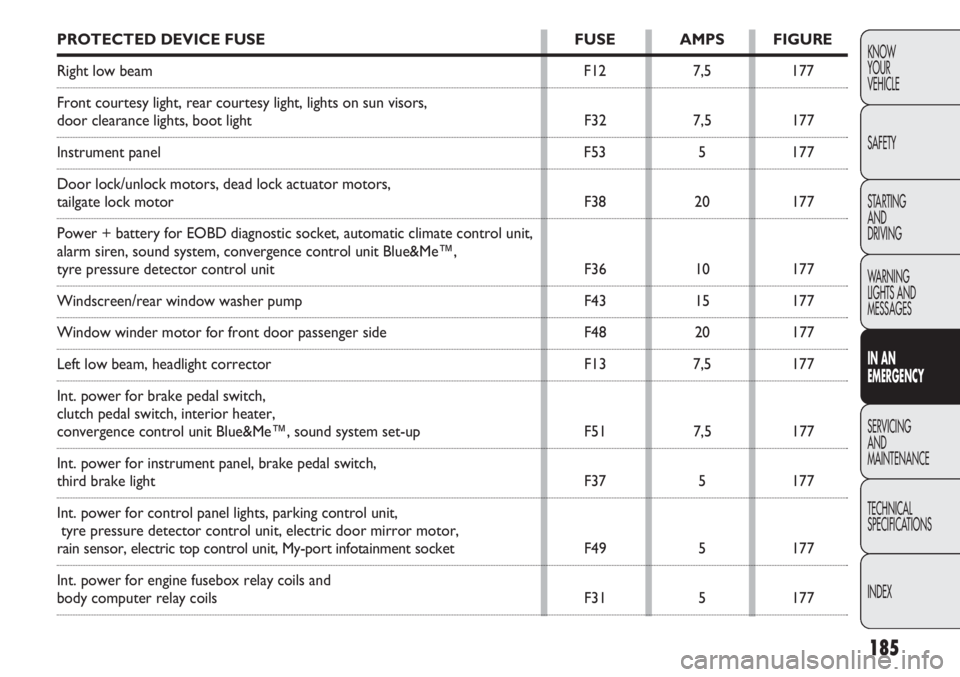
INDEXPROTECTED DEVICE FUSE FUSE AMPS FIGURE
Right low beam F127,5177
Front courtesy light, rear courtesy light, lights on sun visors,
door clearance lights, boot light F327,5177
Instrument panel F535177
Door lock/unlock motors, dead lock actuator motors,
tailgate lock motor F3820177
Power + battery for EOBD diagnostic socket, automatic climate control un\
it,
alarm siren, sound system, convergence control unit Blue&Me™,
tyre pressure detector control unit F3610177
Windscreen/rear window washer pump F4315177
Window winder motor for front door passenger side F4820177
Left low beam, headlight corrector F137,5177
Int. power for brake pedal switch,
clutch pedal switch, interior heater,
convergence control unit Blue&Me™, sound system set-up F517,5177
Int. power for instrument panel, brake pedal switch,
third brake light F375177
Int. power for control panel lights, parking control unit, tyre pressure detector control unit, electric door mirror motor,
rain sensor, electric top control unit, My-port infotainment socket F495177
Int. power for engine fusebox relay coils and
body computer relay coils F315177
Page 194 of 283
190
KNOWYOUR
VEHICLE
SAFETY
STARTING AND
DRIVING
WARNING
LIGHTS AND MESSAGES
IN AN
EMERGENCY
SERVICING AND
MAINTENANCE
TECHNICAL
SPECIFICA TIONS
INDEX
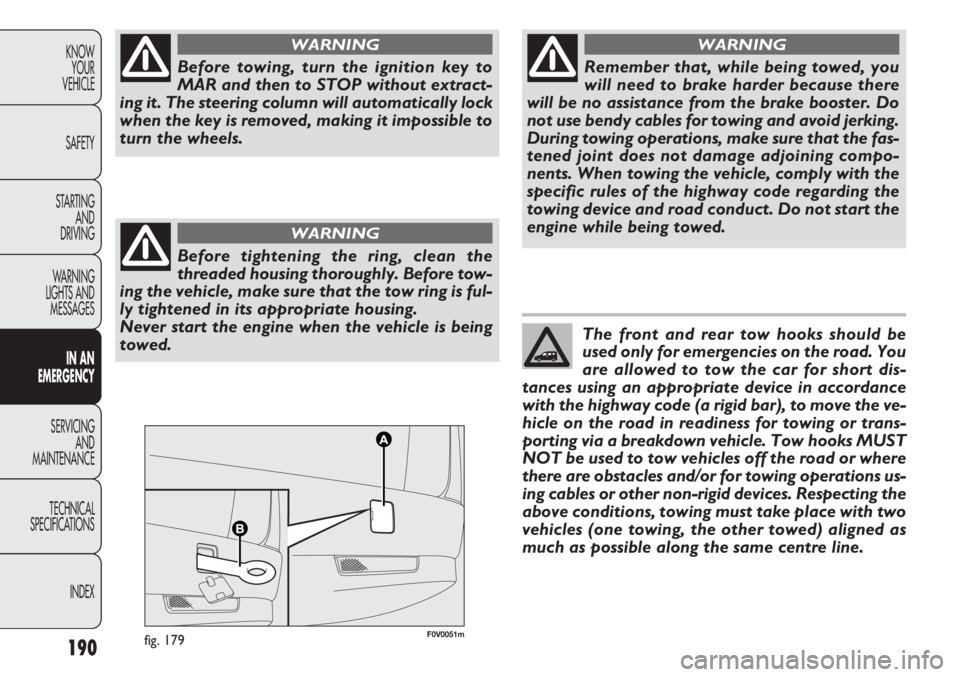
F0V0051mfig. 179
Before towing, turn the ignition key to
MAR and then to STOP without extract-
ing it. The steering column will automatically lock
when the key is removed, making it impossible to
turn the wheels.
WARNING
Before tightening the ring, clean the
threaded housing thoroughly. Before tow-
ing the vehicle, make sure that the tow ring is ful-
ly tightened in its appropriate housing.
Never start the engine when the vehicle is being
towed.
WARNING
Remember that, while being towed, you
will need to brake harder because there
will be no assistance from the brake booster. Do
not use bendy cables for towing and avoid jerking.
During towing operations, make sure that the fas-
tened joint does not damage adjoining compo-
nents. When towing the vehicle, comply with the
specific rules of the highway code regarding the
towing device and road conduct. Do not start the
engine while being towed.
WARNING
The front and rear tow hooks should be
used only for emergencies on the road. You
are allowed to tow the car for short dis-
tances using an appropriate device in accordance
with the highway code (a rigid bar), to move the ve-
hicle on the road in readiness for towing or trans-
porting via a breakdown vehicle. Tow hooks MUST
NOT be used to tow vehicles off the road or where
there are obstacles and/or for towing operations us-
ing cables or other non-rigid devices. Respecting the
above conditions, towing must take place with two
vehicles (one towing, the other towed) aligned as
much as possible along the same centre line.
Page 197 of 283
193
KNOW
YOUR
VEHICLE
SAFETY
STARTING
AND
DRIVING
WARNING
LIGHTS AND
MESSAGES
IN AN
EMERGENCY
SERVIC
ING
AND
MAINTENANCE
TECHNICAL
SPECIFICA TIONS
INDEX
●●
●●●●●●
●
●
●●●●●●
●●●●●●
●●●●●●
●●●●●●
●●●●●● ●●●
●●●●●●
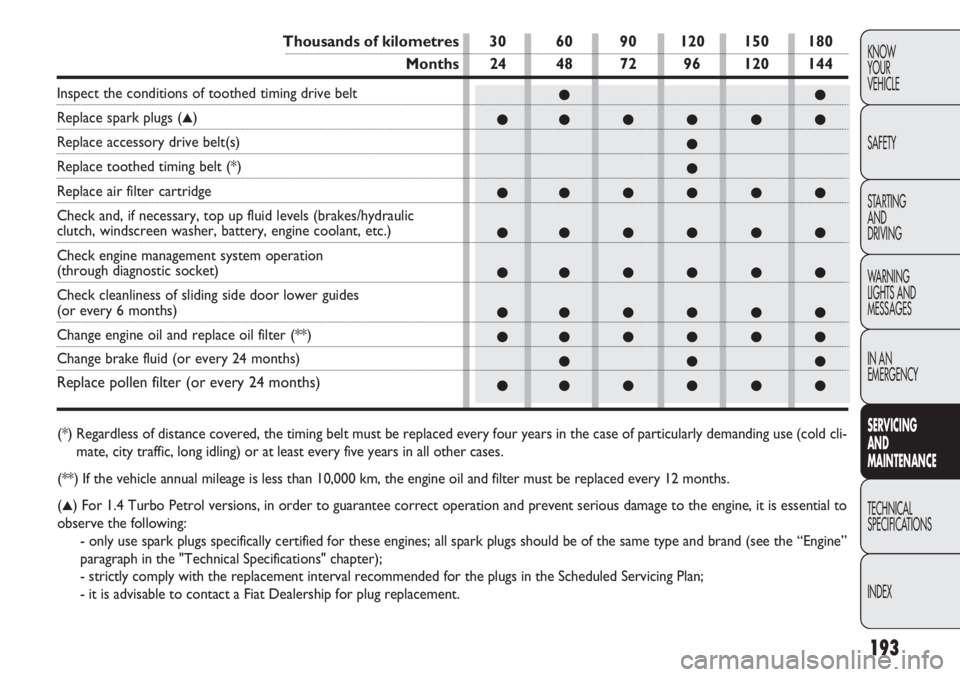
Thousands of kilometres 30 60 90 120 150 180
Months 24 48 72 96 120 144
Inspect the conditions of toothed timing drive belt
Replace spark plugs (▲)
Replace accessory drive belt(s)
Replace toothed timing belt (*)
Replace air filter cartridge
Check and, if necessary, top up fluid levels (brakes/hydraulic
clutch, windscreen washer, battery, engine coolant, etc.)
Check engine management system operation
(through diagnostic socket)
Check cleanliness of sliding side door lower guides
(or every 6 months)
Change engine oil and replace oil filter (**)
Change brake fluid (or every 24 months)
Replace pollen filter (or every 24 months)
(*) Regardless of distance covered, the timing belt must be replaced every f\
our years in the case of particularly demanding use (cold cli-
mate, city traffic, long idling) or at least every five years in all ot\
her cases.
(**) If the vehicle annual mileage is less than 10,000 km, the engine oil and\
filter must be replaced every 12 months.
(
▲) For 1.4 Turbo Petrol versions, in order to guarantee correct operatio\
n and prevent serious damage to the engine, it is essential to
observe the following: - only use spark plugs specifically certified for these engines; all spa\
rk plugs should be of the same type and brand (see the “Engine”
paragraph in the "Technical Specifications" chapter);
- strictly comply with the replacement interval recommended for the plug\
s in the Scheduled Servicing Plan;
- it is advisable to contact a Fiat Dealership for plug replacement.
Page 198 of 283
194
KNOWYOUR
VEHICLE
SAFETY
STARTING AND
DRIVING
WARNING
LIGHTS AND MESSAGES
IN AN
EMERGENCY
SERV IC
ING
AND
MAINTENANCE
TECHNICAL
SPECIFICA TIONS
INDEX
●●●●●●
●●●●●●
●●●●●●
●●●●●●
●●●●●● ●●●
●●●●●●
●●●●●●
●●●●●●
●●
●●●●●● ●●
●●●●●●
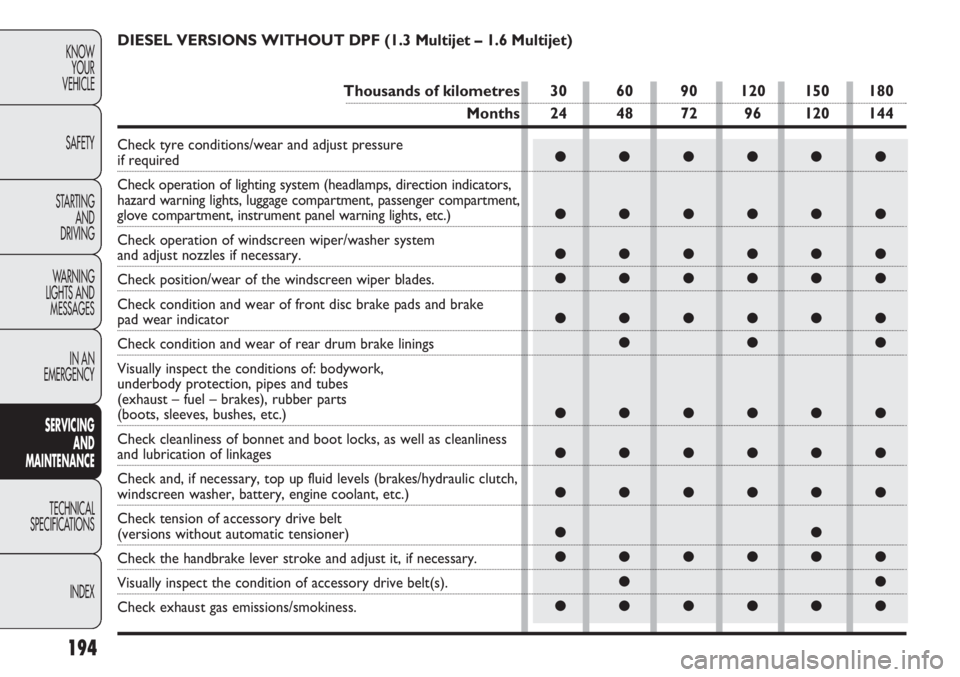
DIESEL VERSIONS WITHOUT DPF (1.3 Multijet – 1.6 Multijet)
Thousands of kilometres 30 60 90 120 150 180
Months 24 48 72 96 120 144
Check tyre conditions/wear and adjust pressure if required
Check operation of lighting system (headlamps, direction indicators,
hazard warning lights, luggage compartment, passenger compartment,
glove compartment, instrument panel warning lights, etc.)
Check operation of windscreen wiper/washer system
and adjust nozzles if necessary.
Check position/wear of the windscreen wiper blades.
Check condition and wear of front disc brake pads and brake
pad wear indicator
Check condition and wear of rear drum brake linings
Visually inspect the conditions of: bodywork,
underbody protection, pipes and tubes
(exhaust – fuel – brakes), rubber parts
(boots, sleeves, bushes, etc.)
Check cleanliness of bonnet and boot locks, as well as cleanliness
and lubrication of linkages
Check and, if necessary, top up fluid levels (brakes/hydraulic clutch, \
windscreen washer, battery, engine coolant, etc.)
Check tension of accessory drive belt
(versions without automatic tensioner)
Check the handbrake lever stroke and adjust it, if necessary.
Visually inspect the condition of accessory drive belt(s).
Check exhaust gas emissions/smokiness.