level FIAT DOBLO COMBI 2014 Owner handbook (in English)
[x] Cancel search | Manufacturer: FIAT, Model Year: 2014, Model line: DOBLO COMBI, Model: FIAT DOBLO COMBI 2014Pages: 283, PDF Size: 6.31 MB
Page 15 of 283
11
KNOW
YOUR
VEHICLE
SAFETY
STAR
TING
AND
DRIVING
WARNING
LIGHTS AND
MESSAGES
IN AN
EMERGENCY
SERVICING
AND
MAINTENANCE
TECHNICAL
SPECIFICATIONS
INDEX
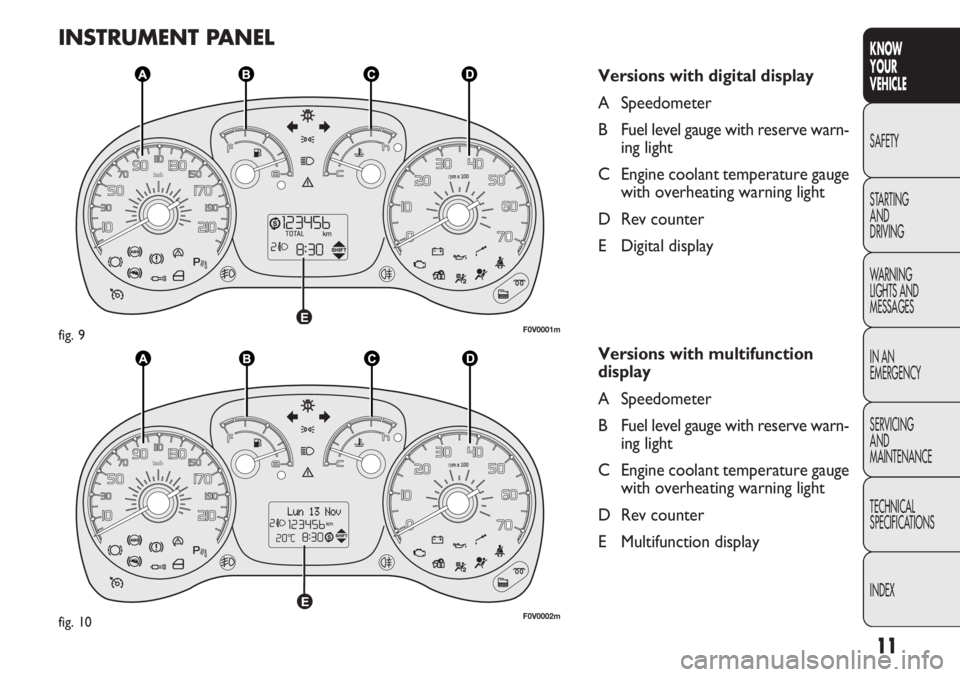
INSTRUMENT PANEL
Versions with digital display
A Speedometer
B Fuel level gauge with reserve warn-
ing light
C Engine coolant temperature gauge with overheating warning light
D Rev counter
E Digital display
Versions with multifunction
display
A Speedometer
B Fuel level gauge with reserve warn- ing light
C Engine coolant temperature gauge with overheating warning light
D Rev counter
E Multifunction display
F0V0001mfig. 9
F0V0002mfig. 10
Page 17 of 283
13
KNOW
YOUR
VEHICLE
SAFETY
STAR
TING
AND
DRIVING
WARNING
LIGHTS AND
MESSAGES
IN AN
EMERGENCY
SERVICING
AND
MAINTENANCE
TECHNICAL
SPECIFICATIONS
INDEX
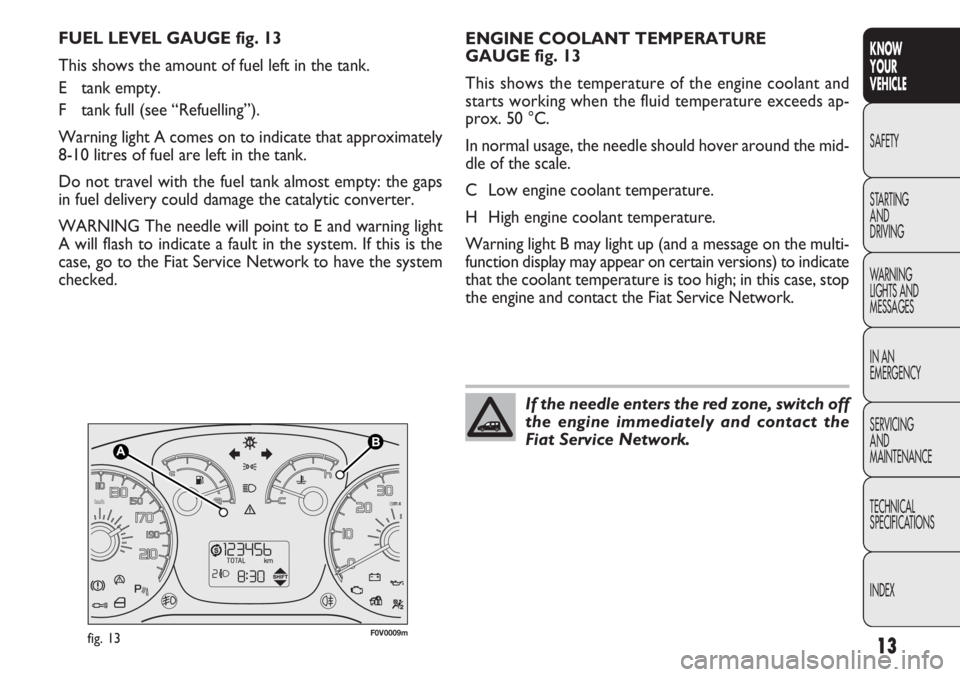
F0V0009mfig. 13
ENGINE COOLANT TEMPERATURE
GAUGE fig. 13
This shows the temperature of the engine coolant and
starts working when the fluid temperature exceeds ap-
prox. 50 °C.
In normal usage, the needle should hover around the mid-
dleofthescale.
C Low engine coolant temperature.
H High engine coolant temperature.
Warning light B may light up (and a message on the multi-
function display may appear on certain versions) to indicate
that the coolant temperature is too high; in this case, stop
the engine and contact the Fiat Service Network.
FUEL LEVEL GAUGE fig. 13
This shows the amount of fuel left in the tank.
E tank empty.
F tank full (see “Refuelling”).
Warning light A comes on to indicate that approximately
8-10 litres of fuel are left in the tank.
Do not travel with the fuel tank almost empty: the gaps
in fuel delivery could damage the catalytic converter.
WARNING The needle will point to E and warning light
A will flash to indicate a fault in the system. If this is the
case, go to the Fiat Service Network to have the system
checked.
If the needle enters the red zone, switch off
the engine immediately and contact the
Fiat Service Network.
Page 20 of 283
Proceed as follows to adjust the brightness:
– press the SET ESC button: the display will show ILLU;
– press button▲or ▼to adjust the brightness level;
– press the SET ESC button to go back to the menu screen
or hold the button down to go back to the standard screen
without saving.
Setting the speed limit (SPEEd)
This function is used to set a speed limit (km/h or mph);
the driver is alerted when this limit is exceeded (see
“Warning lights and messages”).
To set the desired speed limit, proceed as follows:
– press SET ESC: the word SPEEd and the previously set
unit (km/h or mph) will appear on the display;
– press button ▲or ▼to select speed limit activation (On)
or deactivation (Off);
– when the function is activated (On), press buttons
▲ or ▼to select the speed limit and press SET ESC to
confirm.
Hold down the SET ESC button
– to quit the setup menu if you are in the menu;
– to quit to the menu if you are setting an option;
– to save only the settings already memorized (confirmed
by pressing the SET ESC button).
The setup menu page is timed. Only the changes already
memorized by pressing the SET ESC button are saved
when you come out of the menu.
Adjusting the vehicle interior lighting
(ILLU)
This function is available, with the dipped headlamps on
and at night, to adjust the brightness of the instrument pan-
el, buttons, radio display and automatic climate control dis-
play.
During the daytime, and with the dipped headlamps on,
the instrument panel, buttons and radio and automatic cli-
mate control displays are set to maximum brightness.
16
KNOW
YOUR
VEHICLE
SAFETY
ST AR
TINGAND
DRIVING
WARNING
LIGHTS AND MESSAGES
IN AN
EMERGENCY
SERVICING AND
MAINTENANCE
TECHNICAL
SPECIFICATIONS
INDEX
Page 22 of 283
18
KNOWYOUR
VEHICLE
SAFETY
ST AR
TINGAND
DRIVING
WARNING
LIGHTS AND MESSAGES
IN AN
EMERGENCY
SERVICING AND
MAINTENANCE
TECHNICAL
SPECIFICATIONS
INDEX
Daytime Running Lights (DRL)
This function allows you to activate/deactivate the daytime
running lights.
Proceed as follows to switch this function on or off:
– press the SET ESC button: the display shows DRL;
– press button ▲or ▼to activate (On) or deactivate (Off)
the daytime running lights;
– press the SET ESC button to return to the submenu
screen or hold the button down to return to the main
menu screen without saving;
Adjusting the buzzer volume (BUZZ)
This function is used to adjust the volume of the buzzer
that sounds in the event of failure/warning indications and
when the SET ESC,
▲and ▼buttons are pressed.
To set the desired volume, proceed as follows:
– press SET ESC: the display shows the word bUZZ;
– press ▲or ▼to select the required volume (adjustable
over eight levels).
– press the SET ESC button to go back to the menu screen
or hold the button down to go back to the standard screen
without saving.
Passenger front and side airbag
activation/deactivation (BAG P)
(for versions/markets where provided)
This function is used to activate/deactivate the front and
side passenger airbags (for versions/markets where pro-
vided).
Proceed as follows:
❒press SET ESC and, after the message BAG P OFF (to
deactivate) or BAG P On (to activate) is displayed by
pressing buttons ▲or ▼, press SET ESC again;
❒the confirmation request message is displayed;
❒press ▲or ▼to select YES (confirming activa-
tion/deactivation) or no (to cancel);
❒press SET ESC to confirm setting and go back to the
menu screen or hold the button down to go back to
the standard screen without saving.
Page 25 of 283
21
KNOW
YOUR
VEHICLE
SAFETY
STAR
TING
AND
DRIVING
WARNING
LIGHTS AND
MESSAGES
IN AN
EMERGENCY
SERVICING
AND
MAINTENANCE
TECHNICAL
SPECIFICATIONS
INDEX
MENU FUNCTIONS
Adjusting the vehicle interior lighting
This function is available, with the dipped headlamps on
and at night, to adjust the brightness of the instrument pan-
el, buttons, radio display and automatic climate control dis-
play.
During the daytime, and with the dipped headlamps on,
the instrument panel, buttons and radio and automatic cli-
mate control displays are set to maximum brightness.
Proceed as follows to adjust the brightness:
– press SET ESC: the previously set brightness level flash-
es in the display;
– press button ▲or ▼to adjust the brightness level;
– press the SET ESC button to go back to the menu screen
or hold the button down to go back to the standard screen
without saving.
Speed beep (Speed limit)
This function makes it possible to set the vehicle speed
limit (km/h or mph). When this limit is exceeded the dri-
ver is immediately alerted (see “Warning lights and mes-
sages” section).
To set the desired speed limit, proceed as follows:
– press the SET ESC button: the display shows the words
Speed Beep;
– press button ▲or ▼to select speed limit activation (On)
or deactivation (Off);
– PASSENGER AIRBAG
– DAYTIME RUNNING LIGHTS
– EXIT MENU
Selecting an option from the main menu without a submenu:
– press SET ESC to select the main menu option you wish
to set;
– press
▲or ▼to select the new setting;
– press the SET ESC button to memorize the new set-
ting and go back to the previous main menu option.
Selecting an option from the main menu with a submenu:
– press the SET ESC button to display the first submenu
option;
– press ▲or ▼to scroll through all the submenu options;
– press the SET ESC button to select the displayed sub-
menu option and open the relevant setup menu;
– press ▲or ▼to select the new setting for this submenu
option;
– press the SET ESC button to memorize the new set-
ting and go back to the previous submenu option.
Page 29 of 283
25
KNOW
YOUR
VEHICLE
SAFETY
STAR
TING
AND
DRIVING
WARNING
LIGHTS AND
MESSAGES
IN AN
EMERGENCY
SERVICING
AND
MAINTENANCE
TECHNICAL
SPECIFICATIONS
INDEX
Language (Selecting the language)
Display messages can be shown in different languages: Ital-
ian, English, German, Portuguese, Spanish, French, Dutch,
Polish and Turkish.
To set the required language, proceed as follows:
– press SET ESC: the previously set language flashes in
the display;
– press ▲or ▼to select;
– press the SET ESC button to go back to the menu screen
or hold the button down to go back to the standard screen
without saving.
Warning volume (Adjusting the failure/warning
buzzer volume)
This function allows the volume of the buzzer which ac-
companies the display of failures/warnings to be adjusted
(over 8 levels).
To set the desired volume, proceed as follows:
– press SET ESC: the previously set volume level flashes in
the display;
– press ▲or ▼to adjust the value;
– press the SET ESC button to go back to the menu screen
or hold the button down to go back to the standard screen
without saving.
– press
▲or ▼to choose;
– when you select “Consumption”, pressing SET ESC
makes km/l, l/100km or mpg appear on the display de-
pending on the previous setting;
If the set distance unit is “km”, you can set the fuel con-
sumption unit to km/l or l/100km depending on the
amount of fuel consumed.
If the distance unit is set to mi, fuel consumption is dis-
played in mpg.
– press ▲or ▼to select;
– when you select “Temperature”, pressing SET ESC
makes °C or °F appear on the display depending on the
previous setting;
– press ▲or ▼to select;
When you have made the required adjustments, briefly
press MENU ESC to go back to the submenu screen or
hold the button down to go back to the main menu screen
without saving.
– hold down SET ESC again to go back to the standard
screen or main menu, depending on which point in the
menu you have reached.
Page 30 of 283
26
KNOWYOUR
VEHICLE
SAFETY
ST AR
TINGAND
DRIVING
WARNING
LIGHTS AND MESSAGES
IN AN
EMERGENCY
SERVICING AND
MAINTENANCE
TECHNICAL
SPECIFICATIONS
INDEX
Service (Programmed maintenance)
Through this function it is possible to display information
related to regular maintenance intervals.
This information can be consulted as follows:
– press SET ESC: the service intervals appear in the dis-
play in km or mi, depending on the previous setting (see
“Unit of distance” paragraph);
– press the SET ESC button to return to the menu screen
or hold the button down to return to the standard screen.
N.B. The „Scheduled Servicing Plan” provides for the ve-
hicle to be serviced every 30,000 km/35,000 km (depending
on the version) (or the equivalent in miles). This is auto-
matically displayed, when the ignition key is at MAR, from
2,000 km (or the equivalent in miles) and reappears every
200 km (or the equivalent in miles). Below 200 km the
reminders become more frequent. The indication will ap-
pear in kilometres or miles depending on the measure-
ment unit settings. When the next scheduled service is ap-
proaching, the message „Service” will appear on the dis-
play, followed by the number of kilometres or miles left,
when the key is turned to MAR. Go to the Fiat Service
Network, where the „Planned Maintenance Programme”
operations will be performed and the message will be re-
set.
Button volume (Adjusting the button volume)
This function allows you to adjust (over 8 levels) the vol-
ume of the buzzer that can be heard when the SET ESC,
▲
and ▼buttons are pressed.
To set the desired volume, proceed as follows:
– press SET ESC: the previously set volume level flashes in
the display;
– press ▲or ▼to adjust the value;
– press the SET ESC button to go back to the menu screen
or hold the button down to go back to the standard screen
without saving.
Seat belt buzzer
(Reactivating buzzer for SBR indication)
This function can only be displayed after the Fiat Service
Network has deactivated the SBR system (see “SBR sys-
tem” in the “Safety” section).
Page 49 of 283

45
KNOW
YOUR
VEHICLE
SAFETY
STAR
TING
AND
DRIVING
WARNING
LIGHTS AND
MESSAGES
IN AN
EMERGENCY
SERVICING
AND
MAINTENANCE
TECHNICAL
SPECIFICATIONS
INDEX
FAST HEATING
Proceed as follows:
❒close all the diffusers in the dashboard;
❒turn knob A to -;
❒turn knob B to 4 -;
❒turn knob C to ©.
RAPID WINDSCREEN AND FRONT SIDE
WINDOWS DEMISTING/
DEFROSTING
(MAX-DEF function)
Proceed as follows:
❒turn knob A to -;
❒turn knob B to 4 -;
❒turn knob C to -;
❒turn off internal air recirculation (button D LED off).
After demisting/defrosting, operate the controls as nor-
mal to restore the required comfort.
TEMPERATURE COMFORT
Knob C enables the air introduced into the vehicle to reach
all parts of the passenger compartment through five dis-
tribution options:
¶delivers air from central and side diffusers;
ßwarms the feet and keeps the face cool (bi-level func-
tion)
©warms up the passenger compartment more quickly;
®warms up the passenger compartment and, at the same
time, demists the windscreen;
-demists and defrosts the windscreen and front side win-
dows.
HEATING
Proceed as follows:
❒turn knob A fully to the right (to -);
❒turn knob B to the required speed;
❒turn knob C to:
®to warm the feet and, at the same time, demist the
windscreen;
ßto send air to the feet and introduce fresher air
from the central and dashboard diffusers;
©to warm up quickly.
Page 52 of 283
48
KNOWYOUR
VEHICLE
SAFETY
ST AR
TING AND
DRIVING
WARNING
LIGHTS AND MESSAGES
IN AN
EMERGENCY
SERVICING AND
MAINTENANCE
TECHNICAL
SPECIFICATIONS
INDEX
Once the demisting/defrosting is complete, use the con-
trols as normal to maintain optimum visibility.
Window demisting
In the event of considerable external moisture and/or rain
and/or large differences in temperature inside and outside
the passenger compartment, perform the following pre-
ventive window demisting procedure:
❒press button ❄;
❒turn off internal air recirculation (button E LED off);
❒turn knob A to the red section;
❒turn knob B to the second speed level;
❒turn knob C to -or to ®if there is no sign of the
windows steaming up.
The climate control system is very useful for demisting the
windows more quickly: just carry out the above procedure
and activate the system by pressing
❄.
PASSENGER COMPARTMENT HEATING
Proceed as follows:
❒turn knob A to the red section;
❒turn knob B to the required speed;
❒turn knob C to:
® to warm the feet and, at the same time, demist the
windscreen
ßto warm the feet and keep the face cool (bi-level func-
tion)
©to warm the feet of those in the front and rear seats.
❒to turn off internal air recirculation (button E LED off);
FAST FRONT DOOR WINDOW GLASSES
DEMISTING/DEFROSTING
Proceed as follows:
❒press button ❄;
❒turn knob A fully to the right;
❒turn knob B to -;
❒turn knob C to -;
❒turn off internal air recirculation (button E LED off).
Page 55 of 283
51
KNOW
YOUR
VEHICLE
SAFETY
STAR
TING
AND
DRIVING
WARNING
LIGHTS AND
MESSAGES
IN AN
EMERGENCY
SERVICING
AND
MAINTENANCE
TECHNICAL
SPECIFICATIONS
INDEX
Manual selections will always take priority over automat-
ic settings and will be stored until the user switches the
system back to automatic operation by pressing the
AUTO button again, except for when the system inter-
venes for particular safety-related reasons. You can adjust
one function manually without affecting the automatic con-
trol of the others.
The temperature of the air introduced is always controlled
automatically, depending on the temperature set in the dis-
play (except when the system is off or in certain condi-
tions when the compressor is switched off).
The system allows the following parameters and functions
to be set or altered manually: air temperature, fan speed
(continuous variation); air distribution in seven positions;
compressor enablement; fast defrosting/demisting func-
tion; air recirculation; switching off the system.AUTOMATIC CLIMATE CONTROL
(for versions/markets, where provided)
GENERAL INFORMATION
The automatic climate control system adjusts the tem-
perature, the quantity and the distribution of the air in the
passenger compartment. The temperature control is based
on the “equivalent temperature”: in other words, the sys-
tem continuously works to keep the comfort level inside
the vehicle constant and to compensate for possible vari-
ations in outside conditions, including the solar radiation
detected by a dedicated sensor. The automatically con-
trolled parameters and functions are:
❒air temperature at the vents;
❒air distribution at the vents;
❒fan speed
(continuous air flow variation);
❒compressor activation
(to cool/dehumidify the air);
❒air recirculation.
All functions may be changed manually. In other words,
you may select one or more functions and change the pa-
rameters as required. Automatic control of the manually
changed functions will be deactivated: the system will on-
ly override your settings for safety related reasons (e.g.
risk of misting up).