light FIAT DOBLO COMBI 2015 2.G Owners Manual
[x] Cancel search | Manufacturer: FIAT, Model Year: 2015, Model line: DOBLO COMBI, Model: FIAT DOBLO COMBI 2015 2.GPages: 323, PDF Size: 46.77 MB
Page 170 of 323
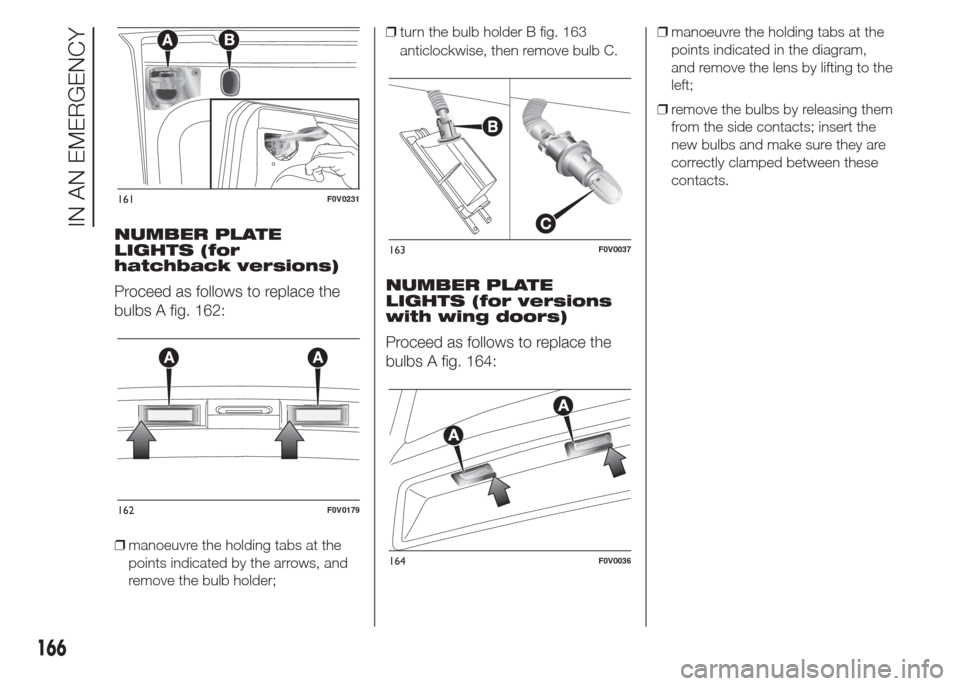
NUMBER PLATE
LIGHTS (for
hatchback versions)
Proceed as follows to replace the
bulbs A fig. 162:
❒manoeuvre the holding tabs at the
points indicated by the arrows, and
remove the bulb holder;❒turn the bulb holder B fig. 163
anticlockwise, then remove bulb C.
NUMBER PLATE
LIGHTS (for versions
with wing doors)
Proceed as follows to replace the
bulbs A fig. 164:
❒manoeuvre the holding tabs at the
points indicated in the diagram,
and remove the lens by lifting to the
left;
❒remove the bulbs by releasing them
from the side contacts; insert the
new bulbs and make sure they are
correctly clamped between these
contacts.
161F0V0231
162F0V0179
163F0V0037
164F0V0036
166
IN AN EMERGENCY
Page 171 of 323
REPLACING AN
INTERIOR BULB
For the type of bulb and power
rating, see "Changing a bulb".
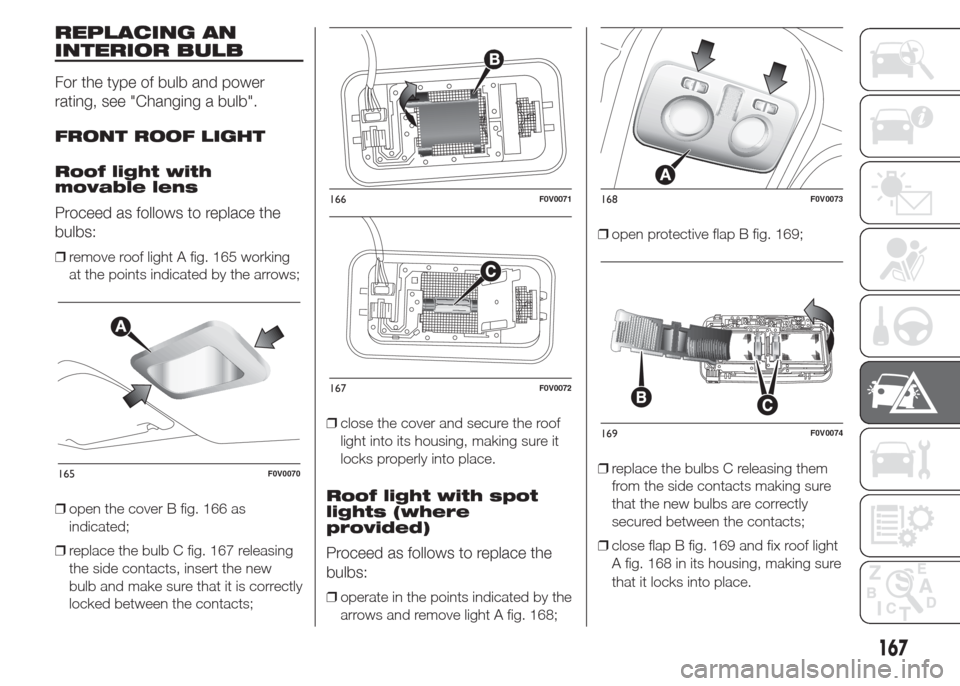
FRONT ROOF LIGHT
Roof light with
movable lens
Proceed as follows to replace the
bulbs:
❒remove roof light A fig. 165 working
at the points indicated by the arrows;
❒open the cover B fig. 166 as
indicated;
❒replace the bulb C fig. 167 releasing
the side contacts, insert the new
bulb and make sure that it is correctly
locked between the contacts;❒close the cover and secure the roof
light into its housing, making sure it
locks properly into place.
Roof light with spot
lights (where
provided)
Proceed as follows to replace the
bulbs:
❒operate in the points indicated by the
arrows and remove light A fig. 168;❒open protective flap B fig. 169;
❒replace the bulbs C releasing them
from the side contacts making sure
that the new bulbs are correctly
secured between the contacts;
❒close flap B fig. 169 and fix roof light
A fig. 168 in its housing, making sure
that it locks into place.
165F0V0070
166F0V0071
167F0V0072
168F0V0073
169F0V0074
167
Page 172 of 323
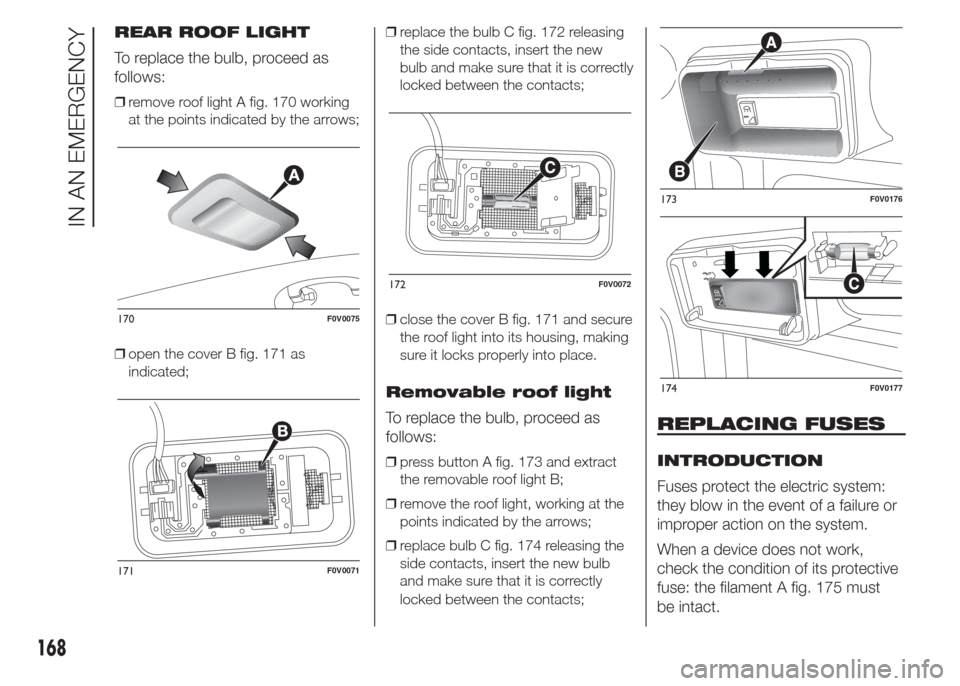
REAR ROOF LIGHT
To replace the bulb, proceed as
follows:
❒remove roof light A fig. 170 working
at the points indicated by the arrows;
❒open the cover B fig. 171 as
indicated;❒replace the bulb C fig. 172 releasing
the side contacts, insert the new
bulb and make sure that it is correctly
locked between the contacts;
❒close the cover B fig. 171 and secure
the roof light into its housing, making
sure it locks properly into place.
Removable roof light
To replace the bulb, proceed as
follows:
❒press button A fig. 173 and extract
the removable roof light B;
❒remove the roof light, working at the
points indicated by the arrows;
❒replace bulb C fig. 174 releasing the
side contacts, insert the new bulb
and make sure that it is correctly
locked between the contacts;
REPLACING FUSES
INTRODUCTION
Fuses protect the electric system:
they blow in the event of a failure or
improper action on the system.
When a device does not work,
check the condition of its protective
fuse: the filament A fig. 175 must
be intact.
170F0V0075
171F0V0071
172F0V0072
173F0V0176
174F0V0177
168
IN AN EMERGENCY
Page 175 of 323
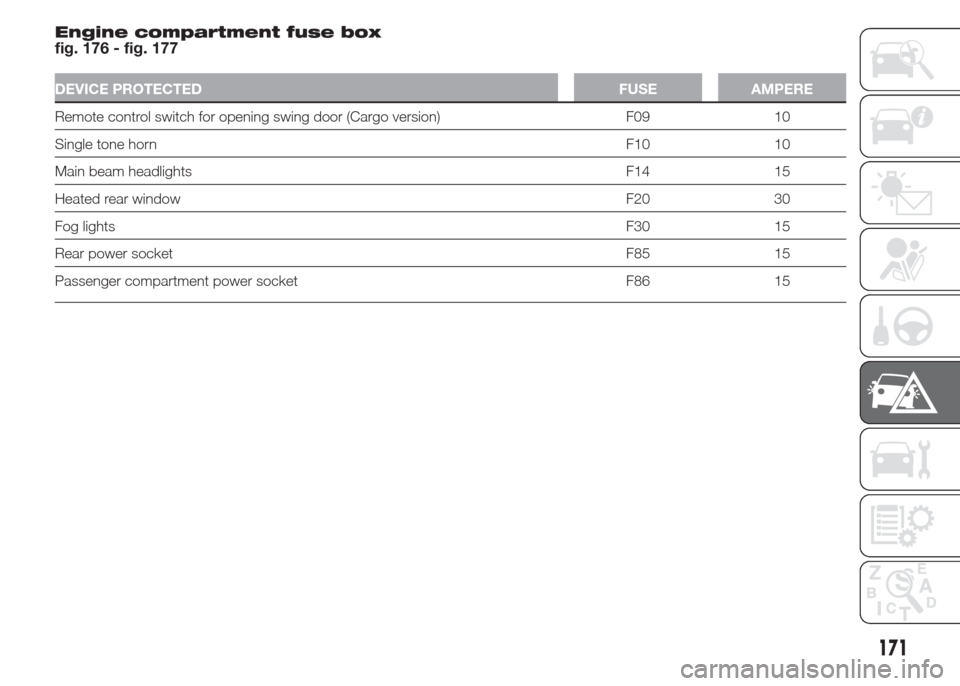
Engine compartment fuse box
fig. 176 - fig. 177
DEVICE PROTECTED FUSE AMPERE
Remote control switch for opening swing door (Cargo version) F09 10
Single tone hornF10 10
Main beam headlights F14 15
Heated rear window F20 30
Fog lightsF30 15
Rear power socket F85 15
Passenger compartment power socket F86 15
171
Page 176 of 323
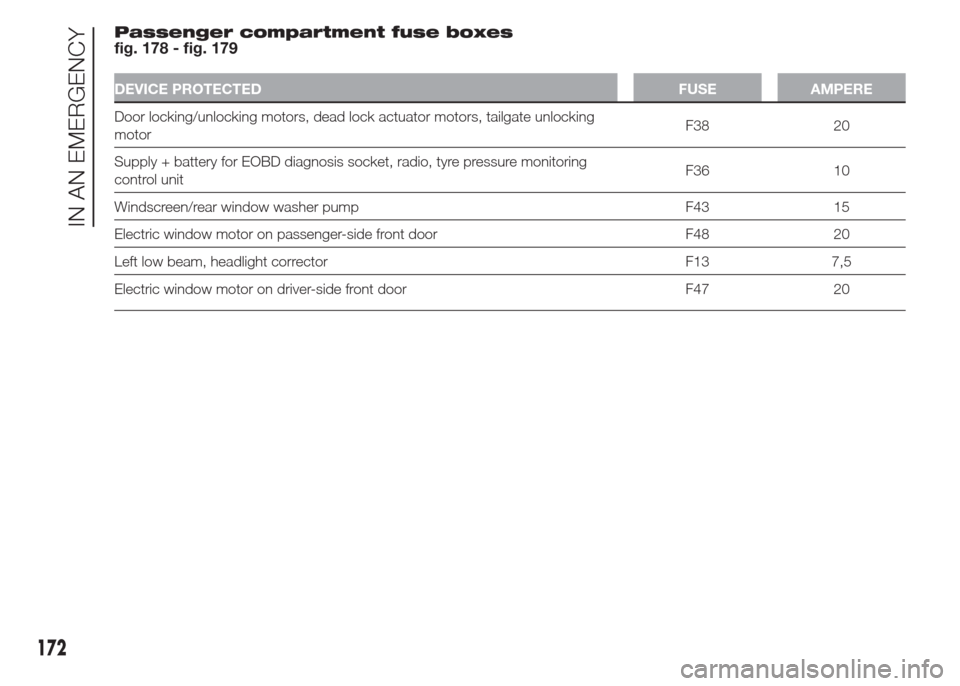
Passenger compartment fuse boxes
fig. 178 - fig. 179
DEVICE PROTECTED FUSE AMPERE
Door locking/unlocking motors, dead lock actuator motors, tailgate unlocking
motorF38 20
Supply + battery for EOBD diagnosis socket, radio, tyre pressure monitoring
control unitF36 10
Windscreen/rear window washer pump F43 15
Electric window motor on passenger-side front door F48 20
Left low beam, headlight corrector F13 7,5
Electric window motor on driver-side front door F47 20
172
IN AN EMERGENCY
Page 177 of 323
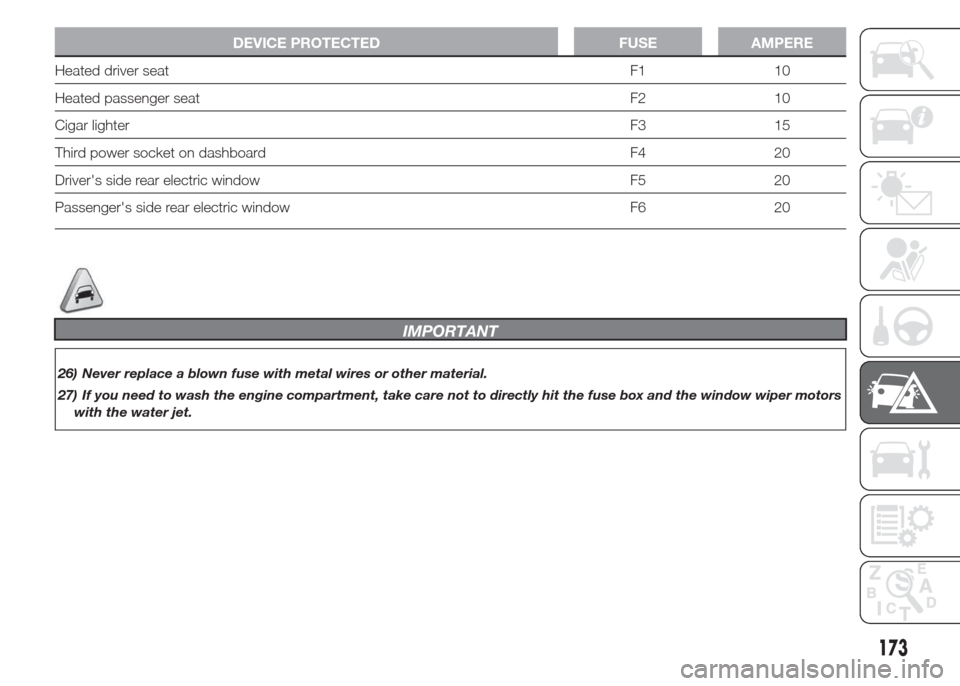
DEVICE PROTECTED FUSE AMPERE
Heated driver seat F1 10
Heated passenger seat F2 10
Cigar lighterF3 15
Third power socket on dashboard F4 20
Driver's side rear electric window F5 20
Passenger's side rear electric window F6 20
IMPORTANT
26) Never replace a blown fuse with metal wires or other material.
27) If you need to wash the engine compartment, take care not to directly hit the fuse box and the window wiper motors
with the water jet.
173
Page 179 of 323
CHANGING A WHEEL
The vehicle is originally equipped
with the Fix&Go automatic quick
tyre repair kit (see instructions in the
next section). As an alternative,
the vehicle may have a normal-sized
spare wheel.
Wheel changing and correct use of
the jack and spare wheel call for
some precautions, as listed below.
108) 109) 110) 111)
Note for one-way
tyres
One-way tyres have a few arrows on
the side indicating the rotation
direction. If a wheel is changed
(when punctured, for example) the
direction of the arrows on the spare
wheel tyre may not coincide with
the rotation direction of the wheel to
be replaced.
In these conditions, too, the tyre still
maintains its safety features.Anyway, it is recommended to have
the wheel repaired and refitted as
soon as possible, as the best
performance is achieved when the
rotation direction of all tyres
coincides with the one indicated by
the arrows.
Please note that:
❒the jack weight is 4 kg;
❒the jack requires no adjustment;
❒the jack cannot be repaired and in
the event of a fault it must be
replaced by another original one;
❒no tool other than its cranking device
may be fitted on the jack.
To change a wheel, proceed as
follows:
❒stop the vehicle in a position that is
not dangerous for oncoming traffic
where you can change the wheel
safely. The ground should be flat
if possible, and sufficiently firm;
❒stop the engine and pull the
handbrake;
❒engage first gear or reverse;
❒wear the reflective safety jacket
(compulsory by law in certain
countries) before getting out of the
vehicle;❒indicate that the vehicle has broken
down using the devices required by
the law in the current country (e.g.
warning triangle, hazard lights, etc.);
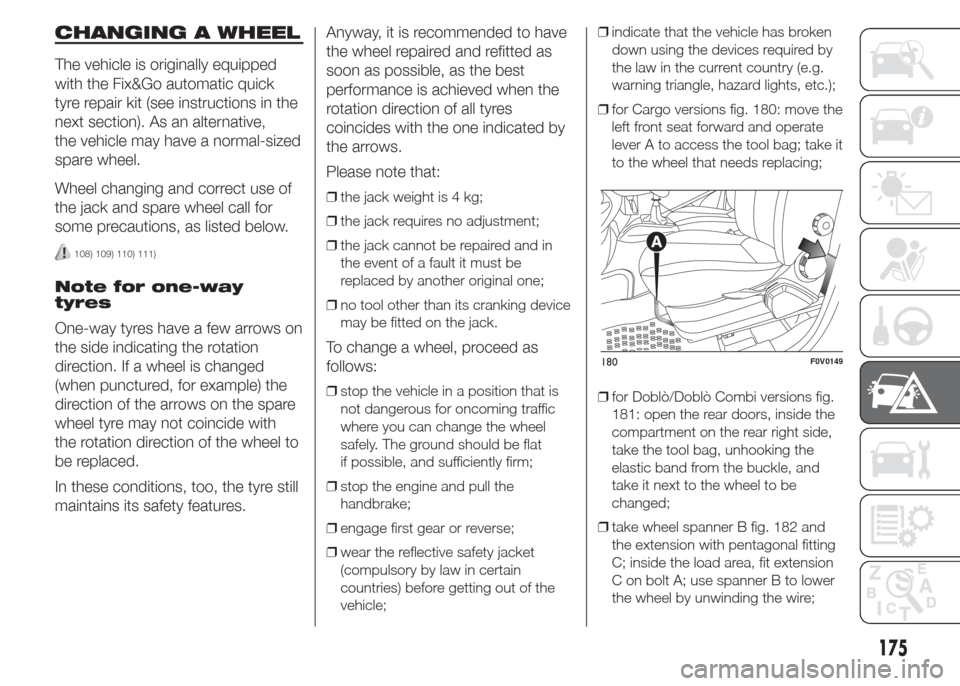
❒for Cargo versions fig. 180: move the
left front seat forward and operate
lever A to access the tool bag; take it
to the wheel that needs replacing;
❒for Doblò/Doblò Combi versions fig.
181: open the rear doors, inside the
compartment on the rear right side,
take the tool bag, unhooking the
elastic band from the buckle, and
take it next to the wheel to be
changed;
❒take wheel spanner B fig. 182 and
the extension with pentagonal fitting
C; inside the load area, fit extension
C on bolt A; use spanner B to lower
the wheel by unwinding the wire;
180F0V0149
175
Page 183 of 323
❒reposition the tool bag behind the left
side seat (Cargo versions) or, resting
the bottom of the bag against the
side panel, in the compartment inside
the rear right side (Doblò/Doblò
Combi versions).
WARNING
108) The spare wheel (where
provided) is specifically for your
vehicle. Therefore, it must not be
used on other models. Do not
use spare wheels of other models
on your vehicle. The spare wheel
must be used only in an
emergency. Use of the spare
wheel must kept to the minimum
necessary.109) Use your hazard lights, warning
triangle, etc. to show that your
vehicle is stationary according to
the regulations in force.
Passengers should get out of the
vehicle, particularly if it is heavily
loaded, and wait for the wheel
to be changed away from the
traffic. If you are on a slope or
uneven surface, place wedges or
other suitable objects under the
wheels to secure the vehicle.
Have the wheel repaired and
refitted as soon as possible. Do
not apply grease to the bolt
threads before assembly: they
might spontaneously unscrew.
110) Use the jack only to replace
wheels on the vehicle with which
it is supplied or on other vehicles
of the same model. Never use
the jack for other purposes, such
as lifting other models. Never
use the jack to carry out repairs
under the vehicle. Incorrect
positioning of the jack may cause
the lifted vehicle to fall. Do not
use the jack for loads higher than
those shown on the label.111) Incorrect hub cap assembly
may cause it to come off when the
vehicle is moving. Never tamper
with the inflation valve. Never
introduce tools of any kind
between rim and tyre. Check tyre
and spare wheel pressures
regularly, referring to the values
shown in the "Technical
specifications" section.
179
Page 187 of 323
118) affix the adhesive label in an
easy-to-see position for the driver
as a reminder that the tyre has
been treated with the quick tyre
repair kit. Drive carefully,
particularly on bends. Do not
exceed 80 km/h. Do not
accelerate or brake suddenly.
119) If the pressure has fallen below
1.8 bar, do not drive any further:
the automatic Fix&Go automatic
quick tyre repair kit cannot
guarantee the correct hold
because the tyre is too damaged.
Contact a Fiat Dealership.
120) Inform the Dealership that the
tyre has been repaired using the
quick tyre repair kit. Give the
booklet to the personnel charged
with handling the treated tyre.
IMPORTANT
28) Punctures caused by foreign
bodies can be repaired if the
damage does not exceed 4 mm on
the tread and on the shoulder of
the tyre.
IMPORTANT
2) Do not dispose of the can or the
sealing fluid as household waste.
Have them disposed of in
compliance with national and
local regulations.
EMERGENCY
STARTING
Go to a Fiat Dealership immediately
if warning light
stays on
constantly on the instrument panel.
JUMP STARTING
If the battery is flat, it is possible to
start the engine using an auxiliary
battery with the same capacity or a
little higher than the flat one.
Proceed as follows to start the
vehicle fig. 204:
❒connect the positive terminals (+
mark near the terminal) of the two
batteries using a suitable lead;
❒with a second lead, connect the
negative terminal (–) of the auxiliary
battery to an earthing point
on the
engine or the gearbox of the vehicle
to be started;
❒start the engine;
❒when the engine has been started,
remove the cables reversing the
order above.
If after a few attempts the engine
does not start, do not persist but
contact the nearest Fiat Dealership.
183
Page 189 of 323
FUEL CUT-OFF
SYSTEM
This intervenes in the case of an
impact causing:
❒the fuel supply cut-off with the engine
consequently switching off;
❒the automatic unlocking of the doors;
❒the switching on of the interior lights;
❒switching on of the hazard warning
lights (to deactivate the lights press
the dedicated button on the
dashboard).
122)
When the system has been
triggered, the message “Fuel cut off,
see handbook” is displayed on
some versions.
Check carefully for fuel leaks, for
instance in the engine compartment,
under the vehicle or near the tank
area.
After a collision, turn the ignition key
to STOP to prevent the battery
from running down.
The following procedure should be
carried out to restore the correct
operation of the vehicle:
❒turn the ignition key to the MAR
position;❒activate the right direction indicator;
❒deactivate the right direction
indicator;
❒activate the left direction indicator;
❒deactivate the left direction indicator;
❒activate the right direction indicator;
❒deactivate the right direction
indicator;
❒activate the left direction indicator;
❒deactivate the left direction indicator;
❒turn the ignition key to the OFF
position.
WARNING
122) If, after an impact, you smell
fuel or notice leaks from the fuel
supply system, do not reactivate
the system to avoid the risk of fire.
LIFTING THE
VEHICLE
If the vehicle needs to be lifted, go
to a Fiat Dealership which is
equipped with the arm hoist or
workshop lift.
185