diagram FIAT DOBLO COMBI 2015 2.G Owners Manual
[x] Cancel search | Manufacturer: FIAT, Model Year: 2015, Model line: DOBLO COMBI, Model: FIAT DOBLO COMBI 2015 2.GPages: 323, PDF Size: 46.77 MB
Page 25 of 323
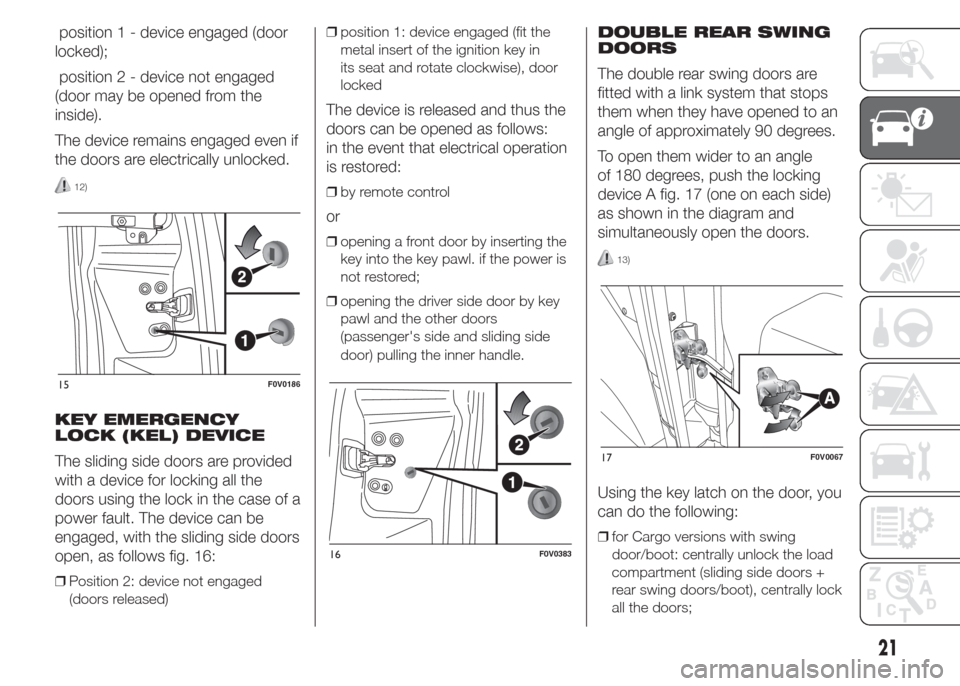
position 1 - device engaged (door
locked);
position 2 - device not engaged
(door may be opened from the
inside).
The device remains engaged even if
the doors are electrically unlocked.
12)
KEY EMERGENCY
LOCK (KEL) DEVICE
The sliding side doors are provided
with a device for locking all the
doors using the lock in the case of a
power fault. The device can be
engaged, with the sliding side doors
open, as follows fig. 16:
❒Position 2: device not engaged
(doors released)❒position 1: device engaged (fit the
metal insert of the ignition key in
its seat and rotate clockwise), door
locked
The device is released and thus the
doors can be opened as follows:
in the event that electrical operation
is restored:
❒by remote control
or
❒opening a front door by inserting the
key into the key pawl. if the power is
not restored;
❒opening the driver side door by key
pawl and the other doors
(passenger's side and sliding side
door) pulling the inner handle.
DOUBLE REAR SWING
DOORS
The double rear swing doors are
fitted with a link system that stops
them when they have opened to an
angle of approximately 90 degrees.
To open them wider to an angle
of 180 degrees, push the locking
device A fig. 17 (one on each side)
as shown in the diagram and
simultaneously open the doors.
13)
Using the key latch on the door, you
can do the following:
❒for Cargo versions with swing
door/boot: centrally unlock the load
compartment (sliding side doors +
rear swing doors/boot), centrally lock
all the doors;
15F0V0186
16F0V0383
17F0V0067
21
Page 26 of 323
❒for Doblò/Doblò Combi versions with
swing door: local unlocking/locking.
Opening/closing the
first swing door from
the outside
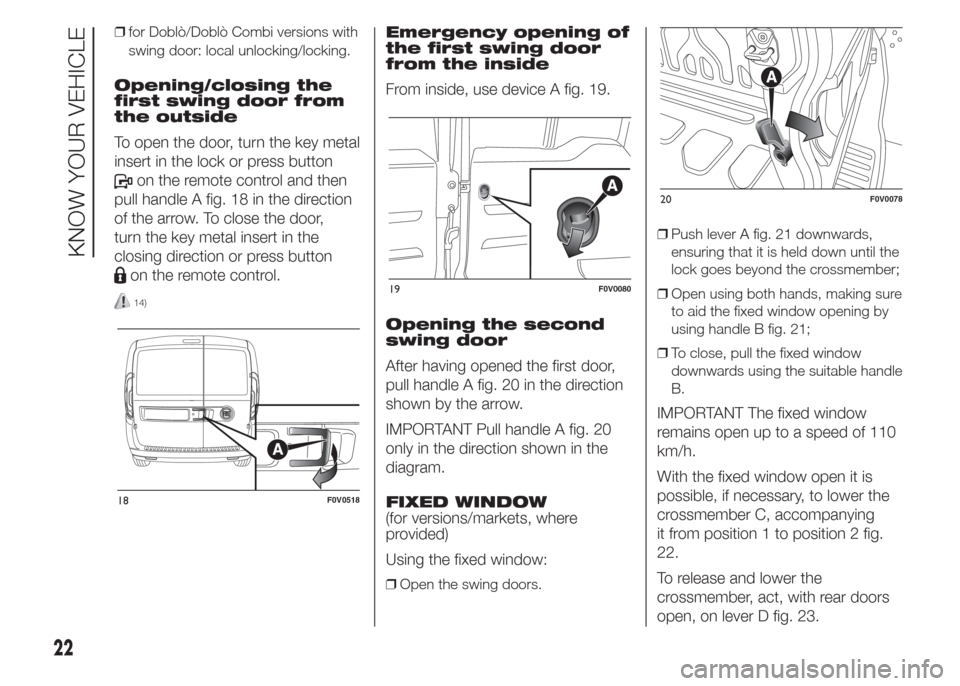
To open the door, turn the key metal
insert in the lock or press button
on the remote control and then
pull handle A fig. 18 in the direction
of the arrow. To close the door,
turn the key metal insert in the
closing direction or press button
on the remote control.
14)
Emergency opening of
the first swing door
from the inside
From inside, use device A fig. 19.
Opening the second
swing door
After having opened the first door,
pull handle A fig. 20 in the direction
shown by the arrow.
IMPORTANT Pull handle A fig. 20
only in the direction shown in the
diagram.
FIXED WINDOW
(for versions/markets, where
provided)
Using the fixed window:
❒Open the swing doors.❒Push lever A fig. 21 downwards,
ensuring that it is held down until the
lock goes beyond the crossmember;
❒Open using both hands, making sure
to aid the fixed window opening by
using handle B fig. 21;
❒To close, pull the fixed window
downwards using the suitable handle
B.
IMPORTANT The fixed window
remains open up to a speed of 110
km/h.
With the fixed window open it is
possible, if necessary, to lower the
crossmember C, accompanying
it from position 1 to position 2 fig.
22.
To release and lower the
crossmember, act, with rear doors
open, on lever D fig. 23.
18F0V0518
19F0V0080
20F0V0078
22
KNOW YOUR VEHICLE
Page 41 of 323
IMPORTANT Before getting out of
the vehicle, make sure both
switches are in the middle position;
when the doors are closed, the
lights switch off to prevent the
battery from being run down. In any
case, if the switch is left in on
position, the roof light switches off
automatically 15 minutes after
the engine switching off.
REAR ROOF LIGHT
WITH MOVABLE LENS
(Doblò/Doblò Combi versions)
The light comes on automatically
when a front door or sliding side
door is opened and goes out when
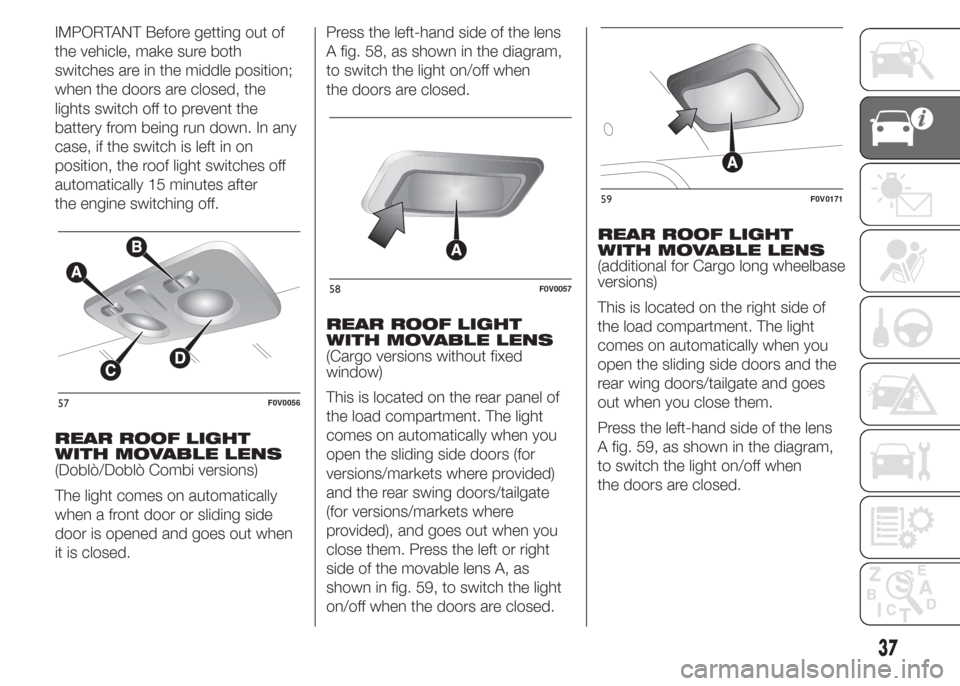
it is closed.Press the left-hand side of the lens
A fig. 58, as shown in the diagram,
to switch the light on/off when
the doors are closed.
REAR ROOF LIGHT
WITH MOVABLE LENS
(Cargo versions without fixed
window)
This is located on the rear panel of
the load compartment. The light
comes on automatically when you
open the sliding side doors (for
versions/markets where provided)
and the rear swing doors/tailgate
(for versions/markets where
provided), and goes out when you
close them. Press the left or right
side of the movable lens A, as
shown in fig. 59, to switch the light
on/off when the doors are closed.REAR ROOF LIGHT
WITH MOVABLE LENS
(additional for Cargo long wheelbase
versions)
This is located on the right side of
the load compartment. The light
comes on automatically when you
open the sliding side doors and the
rear wing doors/tailgate and goes
out when you close them.
Press the left-hand side of the lens
A fig. 59, as shown in the diagram,
to switch the light on/off when
the doors are closed.
57F0V0056
58F0V0057
59F0V0171
37
Page 143 of 323
USING THE
GEARBOX
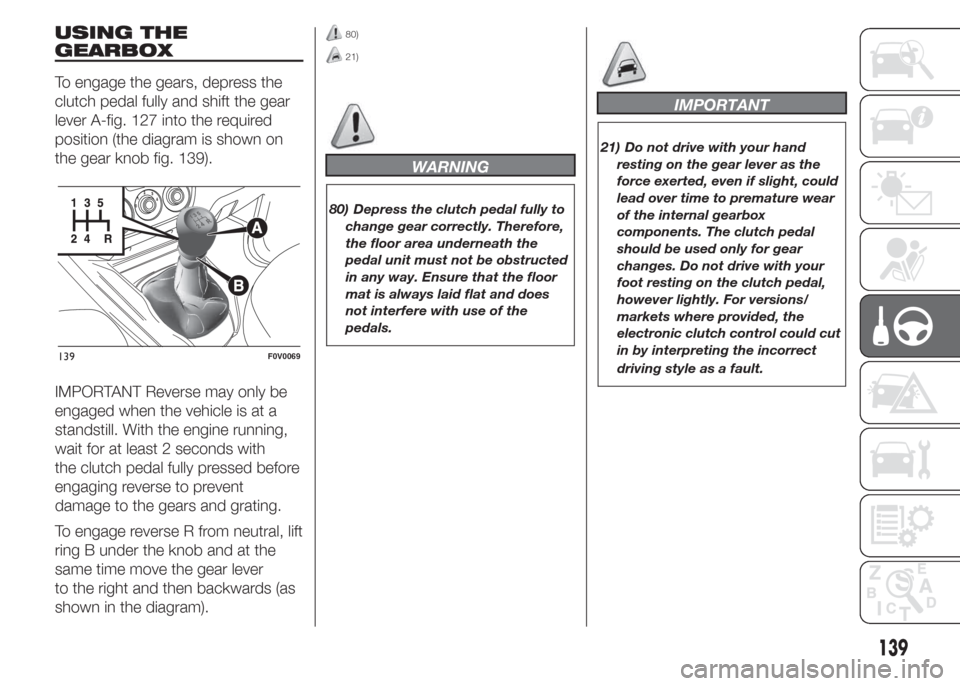
To engage the gears, depress the
clutch pedal fully and shift the gear
lever A-fig. 127 into the required
position (the diagram is shown on
the gear knob fig. 139).
IMPORTANT Reverse may only be
engaged when the vehicle is at a
standstill. With the engine running,
wait for at least 2 seconds with
the clutch pedal fully pressed before
engaging reverse to prevent
damage to the gears and grating.
To engage reverse R from neutral, lift
ring B under the knob and at the
same time move the gear lever
to the right and then backwards (as
shown in the diagram).
80)
21)
WARNING
80) Depress the clutch pedal fully to
change gear correctly. Therefore,
the floor area underneath the
pedal unit must not be obstructed
in any way. Ensure that the floor
mat is always laid flat and does
not interfere with use of the
pedals.
IMPORTANT
21) Do not drive with your hand
resting on the gear lever as the
force exerted, even if slight, could
lead over time to premature wear
of the internal gearbox
components. The clutch pedal
should be used only for gear
changes. Do not drive with your
foot resting on the clutch pedal,
however lightly. For versions/
markets where provided, the
electronic clutch control could cut
in by interpreting the incorrect
driving style as a fault.
139F0V0069
139
Page 170 of 323
NUMBER PLATE
LIGHTS (for
hatchback versions)
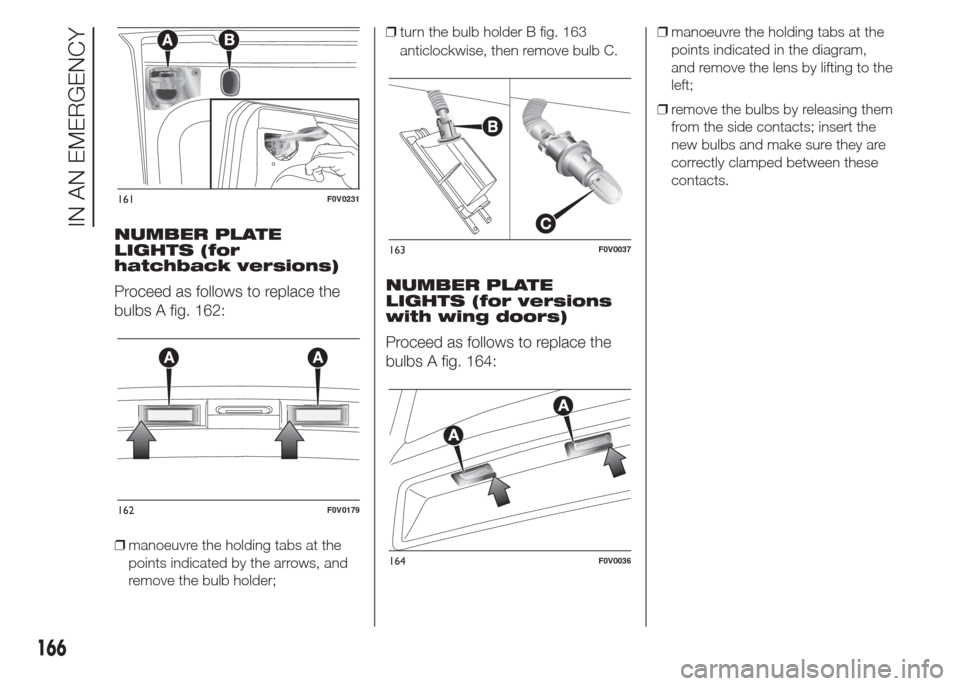
Proceed as follows to replace the
bulbs A fig. 162:
❒manoeuvre the holding tabs at the
points indicated by the arrows, and
remove the bulb holder;❒turn the bulb holder B fig. 163
anticlockwise, then remove bulb C.
NUMBER PLATE
LIGHTS (for versions
with wing doors)
Proceed as follows to replace the
bulbs A fig. 164:
❒manoeuvre the holding tabs at the
points indicated in the diagram,
and remove the lens by lifting to the
left;
❒remove the bulbs by releasing them
from the side contacts; insert the
new bulbs and make sure they are
correctly clamped between these
contacts.
161F0V0231
162F0V0179
163F0V0037
164F0V0036
166
IN AN EMERGENCY
Page 216 of 323
WINDSCREEN/REAR
WINDOW WIPER
(for versions/markets, where
provided)
BLADES
Periodically clean the rubber part
using special products; TUTELA
PROFESSIONAL SC 35 is
recommended.
Replace the blades if the rubber
edge is deformed or worn. In any
case, it is advisable to replace them
approximately once a year.
A few simple precautions can
reduce the possibility of damage to
the blades:
❒if the temperature falls below zero,
make sure that ice has not frozen
the rubber against the glass. Use a
de-icing product to release it if
required;
❒remove any snow from the glass: in
addition to protecting the blades,
this prevents effort on the motor and
overheating;
❒do not operate the windscreen and
rear window wipers on dry glass.
138)
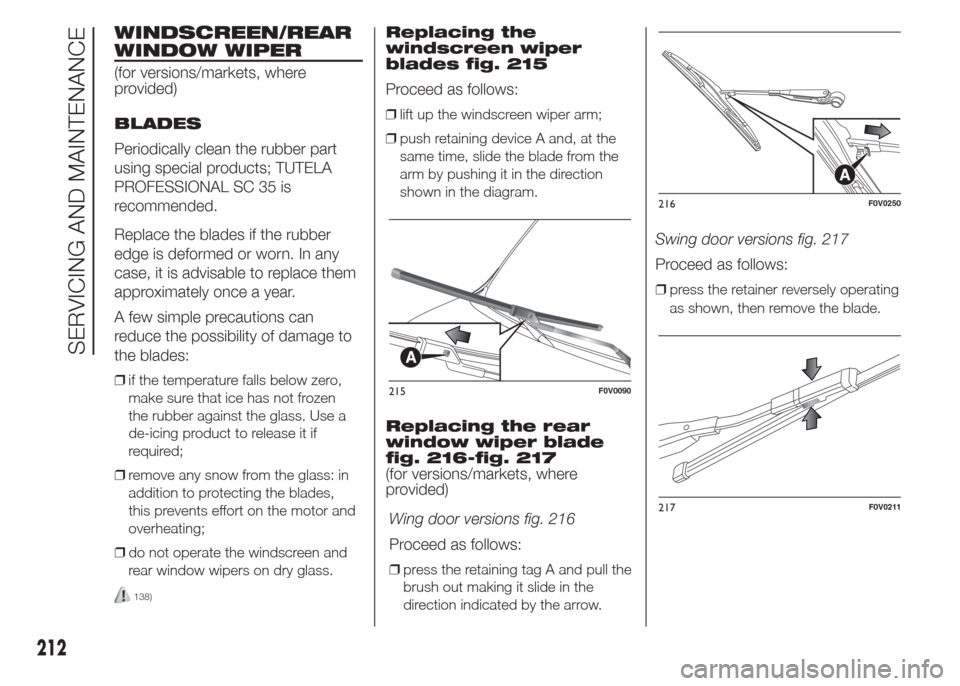
Replacing the
windscreen wiper
blades fig. 215
Proceed as follows:
❒lift up the windscreen wiper arm;
❒push retaining device A and, at the
same time, slide the blade from the
arm by pushing it in the direction
shown in the diagram.
Replacing the rear
window wiper blade
fig. 216-fig. 217
(for versions/markets, where
provided)
Wing door versions fig. 216
Proceed as follows:
❒press the retaining tag A and pull the
brush out making it slide in the
direction indicated by the arrow.
Swing door versions fig. 217
Proceed as follows:
❒press the retainer reversely operating
as shown, then remove the blade.
215F0V0090
216F0V0250
217F0V0211
212
SERVICING AND MAINTENANCE