light FIAT DOBLO COMBI 2018 Owner handbook (in English)
[x] Cancel search | Manufacturer: FIAT, Model Year: 2018, Model line: DOBLO COMBI, Model: FIAT DOBLO COMBI 2018Pages: 272, PDF Size: 23.75 MB
Page 120 of 272
Closing
1) Fit the cap (complete with key) and
turn it clockwise until it clicks once
or more.
2) Turn the key clockwise and extract it,
then close the flap.
The sealing may cause a slight pressure
increase in the tank. A little breathing
off, while slackening the cap is
absolutely normal.
29)
NATURAL POWER
VERSIONS
The methane filler is located near the
petrol filler
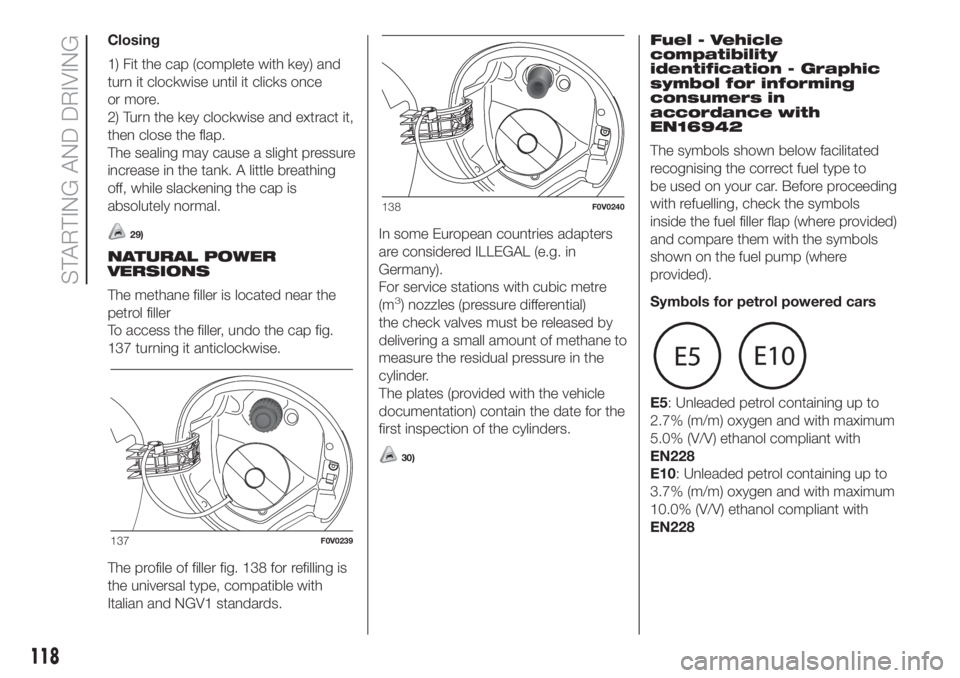
To access the filler, undo the cap fig.
137 turning it anticlockwise.
The profile of filler fig. 138 for refilling is
the universal type, compatible with
Italian and NGV1 standards.In some European countries adapters
are considered ILLEGAL (e.g. in
Germany).
For service stations with cubic metre
(m
3) nozzles (pressure differential)
the check valves must be released by
delivering a small amount of methane to
measure the residual pressure in the
cylinder.
The plates (provided with the vehicle
documentation) contain the date for the
first inspection of the cylinders.
30)
Fuel - Vehicle
compatibility
identification - Graphic
symbol for informing
consumers in
accordance with
EN16942
The symbols shown below facilitated
recognising the correct fuel type to
be used on your car. Before proceeding
with refuelling, check the symbols
inside the fuel filler flap (where provided)
and compare them with the symbols
shown on the fuel pump (where
provided).
Symbols for petrol powered cars
E5: Unleaded petrol containing up to
2.7% (m/m) oxygen and with maximum
5.0% (V/V) ethanol compliant with
EN228
E10: Unleaded petrol containing up to
3.7% (m/m) oxygen and with maximum
10.0% (V/V) ethanol compliant with
EN228
137F0V0239
138F0V0240
118
STARTING AND DRIVING
Page 123 of 272
IN AN EMERGENCY
A punctured tyre or a burnt-out bulb?
At times, a problem may interfere
with our journey.
The pages on emergencies can help
you to deal with critical situations
independently and with calm.
In an emergency we recommend that
you call the freephone number found in
the Warranty Booklet.
It is also possible to call the 00 800
3428 0000 freephone number to
search the nearest Fiat Dealership.HAZARD WARNING LIGHTS...........122
REPLACING A BULB ......................122
REPLACING AN EXTERIOR BULB ..125
REPLACING INTERIOR BULBS ......128
REPLACING FUSES........................129
REPLACING A WHEEL ...................134
FIX&GO AUTOMATIC KIT ................138
EMERGENCY STARTING ................141
FUEL CUT-OFF SYSTEM ................142
LIFTING THE VEHICLE....................142
TOWING THE VEHICLE ..................143
121
Page 124 of 272
HAZARD WARNING
LIGHTS
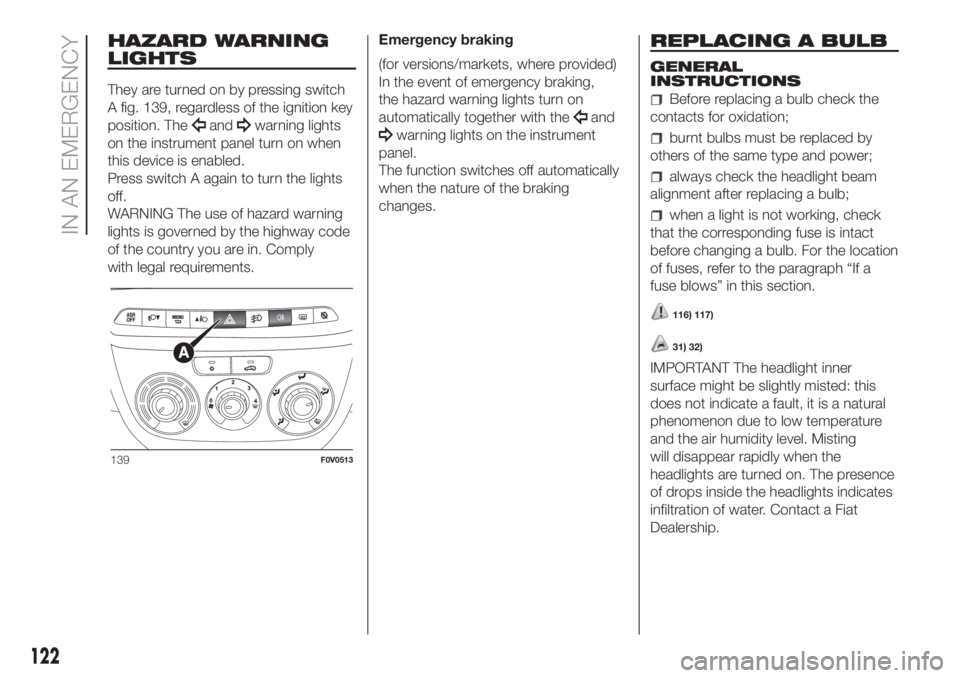
They are turned on by pressing switch
A fig. 139, regardless of the ignition key
position. The
andwarning lights
on the instrument panel turn on when
this device is enabled.
Press switch A again to turn the lights
off.
WARNING The use of hazard warning
lights is governed by the highway code
of the country you are in. Comply
with legal requirements.Emergency braking
(for versions/markets, where provided)
In the event of emergency braking,
the hazard warning lights turn on
automatically together with theand
warning lights on the instrument
panel.
The function switches off automatically
when the nature of the braking
changes.
REPLACING A BULB
GENERAL
INSTRUCTIONS
Before replacing a bulb check the
contacts for oxidation;
burnt bulbs must be replaced by
others of the same type and power;
always check the headlight beam
alignment after replacing a bulb;
when a light is not working, check
that the corresponding fuse is intact
before changing a bulb. For the location
of fuses, refer to the paragraph “If a
fuse blows” in this section.
116) 117)
31) 32)
IMPORTANT The headlight inner
surface might be slightly misted: this
does not indicate a fault, it is a natural
phenomenon due to low temperature
and the air humidity level. Misting
will disappear rapidly when the
headlights are turned on. The presence
of drops inside the headlights indicates
infiltration of water. Contact a Fiat
Dealership.
139F0V0513
122
IN AN EMERGENCY
Page 125 of 272
TYPES OF BULBS
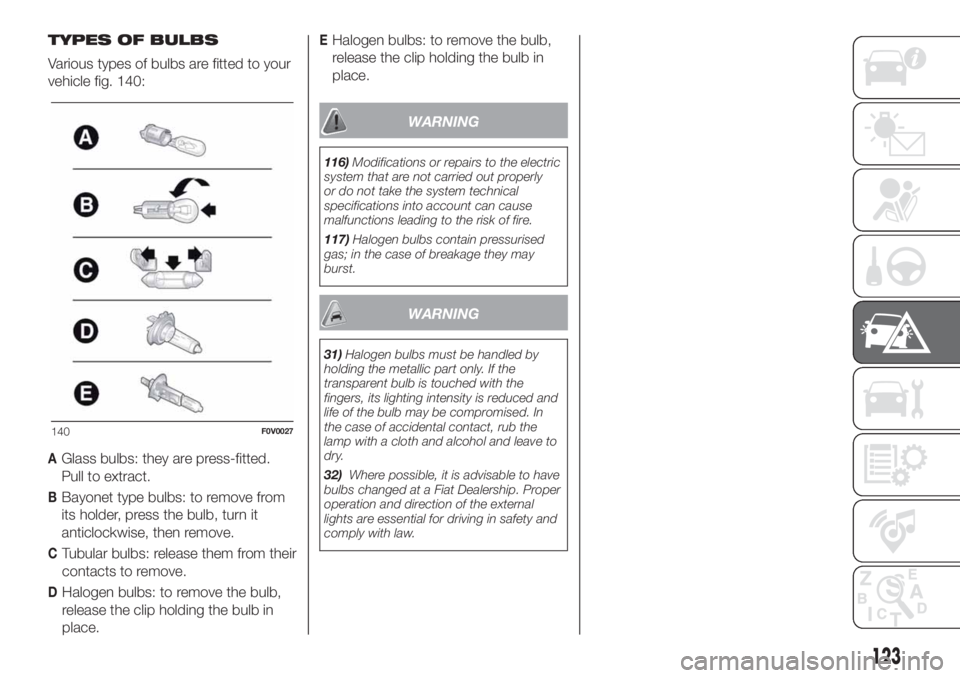
Various types of bulbs are fitted to your
vehicle fig. 140:
AGlass bulbs: they are press-fitted.
Pull to extract.
BBayonet type bulbs: to remove from
its holder, press the bulb, turn it
anticlockwise, then remove.
CTubular bulbs: release them from their
contacts to remove.
DHalogen bulbs: to remove the bulb,
release the clip holding the bulb in
place.
EHalogen bulbs: to remove the bulb,
release the clip holding the bulb in
place.
WARNING
116)Modifications or repairs to the electric
system that are not carried out properly
or do not take the system technical
specifications into account can cause
malfunctions leading to the risk of fire.
117)Halogen bulbs contain pressurised
gas; in the case of breakage they may
burst.
WARNING
31)Halogen bulbs must be handled by
holding the metallic part only. If the
transparent bulb is touched with the
fingers, its lighting intensity is reduced and
life of the bulb may be compromised. In
the case of accidental contact, rub the
lamp with a cloth and alcohol and leave to
dry.
32)Where possible, it is advisable to have
bulbs changed at a Fiat Dealership. Proper
operation and direction of the external
lights are essential for driving in safety and
comply with law.
140F0V0027
123
Page 126 of 272
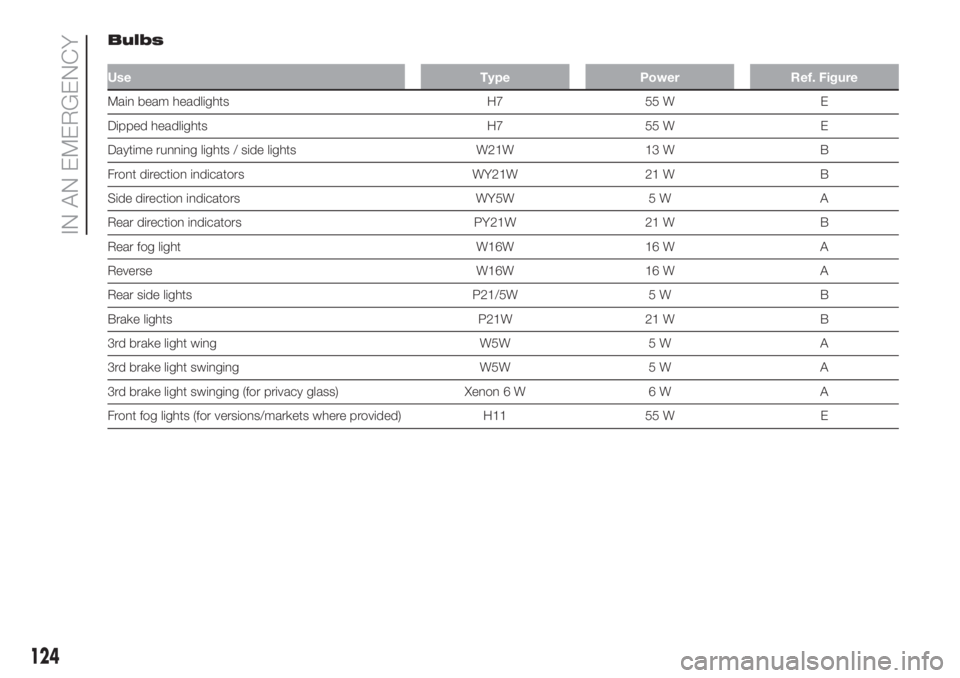
Bulbs
Use Type Power Ref. Figure
Main beam headlights H7 55 W E
Dipped headlights H7 55 W E
Daytime running lights / side lights W21W 13 W B
Front direction indicators WY21W 21 W B
Side direction indicators WY5W 5 W A
Rear direction indicators PY21W 21 W B
Rear fog light W16W 16 W A
Reverse W16W 16 W A
Rear side lights P21/5W 5 W B
Brake lights P21W 21 W B
3rd brake light wing W5W 5 W A
3rd brake light swinging W5W 5 W A
3rd brake light swinging (for privacy glass) Xenon 6 W 6 W A
Front fog lights (for versions/markets where provided) H11 55 W E
124
IN AN EMERGENCY
Page 127 of 272
REPLACING AN
EXTERIOR BULB
For the type of bulb and relevant power
rating, see “Changing a bulb”.
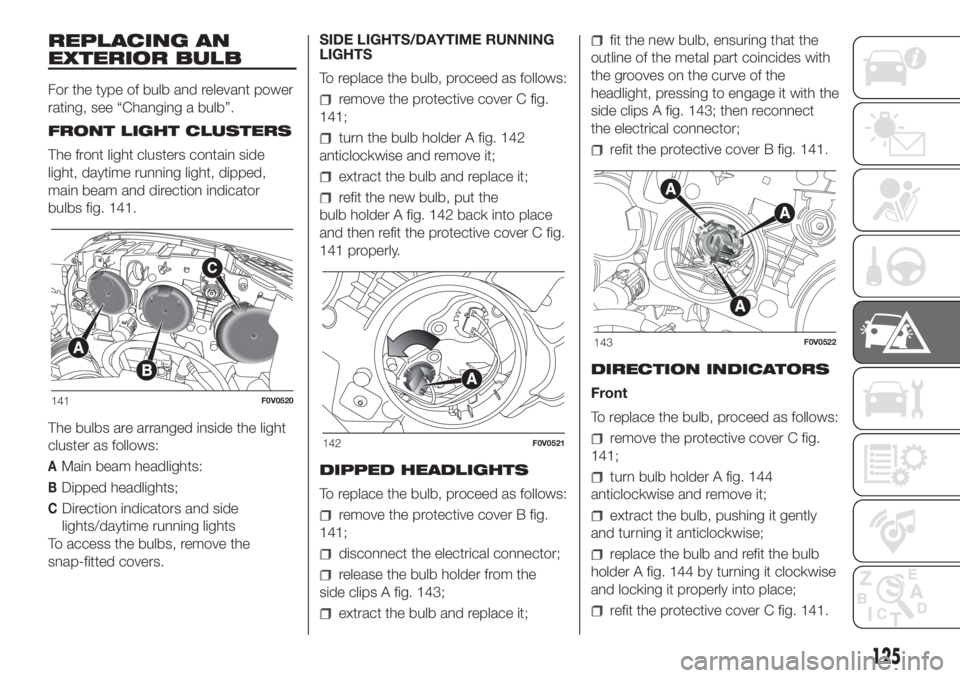
FRONT LIGHT CLUSTERS
The front light clusters contain side
light, daytime running light, dipped,
main beam and direction indicator
bulbs fig. 141.
The bulbs are arranged inside the light
cluster as follows:
AMain beam headlights:
BDipped headlights;
CDirection indicators and side
lights/daytime running lights
To access the bulbs, remove the
snap-fitted covers.SIDE LIGHTS/DAYTIME RUNNING
LIGHTS
To replace the bulb, proceed as follows:
remove the protective cover C fig.
141;
turn the bulb holder A fig. 142
anticlockwise and remove it;
extract the bulb and replace it;
refit the new bulb, put the
bulb holder A fig. 142 back into place
and then refit the protective cover C fig.
141 properly.
DIPPED HEADLIGHTS
To replace the bulb, proceed as follows:
remove the protective cover B fig.
141;
disconnect the electrical connector;
release the bulb holder from the
side clips A fig. 143;
extract the bulb and replace it;
fit the new bulb, ensuring that the
outline of the metal part coincides with
the grooves on the curve of the
headlight, pressing to engage it with the
side clips A fig. 143; then reconnect
the electrical connector;
refit the protective cover B fig. 141.
DIRECTION INDICATORS
Front
To replace the bulb, proceed as follows:
remove the protective cover C fig.
141;
turn bulb holder A fig. 144
anticlockwise and remove it;
extract the bulb, pushing it gently
and turning it anticlockwise;
replace the bulb and refit the bulb
holder A fig. 144 by turning it clockwise
and locking it properly into place;
refit the protective cover C fig. 141.
141F0V0520
142F0V0521
143F0V0522
125
Page 128 of 272
Side
IMPORTANT Go to a Fiat Dealership to
have bulbs for the side direction
indicators replaced, because they are
located inside the wing mirror.
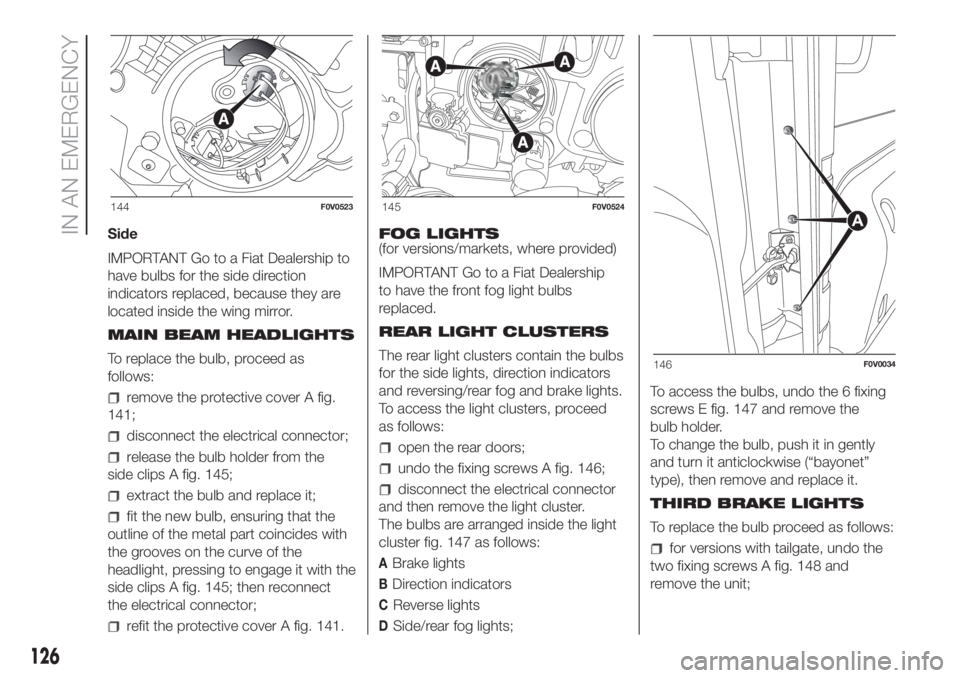
MAIN BEAM HEADLIGHTS
To replace the bulb, proceed as
follows:
remove the protective cover A fig.
141;
disconnect the electrical connector;
release the bulb holder from the
side clips A fig. 145;
extract the bulb and replace it;
fit the new bulb, ensuring that the
outline of the metal part coincides with
the grooves on the curve of the
headlight, pressing to engage it with the
side clips A fig. 145; then reconnect
the electrical connector;
refit the protective cover A fig. 141.FOG LIGHTS
(for versions/markets, where provided)
IMPORTANT Go to a Fiat Dealership
to have the front fog light bulbs
replaced.
REAR LIGHT CLUSTERS
The rear light clusters contain the bulbs
for the side lights, direction indicators
and reversing/rear fog and brake lights.
To access the light clusters, proceed
as follows:
open the rear doors;
undo the fixing screws A fig. 146;
disconnect the electrical connector
and then remove the light cluster.
The bulbs are arranged inside the light
cluster fig. 147 as follows:
ABrake lights
BDirection indicators
CReverse lights
DSide/rear fog lights;To access the bulbs, undo the 6 fixing
screws E fig. 147 and remove the
bulb holder.
To change the bulb, push it in gently
and turn it anticlockwise (“bayonet”
type), then remove and replace it.
THIRD BRAKE LIGHTS
To replace the bulb proceed as follows:
for versions with tailgate, undo the
two fixing screws A fig. 148 and
remove the unit;
144F0V0523145F0V0524
146F0V0034
126
IN AN EMERGENCY
Page 129 of 272
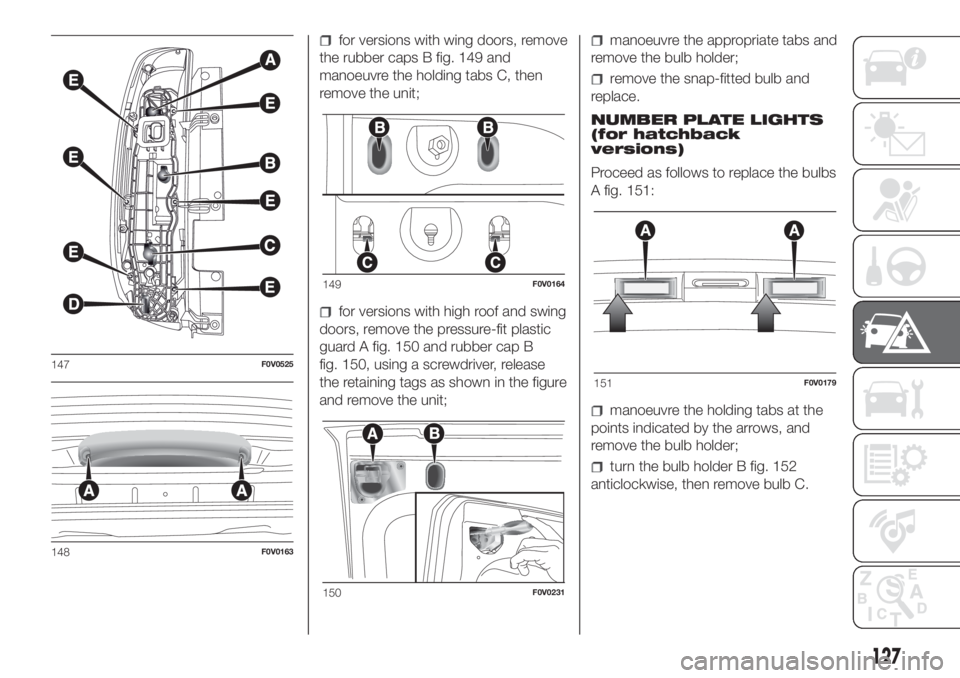
for versions with wing doors, remove
the rubber caps B fig. 149 and
manoeuvre the holding tabs C, then
remove the unit;
for versions with high roof and swing
doors, remove the pressure-fit plastic
guard A fig. 150 and rubber cap B
fig. 150, using a screwdriver, release
the retaining tags as shown in the figure
and remove the unit;
manoeuvre the appropriate tabs and
remove the bulb holder;
remove the snap-fitted bulb and
replace.
NUMBER PLATE LIGHTS
(for hatchback
versions)
Proceed as follows to replace the bulbs
A fig. 151:
manoeuvre the holding tabs at the
points indicated by the arrows, and
remove the bulb holder;
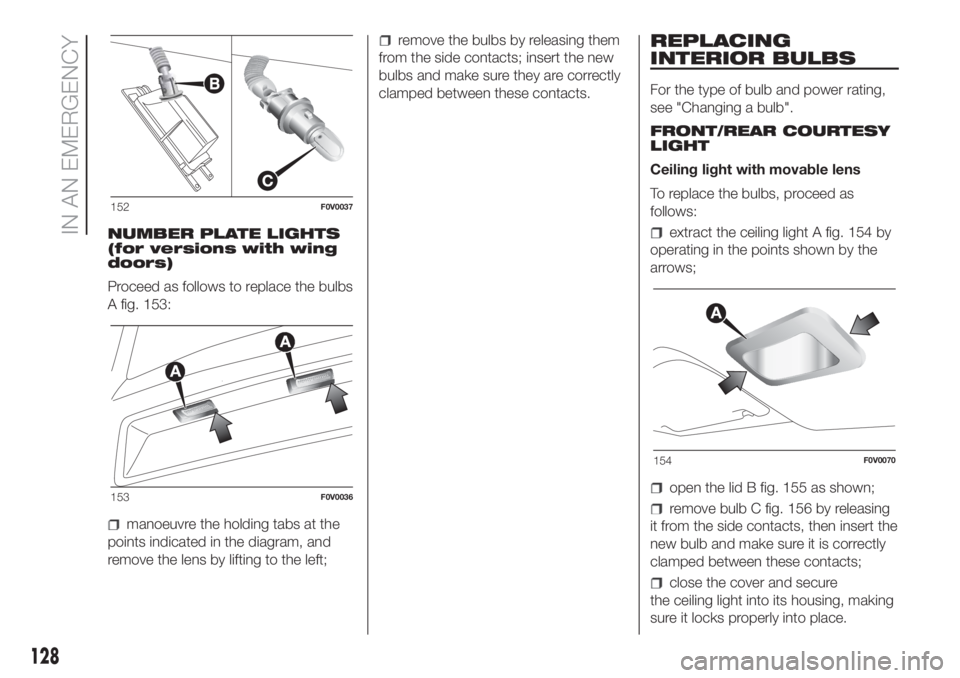
turn the bulb holder B fig. 152
anticlockwise, then remove bulb C.
147F0V0525
148F0V0163
149F0V0164
150F0V0231
151F0V0179
127
Page 130 of 272
NUMBER PLATE LIGHTS
(for versions with wing
doors)
Proceed as follows to replace the bulbs
A fig. 153:
manoeuvre the holding tabs at the
points indicated in the diagram, and
remove the lens by lifting to the left;
remove the bulbs by releasing them
from the side contacts; insert the new
bulbs and make sure they are correctly
clamped between these contacts.REPLACING
INTERIOR BULBS
For the type of bulb and power rating,
see "Changing a bulb".
FRONT/REAR COURTESY
LIGHT
Ceiling light with movable lens
To replace the bulbs, proceed as
follows:
extract the ceiling light A fig. 154 by
operating in the points shown by the
arrows;
open the lid B fig. 155 as shown;
remove bulb C fig. 156 by releasing
it from the side contacts, then insert the
new bulb and make sure it is correctly
clamped between these contacts;
close the cover and secure
the ceiling light into its housing, making
sure it locks properly into place.
152F0V0037
153F0V0036
154F0V0070
128
IN AN EMERGENCY
Page 131 of 272
Ceiling light with spot lights (where
provided)
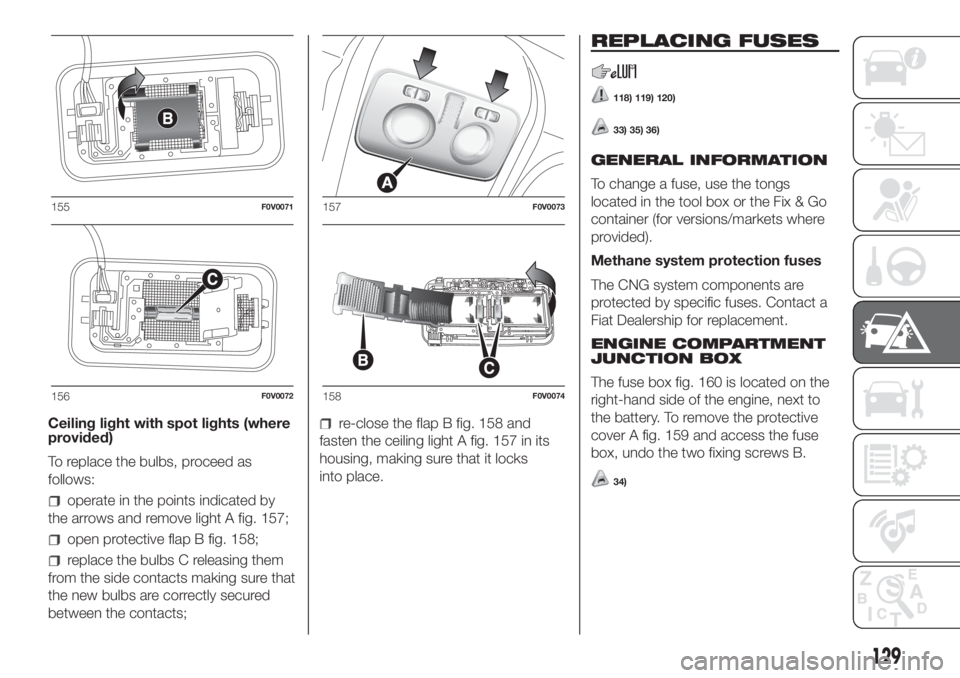
To replace the bulbs, proceed as
follows:
operate in the points indicated by
the arrows and remove light A fig. 157;
open protective flap B fig. 158;
replace the bulbs C releasing them
from the side contacts making sure that
the new bulbs are correctly secured
between the contacts;
re-close the flap B fig. 158 and
fasten the ceiling light A fig. 157 in its
housing, making sure that it locks
into place.
REPLACING FUSES
118) 119) 120)
33) 35) 36)
GENERAL INFORMATION
To change a fuse, use the tongs
located in the tool box or the Fix & Go
container (for versions/markets where
provided).
Methane system protection fuses
The CNG system components are
protected by specific fuses. Contact a
Fiat Dealership for replacement.
ENGINE COMPARTMENT
JUNCTION BOX
The fuse box fig. 160 is located on the
right-hand side of the engine, next to
the battery. To remove the protective
cover A fig. 159 and access the fuse
box, undo the two fixing screws B.
34)
155F0V0071
156F0V0072
157F0V0073
158F0V0074
129