dashboard FIAT DOBLO COMBI 2018 Owner handbook (in English)
[x] Cancel search | Manufacturer: FIAT, Model Year: 2018, Model line: DOBLO COMBI, Model: FIAT DOBLO COMBI 2018Pages: 272, PDF Size: 23.75 MB
Page 20 of 272
DRIVER’S SEAT
(for Doblò/Doblò Combi/Cargo
versions, where provided)
15)
Lengthwise adjustment
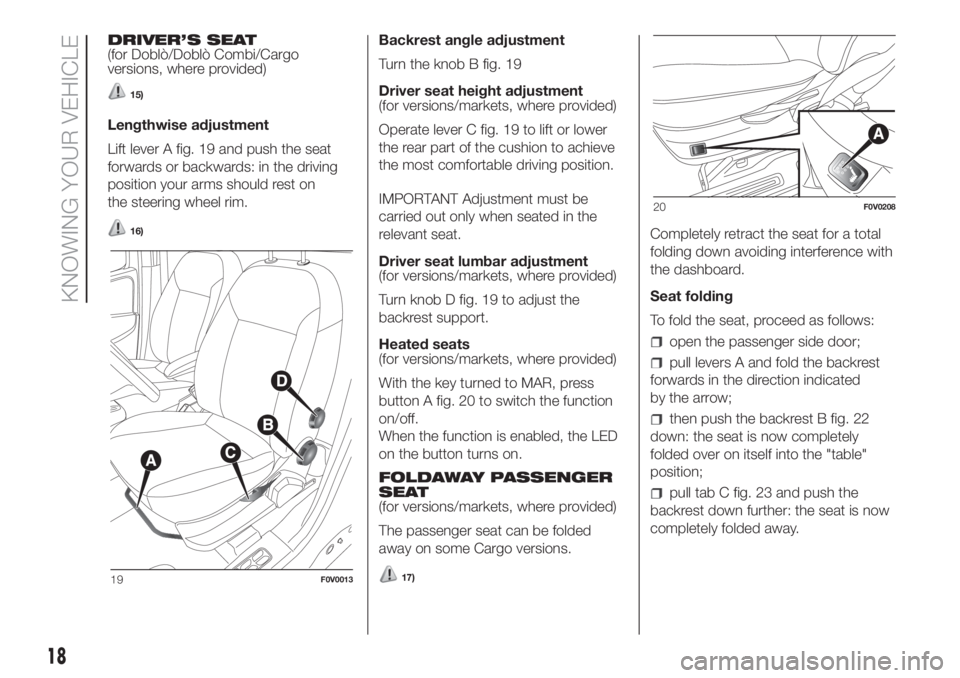
Lift lever A fig. 19 and push the seat
forwards or backwards: in the driving
position your arms should rest on
the steering wheel rim.
16)
Backrest angle adjustment
Turn the knob B fig. 19
Driver seat height adjustment
(for versions/markets, where provided)
Operate lever C fig. 19 to lift or lower
the rear part of the cushion to achieve
the most comfortable driving position.
IMPORTANT Adjustment must be
carried out only when seated in the
relevant seat.
Driver seat lumbar adjustment
(for versions/markets, where provided)
Turn knob D fig. 19 to adjust the
backrest support.
Heated seats
(for versions/markets, where provided)
With the key turned to MAR, press
button A fig. 20 to switch the function
on/off.
When the function is enabled, the LED
on the button turns on.
FOLDAWAY PASSENGER
SEAT
(for versions/markets, where provided)
The passenger seat can be folded
away on some Cargo versions.
17)
Completely retract the seat for a total
folding down avoiding interference with
the dashboard.
Seat folding
To fold the seat, proceed as follows:
open the passenger side door;
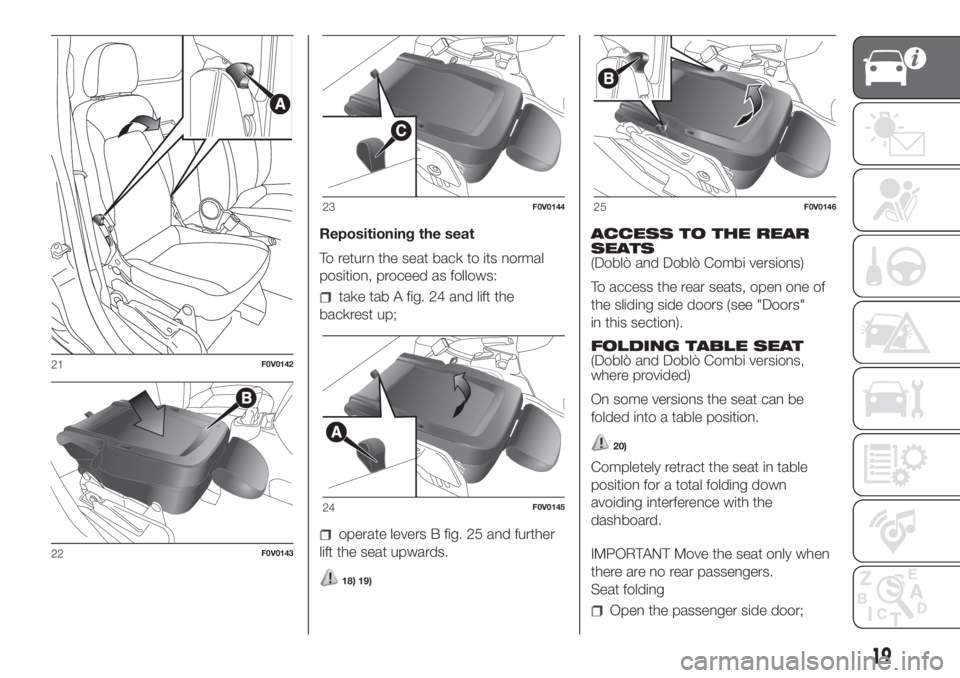
pull levers A and fold the backrest
forwards in the direction indicated
by the arrow;
then push the backrest B fig. 22
down: the seat is now completely
folded over on itself into the "table"
position;
pull tab C fig. 23 and push the
backrest down further: the seat is now
completely folded away.
19F0V0013
20F0V0208
18
KNOWING YOUR VEHICLE
Page 21 of 272
Repositioning the seat
To return the seat back to its normal
position, proceed as follows:
take tab A fig. 24 and lift the
backrest up;
operate levers B fig. 25 and further
lift the seat upwards.
18) 19)
ACCESS TO THE REAR
SEATS
(Doblò and Doblò Combi versions)
To access the rear seats, open one of
the sliding side doors (see "Doors"
in this section).
FOLDING TABLE SEAT
(Doblò and Doblò Combi versions,
where provided)
On some versions the seat can be
folded into a table position.
20)
Completely retract the seat in table
position for a total folding down
avoiding interference with the
dashboard.
IMPORTANT Move the seat only when
there are no rear passengers.
Seat folding
Open the passenger side door;
21F0V0142
22F0V0143
23F0V0144
24F0V0145
25F0V0146
19
Page 25 of 272
WARNING
15)All adjustments must be made with the
vehicle stationary.
16)Once you have released the
adjustment lever, always check that the
seat is locked on the guides by trying
to move it back and forth. If it is not locked,
the seat may move unexpectedly and
make you lose control of the vehicle.
17)Close the dashboard console before
folding the retractable front passenger seat
to avoid damage.
18)When the passenger seat is folded
away, the space created cannot be used
for loading. When the vehicle is in motion,
you are therefore advised to remove or
secure any objects that might interfere with
the driver.
19)If there is no partition between the cab
and the load compartment, tall objects
or packages may take up part of the
passenger area. Make sure that these
items are well secured by using the
available hooks and that they cannot
interfere with the driver.
20)Close the dashboard console before
folding the front passenger seat to form
a table to avoid damage.
21)While travelling, before using the third
row seats, make sure that the second
row seats are in running position and well
anchored (see the specific label fig. 28.
PARTITIONS
FIXED PANEL PARTITION
(for versions/markets, where provided)
Separates the passenger area from
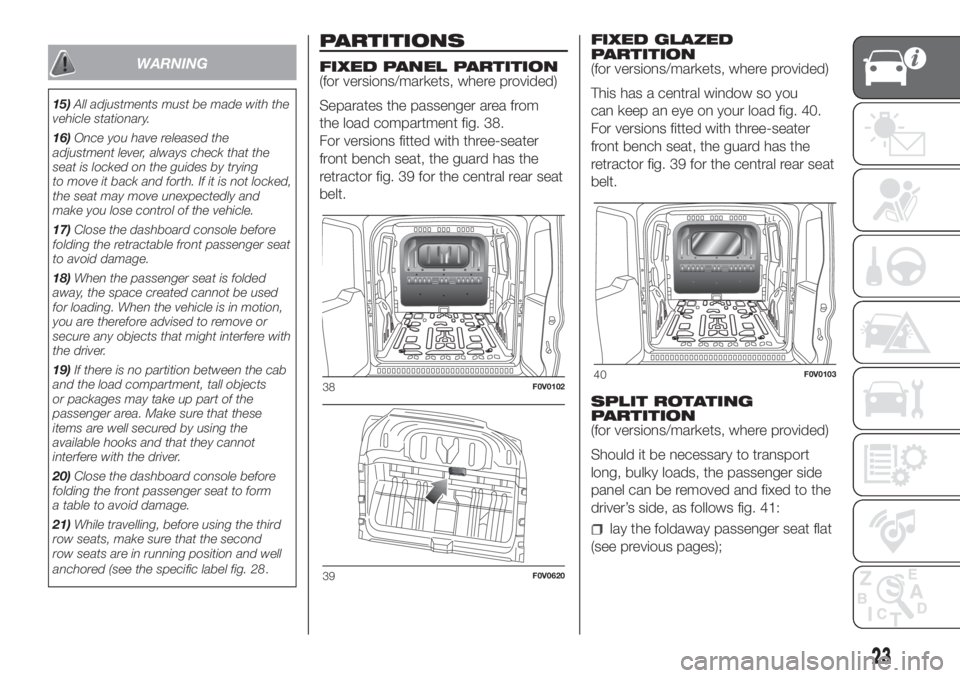
the load compartment fig. 38.
For versions fitted with three-seater
front bench seat, the guard has the
retractor fig. 39 for the central rear seat
belt.FIXED GLAZED
PARTITION
(for versions/markets, where provided)
This has a central window so you
can keep an eye on your load fig. 40.
For versions fitted with three-seater
front bench seat, the guard has the
retractor fig. 39 for the central rear seat
belt.
SPLIT ROTATING
PARTITION
(for versions/markets, where provided)
Should it be necessary to transport
long, bulky loads, the passenger side
panel can be removed and fixed to the
driver’s side, as follows fig. 41:
lay the foldaway passenger seat flat
(see previous pages);
38F0V0102
39F0V0620
40F0V0103
23
Page 30 of 272
WARNING
26)When driving, the mirrors shall always
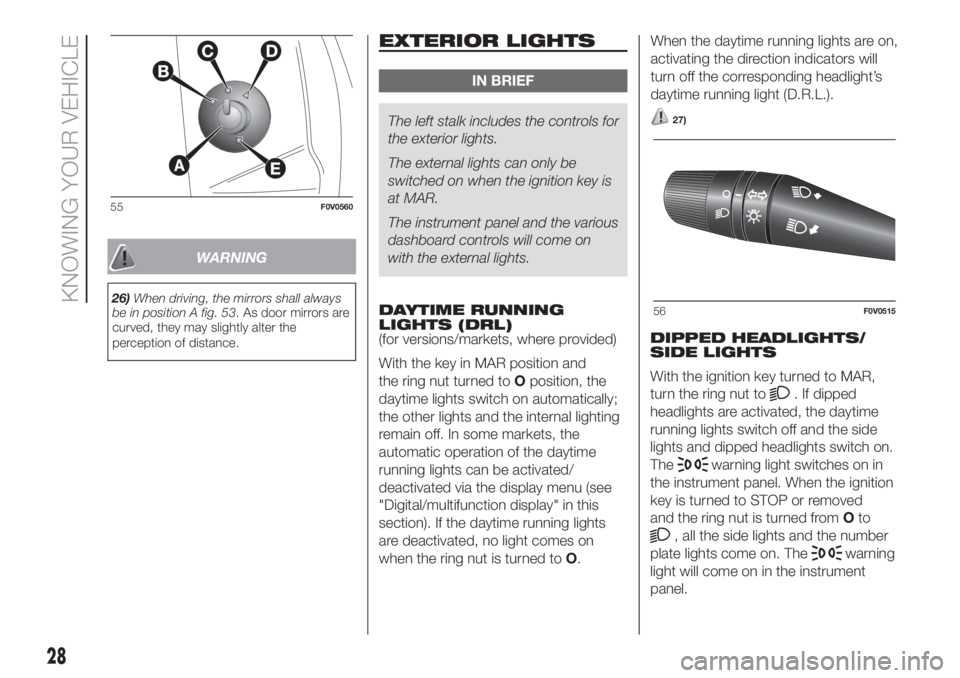
be in position A fig. 53. As door mirrors are
curved, they may slightly alter the
perception of distance.
EXTERIOR LIGHTS
IN BRIEF
The left stalk includes the controls for
the exterior lights.
The external lights can only be
switched on when the ignition key is
at MAR.
The instrument panel and the various
dashboard controls will come on
with the external lights.
DAYTIME RUNNING
LIGHTS (DRL)
(for versions/markets, where provided)
With the key in MAR position and
the ring nut turned toOposition, the
daytime lights switch on automatically;
the other lights and the internal lighting
remain off. In some markets, the
automatic operation of the daytime
running lights can be activated/
deactivated via the display menu (see
"Digital/multifunction display" in this
section). If the daytime running lights
are deactivated, no light comes on
when the ring nut is turned toO.When the daytime running lights are on,
activating the direction indicators will
turn off the corresponding headlight’s
daytime running light (D.R.L.).27)
DIPPED HEADLIGHTS/
SIDE LIGHTS
With the ignition key turned to MAR,
turn the ring nut to
. If dipped
headlights are activated, the daytime
running lights switch off and the side
lights and dipped headlights switch on.
The
warning light switches on in
the instrument panel. When the ignition
key is turned to STOP or removed
and the ring nut is turned fromOto
, all the side lights and the number
plate lights come on. The
warning
light will come on in the instrument
panel.
55F0V0560
56F0V0515
28
KNOWING YOUR VEHICLE
Page 31 of 272
MAIN BEAM HEADLIGHTS
With ring nut in position
, push the
stalk forward toward the dashboard
(stable position). The
warning light
switches on in the instrument panel.
Pulling the stalk towards the steering
wheel, the main beams are turned
off and the dipped headlights on.
FLASHING
You can flash the beams pulling the
stalk toward the steering wheel
(unstable position). The
warning
light switches on in the instrument
panel.
DIRECTION INDICATORS
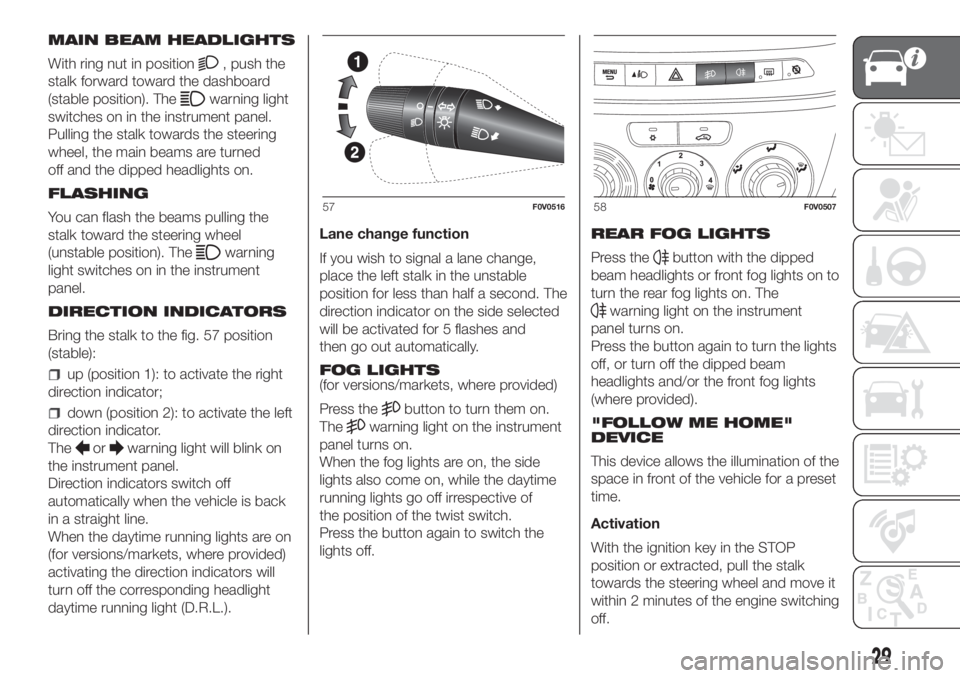
Bring the stalk to the fig. 57 position
(stable):
up (position 1): to activate the right
direction indicator;
down (position 2): to activate the left
direction indicator.
The
orwarning light will blink on
the instrument panel.
Direction indicators switch off
automatically when the vehicle is back
in a straight line.
When the daytime running lights are on
(for versions/markets, where provided)
activating the direction indicators will
turn off the corresponding headlight
daytime running light (D.R.L.).Lane change function
If you wish to signal a lane change,
place the left stalk in the unstable
position for less than half a second. The
direction indicator on the side selected
will be activated for 5 flashes and
then go out automatically.
FOG LIGHTS
(for versions/markets, where provided)
Press the
button to turn them on.
The
warning light on the instrument
panel turns on.
When the fog lights are on, the side
lights also come on, while the daytime
running lights go off irrespective of
the position of the twist switch.
Press the button again to switch the
lights off.REAR FOG LIGHTS
Press the
button with the dipped
beam headlights or front fog lights on to
turn the rear fog lights on. The
warning light on the instrument
panel turns on.
Press the button again to turn the lights
off, or turn off the dipped beam
headlights and/or the front fog lights
(where provided).
"FOLLOW ME HOME"
DEVICE
This device allows the illumination of the
space in front of the vehicle for a preset
time.
Activation
With the ignition key in the STOP
position or extracted, pull the stalk
towards the steering wheel and move it
within 2 minutes of the engine switching
off.
57F0V051658F0V0507
29
Page 35 of 272
REAR WINDOW WIPER /
WASHER
(For versions/markets, where provided)
This operates only with the ignition
key turned to MAR.
Activation
Turn the ring nut to
to operate the
rear window wiper:
in intermittent mode when the
windscreen wiper is not operating;
in synchronous mode (at half the
speed of the windscreen wiper) when
the windscreen wiper is operating;
in continuous mode with reverse
gear engaged and the control active.
With the windscreen wiper on and
reverse gear engaged, rear window
wiping will be continuous.
Pushing the stalk towards the
dashboard (rocking position) will
activate the rear window washer jet.
Keep the stalk pushed for more than
half a second to activate the rear
window wiper as well. Releasing the
stalk will activate the smart washing
function, as described for the
windscreen wiper.
Deactivation
The function stops when the stalk is
released.
5)
HEADLIGHT WASHERS
(for versions/markets, where provided)
They are activated when the dipped
headlights are on and the windscreen
washer is activated.
IMPORTANT Check jet function and
cleanliness at regular intervals.
6)
WARNING
3)Do not use the windscreen wiper to
remove layers of snow or ice from the
windscreen. In such conditions, the
windscreen wiper may be subjected to
excessive stress and the motor cut-out
switch, which prevents operation for a few
seconds, may intervene. If operation is
not restored (even after turning the key and
restarting the engine), contact a Fiat
Dealership.
4)Do not operate the windscreen wiper
with the blades lifted from the windscreen.
5)Do not use the rear window wiper to
remove layers of snow or ice. In such
conditions, the screen wiper may be
subjected to excessive stress and the
motor cut-out switch, which prevents
operation for a few seconds, may
intervene. If operation is not restored,
contact a Fiat Dealership.
6)The headlamp washer jet does not
function when the level of fluid in the
reservoir falls below 1.6 litres.
33
Page 40 of 272
AUTOMATIC CLIMATE CONTROL SYSTEM
(for versions/markets, where provided)
.
CONTROLS
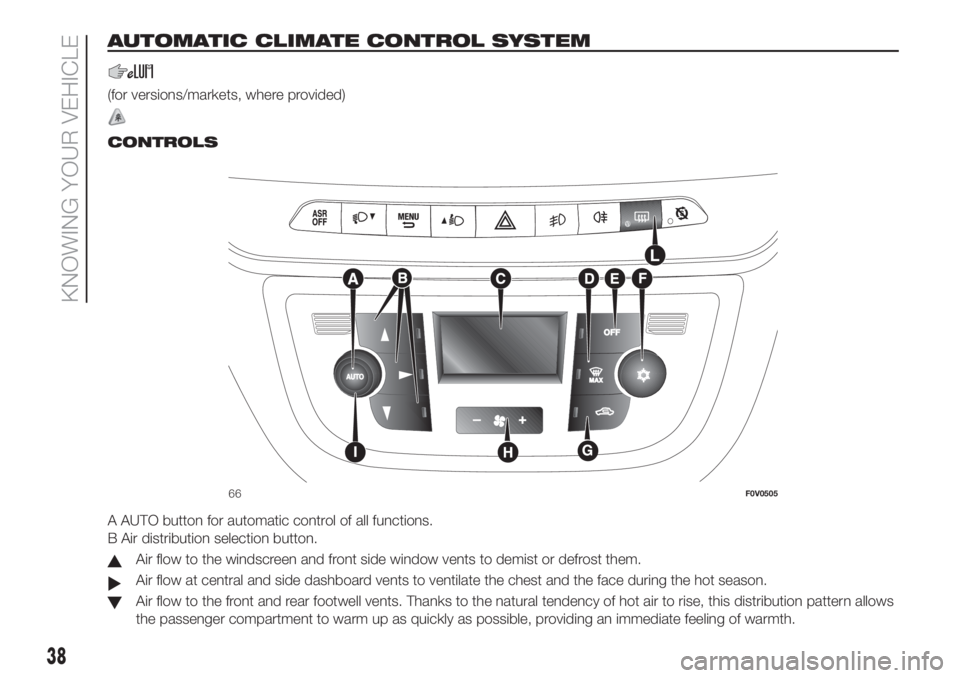
A AUTO button for automatic control of all functions.
B Air distribution selection button.
Air flow to the windscreen and front side window vents to demist or defrost them.
Air flow at central and side dashboard vents to ventilate the chest and the face during the hot season.
Air flow to the front and rear footwell vents. Thanks to the natural tendency of hot air to rise, this distribution pattern allows
the passenger compartment to warm up as quickly as possible, providing an immediate feeling of warmth.
66F0V0505
38
KNOWING YOUR VEHICLE
Page 41 of 272

Air flow distributed between footwell diffusers (hotter air) and central and side dashboard vents (cooler air). This
distribution mode is particularly useful in spring and autumn on sunny days.
Air flow distributed between the footwell vents and the windscreen and front side window defrosting/demisting vents.
This allows an adequate warming of the passenger compartment and prevents the windows from misting up.
C Display.
D MAX DEF function control button.
E System deactivation button.
F Compressor on/off control button.
G Air recirculation control button.
H Fan speed increase/decrease control buttons.
I Temperature increase/decrease control knob.
L Heated rear window and electric door mirror on/off button (for versions/markets, where provided).
39
Page 49 of 272
VERSION WITH
METHANE SYSTEM
(Natural Power)
41) 42) 43)
8) 9) 10)
INTRODUCTION
The Fiat Doblò Natural Power version
features two fuel supply systems,
one for petrol and one for natural gas
(methane).
Selecting the type of fuel supply
Fiat Doblò Natural Power is configured
to run normally on methane.
When the methane is running out and
the pressure in the cylinder is close
to the correct operating limit, the
system automatically switches to petrol
operation.
The engine always starts up on petrol,
with automatic switching to methane
when the best conditions are achieved
(engine water temperature, minimum
engine rpm limit) for switching to
methane.
Therefore, there must always be some
petrol in the tank (at least 1/4 full), in
order not to compromise the operation
of the fuel pump.
For this reason there must always
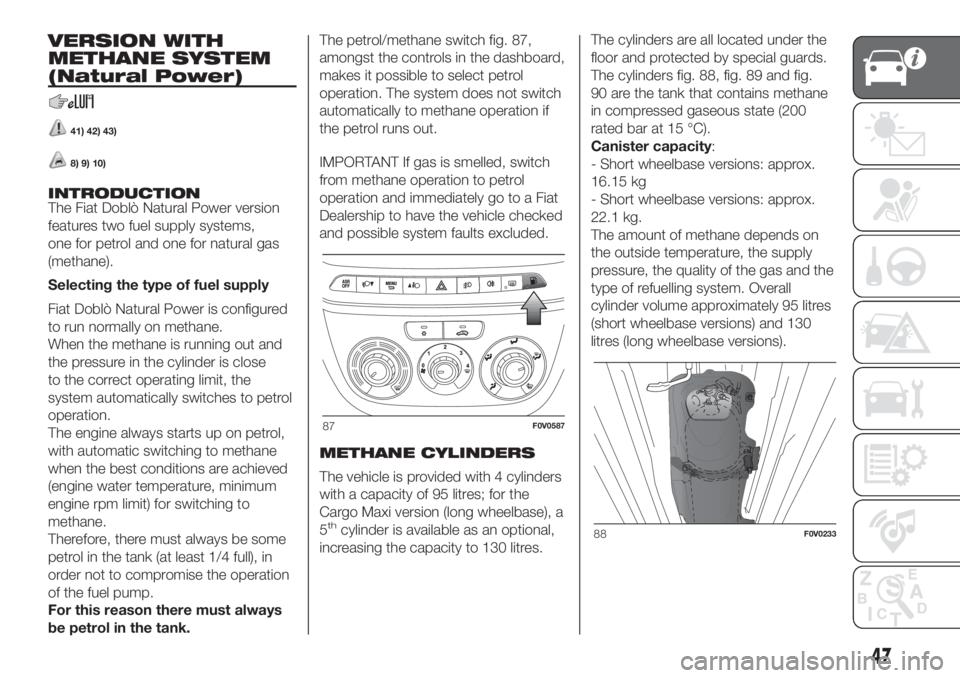
be petrol in the tank.The petrol/methane switch fig. 87,
amongst the controls in the dashboard,
makes it possible to select petrol
operation. The system does not switch
automatically to methane operation if
the petrol runs out.
IMPORTANT If gas is smelled, switch
from methane operation to petrol
operation and immediately go to a Fiat
Dealership to have the vehicle checked
and possible system faults excluded.
METHANE CYLINDERS
The vehicle is provided with 4 cylinders
with a capacity of 95 litres; for the
Cargo Maxi version (long wheelbase), a
5
thcylinder is available as an optional,
increasing the capacity to 130 litres.The cylinders are all located under the
floor and protected by special guards.
The cylinders fig. 88, fig. 89 and fig.
90 are the tank that contains methane
in compressed gaseous state (200
rated bar at 15 °C).
Canister capacity:
- Short wheelbase versions: approx.
16.15 kg
- Short wheelbase versions: approx.
22.1 kg.
The amount of methane depends on
the outside temperature, the supply
pressure, the quality of the gas and the
type of refuelling system. Overall
cylinder volume approximately 95 litres
(short wheelbase versions) and 130
litres (long wheelbase versions).
87F0V0587
88F0V0233
47
Page 52 of 272
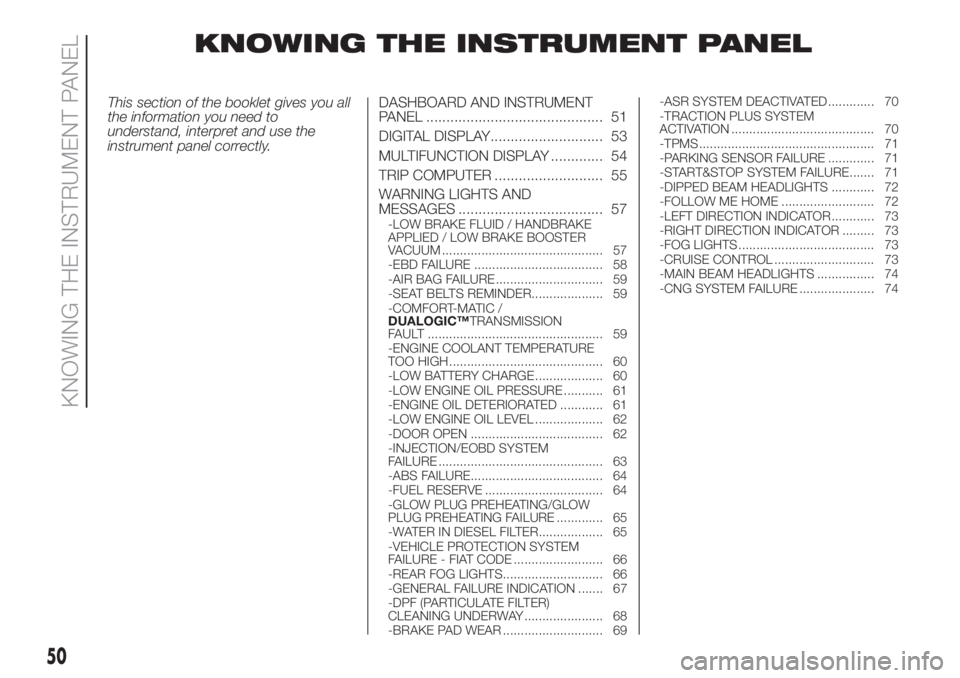
KNOWING THE INSTRUMENT PANEL
This section of the booklet gives you all
the information you need to
understand, interpret and use the
instrument panel correctly.DASHBOARD AND INSTRUMENT
PANEL ............................................ 51
DIGITAL DISPLAY............................ 53
MULTIFUNCTION DISPLAY ............. 54
TRIP COMPUTER ........................... 55
WARNING LIGHTS AND
MESSAGES .................................... 57
-LOW BRAKE FLUID / HANDBRAKE
APPLIED / LOW BRAKE BOOSTER
VACUUM ............................................. 57
-EBD FAILURE .................................... 58
-AIR BAG FAILURE .............................. 59
-SEAT BELTS REMINDER.................... 59
-COMFORT-MATIC /
DUALOGIC™TRANSMISSION
FAULT ................................................. 59
-ENGINE COOLANT TEMPERATURE
TOO HIGH........................................... 60
-LOW BATTERY CHARGE ................... 60
-LOW ENGINE OIL PRESSURE ........... 61
-ENGINE OIL DETERIORATED ............ 61
-LOW ENGINE OIL LEVEL ................... 62
-DOOR OPEN ..................................... 62
-INJECTION/EOBD SYSTEM
FAILURE .............................................. 63
-ABS FAILURE..................................... 64
-FUEL RESERVE ................................. 64
-GLOW PLUG PREHEATING/GLOW
PLUG PREHEATING FAILURE ............. 65
-WATER IN DIESEL FILTER.................. 65
-VEHICLE PROTECTION SYSTEM
FAILURE - FIAT CODE ......................... 66
-REAR FOG LIGHTS............................ 66
-GENERAL FAILURE INDICATION ....... 67
-DPF (PARTICULATE FILTER)
CLEANING UNDERWAY ...................... 68
-BRAKE PAD WEAR ............................ 69-ASR SYSTEM DEACTIVATED ............. 70
-TRACTION PLUS SYSTEM
ACTIVATION ........................................ 70
-TPMS................................................. 71
-PARKING SENSOR FAILURE ............. 71
-START&STOP SYSTEM FAILURE....... 71
-DIPPED BEAM HEADLIGHTS ............ 72
-FOLLOW ME HOME .......................... 72
-LEFT DIRECTION INDICATOR ............ 73
-RIGHT DIRECTION INDICATOR ......... 73
-FOG LIGHTS ...................................... 73
-CRUISE CONTROL ............................ 73
-MAIN BEAM HEADLIGHTS ................ 74
-CNG SYSTEM FAILURE ..................... 74
50
KNOWING THE INSTRUMENT PANEL