bonnet FIAT DOBLO PANORAMA 2015 2.G Owners Manual
[x] Cancel search | Manufacturer: FIAT, Model Year: 2015, Model line: DOBLO PANORAMA, Model: FIAT DOBLO PANORAMA 2015 2.GPages: 323, PDF Size: 47.13 MB
Page 8 of 323
IMPORTANT
This Owner Handbook describes all Fiat Doblò versions. Options, equipment dedicated to specific
markets or versions are not explicitly indicated in the text: as a consequence, you should only consider
the information which is related to the trim level, engine and version that you have purchased. Any
content introduced throughout the production of the model, outside the explicit request of options at the
time of purchase, will be identified with the wording(for versions/markets, where provided).
All data contained in this publication are intended to help you use your vehicle in the best possible way.
Fiat aims at a constant improvement of the vehicles produced. For this reason it reserves the right to
make changes to the model described for technical and/or commercial reasons.
For further information, contact a Fiat Dealership.
SYMBOLS
Some vehicle components have coloured labels whose symbols indicate precautions to be observed when using this
component.
A plate summarising these symbols can also be found under the bonnet.
Page 16 of 323
.
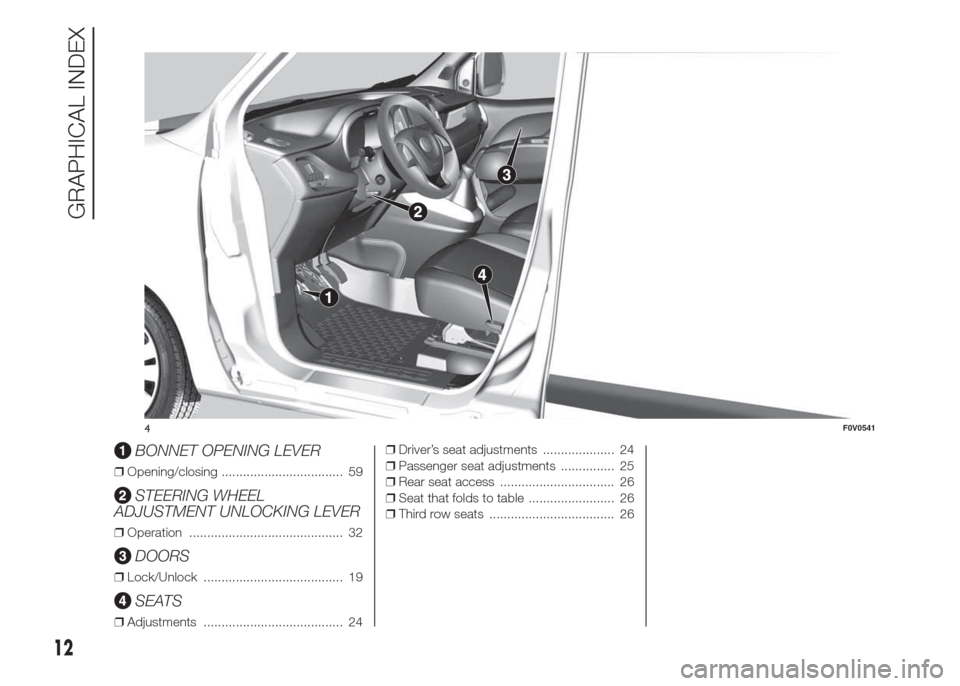
BONNET OPENING LEVER
❒Opening/closing .................................. 59
STEERING WHEEL
ADJUSTMENT UNLOCKING LEVER
❒Operation ........................................... 32
DOORS
❒Lock/Unlock ....................................... 19
SEATS
❒Adjustments ....................................... 24❒Driver’s seat adjustments .................... 24
❒Passenger seat adjustments ............... 25
❒Rear seat access ................................ 26
❒Seat that folds to table ........................ 26
❒Third row seats ................................... 26
4F0V0541
12
GRAPHICAL INDEX
Page 17 of 323
KNOW YOUR VEHICLE
In-depth knowledge of your new
vehicle starts here.
The booklet that you are reading
simply and directly explains how it is
made and how it works.
That’s why we advise you to read it
seated comfortably on board, so
that you can see what is described
here for yourself.THE KEYS....................................... 14
IGNITION DEVICE ........................... 17
SYMBOLS ...................................... 18
THE FIAT CODE SYSTEM ............... 18
DOORS ........................................... 19
SEATS ............................................ 24
PARTITIONS ................................... 29
HEAD RESTRAINTS ........................ 31
STEERING WHEEL ......................... 32
REAR VIEW MIRRORS .................... 32
EXTERIOR LIGHTS ......................... 34
INTERIOR LIGHTS .......................... 36
WINDSCREEN/REAR WINDOW
WIPER ............................................ 40
HEATING AND VENTILATION
SYSTEM ......................................... 42
DIFFUSERS..................................... 43
HEATING AND VENTILATION.......... 44
MANUAL CLIMATE CONTROL
SYSTEM ......................................... 47
AUTOMATIC CLIMATE CONTROL
SYSTEM ......................................... 50
ELECTRIC WINDOWS .................... 56
CONTROLS .................................... 58
BONNET ......................................... 59
BOOT ............................................. 60
INTERIOR FITTINGS ....................... 64
ROOF RACK/SKI RACK .................. 68HEADLIGHTS.................................. 69
RADIO............................................. 70
PROTECTING THE
ENVIRONMENT .............................. 71
13
Page 22 of 323
SYMBOLS
Some vehicle components have
coloured labels whose symbols
indicate precautions to be observed
when using this component. Under
the bonnet there is also a label
that summarises all the symbols.
THE FIAT CODE
SYSTEM
IN BRIEF
This is an electrical engine locking
system which increases protection
against attempted theft of the
vehicle. It is automatically
activated when the ignition key is
removed.
Each key contains an electronic
device which modulates the signal
emitted during ignition by an
antenna built into the ignition
device. The signal, which changes
each time the engine is started,
is the “password”, by means
of which the control unit
recognises the key and enables
starting.
1)
Operation
Each time the vehicle is started
turning the ignition key toMAR, the
Fiat CODE system control unit
sends a recognition code to the
Powertrain Control Module to
deactivate the inhibitor.
The acknowledgement code is sent
only if the Fiat CODE system control
unit has recognised the code
transmitted from the key.
Each time the ignition key is turned
to STOP, the Fiat CODE system
deactivates the functions of the
Powertrain Control Module.
Irregular operation
If, during starting, the code has not
been recognised correctly the
warning light
on the instrument
panel turns on accompanied by
the related message on the display
(see section “Warning lights and
messages”).
In this case, turn the key toSTOP
and then back toMAR; if the lock
continues, try with the other keys
provided with the vehicle. Contact a
Fiat Dealership if you still cannot
start the engine.
18
KNOW YOUR VEHICLE
Page 63 of 323
REAR FOG LIGHTS
Press the
button with the dipped
beam headlights or front fog lights
on to turn the rear fog lights on. The
warning light on the panel
switches on.
Press the button again to turn the
lights off, or turn off the dipped
beam headlights and/or the front fog
lights (where provided).
BONNET
Opening
Proceed as follows:
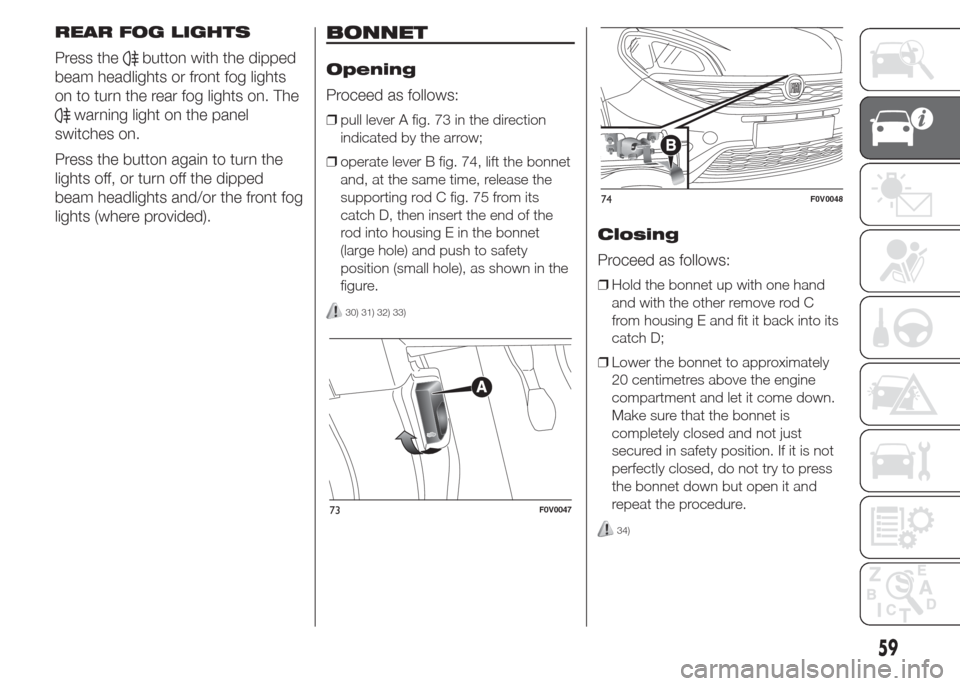
❒pull lever A fig. 73 in the direction
indicated by the arrow;
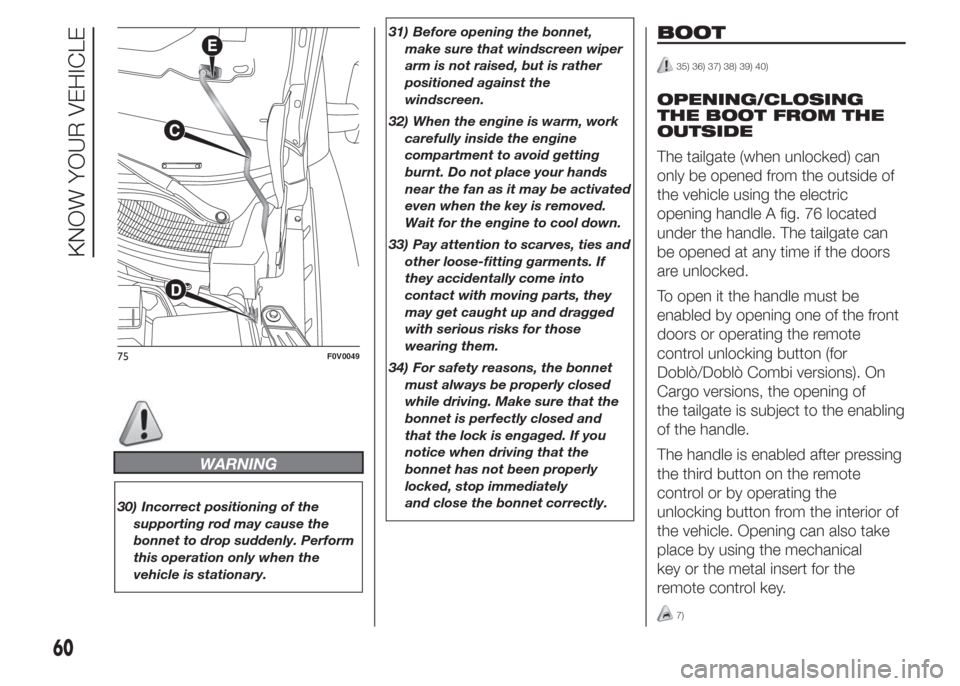
❒operate lever B fig. 74, lift the bonnet
and, at the same time, release the
supporting rod C fig. 75 from its
catch D, then insert the end of the
rod into housing E in the bonnet
(large hole) and push to safety
position (small hole), as shown in the
figure.
30) 31) 32) 33)
Closing
Proceed as follows:
❒Hold the bonnet up with one hand
and with the other remove rod C
from housing E and fit it back into its
catch D;
❒Lower the bonnet to approximately
20 centimetres above the engine
compartment and let it come down.
Make sure that the bonnet is
completely closed and not just
secured in safety position. If it is not
perfectly closed, do not try to press
the bonnet down but open it and
repeat the procedure.
34)
73F0V0047
74F0V0048
59
Page 64 of 323
WARNING
30) Incorrect positioning of the
supporting rod may cause the
bonnet to drop suddenly. Perform
this operation only when the
vehicle is stationary.31) Before opening the bonnet,
make sure that windscreen wiper
arm is not raised, but is rather
positioned against the
windscreen.
32) When the engine is warm, work
carefully inside the engine
compartment to avoid getting
burnt. Do not place your hands
near the fan as it may be activated
even when the key is removed.
Wait for the engine to cool down.
33) Pay attention to scarves, ties and
other loose-fitting garments. If
they accidentally come into
contact with moving parts, they
may get caught up and dragged
with serious risks for those
wearing them.
34) For safety reasons, the bonnet
must always be properly closed
while driving. Make sure that the
bonnet is perfectly closed and
that the lock is engaged. If you
notice when driving that the
bonnet has not been properly
locked, stop immediately
and close the bonnet correctly.
BOOT
35) 36) 37) 38) 39) 40)
OPENING/CLOSING
THE BOOT FROM THE
OUTSIDE
The tailgate (when unlocked) can
only be opened from the outside of
the vehicle using the electric
opening handle A fig. 76 located
under the handle. The tailgate can
be opened at any time if the doors
are unlocked.
To open it the handle must be
enabled by opening one of the front
doors or operating the remote
control unlocking button (for
Doblò/Doblò Combi versions). On
Cargo versions, the opening of
the tailgate is subject to the enabling
of the handle.
The handle is enabled after pressing
the third button on the remote
control or by operating the
unlocking button from the interior of
the vehicle. Opening can also take
place by using the mechanical
key or the metal insert for the
remote control key.
7)
75F0V0049
60
KNOW YOUR VEHICLE
Page 147 of 323
Versions without
dummy pole fig. 144
In the event of vehicle inactivity,
special attention must be paid to the
disconnection of the battery power
supply.
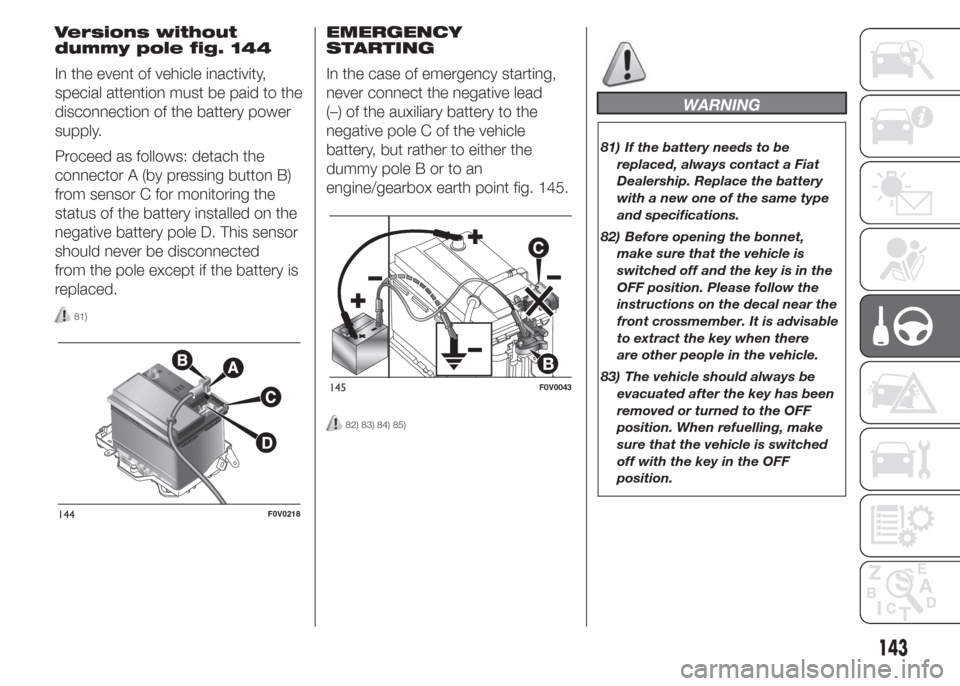
Proceed as follows: detach the
connector A (by pressing button B)
from sensor C for monitoring the
status of the battery installed on the
negative battery pole D. This sensor
should never be disconnected
from the pole except if the battery is
replaced.
81)
EMERGENCY
STARTING
In the case of emergency starting,
never connect the negative lead
(–) of the auxiliary battery to the
negative pole C of the vehicle
battery, but rather to either the
dummy pole B or to an
engine/gearbox earth point fig. 145.
82) 83) 84) 85)
WARNING
81) If the battery needs to be
replaced, always contact a Fiat
Dealership. Replace the battery
with a new one of the same type
and specifications.
82) Before opening the bonnet,
make sure that the vehicle is
switched off and the key is in the
OFF position. Please follow the
instructions on the decal near the
front crossmember. It is advisable
to extract the key when there
are other people in the vehicle.
83) The vehicle should always be
evacuated after the key has been
removed or turned to the OFF
position. When refuelling, make
sure that the vehicle is switched
off with the key in the OFF
position.
144F0V0218
145F0V0043
143
Page 195 of 323
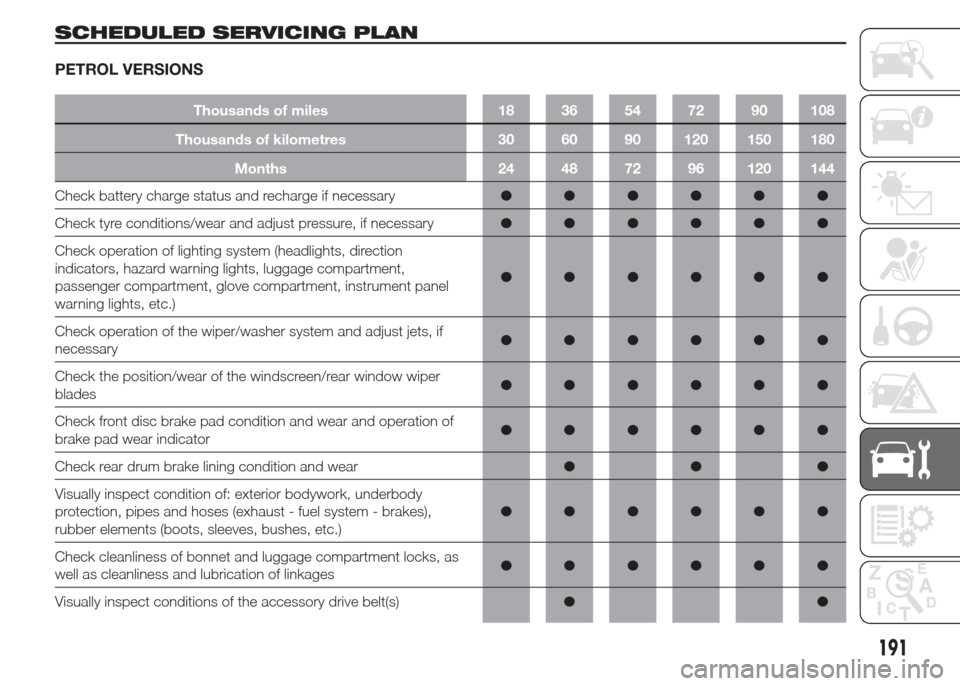
SCHEDULED SERVICING PLAN
PETROL VERSIONS
Thousands of miles 18 36 54 72 90 108
Thousands of kilometres 30 60 90 120 150 180
Months 24 48 72 96 120 144
Check battery charge status and recharge if necessary●●●●●●
Check tyre conditions/wear and adjust pressure, if necessary●●●●●●
Check operation of lighting system (headlights, direction
indicators, hazard warning lights, luggage compartment,
passenger compartment, glove compartment, instrument panel
warning lights, etc.)●●●●●●
Check operation of the wiper/washer system and adjust jets, if
necessary●●●●●●
Check the position/wear of the windscreen/rear window wiper
blades●●●●●●
Check front disc brake pad condition and wear and operation of
brake pad wear indicator●●●●●●
Check rear drum brake lining condition and wear●●●
Visually inspect condition of: exterior bodywork, underbody
protection, pipes and hoses (exhaust - fuel system - brakes),
rubber elements (boots, sleeves, bushes, etc.)●●●●●●
Check cleanliness of bonnet and luggage compartment locks, as
well as cleanliness and lubrication of linkages●●●●●●
Visually inspect conditions of the accessory drive belt(s)●●
191
Page 198 of 323
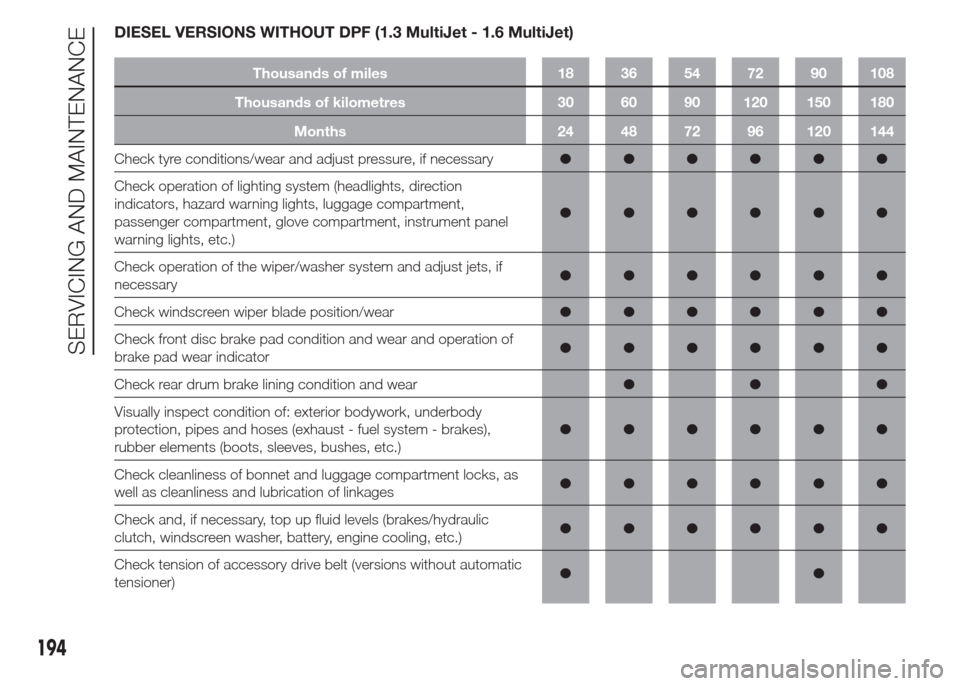
DIESEL VERSIONS WITHOUT DPF (1.3 MultiJet - 1.6 MultiJet)
Thousands of miles 18 36 54 72 90 108
Thousands of kilometres 30 60 90 120 150 180
Months 24 48 72 96 120 144
Check tyre conditions/wear and adjust pressure, if necessary●●●●●●
Check operation of lighting system (headlights, direction
indicators, hazard warning lights, luggage compartment,
passenger compartment, glove compartment, instrument panel
warning lights, etc.)●●●●●●
Check operation of the wiper/washer system and adjust jets, if
necessary●●●●●●
Check windscreen wiper blade position/wear●●●●●●
Check front disc brake pad condition and wear and operation of
brake pad wear indicator●●●●●●
Check rear drum brake lining condition and wear●●●
Visually inspect condition of: exterior bodywork, underbody
protection, pipes and hoses (exhaust - fuel system - brakes),
rubber elements (boots, sleeves, bushes, etc.)●●●●●●
Check cleanliness of bonnet and luggage compartment locks, as
well as cleanliness and lubrication of linkages●●●●●●
Check and, if necessary, top up fluid levels (brakes/hydraulic
clutch, windscreen washer, battery, engine cooling, etc.)●●●●●●
Check tension of accessory drive belt (versions without automatic
tensioner)●●
194
SERVICING AND MAINTENANCE
Page 200 of 323
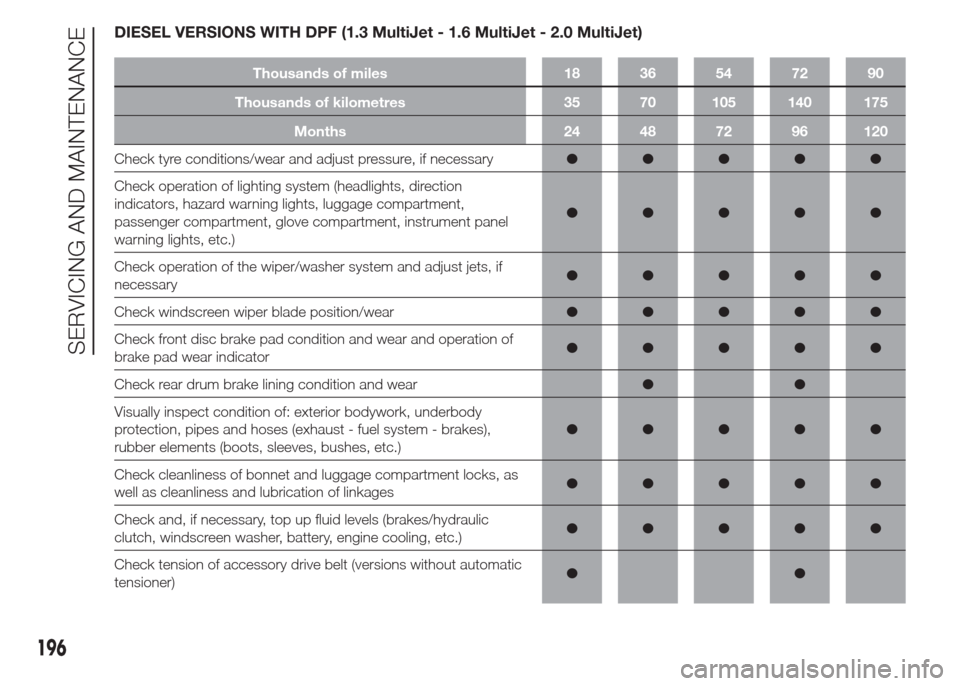
DIESEL VERSIONS WITH DPF (1.3 MultiJet - 1.6 MultiJet - 2.0 MultiJet)
Thousands of miles 18 36 54 72 90
Thousands of kilometres 35 70 105 140 175
Months 24 48 72 96 120
Check tyre conditions/wear and adjust pressure, if necessary●●●●●
Check operation of lighting system (headlights, direction
indicators, hazard warning lights, luggage compartment,
passenger compartment, glove compartment, instrument panel
warning lights, etc.)●●●●●
Check operation of the wiper/washer system and adjust jets, if
necessary●●●●●
Check windscreen wiper blade position/wear●●●●●
Check front disc brake pad condition and wear and operation of
brake pad wear indicator●●●●●
Check rear drum brake lining condition and wear●●
Visually inspect condition of: exterior bodywork, underbody
protection, pipes and hoses (exhaust - fuel system - brakes),
rubber elements (boots, sleeves, bushes, etc.)●●●●●
Check cleanliness of bonnet and luggage compartment locks, as
well as cleanliness and lubrication of linkages●●●●●
Check and, if necessary, top up fluid levels (brakes/hydraulic
clutch, windscreen washer, battery, engine cooling, etc.)●●●●●
Check tension of accessory drive belt (versions without automatic
tensioner)●●
196
SERVICING AND MAINTENANCE