stop start FIAT DOBLO PANORAMA 2018 Owner handbook (in English)
[x] Cancel search | Manufacturer: FIAT, Model Year: 2018, Model line: DOBLO PANORAMA, Model: FIAT DOBLO PANORAMA 2018Pages: 272, PDF Size: 23.75 MB
Page 113 of 272
JUMP STARTING
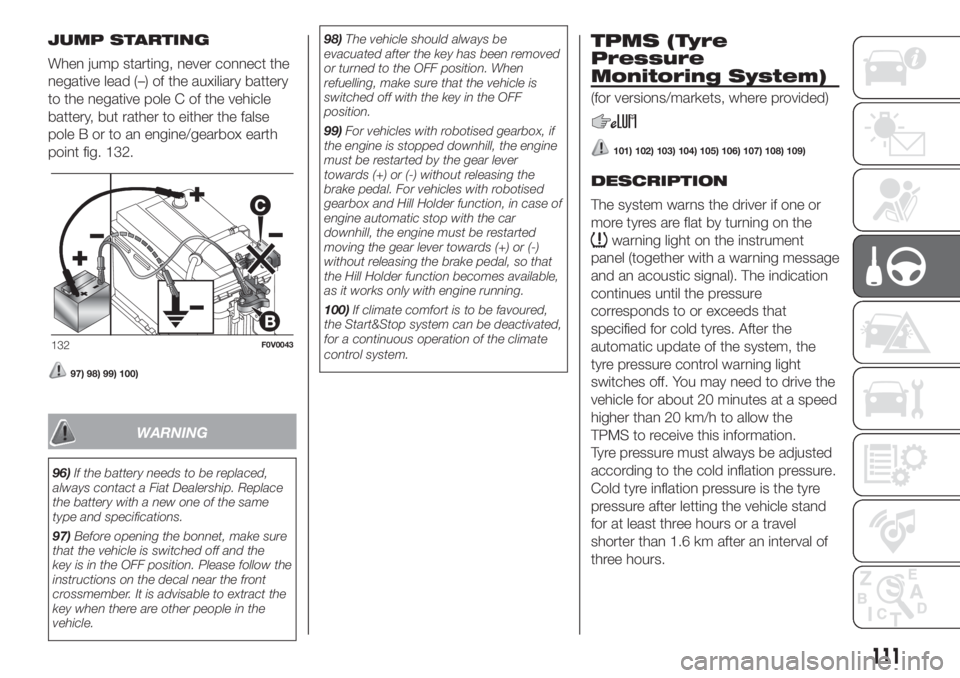
When jump starting, never connect the
negative lead (–) of the auxiliary battery
to the negative pole C of the vehicle
battery, but rather to either the false
pole B or to an engine/gearbox earth
point fig. 132.
97) 98) 99) 100)
WARNING
96)If the battery needs to be replaced,
always contact a Fiat Dealership. Replace
the battery with a new one of the same
type and specifications.
97)Before opening the bonnet, make sure
that the vehicle is switched off and the
key is in the OFF position. Please follow the
instructions on the decal near the front
crossmember. It is advisable to extract the
key when there are other people in the
vehicle.98)The vehicle should always be
evacuated after the key has been removed
or turned to the OFF position. When
refuelling, make sure that the vehicle is
switched off with the key in the OFF
position.
99)For vehicles with robotised gearbox, if
the engine is stopped downhill, the engine
must be restarted by the gear lever
towards (+) or (-) without releasing the
brake pedal. For vehicles with robotised
gearbox and Hill Holder function, in case of
engine automatic stop with the car
downhill, the engine must be restarted
moving the gear lever towards (+) or (-)
without releasing the brake pedal, so that
the Hill Holder function becomes available,
as it works only with engine running.
100)If climate comfort is to be favoured,
the Start&Stop system can be deactivated,
for a continuous operation of the climate
control system.
TPMS (Tyre
Pressure
Monitoring System)
(for versions/markets, where provided)
101) 102) 103) 104) 105) 106) 107) 108) 109)
DESCRIPTION
The system warns the driver if one or
more tyres are flat by turning on the
warning light on the instrument
panel (together with a warning message
and an acoustic signal). The indication
continues until the pressure
corresponds to or exceeds that
specified for cold tyres. After the
automatic update of the system, the
tyre pressure control warning light
switches off. You may need to drive the
vehicle for about 20 minutes at a speed
higher than 20 km/h to allow the
TPMS to receive this information.
Tyre pressure must always be adjusted
according to the cold inflation pressure.
Cold tyre inflation pressure is the tyre
pressure after letting the vehicle stand
for at least three hours or a travel
shorter than 1.6 km after an interval of
three hours.
132F0V0043
111
Page 114 of 272
The cold tyre inflation pressure must
not exceed the maximum inflation
pressure value printed on the side of
the tyre.
NOTE
The TPMS does not replace the
normal tyre maintenance service and
does not indicate any fault in a tyre.
Therefore, the TPMS should not be
used as pressure switch while adjusting
the tyre inflation pressure.
Driving with insufficient tyre pressure
causes their overheating and can
result in tyre failure. The low inflation
pressure reduces fuel efficiency and
tyre tread life and may also affect
handling and braking performance of
the vehicle.
The TPMS does not replace the
correct tyre maintenance. It is up to the
driver to maintain the correct tyre
pressure level measuring it with
a suitable pressure switch. This is
necessary even if the decrease in the
inflation pressure value does not cause
the tyre pressure control warning light
to switch on.
The TPMS warns the driver of any
condition of insufficient tyre pressure. If
this drops below the insufficient
pressure limit for any reason including
low temperature and normal pressure
loss of the tyre.
The seasonal temperature changes
affect tyre pressure.
IMPORTANT Monitoring and
maintaining the correct pressure in all
four tyres are particularly important.
Tyre pressure monitoring system
low pressure warning
IMPORTANT In the case of deflation of
more than one tyre sequentially, without
switching off and on the engine, from
the second tyre involved the acoustic
signal is not activated, only the
dedicated signal is shown on the
display.
To prevent the signal from being stored
in the event of pressure loss of a
subsequent tyre (with deactivation of
the acoustic signal), the ignition key
must be turned to MAR and then to
STOP, each time pressure is restored.
TPMS operation faults
The system fault is indicated by the
warning light
which first flashes for
75 seconds and then stays on steadily.
WARNING
101)The TPMS is optimised for the original
tyres and wheels provided. TPMS
pressures and alerts have been defined
according to the size of the tyres mounted
on the vehicle. Using equipment with
different size, type or kind may cause
irregular system operation or sensor
damage. Non-original spare wheels can
damage the sensor. Do not use tyre
sealant or balancing weights if the vehicle
is equipped with TPMS as these may
damage the sensors.
102)If the system signals a pressure
decrease on a specific tyre, it is
recommended to check the pressure on all
four tyres.
103)The TPMS does not relieve the driver
from the obligation to check the tyre
pressure every month; it is not even to be
considered a replacing system for
maintenance or a safety system
104)Tyre pressure must be checked with
tyres cold. Should it become necessary for
whatever reason to check pressure with
warm tyres, do not reduce pressure even
though it is higher than the prescribed
value, but repeat the check when tyres are
cold.
105)The TPMS cannot indicate sudden
tyre pressure drops (for example when
a tyre bursts). In this case, stop the vehicle,
braking with caution and avoiding abrupt
steering.
112
STARTING AND DRIVING
Page 116 of 272
Storing vehicle speed
Proceed as follows:
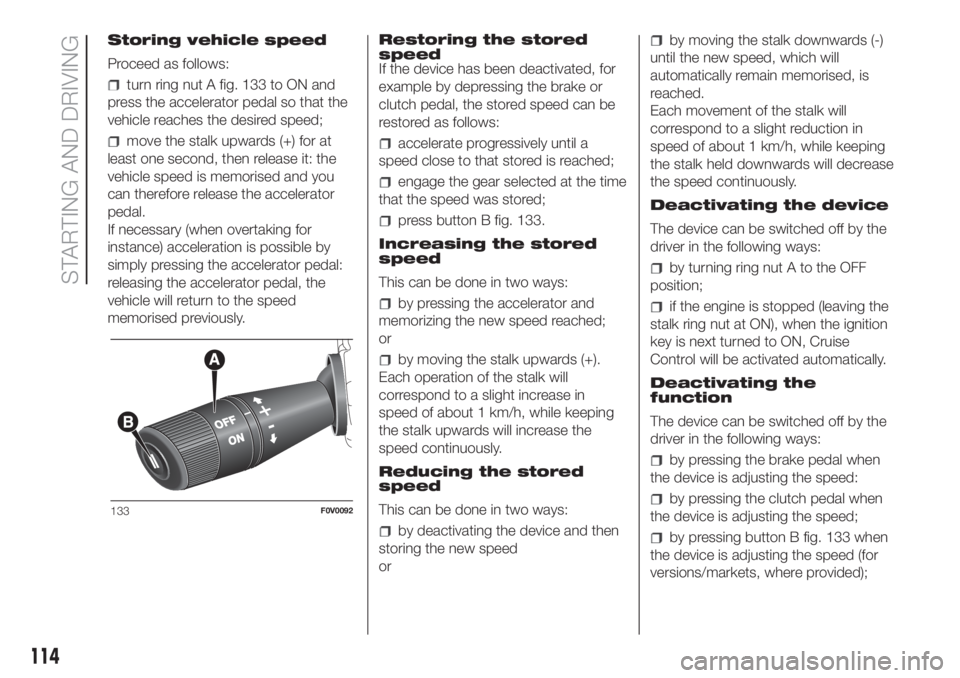
turn ring nut A fig. 133 to ON and
press the accelerator pedal so that the
vehicle reaches the desired speed;
move the stalk upwards (+) for at
least one second, then release it: the
vehicle speed is memorised and you
can therefore release the accelerator
pedal.
If necessary (when overtaking for
instance) acceleration is possible by
simply pressing the accelerator pedal:
releasing the accelerator pedal, the
vehicle will return to the speed
memorised previously.Restoring the stored
speed
If the device has been deactivated, for
example by depressing the brake or
clutch pedal, the stored speed can be
restored as follows:accelerate progressively until a
speed close to that stored is reached;
engage the gear selected at the time
that the speed was stored;
press button B fig. 133.
Increasing the stored
speed
This can be done in two ways:
by pressing the accelerator and
memorizing the new speed reached;
or
by moving the stalk upwards (+).
Each operation of the stalk will
correspond to a slight increase in
speed of about 1 km/h, while keeping
the stalk upwards will increase the
speed continuously.
Reducing the stored
speed
This can be done in two ways:
by deactivating the device and then
storing the new speed
or
by moving the stalk downwards (-)
until the new speed, which will
automatically remain memorised, is
reached.
Each movement of the stalk will
correspond to a slight reduction in
speed of about 1 km/h, while keeping
the stalk held downwards will decrease
the speed continuously.
Deactivating the device
The device can be switched off by the
driver in the following ways:
by turning ring nut A to the OFF
position;
if the engine is stopped (leaving the
stalk ring nut at ON), when the ignition
key is next turned to ON, Cruise
Control will be activated automatically.
Deactivating the
function
The device can be switched off by the
driver in the following ways:
by pressing the brake pedal when
the device is adjusting the speed:
by pressing the clutch pedal when
the device is adjusting the speed;
by pressing button B fig. 133 when
the device is adjusting the speed (for
versions/markets, where provided);
133F0V0092
114
STARTING AND DRIVING
Page 141 of 272
TYRE REPAIRING AND
PRESSURE RESTORING
PROCEDURE
Proceed as follows:
stop the car in a position that is not
dangerous for oncoming traffic where
you can carry out the procedure safely.
The ground must be flat and sufficiently
compact;
stop the engine, engage the hazard
warning lights and the parking brake;
wear the reflective safety jacket
before getting out of the car (anyway
comply with the laws in force in the
country you are driving in);
Insert the cartridge 1 containing the
sealant in the proper compartment of
the compressor 2, pressing it down
hard fig. 181. Remove the speed limit
sticker 3 and apply it in a clearly visible
position fig. 185;
wear the gloves;
remove the cap from the tyre valve
and connect and firmly tighten the
transparent tube of the sealing fluid 4
fig. 181. If a 250 ml cartridge is present
the housing of the transparent tube is
provided with removable ring to
facilitate extraction. Make sure that the
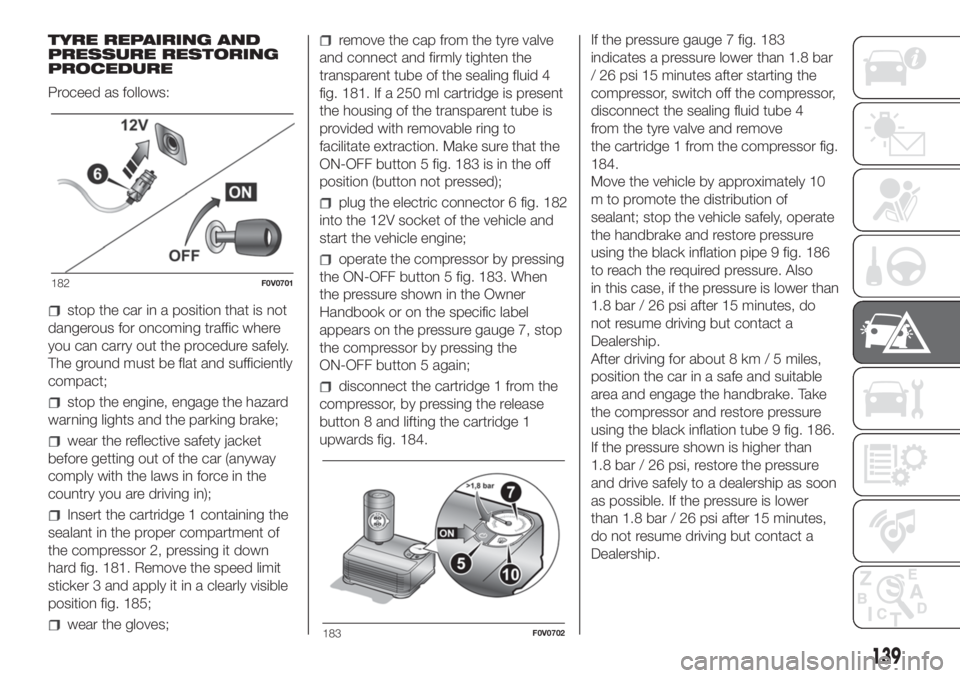
ON-OFF button 5 fig. 183 is in the off
position (button not pressed);
plug the electric connector 6 fig. 182
into the 12V socket of the vehicle and
start the vehicle engine;
operate the compressor by pressing
the ON-OFF button 5 fig. 183. When
the pressure shown in the Owner
Handbook or on the specific label
appears on the pressure gauge 7, stop
the compressor by pressing the
ON-OFF button 5 again;
disconnect the cartridge 1 from the
compressor, by pressing the release
button 8 and lifting the cartridge 1
upwards fig. 184.If the pressure gauge 7 fig. 183
indicates a pressure lower than 1.8 bar
/ 26 psi 15 minutes after starting the
compressor, switch off the compressor,
disconnect the sealing fluid tube 4
from the tyre valve and remove
the cartridge 1 from the compressor fig.
184.
Move the vehicle by approximately 10
m to promote the distribution of
sealant; stop the vehicle safely, operate
the handbrake and restore pressure
using the black inflation pipe 9 fig. 186
to reach the required pressure. Also
in this case, if the pressure is lower than
1.8 bar / 26 psi after 15 minutes, do
not resume driving but contact a
Dealership.
After driving for about 8 km / 5 miles,
position the car in a safe and suitable
area and engage the handbrake. Take
the compressor and restore pressure
using the black inflation tube 9 fig. 186.
If the pressure shown is higher than
1.8 bar / 26 psi, restore the pressure
and drive safely to a dealership as soon
as possible. If the pressure is lower
than 1.8 bar / 26 psi after 15 minutes,
do not resume driving but contact a
Dealership.
182F0V0701
183F0V0702
139
Page 145 of 272
TOWING THE
VEHICLE
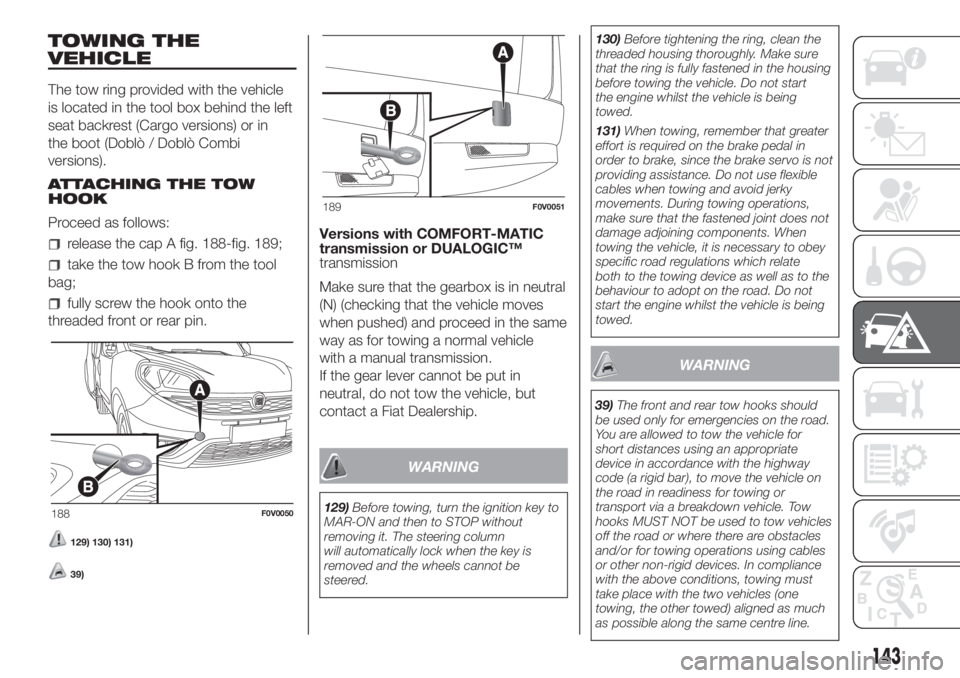
The tow ring provided with the vehicle
is located in the tool box behind the left
seat backrest (Cargo versions) or in
the boot (Doblò / Doblò Combi
versions).
ATTACHING THE TOW
HOOK
Proceed as follows:
release the cap A fig. 188-fig. 189;
take the tow hook B from the tool
bag;
fully screw the hook onto the
threaded front or rear pin.
129) 130) 131)
39)
Versions with COMFORT-MATIC
transmission or DUALOGIC™
transmission
Make sure that the gearbox is in neutral
(N) (checking that the vehicle moves
when pushed) and proceed in the same
way as for towing a normal vehicle
with a manual transmission.
If the gear lever cannot be put in
neutral, do not tow the vehicle, but
contact a Fiat Dealership.
WARNING
129)Before towing, turn the ignition key to
MAR-ON and then to STOP without
removing it. The steering column
will automatically lock when the key is
removed and the wheels cannot be
steered.130)Before tightening the ring, clean the
threaded housing thoroughly. Make sure
that the ring is fully fastened in the housing
before towing the vehicle. Do not start
the engine whilst the vehicle is being
towed.
131)When towing, remember that greater
effort is required on the brake pedal in
order to brake, since the brake servo is not
providing assistance. Do not use flexible
cables when towing and avoid jerky
movements. During towing operations,
make sure that the fastened joint does not
damage adjoining components. When
towing the vehicle, it is necessary to obey
specific road regulations which relate
both to the towing device as well as to the
behaviour to adopt on the road. Do not
start the engine whilst the vehicle is being
towed.
WARNING
39)The front and rear tow hooks should
be used only for emergencies on the road.
You are allowed to tow the vehicle for
short distances using an appropriate
device in accordance with the highway
code (a rigid bar), to move the vehicle on
the road in readiness for towing or
transport via a breakdown vehicle. Tow
hooks MUST NOT be used to tow vehicles
off the road or where there are obstacles
and/or for towing operations using cables
or other non-rigid devices. In compliance
with the above conditions, towing must
take place with the two vehicles (one
towing, the other towed) aligned as much
as possible along the same centre line.
188F0V0050
189F0V0051
143
Page 168 of 272
42)PARAFLUUPanti-freeze is used in the
engine cooling system. Use the same fluid
as in the cooling system when topping
up. PARAFLU
UPcannot be mixed with any
other type of fluid. If this occurs, do not
start the engine and contact your Fiat
Dealership immediately.
43)Prevent brake fluid, which is highly
corrosive, from coming into contact with
painted parts. Should it happen,
immediately wash with water.
44)Do not press on the power steering
end of travel with engine on for more than
8 consecutive seconds, since noise is
produced and there is a risk of system
damages.
WARNING
3)Used engine oil and oil filters contain
substances which are harmful to the
environment. Contact a Fiat Dealership to
have the oil and filters changed. They
are equipped to dispose of the used oil
and filters respecting nature and the law.
4)Power steering fluid consumption is
extremely low; if another top-up is required
after only a short period of time, have the
system checked for leaks at a Fiat
Dealership.
5)Used transmission fluid contains
substances that are harmful to the
environment. It is advisable to have the oil
changed by a Fiat Dealership where it
will be disposed of respecting the
environment and according to legal
requirements.
RECHARGING THE
BATTERY
IMPORTANT The battery recharging
procedure is provided for information
purposes only. This operation should be
performed at a Fiat Dealership.
IMPORTANT Charging should be slow
at a low ampere rating for
approximately 24 hours. Charging for a
longer time may damage the battery.
IMPORTANT If a "quick-type" battery
charger is used with the battery fitted
on the car, before connecting it
disconnect both cables of the battery
itself. Do not use a "quick-type" battery
charger to provide the starting voltage.
To recharge, proceed as follows:
IN THE ABSENCE OF THE
START&STOP SYSTEM
disconnect the terminal from the
negative battery pole;
connect the charger cables to the
battery terminals, observing the poles;
turn on the charger;
when you have finished, turn the
charger off before disconnecting the
battery;
reconnect the terminal to the
negative battery pole.WITH START&STOP
SYSTEM
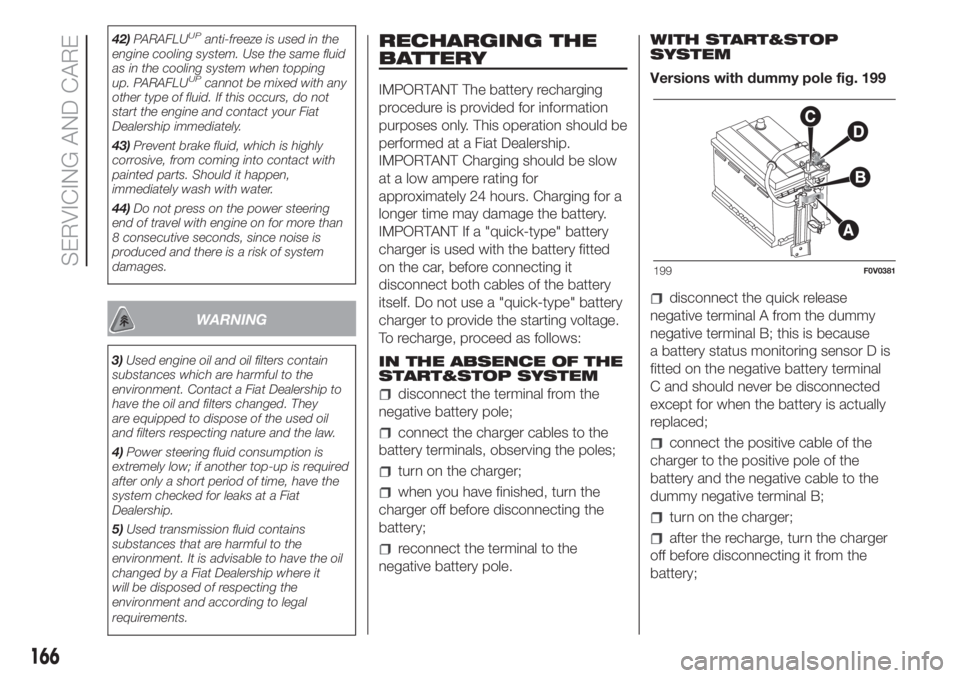
Versions with dummy pole fig. 199
disconnect the quick release
negative terminal A from the dummy
negative terminal B; this is because
a battery status monitoring sensor D is
fitted on the negative battery terminal
C and should never be disconnected
except for when the battery is actually
replaced;
connect the positive cable of the
charger to the positive pole of the
battery and the negative cable to the
dummy negative terminal B;
turn on the charger;
after the recharge, turn the charger
off before disconnecting it from the
battery;
199F0V0381
166
SERVICING AND CARE
Page 201 of 272
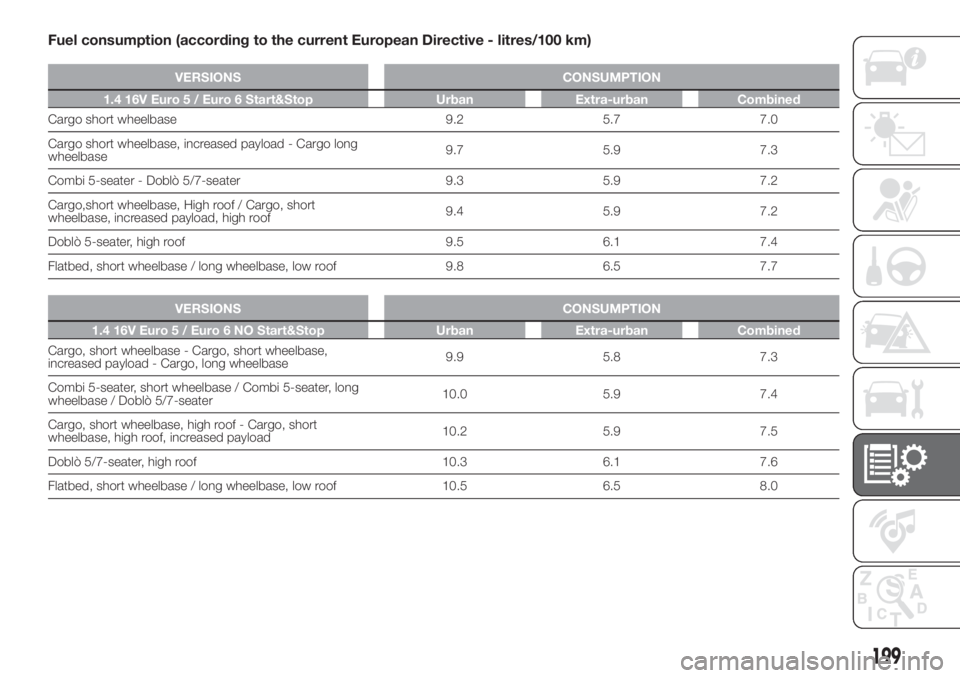
Fuel consumption (according to the current European Directive - litres/100 km)
VERSIONS CONSUMPTION
1.4 16V Euro 5 / Euro 6 Start&Stop Urban Extra-urban Combined
Cargo short wheelbase 9.2 5.7 7.0
Cargo short wheelbase, increased payload - Cargo long
wheelbase9.7 5.9 7.3
Combi 5-seater - Doblò 5/7-seater 9.3 5.9 7.2
Cargo,short wheelbase, High roof / Cargo, short
wheelbase, increased payload, high roof9.4 5.9 7.2
Doblò 5-seater, high roof 9.5 6.1 7.4
Flatbed, short wheelbase / long wheelbase, low roof 9.8 6.5 7.7
.
VERSIONS CONSUMPTION
1.4 16V Euro 5 / Euro 6 NO Start&Stop Urban Extra-urban Combined
Cargo, short wheelbase - Cargo, short wheelbase,
increased payload - Cargo, long wheelbase9.9 5.8 7.3
Combi 5-seater, short wheelbase / Combi 5-seater, long
wheelbase / Doblò 5/7-seater10.0 5.9 7.4
Cargo, short wheelbase, high roof - Cargo, short
wheelbase, high roof, increased payload10.2 5.9 7.5
Doblò 5/7-seater, high roof 10.3 6.1 7.6
Flatbed, short wheelbase / long wheelbase, low roof 10.5 6.5 8.0
199
Page 202 of 272
.
VERSIONS CONSUMPTION
1.4 Euro 4 Urban Extra-urban Combined
Cargo short wheelbase 9.8 5.7 7.2
Cargo short wheelbase, increased payload - Cargo long
wheelbase10.3 5.7 7.4
Combi 5-seater - Doblò 5/7-seater 9.7 5.9 7.3
Cargo, short wheelbase, high roof 10.3 5.6 7.3
Doblò 5-seater, high roof 9.9 6.1 7.5
.
VERSIONS CONSUMPTION
1.4 T-JET Euro 5 / Euro 6 Urban Extra-urban Combined
Cargo, short wheelbase - Cargo, long wheelbase 9.5 5.9 7.2
Cargo, short wheelbase, high roof 9.5 6.4 7.5
Cargo, long wheelbase, high roof 9.7 6.5 7.7
Combi 5 seats 9.5 5.9 7.2
Combi 5-seater, long wheelbase 9.7 6.1 7.4
Doblò 5/7-seater 9.5 5.9 7.2
.
VERSIONS CONSUMPTION
1.3 MultiJet 90 HP Euro 5 / Euro 5+ Start&Stop Urban Extra-urban Combined
Cargo short wheelbase / Cargo short wheelbase,
increased payload5.9 4.2 4.8
Cargo long wheelbase 6 4.3 4.9
Combi 5 seats 6 4.3 4.9
Flatbed, short wheelbase / long wheelbase, low roof 6.3 4.7 5.4
.
200
TECHNICAL DATA
Page 203 of 272
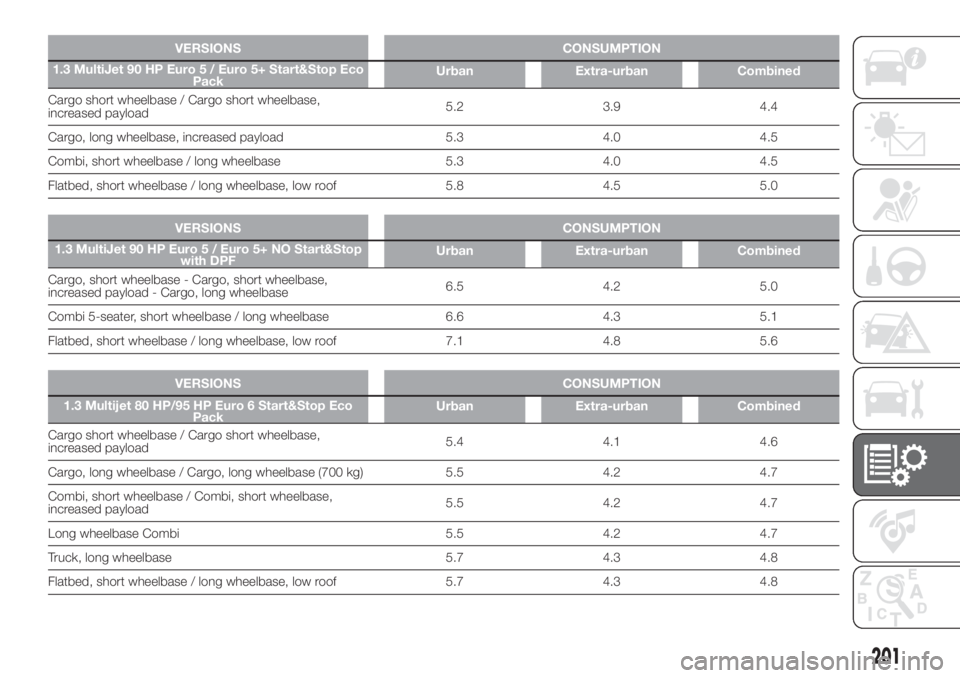
VERSIONS CONSUMPTION
1.3 MultiJet 90 HP Euro 5 / Euro 5+ Start&Stop Eco
PackUrban Extra-urban Combined
Cargo short wheelbase / Cargo short wheelbase,
increased payload5.2 3.9 4.4
Cargo, long wheelbase, increased payload 5.3 4.0 4.5
Combi, short wheelbase / long wheelbase 5.3 4.0 4.5
Flatbed, short wheelbase / long wheelbase, low roof 5.8 4.5 5.0
.
VERSIONS CONSUMPTION
1.3 MultiJet 90 HP Euro 5 / Euro 5+ NO Start&Stop
with DPFUrban Extra-urban Combined
Cargo, short wheelbase - Cargo, short wheelbase,
increased payload - Cargo, long wheelbase6.5 4.2 5.0
Combi 5-seater, short wheelbase / long wheelbase 6.6 4.3 5.1
Flatbed, short wheelbase / long wheelbase, low roof 7.1 4.8 5.6
.
VERSIONS CONSUMPTION
1.3 Multijet 80 HP/95 HP Euro 6 Start&Stop Eco
PackUrban Extra-urban Combined
Cargo short wheelbase / Cargo short wheelbase,
increased payload5.4 4.1 4.6
Cargo, long wheelbase / Cargo, long wheelbase (700 kg) 5.5 4.2 4.7
Combi, short wheelbase / Combi, short wheelbase,
increased payload5.5 4.2 4.7
Long wheelbase Combi 5.5 4.2 4.7
Truck, long wheelbase 5.7 4.3 4.8
Flatbed, short wheelbase / long wheelbase, low roof 5.7 4.3 4.8
.
201
Page 204 of 272
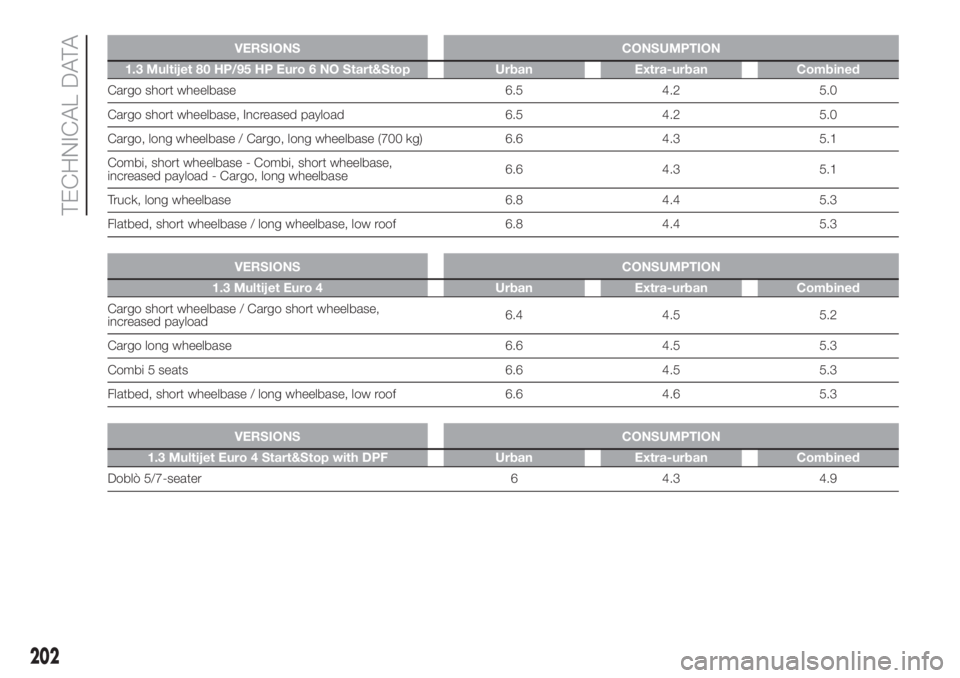
VERSIONS CONSUMPTION
1.3 Multijet 80 HP/95 HP Euro 6 NO Start&Stop Urban Extra-urban Combined
Cargo short wheelbase 6.5 4.2 5.0
Cargo short wheelbase, Increased payload 6.5 4.2 5.0
Cargo, long wheelbase / Cargo, long wheelbase (700 kg) 6.6 4.3 5.1
Combi, short wheelbase - Combi, short wheelbase,
increased payload - Cargo, long wheelbase6.6 4.3 5.1
Truck, long wheelbase 6.8 4.4 5.3
Flatbed, short wheelbase / long wheelbase, low roof 6.8 4.4 5.3
.
VERSIONS CONSUMPTION
1.3 Multijet Euro 4 Urban Extra-urban Combined
Cargo short wheelbase / Cargo short wheelbase,
increased payload6.4 4.5 5.2
Cargo long wheelbase 6.6 4.5 5.3
Combi 5 seats 6.6 4.5 5.3
Flatbed, short wheelbase / long wheelbase, low roof 6.6 4.6 5.3
.
VERSIONS CONSUMPTION
1.3 Multijet Euro 4 Start&Stop with DPF Urban Extra-urban Combined
Doblò 5/7-seater 6 4.3 4.9
202
TECHNICAL DATA