Front lights FIAT DUCATO 2007 3.G User Guide
[x] Cancel search | Manufacturer: FIAT, Model Year: 2007, Model line: DUCATO, Model: FIAT DUCATO 2007 3.GPages: 282, PDF Size: 4.71 MB
Page 40 of 282

39
SAFETY
DEVICES
CORRECT USE
OF THE
VEHICLE
WARNING
LIGHTS AND
MESSAGES
IN AN
EMERGENCY
VEHICLE
MAINTENANCE
TECHNICAL
SPECIFICATIONS
INDEX
DASHBOARD
AND CONTROLS
Only make adjustments
when the vehicle is station-
ary. Specially when revolving the seat,
make sure it is not interfering with the
handbrake lever.
Make sure the outer armrest
(door side) is completely up-
right before unfastening the seat belts
and getting out of the vehicle.
WARNING
Should it be absolutely nec-
essary to carry a child seat
on the front passenger’s seat, make
sure to deactivate the front passen-
ger’s air bag, to fasten the passenger’s
seat belt and to lower completely the
armrests to prevent their accidental
moving.
WARNING
REVOLVING SEAT WITH
INTEGRAL SEAT
BELT (where provided)
The seat is fitted with seat belts with three
anchorage points fig. 28, two adjustable
arm-rests (for adjustment see paragraph
“Seats with adjustable armrests”) and a
height-adjustable head restraint (see “Head
restraint” paragraph for adjustment).
WARNING
fig. 28F0N0173mfig. 27F0N0187m
Ensure the seat is locked in
driving position before dri-
ving off in the vehicle
WARNING
SEAT WITH ROTATING BASE
(where provided)
The seat can be turned through 180° to-
wards the facing seat
To turn the seat, operate control A-fig. 27.
Before turning the seat it must be first
moved forward and only after adjusted in
longitudinal direction fig. 27a.
fig. 27a
12
F0N0700m
037-101 Ducato GB 6-11-2007 9:56 Pagina 39
Page 41 of 282
40
SAFETY
DEVICES
CORRECT USE
OF THE
VEHICLE
WARNING
LIGHTS AND
MESSAGES
IN AN
EMERGENCY
VEHICLE
MAINTENANCE
TECHNICAL
SPECIFICATIONS
INDEX
DASHBOARD
AND CONTROLS
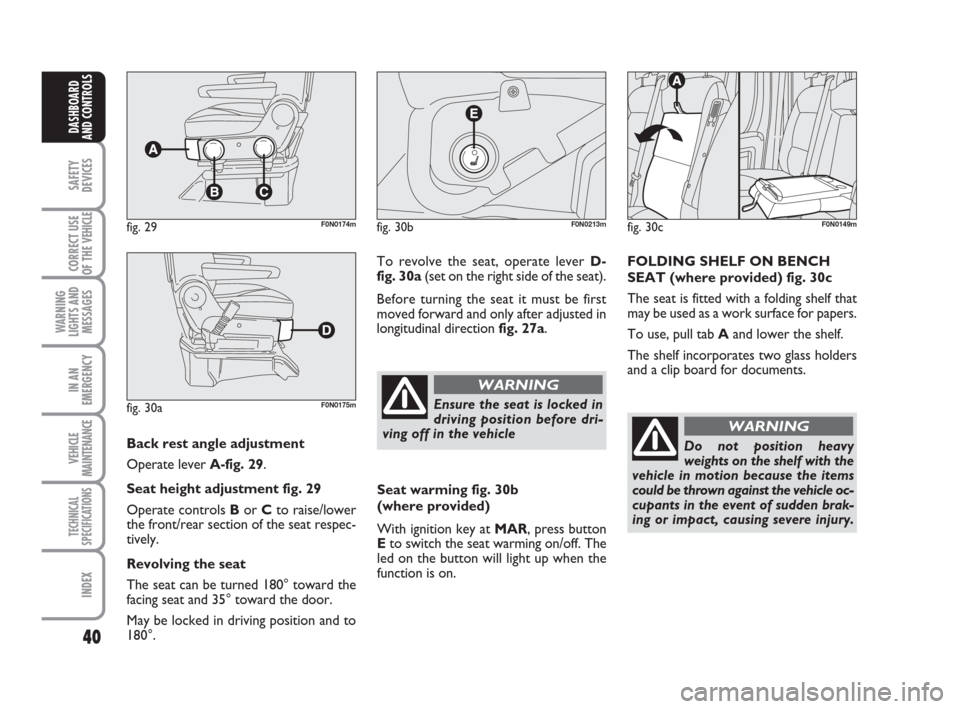
Back rest angle adjustment
Operate lever A-fig. 29.
Seat height adjustment fig. 29
Operate controls Bor Cto raise/lower
the front/rear section of the seat respec-
tively.
Revolving the seat
The seat can be turned 180° toward the
facing seat and 35° toward the door.
May be locked in driving position and to
180°.
fig. 29F0N0174m
fig. 30aF0N0175m
To revolve the seat, operate lever D-
fig. 30a(set on the right side of the seat).
Before turning the seat it must be first
moved forward and only after adjusted in
longitudinal direction fig. 27a.
fig. 30bF0N0213m
Ensure the seat is locked in
driving position before dri-
ving off in the vehicle
WARNING
Seat warming fig. 30b
(where provided)
With ignition key at MAR, press button
Eto switch the seat warming on/off. The
led on the button will light up when the
function is on.
fig. 30cF0N0149m
FOLDING SHELF ON BENCH
SEAT (where provided) fig. 30c
The seat is fitted with a folding shelf that
may be used as a work surface for papers.
To use, pull tab Aand lower the shelf.
The shelf incorporates two glass holders
and a clip board for documents.
Do not position heavy
weights on the shelf with the
vehicle in motion because the items
could be thrown against the vehicle oc-
cupants in the event of sudden brak-
ing or impact, causing severe injury.
WARNING
037-101 Ducato GB 6-11-2007 9:56 Pagina 40
Page 42 of 282

41
SAFETY
DEVICES
CORRECT USE
OF THE
VEHICLE
WARNING
LIGHTS AND
MESSAGES
IN AN
EMERGENCY
VEHICLE
MAINTENANCE
TECHNICAL
SPECIFICATIONS
INDEX
DASHBOARD
AND CONTROLS
fig. 30dF0N0237mfig. 30eF0N0238m
UNDER-SEAT BASKET
(where provided)
The basket under the driver’s seat A-fig.
30dmay be removed easily by withdraw-
ing from the hooks on the support base.
Do not position heavy
weights inside the basket
with the vehicle in motion because the
items could be thrown against the ve-
hicle occupants in the event of sudden
braking or impact, causing severe in-
jury.
WARNING
SEAT BASE PLASTIC COVERS
(where provided) fig. 30e
Front trim Amay be opened by operat-
ing the release handle Bin the upper part.
This gives access to the under-seat basket
(see paragraph “Under-seat basket”)
The seat must be as far back as possible
to facilitate front trim opening and access
to the basket.
To allow removal of the front trim, the
trim must be turned forward as far as pos-
sible and withdrawn from the hooks pre-
sent in the lower part by pulling toward
the front of the vehicle.PANORAMA VERSIONS
Passengers’ seats back rest angle
adjustment fig. 31
Turn knob A.
Access to the second row seats
fig. 31
For accessing the second seat row, oper-
ate lever Bof the external right side seat
of the first row and fold the back of the
seat forward guiding it with your left hand.
Moving the seat back to standard position
the seat will lock into the locking device
without using the lever again.
On Panorama 2
ndrow complete seat both
side seats are fixed.
037-101 Ducato GB 6-11-2007 9:56 Pagina 41
Page 44 of 282

43
SAFETY
DEVICES
CORRECT USE
OF THE
VEHICLE
WARNING
LIGHTS AND
MESSAGES
IN AN
EMERGENCY
VEHICLE
MAINTENANCE
TECHNICAL
SPECIFICATIONS
INDEX
DASHBOARD
AND CONTROLS
HEAD RESTRAINTS
FRONT fig. 36
On certain versions head restraints are ad-
justable in height and they lock automati-
cally in the required position.
To adjust head restraints
❒to raise: raise the head restraint until
hearing the locking click.fig. 33F0N0229mfig. 34F0N0230m
fig. 35F0N0231m
Removing the bench
IMPORTANT Two persons are required
to remove the bench.
To remove the bench proceed as follows:
– from pack position, turn levers Cand
D-fig. 34forward (as specified on the
adhesive label located on the lower
crossmember)
– raise forward the seat base;
– set the seat in vertical position
– from vertical position, turn levers Eand
F-fig. 35upwards;
– raise the bench from the floor and re-
move it.
When refitting the bench
make sure it is properly se-
cured into floor runners.
WARNING
037-101 Ducato GB 6-11-2007 9:56 Pagina 43
Page 45 of 282
44
SAFETY
DEVICES
CORRECT USE
OF THE
VEHICLE
WARNING
LIGHTS AND
MESSAGES
IN AN
EMERGENCY
VEHICLE
MAINTENANCE
TECHNICAL
SPECIFICATIONS
INDEX
DASHBOARD
AND CONTROLS
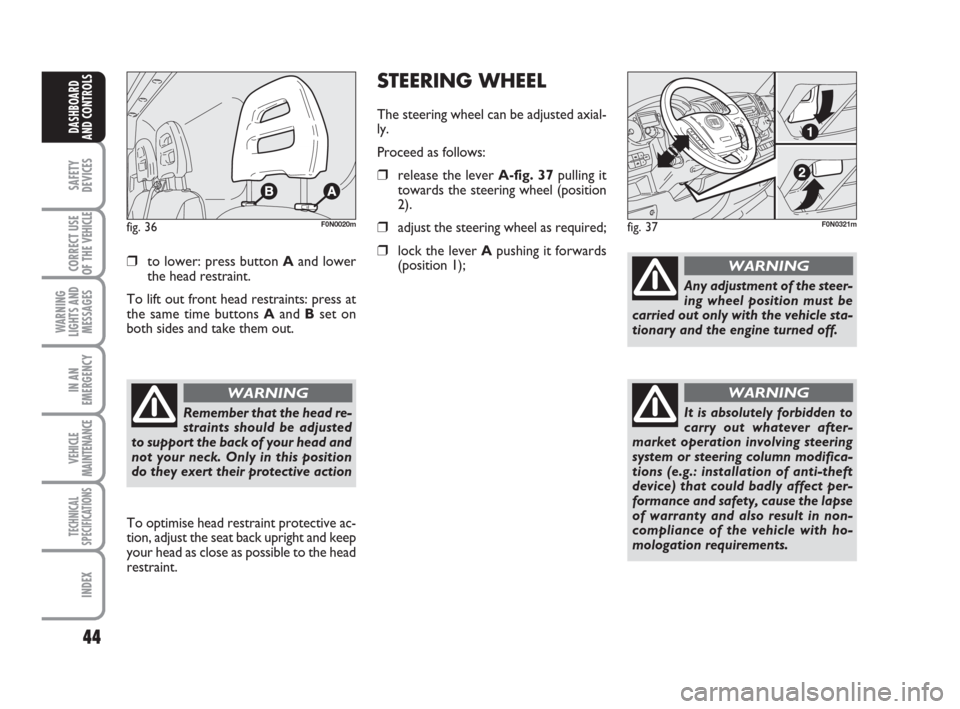
❒to lower: press button Aand lower
the head restraint.
To lift out front head restraints: press at
the same time buttons Aand Bset on
both sides and take them out.
fig. 36F0N0020m
To optimise head restraint protective ac-
tion, adjust the seat back upright and keep
your head as close as possible to the head
restraint.
Remember that the head re-
straints should be adjusted
to support the back of your head and
not your neck. Only in this position
do they exert their protective action
WARNING
STEERING WHEEL
The steering wheel can be adjusted axial-
ly.
Proceed as follows:
❒release the lever A-fig. 37pulling it
towards the steering wheel (position
2).
❒adjust the steering wheel as required;
❒lock the lever Apushing it forwards
(position 1);
fig. 37F0N0321m
Any adjustment of the steer-
ing wheel position must be
carried out only with the vehicle sta-
tionary and the engine turned off.
WARNING
It is absolutely forbidden to
carry out whatever after-
market operation involving steering
system or steering column modifica-
tions (e.g.: installation of anti-theft
device) that could badly affect per-
formance and safety, cause the lapse
of warranty and also result in non-
compliance of the vehicle with ho-
mologation requirements.
WARNING
037-101 Ducato GB 6-11-2007 9:56 Pagina 44
Page 48 of 282

47
SAFETY
DEVICES
CORRECT USE
OF THE
VEHICLE
WARNING
LIGHTS AND
MESSAGES
IN AN
EMERGENCY
VEHICLE
MAINTENANCE
TECHNICAL
SPECIFICATIONS
INDEX
DASHBOARD
AND CONTROLS
fig. 42
F0N0322m
HEATING AND VENTILATION
1.Fixed upper vent - 2.Central swivel vents - 3.Fixed side vents - 4.Side swivel vents - 5. Lower vents for front seats.
037-101 Ducato GB 6-11-2007 9:56 Pagina 47
Page 51 of 282
50
SAFETY
DEVICES
CORRECT USE
OF THE
VEHICLE
WARNING
LIGHTS AND
MESSAGES
IN AN
EMERGENCY
VEHICLE
MAINTENANCE
TECHNICAL
SPECIFICATIONS
INDEX
DASHBOARD
AND CONTROLS
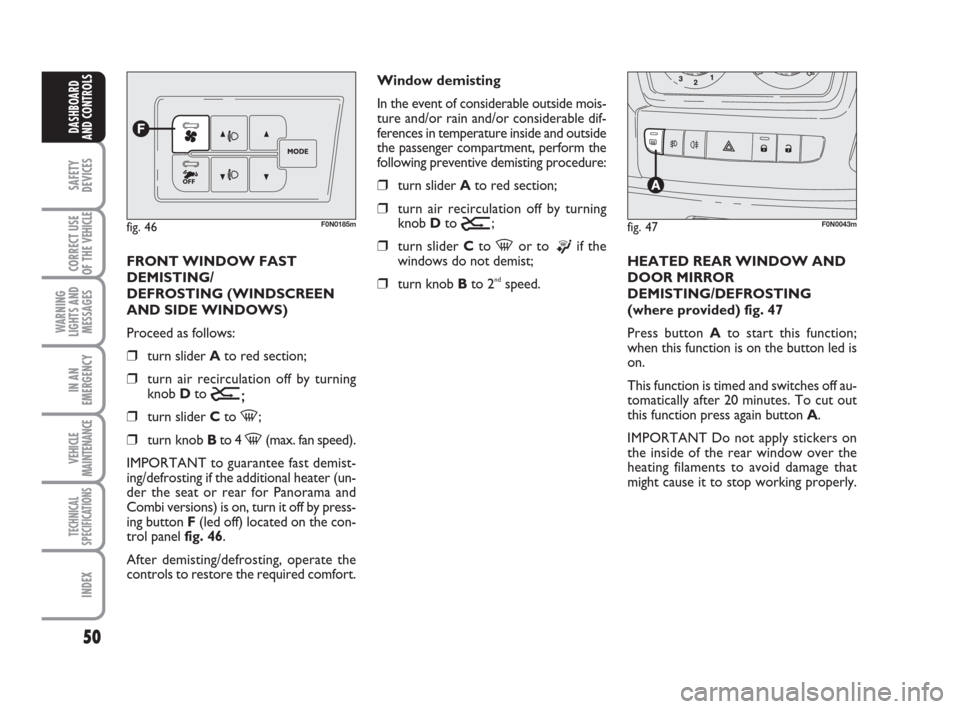
FRONT WINDOW FAST
DEMISTING/
DEFROSTING (WINDSCREEN
AND SIDE WINDOWS)
Proceed as follows:
❒turn slider Ato red section;
❒turn air recirculation off by turning
knob D to
Ú;
❒turn slider Cto -;
❒turn knob Bto 4 -(max. fan speed).
IMPORTANT to guarantee fast demist-
ing/defrosting if the additional heater (un-
der the seat or rear for Panorama and
Combi versions) is on, turn it off by press-
ing button F(led off) located on the con-
trol panel fig. 46.
After demisting/defrosting, operate the
controls to restore the required comfort.Window demisting
In the event of considerable outside mois-
ture and/or rain and/or considerable dif-
ferences in temperature inside and outside
the passenger compartment, perform the
following preventive demisting procedure:
❒turn slider Ato red section;
❒turn air recirculation off by turning
knob D to
Ú;
❒turn slider Cto -or to ®if the
windows do not demist;
❒turn knob Bto 2ndspeed.HEATED REAR WINDOW AND
DOOR MIRROR
DEMISTING/DEFROSTING
(where provided) fig. 47
Press button Ato start this function;
when this function is on the button led is
on.
This function is timed and switches off au-
tomatically after 20 minutes. To cut out
this function press again button A.
IMPORTANT Do not apply stickers on
the inside of the rear window over the
heating filaments to avoid damage that
might cause it to stop working properly.
fig. 46F0N0185mfig. 47F0N0043m
037-101 Ducato GB 6-11-2007 9:56 Pagina 50
Page 54 of 282

53
SAFETY
DEVICES
CORRECT USE
OF THE
VEHICLE
WARNING
LIGHTS AND
MESSAGES
IN AN
EMERGENCY
VEHICLE
MAINTENANCE
TECHNICAL
SPECIFICATIONS
INDEX
DASHBOARD
AND CONTROLS
CLIMATE CONTROL (cooling)
For fast cooling of the passenger com-
partment, proceed as follows:
❒turn slider Ato blue section;
❒turn air recirculation on by turning
knob Dto
Ò;
❒turn slider Cto ¶;
❒press button Eto turn the climate
control system on; the button led E
will turn on;
❒turn knob Bto 4-(max. fan speed).
Cooling adjustment
❒turn slider Ato the right to raise tem-
perature;
❒turn air recirculation off by turning
knob Dto
Ú;
❒turn knob Bto reduce the fan speed.
IMPORTANT Pressing conditioner com-
pressor button E, will activate the func-
tion only if at last the first fan speed is se-
lected (knob B).WARMING THE PASSENGER
COMPARTMENT
Proceed as follows:
❒turn slider Ato red section;
❒turn slider Cto the required symbol;
❒turn knob Bto the required speed.
FAST HEATING
For fast heating of the passenger com-
partment, proceed as follows:
❒turn slider Ato red section;
❒turn air recirculation on by turning
knob Dto
Ò;
❒turn slider Cto ©;
❒turn knob Bto 4-(max. fan speed).
Then use the controls to keep the re-
quired comfort conditions and turn knob
Dto
Úto turn air recirculation off
(button led off).
IMPORTANT With cold engine, you have
to wait for a few minutes to let the sys-
tem fluid reach the operating temperature.FRONT WINDOW FAST
DEMISTING/DEFROSTING
(WINDSCREEN AND SIDE
WINDOWS)
Proceed as follows:
❒turn slider Ato red section;
❒turn knob Bto 4-(max. fan speed);
❒turn slider Cto -;
❒turn air recirculation off by turning
knob D to
Ú.
IMPORTANT to guarantee fast demist-
ing/defrosting if the additional heater/con-
ditioner (under the seat or rear for
Panorama and Combi versions) is on, turn
it off by pressing button F(led off) locat-
ed on the control panel fig. 49.
037-101 Ducato GB 6-11-2007 9:56 Pagina 53
Page 58 of 282
57
SAFETY
DEVICES
CORRECT USE
OF THE
VEHICLE
WARNING
LIGHTS AND
MESSAGES
IN AN
EMERGENCY
VEHICLE
MAINTENANCE
TECHNICAL
SPECIFICATIONS
INDEX
DASHBOARD
AND CONTROLS
SWITCHING THE CLIMATE
CONTROL SYSTEM ON
The system can be started in different
ways, but it is advisable to press the AU-
TO button and then to turn the knob to
set the temperatures required on the dis-
play.
This way the system will start working
completely automatically to reach the
comfort temperature as quickly as possi-
ble. The system will set air temperature,
quantity and distribution and it will con-
trol the air recirculation function and the
activation of conditioner compressor.During fully automatic operation, the on-
ly manual settings required are the fol-
lowing:
❒Òair recirculation, to keep it always
on or off;
❒Zto speed up demisting/defrosting of
windscreen, front side windows, rear
window and door mirrors;
During full automatic system operation,
you can change at any time set tempera-
ture, air distribution and fan speed by us-
ing the relevant buttons or knobs: the sys-
tem will automatically change its settings
to adjust to the new requirements. During FULL AUTO operation, changing
air distribution and/or flow and/or com-
pressor activation and/or air recirculation
will make the FULL wording disappear. In
this way functions will pass from automatic
control to manual control until pressing
again the AUTO button. With one or
more functions engaged manually, the ad-
justment of the temperature of the air ad-
mitted to the passenger compartment
continues to be controlled automatically
by the system, except with the climate
control compressor off: under this condi-
tion in fact, the temperature of the air ad-
mitted to the passenger compartment
cannot be lower than outside air temper-
ature.
037-101 Ducato GB 6-11-2007 9:56 Pagina 57
Page 60 of 282

59
SAFETY
DEVICES
CORRECT USE
OF THE
VEHICLE
WARNING
LIGHTS AND
MESSAGES
IN AN
EMERGENCY
VEHICLE
MAINTENANCE
TECHNICAL
SPECIFICATIONS
INDEX
DASHBOARD
AND CONTROLS
Air distribution
buttons (B)
Pressing these buttons it
is possible to choose manually one of the
seven possible air distributions:
▲Air flow to the windscreen and front
side window vents to demist or de-
frost them.
˙Air flow at central and side dashboard
vents to ventilate the chest and the
face during the hot season.
▼Air flow towards the front and rear
lower parts of the passenger com-
partment. Due to the natural tenden-
cy of heat to spread upwards, this type
of distribution allows heating of the
passenger compartment in the short-
est time, also giving a prompt feeling
of warmth.
˙Splitting of the air flow between the ▼vents to the lower part of the pas-
senger compartment (warmest air)
and the dashboard centre and side
outlets (coolest air). This air flow dis-
tribution is particularly useful in spring
and autumn when the sun is shining.
▲Splitting of the air flow between the ▼windscreen and front side window
demisting/defrosting vents and the
lower part of the passenger compart-
ment. This type of air distribution al-
lows satisfactory heating of the pas-
senger compartment while preventing
possible misting of the windows.
▲Splitting of the air flow between the ˙windscreen and front side window
demisting/defrosting vents and the
dashboard centre and side outlets.
This air flow distribution enables to
obtain satisfactory cooling of the pas-
senger's compartment and to keep the
required cooling condition in summer.
▲Splitting of the air flow between the ˙windscreen and front side window ▼demisting/defrosting vents, dashboard
centre and side outlets and the lower
part of the passenger compartment.
This air flow distribution enables to
keep good overall comfort conditions
both in summer and in winter.
Lighting up of the relevant button leds
shows the type of air distribution select-
ed.
To restore automatic air distribution con-
trol after a manual selection, press button
AUTO.
037-101 Ducato GB 6-11-2007 9:56 Pagina 59