Front lights FIAT DUCATO 2007 3.G Owner's Manual
[x] Cancel search | Manufacturer: FIAT, Model Year: 2007, Model line: DUCATO, Model: FIAT DUCATO 2007 3.GPages: 282, PDF Size: 4.71 MB
Page 61 of 282

60
SAFETY
DEVICES
CORRECT USE
OF THE
VEHICLE
WARNING
LIGHTS AND
MESSAGES
IN AN
EMERGENCY
VEHICLE
MAINTENANCE
TECHNICAL
SPECIFICATIONS
INDEX
DASHBOARD
AND CONTROLS
Fan speed adjusting
buttons (H)
Press button Hends to
increase or to decrease the fan speed and
therefore the amount of air admitted into
the passenger compartment, the system
will however keep the required
temperature.
The fan speed is shown by the lit bars on
the display
❒Max fan speed = all bars lit
❒Min fan speed = one bar lit.
The fan can be cut off only if the climate
control compressor has been switched off
pressing button F-fig. 51.
IMPORTANT To restore automatic fan
speed control after a manual adjustment,
press button AUTO.
IMPORTANT At high vehicle speed, the
dynamic effect increases the air flow inside
the passenger compartment that will not
be directly correlated with the lit fan
speed bars.AUTO button (A)
(automatic
operation)
Pressing the AUTO
button the system automatically adjusts
the amount and distribution of the air
admitted to the passenger compartment,
cancelling all the previous manual
adjustments.
This condition is indicated by the message
FULL AUTO on the front display.
Manual operation of at least one automatic
function (air recirculation, air distribution,
fan speed or climate control compressor off)
will cause FULL message going off the dis-
play. This means that automatic control is
not complete (except temperature control
which is always automatic).
037-101 Ducato GB 6-11-2007 9:56 Pagina 60
Page 64 of 282
63
SAFETY
DEVICES
CORRECT USE
OF THE
VEHICLE
WARNING
LIGHTS AND
MESSAGES
IN AN
EMERGENCY
VEHICLE
MAINTENANCE
TECHNICAL
SPECIFICATIONS
INDEX
DASHBOARD
AND CONTROLS
With the compressor off, if the outside
temperature is higher than set, the system
is not able to meet the request. This is in-
dicated by the temperature setting flash-
ing, after which the AUTO message is
turned off.
With the compressor disabled, it is pos-
sible to zero the fan speed manually (no
bars displayed).
With the compressor enabled and the en-
gine started, the fan speed may only drop
to minimum (one bar displayed).Fast window
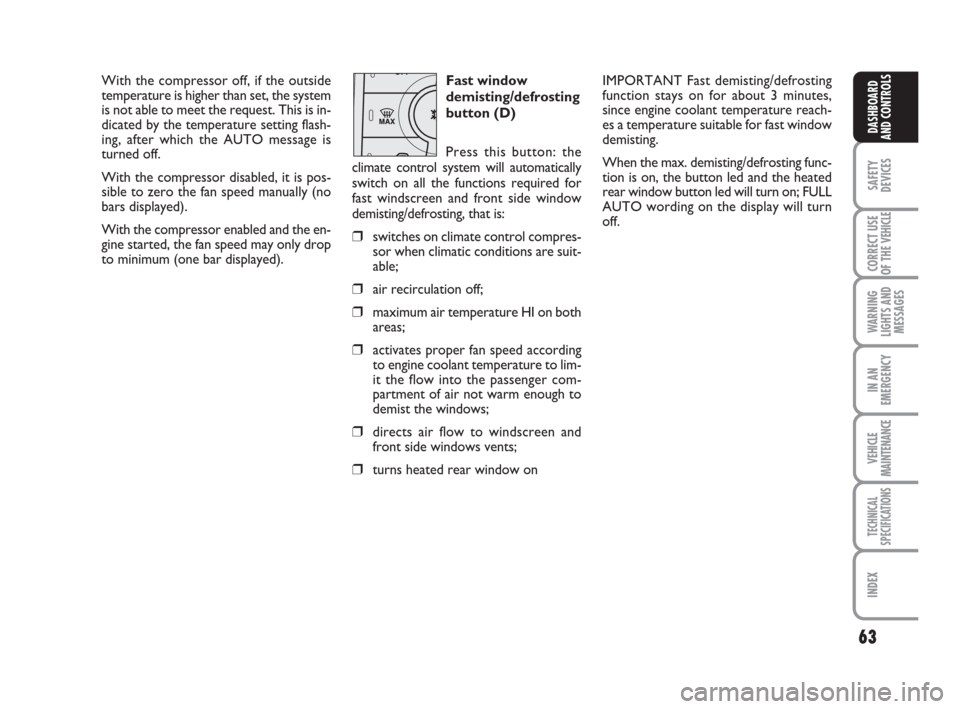
demisting/defrosting
button (D)
Press this button: the
climate control system will automatically
switch on all the functions required for
fast windscreen and front side window
demisting/defrosting, that is:
❒switches on climate control compres-
sor when climatic conditions are suit-
able;
❒air recirculation off;
❒maximum air temperature HI on both
areas;
❒activates proper fan speed according
to engine coolant temperature to lim-
it the flow into the passenger com-
partment of air not warm enough to
demist the windows;
❒directs air flow to windscreen and
front side windows vents;
❒turns heated rear window on
IMPORTANT Fast demisting/defrosting
function stays on for about 3 minutes,
since engine coolant temperature reach-
es a temperature suitable for fast window
demisting.
When the max. demisting/defrosting func-
tion is on, the button led and the heated
rear window button led will turn on; FULL
AUTO wording on the display will turn
off.
037-101 Ducato GB 6-11-2007 9:56 Pagina 63
Page 77 of 282
76
SAFETY
DEVICES
CORRECT USE
OF THE
VEHICLE
WARNING
LIGHTS AND
MESSAGES
IN AN
EMERGENCY
VEHICLE
MAINTENANCE
TECHNICAL
SPECIFICATIONS
INDEX
DASHBOARD
AND CONTROLS
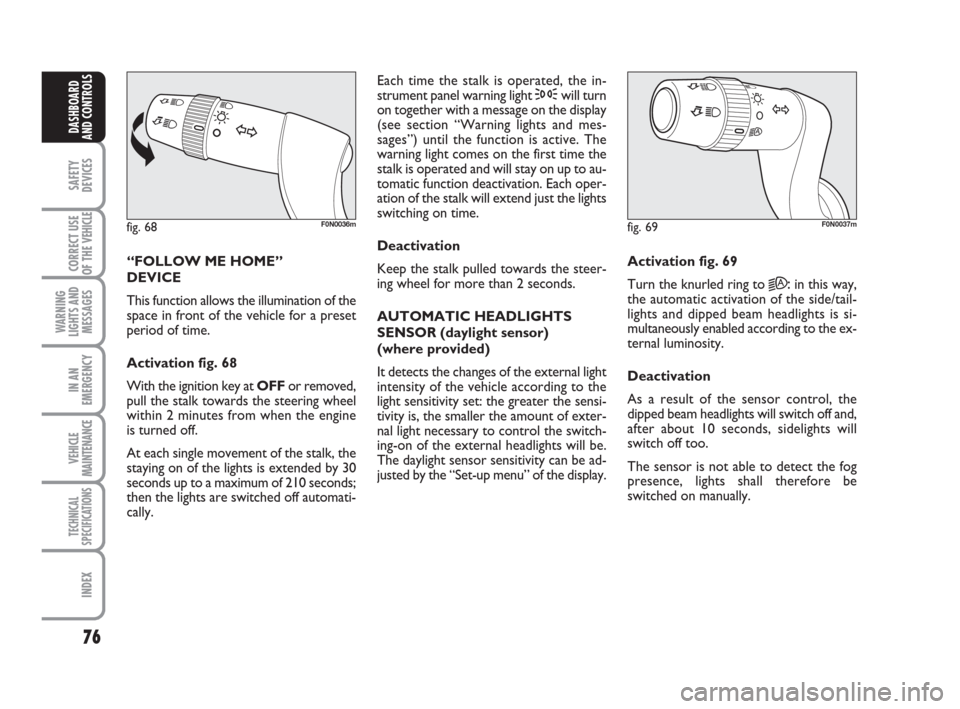
“FOLLOW ME HOME”
DEVICE
This function allows the illumination of the
space in front of the vehicle for a preset
period of time.
Activation fig. 68
With the ignition key at OFFor removed,
pull the stalk towards the steering wheel
within 2 minutes from when the engine
is turned off.
At each single movement of the stalk, the
staying on of the lights is extended by 30
seconds up to a maximum of 210 seconds;
then the lights are switched off automati-
cally. Each time the stalk is operated, the in-
strument panel warning light 3will turn
on together with a message on the display
(see section “Warning lights and mes-
sages”) until the function is active. The
warning light comes on the first time the
stalk is operated and will stay on up to au-
tomatic function deactivation. Each oper-
ation of the stalk will extend just the lights
switching on time.
Deactivation
Keep the stalk pulled towards the steer-
ing wheel for more than 2 seconds.
AUTOMATIC HEADLIGHTS
SENSOR (daylight sensor)
(where provided)
It detects the changes of the external light
intensity of the vehicle according to the
light sensitivity set: the greater the sensi-
tivity is, the smaller the amount of exter-
nal light necessary to control the switch-
ing-on of the external headlights will be.
The daylight sensor sensitivity can be ad-
justed by the “Set-up menu” of the display.Activation fig. 69
Turn the knurled ring to
2A:in this way,
the automatic activation of the side/tail-
lights and dipped beam headlights is si-
multaneously enabled according to the ex-
ternal luminosity.
Deactivation
As a result of the sensor control, the
dipped beam headlights will switch off and,
after about 10 seconds, sidelights will
switch off too.
The sensor is not able to detect the fog
presence, lights shall therefore be
switched on manually.
fig. 68F0N0036mfig. 69F0N0037m
037-101 Ducato GB 6-11-2007 9:56 Pagina 76
Page 79 of 282
78
SAFETY
DEVICES
CORRECT USE
OF THE
VEHICLE
WARNING
LIGHTS AND
MESSAGES
IN AN
EMERGENCY
VEHICLE
MAINTENANCE
TECHNICAL
SPECIFICATIONS
INDEX
DASHBOARD
AND CONTROLS
RAIN SENSOR
(where provided)
The rain sensor is located behind the dri-
ving mirror in contact with the windscreen
and has the purpose of automatically ad-
just, during the intermittent operation, the
frequency of the windscreen wiper
strokes as to the rain intensity.
IMPORTANT Keep clean the glass in the
sensor area.
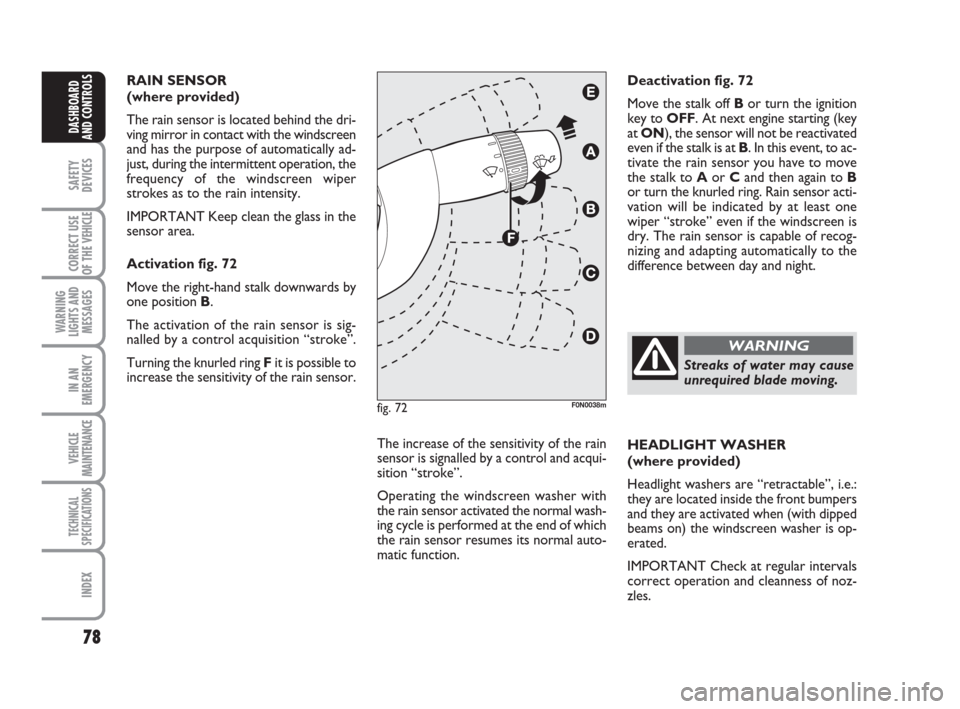
Activation fig. 72
Move the right-hand stalk downwards by
one position B.
The activation of the rain sensor is sig-
nalled by a control acquisition “stroke”.
Turning the knurled ring Fit is possible to
increase the sensitivity of the rain sensor.
The increase of the sensitivity of the rain
sensor is signalled by a control and acqui-
sition “stroke”.
Operating the windscreen washer with
the rain sensor activated the normal wash-
ing cycle is performed at the end of which
the rain sensor resumes its normal auto-
matic function.HEADLIGHT WASHER
(where provided)
Headlight washers are “retractable”, i.e.:
they are located inside the front bumpers
and they are activated when (with dipped
beams on) the windscreen washer is op-
erated.
IMPORTANT Check at regular intervals
correct operation and cleanness of noz-
zles. Deactivation fig. 72
Move the stalk off Bor turn the ignition
key to OFF. At next engine starting (key
at ON), the sensor will not be reactivated
even if the stalk is at B. In this event, to ac-
tivate the rain sensor you have to move
the stalk to Aor Cand then again to B
or turn the knurled ring. Rain sensor acti-
vation will be indicated by at least one
wiper “stroke” even if the windscreen is
dry. The rain sensor is capable of recog-
nizing and adapting automatically to the
difference between day and night.
fig. 72F0N0038m
Streaks of water may cause
unrequired blade moving.
WARNING
037-101 Ducato GB 6-11-2007 9:56 Pagina 78
Page 82 of 282
81
SAFETY
DEVICES
CORRECT USE
OF THE
VEHICLE
WARNING
LIGHTS AND
MESSAGES
IN AN
EMERGENCY
VEHICLE
MAINTENANCE
TECHNICAL
SPECIFICATIONS
INDEX
DASHBOARD
AND CONTROLS
CEILING LIGHTS
FRONT CEILING LIGHT WITH
SPOT LIGHTS
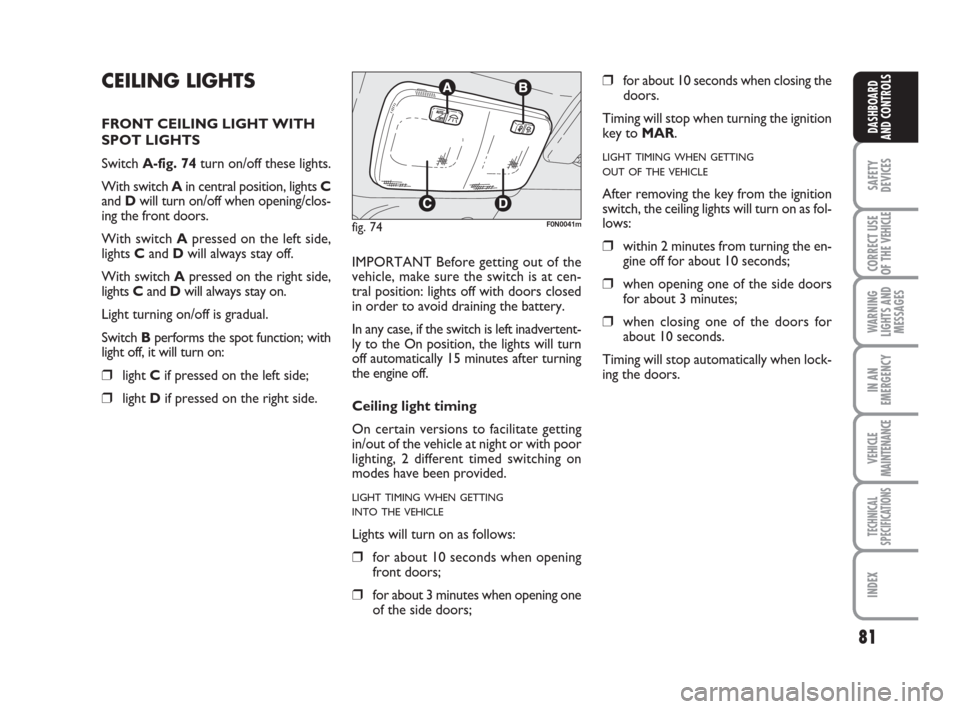
Switch A-fig. 74turn on/off these lights.
With switch A in central position, lights C
and Dwill turn on/off when opening/clos-
ing the front doors.
With switch Apressed on the left side,
lights Cand Dwill always stay off.
With switch Apressed on the right side,
lights Cand Dwill always stay on.
Light turning on/off is gradual.
Switch Bperforms the spot function; with
light off, it will turn on:
❒light Cif pressed on the left side;
❒light Dif pressed on the right side.IMPORTANT Before getting out of the
vehicle, make sure the switch is at cen-
tral position: lights off with doors closed
in order to avoid draining the battery.
In any case, if the switch is left inadvertent-
ly to the On position, the lights will turn
off automatically 15 minutes after turning
the engine off.
Ceiling light timing
On certain versions to facilitate getting
in/out of the vehicle at night or with poor
lighting, 2 different timed switching on
modes have been provided.
LIGHT TIMING WHEN GETTING
INTO THE VEHICLE
Lights will turn on as follows:
❒for about 10 seconds when opening
front doors;
❒for about 3 minutes when opening one
of the side doors;
❒for about 10 seconds when closing the
doors.
Timing will stop when turning the ignition
key to MAR.
LIGHT TIMING WHEN GETTING
OUT OF THE VEHICLE
After removing the key from the ignition
switch, the ceiling lights will turn on as fol-
lows:
❒within 2 minutes from turning the en-
gine off for about 10 seconds;
❒when opening one of the side doors
for about 3 minutes;
❒when closing one of the doors for
about 10 seconds.
Timing will stop automatically when lock-
ing the doors.
fig. 74F0N0041m
037-101 Ducato GB 6-11-2007 9:56 Pagina 81
Page 84 of 282
83
SAFETY
DEVICES
CORRECT USE
OF THE
VEHICLE
WARNING
LIGHTS AND
MESSAGES
IN AN
EMERGENCY
VEHICLE
MAINTENANCE
TECHNICAL
SPECIFICATIONS
INDEX
DASHBOARD
AND CONTROLS
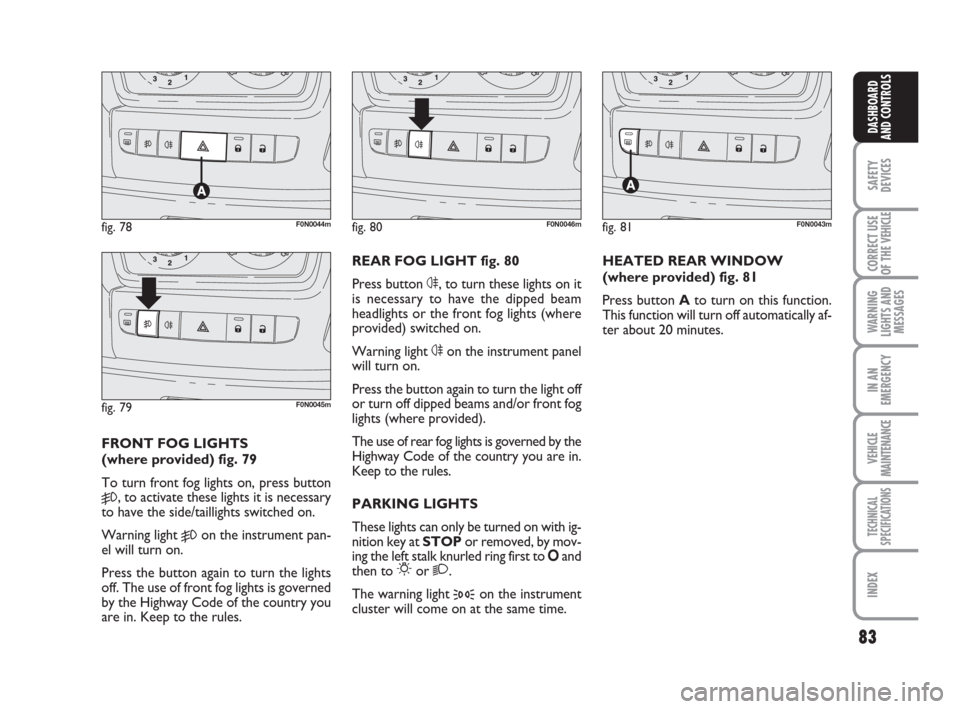
FRONT FOG LIGHTS
(where provided) fig. 79
To turn front fog lights on, press button
5, to activate these lights it is necessary
to have the side/taillights switched on.
Warning light
5on the instrument pan-
el will turn on.
Press the button again to turn the lights
off. The use of front fog lights is governed
by the Highway Code of the country you
are in. Keep to the rules.REAR FOG LIGHT fig. 80
Press button 4, to turn these lights on it
is necessary to have the dipped beam
headlights or the front fog lights (where
provided) switched on.
Warning light 4on the instrument panel
will turn on.
Press the button again to turn the light off
or turn off dipped beams and/or front fog
lights (where provided).
The use of rear fog lights is governed by the
Highway Code of the country you are in.
Keep to the rules.
PARKING LIGHTS
These lights can only be turned on with ig-
nition key at STOP or removed, by mov-
ing the left stalk knurled ring first to Oand
then to
6or 2.
The warning light
3on the instrument
cluster will come on at the same time.HEATED REAR WINDOW
(where provided) fig. 81
Press button Ato turn on this function.
This function will turn off automatically af-
ter about 20 minutes.
fig. 78F0N0044m
fig. 79F0N0045m
fig. 80F0N0046mfig. 81F0N0043m
037-101 Ducato GB 6-11-2007 9:56 Pagina 83
Page 87 of 282
86
SAFETY
DEVICES
CORRECT USE
OF THE
VEHICLE
WARNING
LIGHTS AND
MESSAGES
IN AN
EMERGENCY
VEHICLE
MAINTENANCE
TECHNICAL
SPECIFICATIONS
INDEX
DASHBOARD
AND CONTROLS
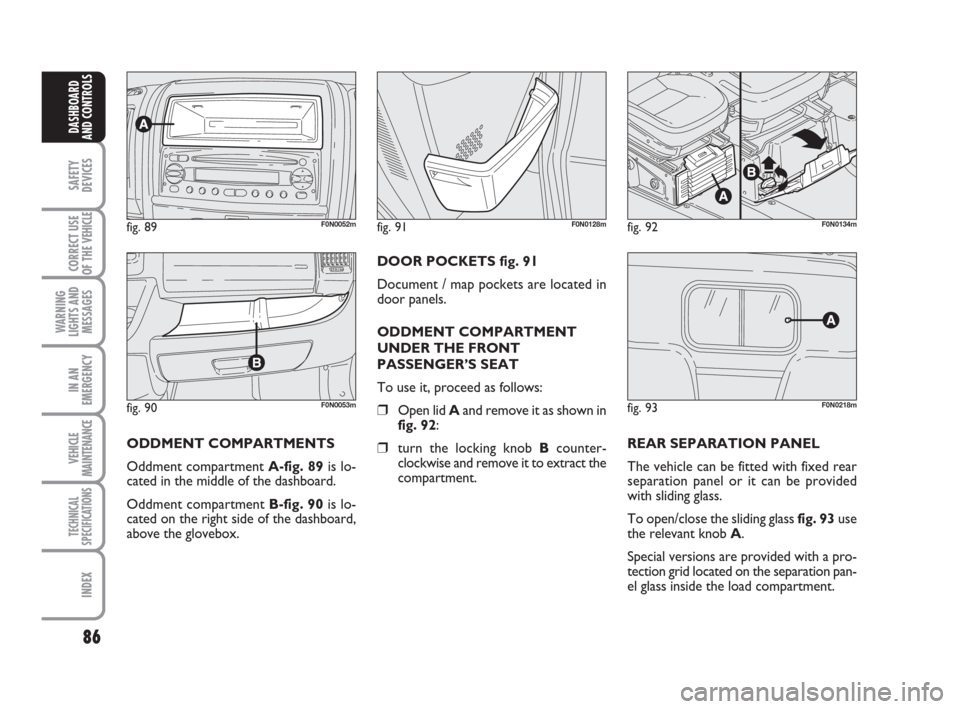
fig. 90F0N0053m
fig. 89F0N0052mfig. 92F0N0134mfig. 91F0N0128m
ODDMENT COMPARTMENTS
Oddment compartment A-fig. 89is lo-
cated in the middle of the dashboard.
Oddment compartment B-fig. 90is lo-
cated on the right side of the dashboard,
above the glovebox.DOOR POCKETS fig. 91
Document / map pockets are located in
door panels.
ODDMENT COMPARTMENT
UNDER THE FRONT
PASSENGER’S SEAT
To use it, proceed as follows:
❒Open lid Aand remove it as shown in
fig. 92:
❒turn the locking knob Bcounter-
clockwise and remove it to extract the
compartment.REAR SEPARATION PANEL
The vehicle can be fitted with fixed rear
separation panel or it can be provided
with sliding glass.
To open/close the sliding glass fig. 93use
the relevant knob A.
Special versions are provided with a pro-
tection grid located on the separation pan-
el glass inside the load compartment.
fig. 93F0N0218m
037-101 Ducato GB 6-11-2007 9:56 Pagina 86
Page 94 of 282

93
SAFETY
DEVICES
CORRECT USE
OF THE
VEHICLE
WARNING
LIGHTS AND
MESSAGES
IN AN
EMERGENCY
VEHICLE
MAINTENANCE
TECHNICAL
SPECIFICATIONS
INDEX
DASHBOARD
AND CONTROLS
flashing. Turn the metal insert counter-
clockwise into the driver’s door lock fig.
109to unlock all the doors.
Door locking/unlocking from
the inside
Press button A-fig. 110to lock and press
button Bto unlock the doors. Block/re-
lease actions are carried out centrally
(front and rear). When doors are locked
the button led Ais on and pressing the
button Bwill obtain central unlocking of
the doors and turning off of the led. When
doors are unlocked, the button led is off
and pressing the button will obtain central
locking of the doors. Door locking is ac-
tivated only if all the doors are perfectly
closed.
fig. 109F0N0059mfig. 110F0N0047m
fig. 111F0N0132m
Pulling the internal door handle of one of the
rear doors will unlock the relevant door.
Lacking power (blown fuse, battery discon-
nected, etc.) it is however possible to lock
the doors manually.
After exceeding 20 km/h speed, doors will
be locked automatically if the set up menu
function has been selected (see paragraph
“Multifunction display” in this section).
LOAD COMPARTMENT KEY
fig. 111
Lock activation is indicated by the led on
the key.
The led turns on in the following cases:
❒after each door lock command gener-
ated by the key itself or by key Øon
the dashboard;
❒upon instrument panel activation;
❒upon opening one of the front doors;
❒when the doors are locked at 20 km/h
(if this is activated from the menu);
Deactivation takes place upon opening
one of the load compartment doors or
upon a door release request (load com-
partment or centralised) or upon a release
request via the remote control/door pawl. After locking doors by:
❒remote control;
❒door revolving plug;
it will not be possible to unlock the doors
by pressing button
A-fig. 110.
IMPORTANT With central locking active
pulling the opening lever of one of the front
doors will cause central locking deactivation.
037-101 Ducato GB 6-11-2007 9:56 Pagina 93
Page 95 of 282

94
SAFETY
DEVICES
CORRECT USE
OF THE
VEHICLE
WARNING
LIGHTS AND
MESSAGES
IN AN
EMERGENCY
VEHICLE
MAINTENANCE
TECHNICAL
SPECIFICATIONS
INDEX
DASHBOARD
AND CONTROLS
DEAD LOCK DEVICE
(where provided)
This safety device enables to inhibit:
❒door internal handles;
❒locking/unlocking buttons A-B fig. 110;
thus hindering doors opening from inside
the passenger’s compartment in case of at-
tempt to break-into (e.g.: window breaking).
The dead lock device guarantees the best
protection against unwanted access.
Therefore, it should be actuated every
time the vehicle is parked and left unat-
tended.
Once the dead lock device
has been actuated, doors
cannot be opened from the passen-
ger’s compartment in any way what-
soever. For this reason, make sure
there are no person left inside the ve-
hicle. If the battery of the key with
remote control is down, the dead lock
device can be deactivated only by fit-
ting the metal insert of the key in
both front door revolving plugs as de-
scribed previously: in this case the
dead lock device will stay engaged
only on the rear doors.
WARNINGDevice activation
The dead lock device is automatically ac-
tivated on every door when pressing twice
briefly the remote control button
Ø, fig.
107.
Device activation is indicated by 3 flashing
of direction indicators and flashing of the
button led A-fig. 110.
If one of the doors is not perfectly closed,
the dead lock device will not activate, thus
preventing that a person getting into the ve-
hicle from the open door remains blocked
inside the passenger’s compartment when
she/he closes the door.
Device deactivation
The device is deactivated automatically on
every door in the following cases:
❒when opening the driver’s door using
the key without remote control;
❒when unlocking doors using the re-
mote control;
❒turning the ignition key to MAR.
037-101 Ducato GB 6-11-2007 9:56 Pagina 94
Page 98 of 282

97
SAFETY
DEVICES
CORRECT USE
OF THE
VEHICLE
WARNING
LIGHTS AND
MESSAGES
IN AN
EMERGENCY
VEHICLE
MAINTENANCE
TECHNICAL
SPECIFICATIONS
INDEX
DASHBOARD
AND CONTROLS
The spring catch system is
designed to ensure the best
comfort in use. An accidental knock
or gust of wind could release the
springs and make doors close.
WARNING
It is possible to increase the opening an-
gle of the two doors to facilitate loading
and unloading operations. Press button A-
fig. 118to open the doors to about 180°.
When open to 180° the
doors are not blocked. Do
not use this system when the vehicle
is parked on a slope or when it is
windy.
WARNING
fig. 118F0N0188m
POWER WINDOWS
fig. 119
The driver’s door armrest features the
switches that with the key at MAR:
Aopen/close the left front window;
Bopen/close the right front window;
037-101 Ducato GB 6-11-2007 9:56 Pagina 97