FIAT DUCATO 2009 3.G Owners Manual
Manufacturer: FIAT, Model Year: 2009, Model line: DUCATO, Model: FIAT DUCATO 2009 3.GPages: 282, PDF Size: 4.55 MB
Page 161 of 282
160
WARNING
LIGHTS AND
MESSAGES
VEHICLE
MAINTENANCE
TECHNICAL
SPECIFICATIONS
IINDEX
DASHBOARD
AND CONTROLS
SAFETY
DEVICES
CORRECT USE
OF THE
VEHICLE
IN AN
EMERGENCY
To change a wheel proceed
as follows:
❒stop the vehicle in a position where
it does not present a danger for on-
coming traffic and where you can
change the wheel safely. The ground
must be flat and compact;
❒turn the engine off and apply the hand-
brake;
❒engage first gear or reverse;
❒wear a high visibility safety jacket
(compulsory by law in certain coun-
tries) before getting out of the vehicle;
❒indicate that the vehicle has broken
down using the devices required by
the law of the country (e.g. warning
triangle, hazard lights etc.);
❒take the extension and the wrench
from the tool kit under the passenger
seat (see “Compartment under front
passenger seat” in the “Dashboard and
Controls” section);
The jack may only be used to
change wheels which come
with the vehicle or from other vehi-
cles of the same model. Never use the
jack for other purposes, such as lift-
ing other models of vehicle. Never use
the jack to carry out repairs under the
vehicle. Incorrect positioning of the
jack may cause the lifted vehicle to
fall. Do not use the jack for loads
higher than those shown on the label.
WARNING
Never tamper with the in-
flation valve. Never intro-
duce tools of any kind between the
rim and the tyre. Check the tyre and
spare wheel pressure regularly refer-
ring to the values shown in the “Tech-
nical Specifications” chapter.
WARNING
Important notes:
❒the jack weighs 4.5 kg;
❒the jack requires no adjustment;
❒the jack cannot be repaired: replace
with an original spare part if damaged;
❒no tool other than the cranking device
may be fitted on the jack.
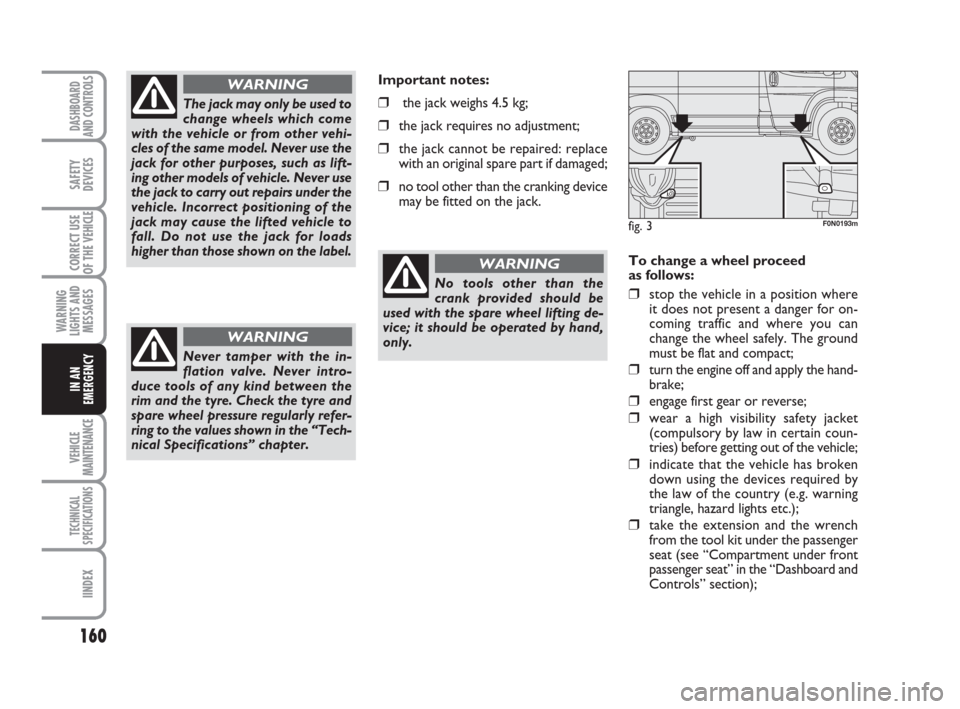
fig. 3F0N0193m
No tools other than the
crank provided should be
used with the spare wheel lifting de-
vice; it should be operated by hand,
only.
WARNING
Page 162 of 282
161
WARNING
LIGHTS AND
MESSAGES
VEHICLE
MAINTENANCE
TECHNICAL
SPECIFICATIONS
INDEX
DASHBOARD
AND CONTROLS
SAFETY
DEVICES
CORRECT USE
OF THE
VEHICLE
IN AN
EMERGENCY
❒for versions with alloy wheels, remo-
ve the press-fitted hub cap;
❒loosen the bolts on the wheel to be
replaced by one turn;
❒turn the ring nut to extend the jack
partly;
❒position the jack near the lift support
closest to the wheel to be changed at
the points shown in fig. 3. For short
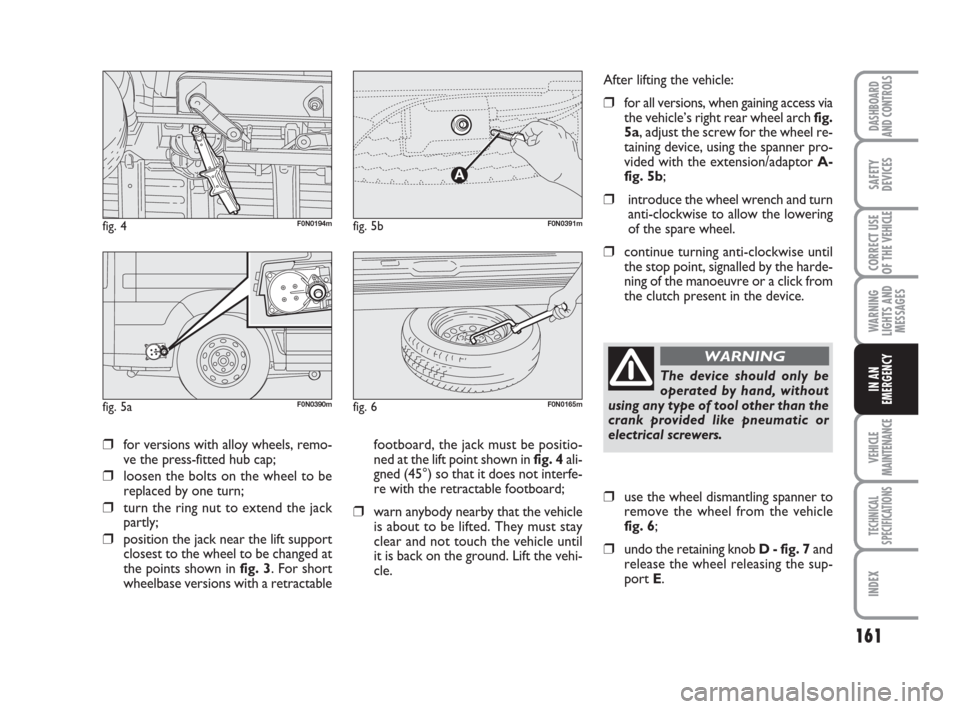
wheelbase versions with a retractablefootboard, the jack must be positio-
ned at the lift point shown in fig. 4ali-
gned (45°) so that it does not interfe-
re with the retractable footboard;
❒warn anybody nearby that the vehicle
is about to be lifted. They must stay
clear and not touch the vehicle until
it is back on the ground. Lift the vehi-
cle.After lifting the vehicle:
❒for all versions, when gaining access via
the vehicle’s right rear wheel arch fig.
5a, adjust the screw for the wheel re-
taining device, using the spanner pro-
vided with the extension/adaptor A-
fig. 5b;
❒introduce the wheel wrench and turn
anti-clockwise to allow the lowering
of the spare wheel.
❒continue turning anti-clockwise until
the stop point, signalled by the harde-
ning of the manoeuvre or a click from
the clutch present in the device.
fig. 4F0N0194m
fig. 6F0N0165m
The device should only be
operated by hand, without
using any type of tool other than the
crank provided like pneumatic or
electrical screwers.
WARNING
❒use the wheel dismantling spanner to
remove the wheel from the vehicle
fig. 6;
❒undo the retaining knob D - fig. 7 and
release the wheel releasing the sup-
port E.
fig. 5aF0N0390m
fig. 5b
A
F0N0391m
Page 163 of 282
162
WARNING
LIGHTS AND
MESSAGES
VEHICLE
MAINTENANCE
TECHNICAL
SPECIFICATIONS
IINDEX
DASHBOARD
AND CONTROLS
SAFETY
DEVICES
CORRECT USE
OF THE
VEHICLE
IN AN
EMERGENCY
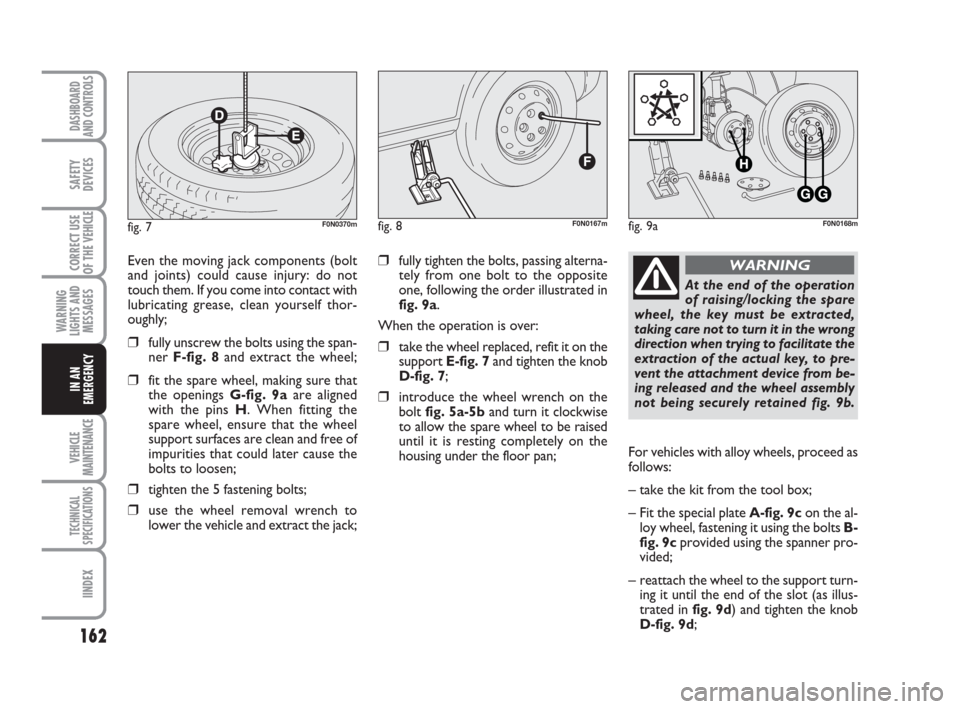
❒fully tighten the bolts, passing alterna-
tely from one bolt to the opposite
one, following the order illustrated in
fig. 9a.
When the operation is over:
❒take the wheel replaced, refit it on the
support E-fig. 7and tighten the knob
D-fig. 7;
❒introduce the wheel wrench on the
bolt fig. 5a-5band turn it clockwise
to allow the spare wheel to be raised
until it is resting completely on the
housing under the floor pan; Even the moving jack components (bolt
and joints) could cause injury: do not
touch them. If you come into contact with
lubricating grease, clean yourself thor-
oughly;
❒fully unscrew the bolts using the span-
ner F-fig. 8and extract the wheel;
❒fit the spare wheel, making sure that
the openings G-fig. 9aare aligned
with the pins H. When fitting the
spare wheel, ensure that the wheel
support surfaces are clean and free of
impurities that could later cause the
bolts to loosen;
❒tighten the 5 fastening bolts;
❒use the wheel removal wrench to
lower the vehicle and extract the jack;
At the end of the operation
of raising/locking the spare
wheel, the key must be extracted,
taking care not to turn it in the wrong
direction when trying to facilitate the
extraction of the actual key, to pre-
vent the attachment device from be-
ing released and the wheel assembly
not being securely retained fig. 9b.
WARNING
For vehicles with alloy wheels, proceed as
follows:
– take the kit from the tool box;
– Fit the special plate A-fig. 9con the al-
loy wheel, fastening it using the bolts B-
fig. 9cprovided using the spanner pro-
vided;
– reattach the wheel to the support turn-
ing it until the end of the slot (as illus-
trated in fig. 9d) and tighten the knob
D-fig. 9d;
fig. 8F0N0167mfig. 9aF0N0168mfig. 7F0N0370m
Page 164 of 282

163
WARNING
LIGHTS AND
MESSAGES
VEHICLE
MAINTENANCE
TECHNICAL
SPECIFICATIONS
INDEX
DASHBOARD
AND CONTROLS
SAFETY
DEVICES
CORRECT USE
OF THE
VEHICLE
IN AN
EMERGENCY
QUICK TYRE REPAIR
KIT - Automatic
FIX & GO
The automatic Fix & Go quick tyre repair
kit is located in the front part of the pas-
senger compartment and includes:
❒a canister A containing sealant liquid
and fitted with:
- a transparent filler pipe B;
- a black pressure renewal pipe E;
– an adhesive label Cwith the words
“max. 80 km/h”, to be placed in a
position clearly visible by the driver
(on the instrument panel) after the
tyre has been repaired;
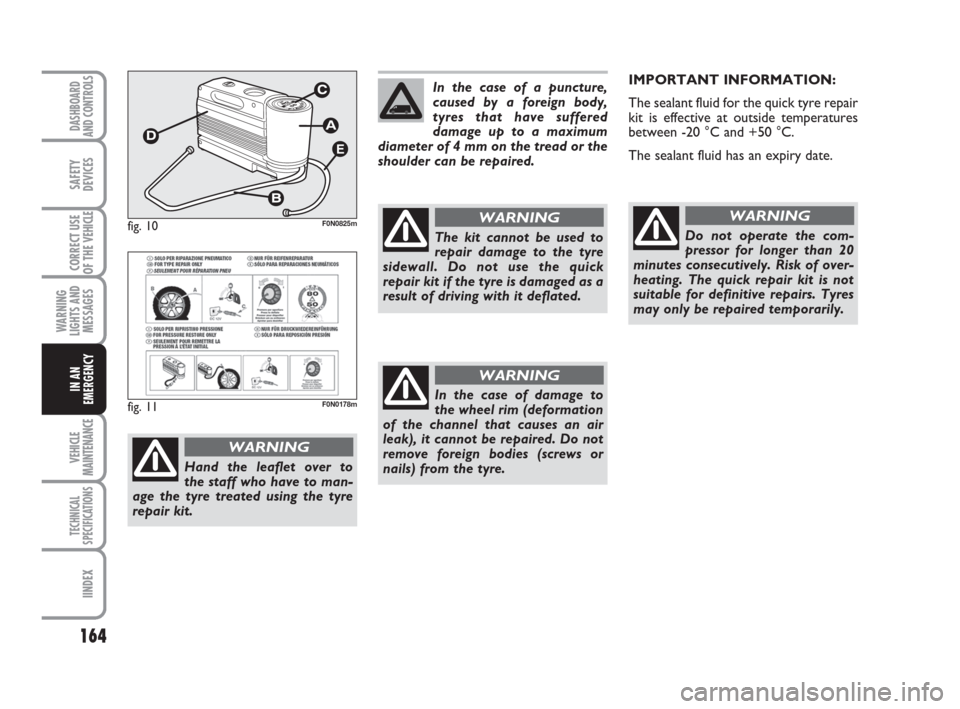
❒information leaflet (see fig. 11), for
quick reference for the correct use of
the quick repair kit and later handed
over to the staff who will have to man-
age the tyre dealt with;
❒a compressor D- Fig. 10complete
with pressure gauge and connectors;
❒adapters for inflating various elements;
❒protective gloves.
– introduce the wheel removal wrench on
the bolt fig. 5and turn it clockwise to
allow the spare wheel to be raised.
❒Check that it is correctly positioned in
the dedicated housing under the floor
pan (the lifting system has an end of
travel clutch which, if incorrectly po-
sitioned, will be unsafe).
❒place the removal spanner back in the
tool box;
❒place the tool box in its housing under the
passenger seat.
Each time the spare wheel is
moved, check that it is cor-
rectly positioned in its housing under the
floor. If it is not correctly positioned, this
could adversely affect safety.
WARNING
fig. 9bF0N0223mfig. 9cF0N0251m
fig. 9dF0N0371m
Page 165 of 282
164
WARNING
LIGHTS AND
MESSAGES
VEHICLE
MAINTENANCE
TECHNICAL
SPECIFICATIONS
IINDEX
DASHBOARD
AND CONTROLS
SAFETY
DEVICES
CORRECT USE
OF THE
VEHICLE
IN AN
EMERGENCY
IMPORTANT INFORMATION:
The sealant fluid for the quick tyre repair
kit is effective at outside temperatures
between -20 °C and +50 °C.
The sealant fluid has an expiry date.
Do not operate the com-
pressor for longer than 20
minutes consecutively. Risk of over-
heating. The quick repair kit is not
suitable for definitive repairs. Tyres
may only be repaired temporarily.
WARNING
In the case of a puncture,
caused by a foreign body,
tyres that have suffered
damage up to a maximum
diameter of 4 mm on the tread or the
shoulder can be repaired.
The kit cannot be used to
repair damage to the tyre
sidewall. Do not use the quick
repair kit if the tyre is damaged as a
result of driving with it deflated.
WARNING
In the case of damage to
the wheel rim (deformation
of the channel that causes an air
leak), it cannot be repaired. Do not
remove foreign bodies (screws or
nails) from the tyre.
WARNING
fig. 11F0N0178m
Hand the leaflet over to
the staff who have to man-
age the tyre treated using the tyre
repair kit.
WARNING
fig. 10
E
F0N0825m
Page 166 of 282
165
WARNING
LIGHTS AND
MESSAGES
VEHICLE
MAINTENANCE
TECHNICAL
SPECIFICATIONS
INDEX
DASHBOARD
AND CONTROLS
SAFETY
DEVICES
CORRECT USE
OF THE
VEHICLE
IN AN
EMERGENCY
The canister contains ethyl-
ene glycol. Contains latex:
may cause an allergic reaction.
Harmful if swallowed. Irritates the
eyes. May cause sensitization by
inhalation or contact. Avoid contact
with your eyes, skin and clothes. In
the event of contact, wash immedi-
ately with plenty of water. Do not
induce vomiting if swallowed. Rinse
your mouth and drink plenty of
water. Call a doctor immediately.
Keep away from children. The prod-
uct must not be used by asthmatics.
Do not breathe in the vapours during
insertion and suction. Call a doctor
immediately if allergic reactions are
noted. Store the canister in the spe-
cific compartment, away from
sources of heat. The sealant fluid has
an expiry date.
WARNINGReplace the canister con-
taining out of date sealant
fluid. Dispose of the canister
and the sealant liquid prop-
erly. Dispose according to the nation-
al and local laws in force.
Put on the protective
gloves provided together
with quick tyre repair kit.
WARNING
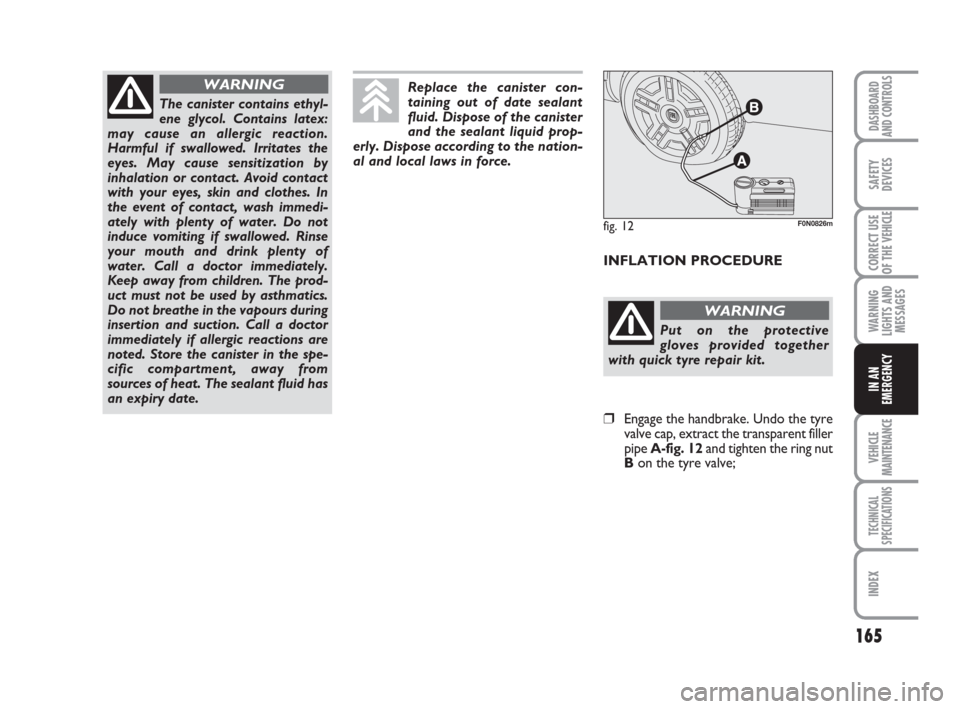
❒Engage the handbrake. Undo the tyre
valve cap, extract the transparent filler
pipe A-fig. 12and tighten the ring nut
Bon the tyre valve;
fig. 12F0N0826m
INFLATION PROCEDURE
Page 167 of 282
166
WARNING
LIGHTS AND
MESSAGES
VEHICLE
MAINTENANCE
TECHNICAL
SPECIFICATIONS
IINDEX
DASHBOARD
AND CONTROLS
SAFETY
DEVICES
CORRECT USE
OF THE
VEHICLE
IN AN
EMERGENCY
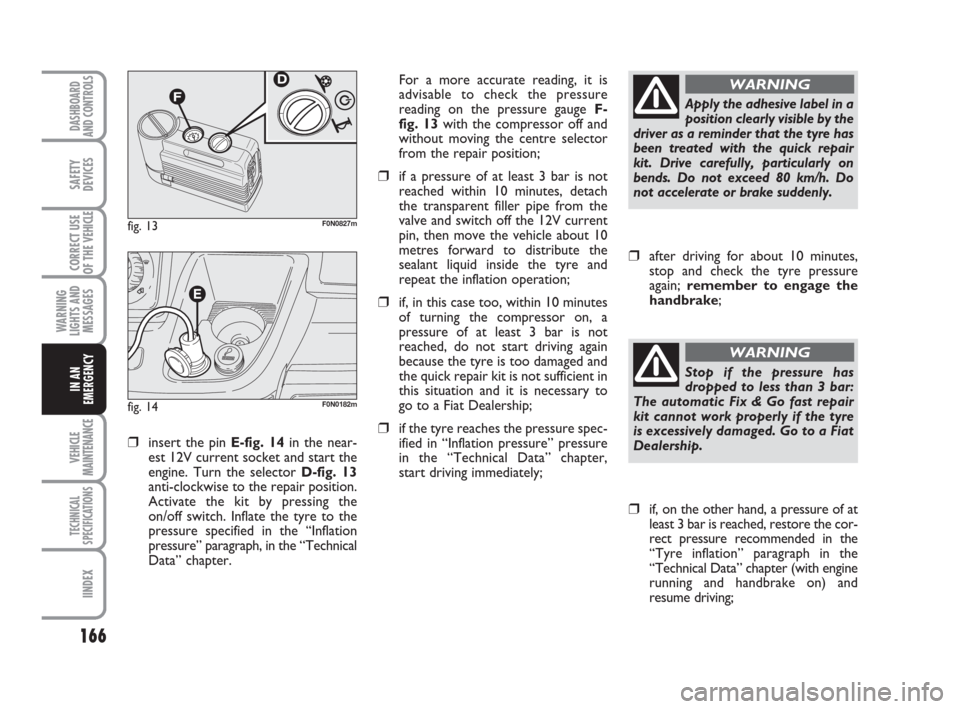
❒insert the pin E-fig. 14in the near-
est 12V current socket and start the
engine. Turn the selector D-fig. 13
anti-clockwise to the repair position.
Activate the kit by pressing the
on/off switch. Inflate the tyre to the
pressure specified in the “Inflation
pressure” paragraph, in the “Technical
Data” chapter.For a more accurate reading, it is
advisable to check the pressure
reading on the pressure gauge F-
fig. 13with the compressor off and
without moving the centre selector
from the repair position;
❒if a pressure of at least 3 bar is not
reached within 10 minutes, detach
the transparent filler pipe from the
valve and switch off the 12V current
pin, then move the vehicle about 10
metres forward to distribute the
sealant liquid inside the tyre and
repeat the inflation operation;
❒if, in this case too, within 10 minutes
of turning the compressor on, a
pressure of at least 3 bar is not
reached, do not start driving again
because the tyre is too damaged and
the quick repair kit is not sufficient in
this situation and it is necessary to
go to a Fiat Dealership;
❒if the tyre reaches the pressure spec-
ified in “Inflation pressure” pressure
in the “Technical Data” chapter,
start driving immediately;
fig. 13F0N0827m
fig. 14F0N0182m
Apply the adhesive label in a
position clearly visible by the
driver as a reminder that the tyre has
been treated with the quick repair
kit. Drive carefully, particularly on
bends. Do not exceed 80 km/h. Do
not accelerate or brake suddenly.
WARNING
❒after driving for about 10 minutes,
stop and check the tyre pressure
again; remember to engage the
handbrake;
❒if, on the other hand, a pressure of at
least 3 bar is reached, restore the cor-
rect pressure recommended in the
“Tyre inflation” paragraph in the
“Technical Data” chapter (with engine
running and handbrake on) and
resume driving;
Stop if the pressure has
dropped to less than 3 bar:
The automatic Fix & Go fast repair
kit cannot work properly if the tyre
is excessively damaged. Go to a Fiat
Dealership.
WARNING
Page 168 of 282
167
WARNING
LIGHTS AND
MESSAGES
VEHICLE
MAINTENANCE
TECHNICAL
SPECIFICATIONS
INDEX
DASHBOARD
AND CONTROLS
SAFETY
DEVICES
CORRECT USE
OF THE
VEHICLE
IN AN
EMERGENCY
❒drive with the utmost care to the
nearest Fiat Dealership.
FOR CHECKING AND
RESTORING PRESSURE ONLY
The compressor may also be used for
restoring pressure only.
❒Engage the handbrake
❒Undo the cap for the tyre valve, extract
the black pipe and tighten the ring nut
on the tyre valve.
❒Insert the pin in the nearest 12V cur-
rent socket and start the engine.
❒Rotate the selector clockwise to the
pressure renewal position.
❒Activate the kit by pressing the
on/off switch. Inflate the tyre to the
pressure specified in the “Inflation
pressure” paragraph, in the
“Technical Data” chapter.
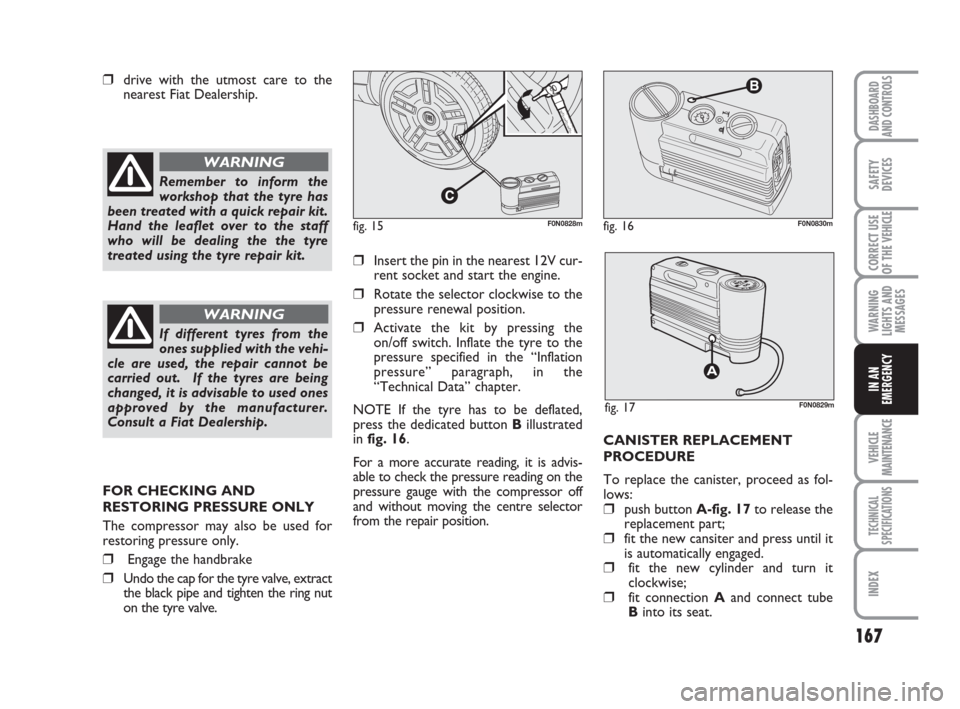
NOTE If the tyre has to be deflated,
press the dedicated button Billustrated
in fig. 16.
For a more accurate reading, it is advis-
able to check the pressure reading on the
pressure gauge with the compressor off
and without moving the centre selector
from the repair position.CANISTER REPLACEMENT
PROCEDURE
To replace the canister, proceed as fol-
lows:
❒push button A-fig. 17to release the
replacement part;
❒fit the new cansiter and press until it
is automatically engaged.
❒fit the new cylinder and turn it
clockwise;
❒fit connection Aand connect tube
Binto its seat.
Remember to inform the
workshop that the tyre has
been treated with a quick repair kit.
Hand the leaflet over to the staff
who will be dealing the the tyre
treated using the tyre repair kit.
WARNING
If different tyres from the
ones supplied with the vehi-
cle are used, the repair cannot be
carried out. If the tyres are being
changed, it is advisable to used ones
approved by the manufacturer.
Consult a Fiat Dealership.
WARNING
fig. 16
B
F0N0830m
fig. 17F0N0829m
fig. 15F0N0828m
Page 169 of 282
168
WARNING
LIGHTS AND
MESSAGES
VEHICLE
MAINTENANCE
TECHNICAL
SPECIFICATIONS
IINDEX
DASHBOARD
AND CONTROLS
SAFETY
DEVICES
CORRECT USE
OF THE
VEHICLE
IN AN
EMERGENCY
WHEN NEEDING TO
CHANGE A BULB
GENERAL INSTRUCTIONS
❒When a light is not working, check
that the corresponding fuse is intact
before changing a bulb. For the loca-
tion of fuses, refer to the paragraph “If
a fuse blows” in this section;
❒Before changing a bulb check the con-
tacts for oxidation;
❒Burnt bulbs must be replaced by oth-
ers of the same type and power;
❒Always check the height of the head-
light beam after changing a bulb.
IMPORTANT The headlight inner surface
may be lightly misted over: this is not a
fault but a natural fact due to low tem-
perature and the level of air humidity. It
will disappear as soon the headlights are
turned on. The presence of drops inside
the headlights means water infiltration,
therefore contact Fiat Dealership.
TYPES OF BULBS
Various types of bulbs are fitted to your
vehicle:
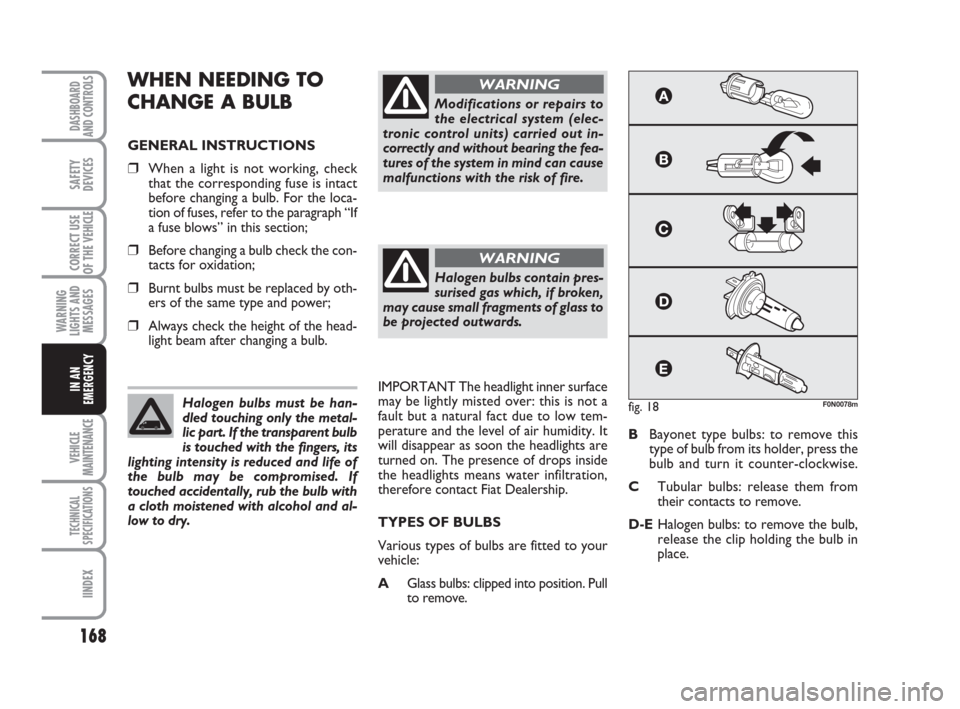
AGlass bulbs: clipped into position. Pull
to remove.BBayonet type bulbs: to remove this
type of bulb from its holder, press the
bulb and turn it counter-clockwise.
CTubular bulbs: release them from
their contacts to remove.
D-EHalogen bulbs: to remove the bulb,
release the clip holding the bulb in
place. Halogen bulbs must be han-
dled touching only the metal-
lic part. If the transparent bulb
is touched with the fingers, its
lighting intensity is reduced and life of
the bulb may be compromised. If
touched accidentally, rub the bulb with
a cloth moistened with alcohol and al-
low to dry.
Modifications or repairs to
the electrical system (elec-
tronic control units) carried out in-
correctly and without bearing the fea-
tures of the system in mind can cause
malfunctions with the risk of fire.
WARNING
Halogen bulbs contain pres-
surised gas which, if broken,
may cause small fragments of glass to
be projected outwards.
WARNING
fig. 18F0N0078m
Page 170 of 282
169
WARNING
LIGHTS AND
MESSAGES
VEHICLE
MAINTENANCE
TECHNICAL
SPECIFICATIONS
INDEX
DASHBOARD
AND CONTROLS
SAFETY
DEVICES
CORRECT USE
OF THE
VEHICLE
IN AN
EMERGENCY
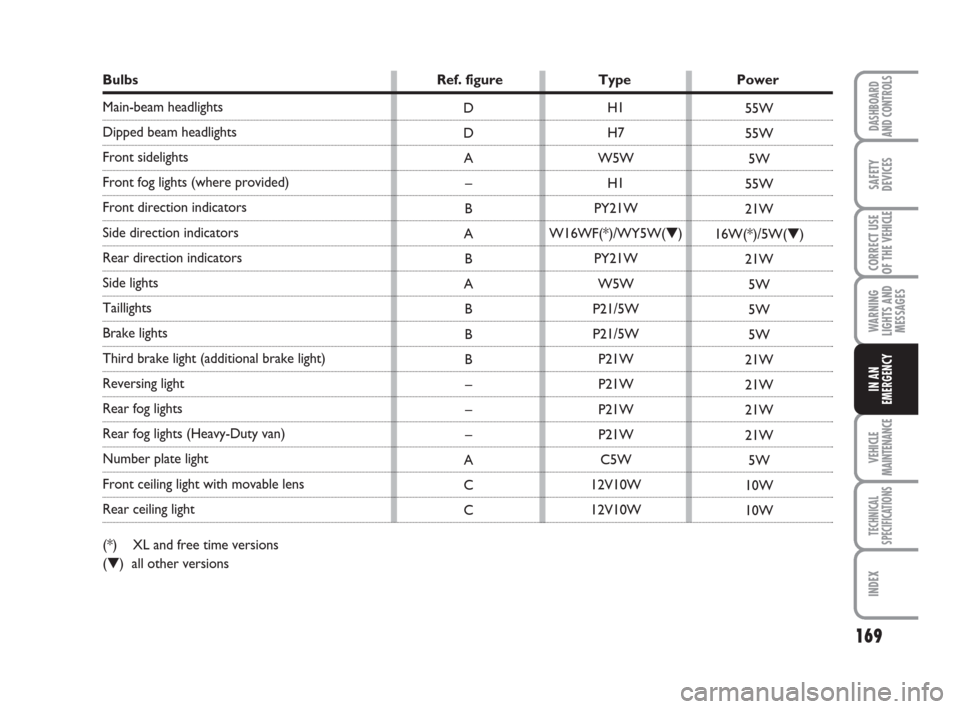
Bulbs Ref. figure Type Power
Main-beam headlights
Dipped beam headlights
Front sidelights
Front fog lights (where provided)
Front direction indicators
Side direction indicators
Rear direction indicators
Side lights
Taillights
Brake lights
Third brake light (additional brake light)
Reversing light
Rear fog lights
Rear fog lights (Heavy-Duty van)
Number plate light
Front ceiling light with movable lens
Rear ceiling light
(*) XL and free time versions
(▼) all other versionsH1
H7
W5W
H1
PY21W
W16WF(*)/WY5W(▼)
PY21W
W5W
P21/5W
P21/5W
P21W
P21W
P21W
P21W
C5W
12V10W
12V10W D
D
A
–
B
A
B
A
B
B
B
–
–
–
A
C
C55W
55W
5W
55W
21W
16W(*)/5W(▼)
21W
5W
5W
5W
21W
21W
21W
21W
5W
10W
10W