button FIAT DUCATO 2014 3.G Owner's Manual
[x] Cancel search | Manufacturer: FIAT, Model Year: 2014, Model line: DUCATO, Model: FIAT DUCATO 2014 3.GPages: 367, PDF Size: 20.39 MB
Page 44 of 367
IMPORTANT The heater is equipped
with a thermal limiter that cuts off
combustion in the case of overheating
due to insufficient coolant/coolant
leaks. In this case, after repairing the
fault in the cooling system and/or
topping up the fluid, press the program
selection button before turning the
heater back on.
The heater can turn off spontaneously
due to misfiring after start-up or
because the flame goes out during
operation. In this case, carry out the
turning off procedure and try to turn the
heater back on. If it still does not work,
consult a Fiat Dealership.
Activation of the heating
system
When an automatic climate control
system is present, the control unit sets
the air temperature and distribution
when the heater is turned on from the
park position. When a manual
heater/climate control is present, to
obtain maximum heater efficiency,
check that the passenger compartment
heating/ventilation temperature
adjustment knob is in the 'hot air'
position.
To prioritise passenger compartment
pre-heating, set the air distribution knob
to the
position.To prioritise windscreen demisting, set
the air distribution knob to
position.
To obtain both functions, set the air
distribution knob to
position.
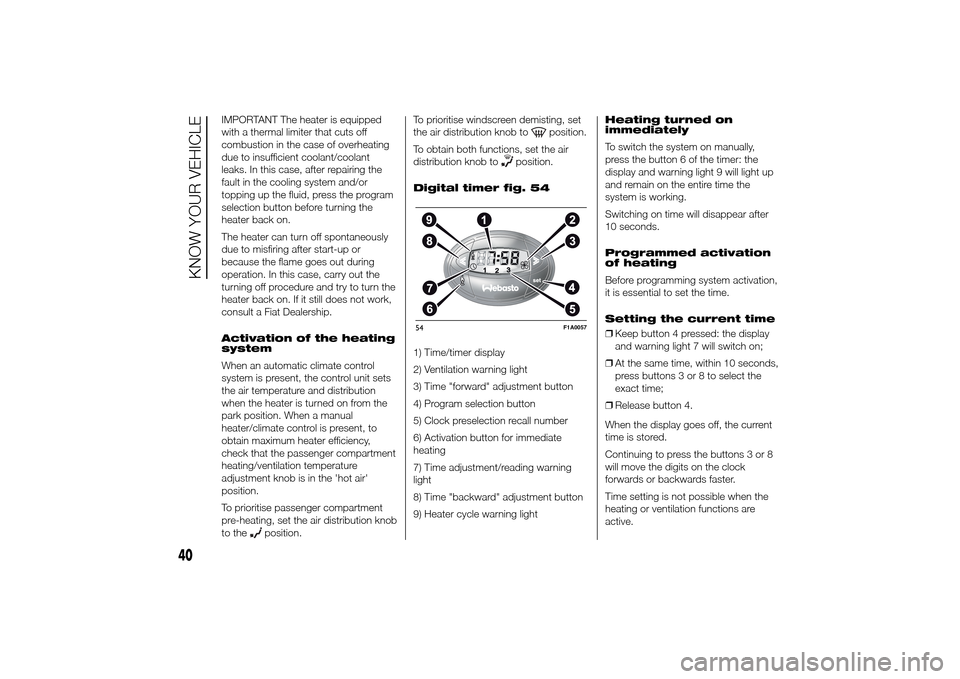
Digital timer fig. 54
1) Time/timer display
2) Ventilation warning light
3) Time "forward" adjustment button
4) Program selection button
5) Clock preselection recall number
6) Activation button for immediate
heating
7) Time adjustment/reading warning
light
8) Time "backward" adjustment button
9) Heater cycle warning lightHeating turned on
immediately
To switch the system on manually,
press the button 6 of the timer: the
display and warning light 9 will light up
and remain on the entire time the
system is working.
Switching on time will disappear after
10 seconds.
Programmed activation
of heating
Before programming system activation,
it is essential to set the time.
Setting the current time
❒Keep button 4 pressed: the display
and warning light 7 will switch on;
❒At the same time, within 10 seconds,
press buttons 3 or 8 to select the
exact time;
❒Release button 4.
When the display goes off, the current
time is stored.
Continuing to press the buttons 3 or 8
will move the digits on the clock
forwards or backwards faster.
Time setting is not possible when the
heating or ventilation functions are
active.
54
F1A0057
40
KNOW YOUR VEHICLE
Page 45 of 367
IMPORTANT Pay attention to the
daylight saving time/standard time
setting.
Reading the current
time
To read the current time, press the
button 3 or 8: the time will appear on
the display for about 10 seconds and
warning light 9 will come on at the
same time.
Programming the
switching on time
Activation can be programmed with an
advance of between 1 minute and 24
hours. Three different activation times
may be selected, but only one can
be activated for each pre-heating cycle.
The duration of activation can be
selected between 10 and 60 minutes.
To program the activation time:
❒press button 4: the symbol 10 or the
time set previously and the number 5
corresponding to the preselection
recalled will light up in the display for
10 seconds.
IMPORTANT If you wish to recall other
preselected times, press button 4
from time to time within 10 seconds.– within 10 seconds, press the buttons
3 or 8 to select the desired switching
on time.
IMPORTANT The confirmation that the
time has been memorised is given by:
❒the disappearance of the switching
on time;
❒the presence of the preselection
number 5;
❒the lighting of the display.
IMPORTANT When the boiler comes
on:
❒the flame warning light 9 switches on
in the display;
❒the preselection number 5 goes out.
Standard settings:
Preselected time 1: 6:00
Preselected time 2: 16:00
Preselected time 3: 22:00
IMPORTANT Factory pre-settings are
cancelled with a new setting.
Preselected times are stored until the
following change. If the clock is
detached from the on-board network
(e.g. if the battery is disconnected), the
factory pre-settings are restored.Deactivation of the
programmed switching
on time
To delete the programmed activation
time, press button 4 briefly: the display
lighting will go off and the number 5
relating to the preselected time will
disappear.
Recalling one of the
preselected switching
on times
Operate button 4 within 10 seconds
until the program number with the
desired preselected time is displayed.
The preselected time you have chosen
to set is automatically activated after
about 10 seconds without the need for
any further confirmation with another
button.
Activate the preselected time taking
into account the safety instructions for
the operation of the independent
heating (for this purpose consult the
Owner's Manual for use of independent
heating).
IMPORTANT Independent heating
switches on at the preselected time,
both with vehicle parked and while
driving.
41
Page 46 of 367
IMPORTANT The programmed
switching on time can be altered or
cancelled by following the instructions
given previously.
Operation duration
setting
Hold the button pressed. At the same
time press button 3 or 8.
The time and warning light 7 are
displayed.
Hold button 4 pressed again. At the
same time press button 3 or 8.
The preset activation duration is
displayed and warning light 9 or 2
flashes.
Set the activation duration with button
3or8.
The set activation duration is stored as
soon as the text in the display
disappears, or pressing button 4.
Switching the heating
system off
Deactivation of the system, depending
on the type of activation (automatic
or manual), may be:
❒automaticwhen the programmed
duration is over; when the set time
is over, the display switches off.❒manualpressing the “immediate
heating” button on the timer again
(flame button 6).
In both cases, the heating warning light,
the display lighting and the passenger
compartment heater fan go off and
burning stops.
The fluid circulation pump continues to
work for around two minutes to
dissipate as much heat as possible; the
heater can be turned back on during
this stage.
22)
IMPORTANT The parking heater goes
off when battery voltage is low to allow
the vehicle to be started.
IMPORTANT Before turning on the
device, ensure that the fuel level is
above the reserve. Otherwise the
device could lock and require
the assistance of a Fiat Dealership.
❒Always turn off the heater when
refuelling and near service stations to
avoid the risk of explosion or fire
hazards.
❒Do not park the vehicle on
inflammable material such as paper,
grass or dry leaves: fire hazard!❒The temperature near the heater
should not exceed 120°C (e.g. during
oven painting in a body shop). The
electronic control unit components
may be damaged at higher
temperatures.
❒Whilst the heater is operating with the
engine switched off, it absorbs
energy from the battery; the engine
should therefore be left running
for a while to make sure that the
battery is properly recharged.
❒To check the coolant level, follow the
instructions in the "Vehicle
maintenance" chapter, "Engine
coolant system fluid" paragraph. The
water in the heating circuit must
contain a minimum percentage of
10% antifreeze.
❒For maintenance and repairs, consult
only a Fiat Dealership and use only
original parts.
MAINTENANCE
Have the additional heater checked
regularly at a Fiat Dealership (and
always at the start of every winter). This
will guarantee safe and economic
operation of the heater as well as a long
duration.
42
KNOW YOUR VEHICLE
Page 47 of 367
ADDITIONAL REAR
HEATING (Panorama and
Combi)
(for versions/markets, where provided)
The Panorama and Combi versions
are equipped with a main heating
system plus an additional system
(available on request) with controls in
the roof lining above the second row of
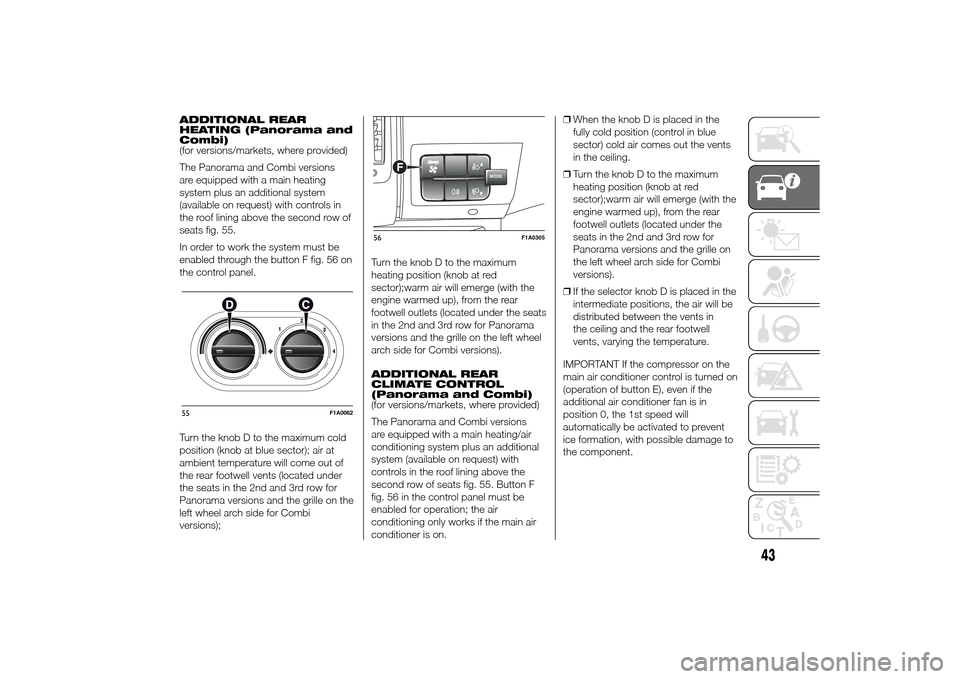
seats fig. 55.
In order to work the system must be
enabled through the button F fig. 56 on
the control panel.
Turn the knob D to the maximum cold
position (knob at blue sector); air at
ambient temperature will come out of
the rear footwell vents (located under
the seats in the 2nd and 3rd row for
Panorama versions and the grille on the
left wheel arch side for Combi
versions);Turn the knob D to the maximum
heating position (knob at red
sector);warm air will emerge (with the
engine warmed up), from the rear
footwell outlets (located under the seats
in the 2nd and 3rd row for Panorama
versions and the grille on the left wheel
arch side for Combi versions).
ADDITIONAL REAR
CLIMATE CONTROL
(Panorama and Combi)
(for versions/markets, where provided)
The Panorama and Combi versions
are equipped with a main heating/air
conditioning system plus an additional
system (available on request) with
controls in the roof lining above the
second row of seats fig. 55. Button F
fig. 56 in the control panel must be
enabled for operation; the air
conditioning only works if the main air
conditioner is on.❒When the knob D is placed in the
fully cold position (control in blue
sector) cold air comes out the vents
in the ceiling.
❒Turn the knob D to the maximum
heating position (knob at red
sector);warm air will emerge (with the
engine warmed up), from the rear
footwell outlets (located under the
seats in the 2nd and 3rd row for
Panorama versions and the grille on
the left wheel arch side for Combi
versions).
❒If the selector knob D is placed in the
intermediate positions, the air will be
distributed between the vents in
the ceiling and the rear footwell
vents, varying the temperature.
IMPORTANT If the compressor on the
main air conditioner control is turned on
(operation of button E), even if the
additional air conditioner fan is in
position 0, the 1st speed will
automatically be activated to prevent
ice formation, with possible damage to
the component.55
F1A0062
MODE
F
56
F1A0305
43
Page 54 of 367
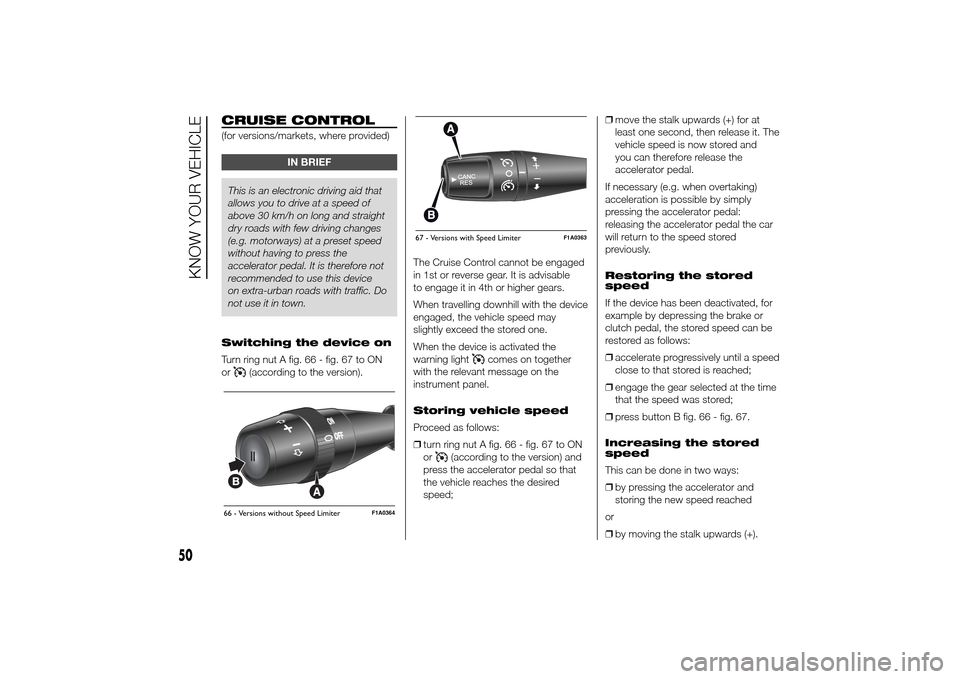
CRUISE CONTROL(for versions/markets, where provided)
IN BRIEF
This is an electronic driving aid that
allows you to drive at a speed of
above 30 km/h on long and straight
dry roads with few driving changes
(e.g. motorways) at a preset speed
without having to press the
accelerator pedal. It is therefore not
recommended to use this device
on extra-urban roads with traffic. Do
not use it in town.
Switching the device on
Turn ring nut A fig. 66 - fig. 67 to ON
or
(according to the version).The Cruise Control cannot be engaged
in 1st or reverse gear. It is advisable
to engage it in 4th or higher gears.
When travelling downhill with the device
engaged, the vehicle speed may
slightly exceed the stored one.
When the device is activated the
warning light
comes on together
with the relevant message on the
instrument panel.
Storing vehicle speed
Proceed as follows:
❒turn ring nut A fig. 66 - fig. 67 to ON
or
(according to the version) and
press the accelerator pedal so that
the vehicle reaches the desired
speed;❒move the stalk upwards (+) for at
least one second, then release it. The
vehicle speed is now stored and
you can therefore release the
accelerator pedal.
If necessary (e.g. when overtaking)
acceleration is possible by simply
pressing the accelerator pedal:
releasing the accelerator pedal the car
will return to the speed stored
previously.
Restoring the stored
speed
If the device has been deactivated, for
example by depressing the brake or
clutch pedal, the stored speed can be
restored as follows:
❒accelerate progressively until a speed
close to that stored is reached;
❒engage the gear selected at the time
that the speed was stored;
❒press button B fig. 66 - fig. 67.
Increasing the stored
speed
This can be done in two ways:
❒by pressing the accelerator and
storing the new speed reached
or
❒by moving the stalk upwards (+).
66 - Versions without Speed Limiter
F1A0364
67 - Versions with Speed Limiter
F1A0363
50
KNOW YOUR VEHICLE
Page 55 of 367
Each activation of the lever
corresponds to an increase in speed of
about 1 km/h, whilst keeping the lever
upwards varies the speed continuously.
Reducing the stored
speed
This can be done in two ways:
❒by switching off the device and then
storing the new speed;
or
❒by moving the stalk downwards (-)
until the new speed, which will be
stored automatically, is reached.
Each movement of the lever will
correspond to a slight reduction in
speed of about 1 km/h, while keeping
the lever held downwards will decrease
the speed continuously.
Deactivating the device
The device can be switched off by
the driver in the following ways:
❒turning ring nut A to OFF orO
(according to the version);
❒by stopping the engine;Deactivating the
function
The device can be switched off by the
driver in the following ways:
❒turning ring nut A to OFF orO
(according to the version);
❒pressing the button B, both with
symbolIIand symbol CANC/RES,
the system pauses;
❒by stopping the engine;
❒by pressing the brake pedal or
operating the handbrake;
❒by pressing the clutch pedal;
❒requesting a gear shift with an
automatic transmission in sequential
mode;
❒with the vehicle speed below the set
limit
❒by pressing the accelerator pedal; in
this case the system is not actually
turned off but the acceleration
request takes priority; the Cruise
Control remains activated, without
the need to press the CANC/RES
button to restore the previous
conditions once the acceleration is
over.
The device is automatically switched off
in the following cases:
❒if the ABS or ESP systems cut in;❒in the event of system failure.
27) 28)
SPEED LIMITER
This device allows the speed of the car
to be limited to values which can be
set by the driver.
The maximum speed can be set both
with vehicle stationary and in motion.
The minimum speed that can be set is
30 km/h.
When the device is active, the car
speed depends on the pressure at the
accelerator pedal, until the
programmed speed limit is reached
(see "Speed limit programming"
paragraph).
If necessary (in the event of overtaking
for example), the set speed limit can
be exceeded by fully depressing the
accelerator pedal.
By gradually reducing the pressure on
the accelerator pedal, the function
will be reactivated as soon as the car
speed drops below the set speed.
51
Page 56 of 367
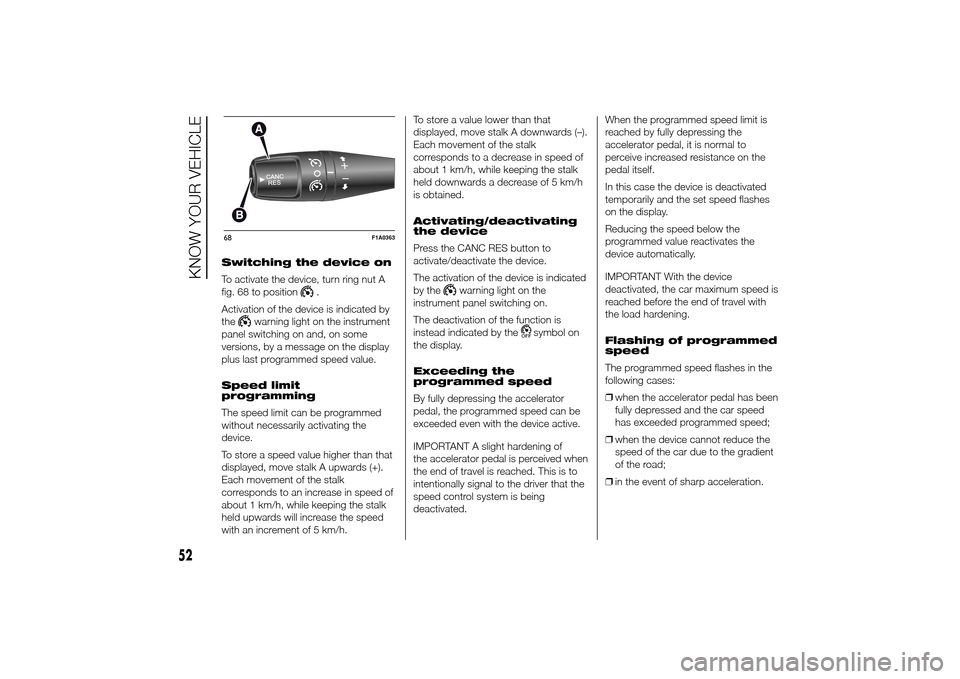
Switching the device on
To activate the device, turn ring nut A
fig. 68 to position
.
Activation of the device is indicated by
the
warning light on the instrument
panel switching on and, on some
versions, by a message on the display
plus last programmed speed value.
Speed limit
programming
The speed limit can be programmed
without necessarily activating the
device.
To store a speed value higher than that
displayed, move stalk A upwards (+).
Each movement of the stalk
corresponds to an increase in speed of
about 1 km/h, while keeping the stalk
held upwards will increase the speed
with an increment of 5 km/h.To store a value lower than that
displayed, move stalk A downwards (–).
Each movement of the stalk
corresponds to a decrease in speed of
about 1 km/h, while keeping the stalk
held downwards a decrease of 5 km/h
is obtained.
Activating/deactivating
the device
Press the CANC RES button to
activate/deactivate the device.
The activation of the device is indicated
by the
warning light on the
instrument panel switching on.
The deactivation of the function is
instead indicated by the
symbol on
the display.
Exceeding the
programmed speed
By fully depressing the accelerator
pedal, the programmed speed can be
exceeded even with the device active.
IMPORTANT A slight hardening of
the accelerator pedal is perceived when
the end of travel is reached. This is to
intentionally signal to the driver that the
speed control system is being
deactivated.When the programmed speed limit is
reached by fully depressing the
accelerator pedal, it is normal to
perceive increased resistance on the
pedal itself.
In this case the device is deactivated
temporarily and the set speed flashes
on the display.
Reducing the speed below the
programmed value reactivates the
device automatically.
IMPORTANT With the device
deactivated, the car maximum speed is
reached before the end of travel with
the load hardening.
Flashing of programmed
speed
The programmed speed flashes in the
following cases:
❒when the accelerator pedal has been
fully depressed and the car speed
has exceeded programmed speed;
❒when the device cannot reduce the
speed of the car due to the gradient
of the road;
❒in the event of sharp acceleration.
68
F1A0363
52
KNOW YOUR VEHICLE
Page 59 of 367
Warning lights
and
are lit up in the
instrument panel when this device is
activated. Press switch A again to turn
the lights off.
IMPORTANT The use of hazard warning
lights is governed by the highway
code of the country you are in. Comply
with legal requirements.
Emergency braking
(for versions/markets, where provided)
In the event of emergency braking
the hazard warning lights come on
automatically, as do theand
warning lights in the panel. The
function switches off automatically
when the nature of the braking
changes. This function complies with
the relevant legislation currently in force.
FOG LIGHTS
(for versions/markets, where provided)
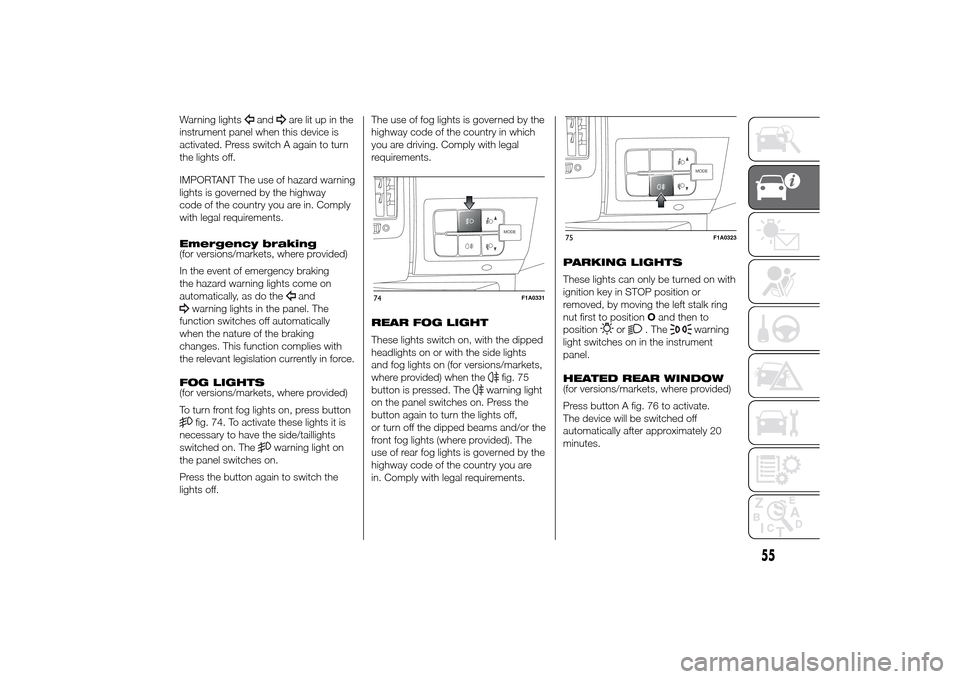
To turn front fog lights on, press buttonfig. 74. To activate these lights it is
necessary to have the side/taillights
switched on. The
warning light on
the panel switches on.
Press the button again to switch the
lights off.The use of fog lights is governed by the
highway code of the country in which
you are driving. Comply with legal
requirements.
REAR FOG LIGHT
These lights switch on, with the dipped
headlights on or with the side lights
and fog lights on (for versions/markets,
where provided) when the
fig. 75
button is pressed. The
warning light
on the panel switches on. Press the
button again to turn the lights off,
or turn off the dipped beams and/or the
front fog lights (where provided). The
use of rear fog lights is governed by the
highway code of the country you are
in. Comply with legal requirements.PARKING LIGHTS
These lights can only be turned on with
ignition key in STOP position or
removed, by moving the left stalk ring
nut first to positionOand then to
position
or
. The
warning
light switches on in the instrument
panel.
HEATED REAR WINDOW
(for versions/markets, where provided)
Press button A fig. 76 to activate.
The device will be switched off
automatically after approximately 20
minutes.
MODE
74
F1A0331
MODE
75
F1A0323
55
Page 60 of 367
BATTERY
DISCONNECTION
FUNCTION
(DISCONNECTOR)
(for versions/markets, where provided)
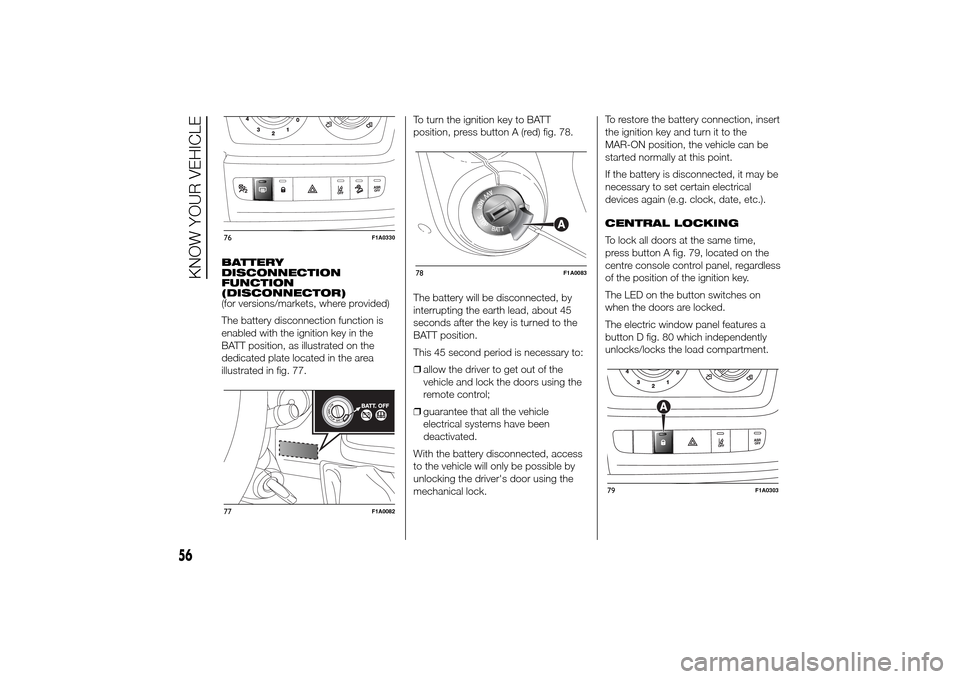
The battery disconnection function is
enabled with the ignition key in the
BATT position, as illustrated on the
dedicated plate located in the area
illustrated in fig. 77.To turn the ignition key to BATT
position, press button A (red) fig. 78.
The battery will be disconnected, by
interrupting the earth lead, about 45
seconds after the key is turned to the
BATT position.
This 45 second period is necessary to:
❒allow the driver to get out of the
vehicle and lock the doors using the
remote control;
❒guarantee that all the vehicle
electrical systems have been
deactivated.
With the battery disconnected, access
to the vehicle will only be possible by
unlocking the driver's door using the
mechanical lock.To restore the battery connection, insert
the ignition key and turn it to the
MAR-ON position, the vehicle can be
started normally at this point.
If the battery is disconnected, it may be
necessary to set certain electrical
devices again (e.g. clock, date, etc.).
CENTRAL LOCKING
To lock all doors at the same time,
press button A fig. 79, located on the
centre console control panel, regardless
of the position of the ignition key.
The LED on the button switches on
when the doors are locked.
The electric window panel features a
button D fig. 80 which independently
unlocks/locks the load compartment.76
F1A0330
77
F1A0082
78
F1A0083
79
F1A0303
56
KNOW YOUR VEHICLE
Page 61 of 367
FUEL CUT-OFF
SWITCHThe vehicle is fitted with a safety switch
that, in the event of a crash, comes
into operation by cutting off the fuel
supply and turning off the engine as a
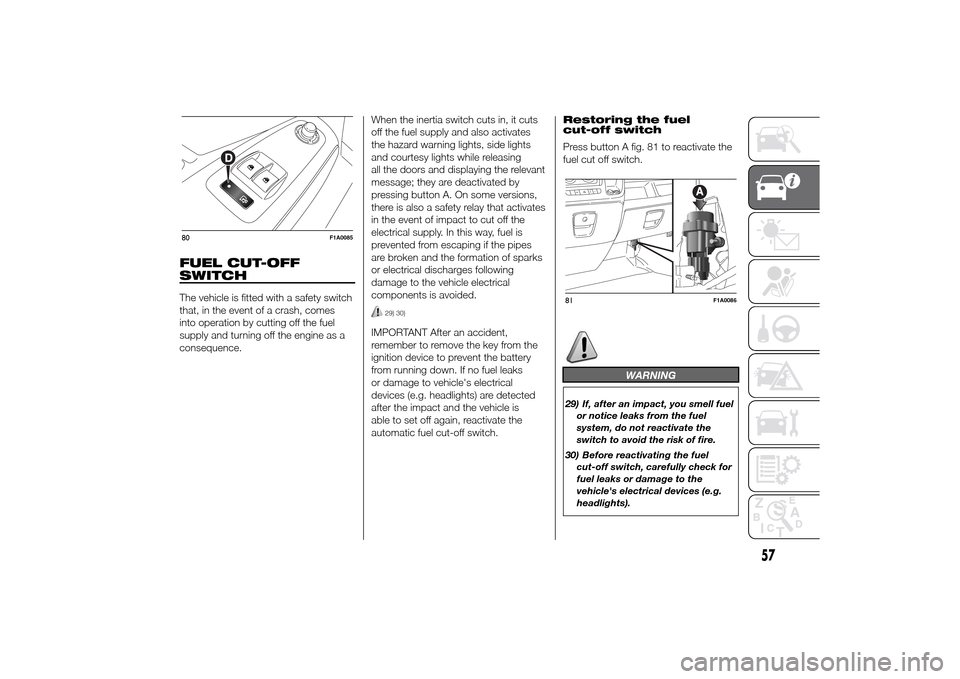
consequence.When the inertia switch cuts in, it cuts
off the fuel supply and also activates
the hazard warning lights, side lights
and courtesy lights while releasing
all the doors and displaying the relevant
message; they are deactivated by
pressing button A. On some versions,
there is also a safety relay that activates
in the event of impact to cut off the
electrical supply. In this way, fuel is
prevented from escaping if the pipes
are broken and the formation of sparks
or electrical discharges following
damage to the vehicle electrical
components is avoided.
29) 30)
IMPORTANT After an accident,
remember to remove the key from the
ignition device to prevent the battery
from running down. If no fuel leaks
or damage to vehicle's electrical
devices (e.g. headlights) are detected
after the impact and the vehicle is
able to set off again, reactivate the
automatic fuel cut-off switch.Restoring the fuel
cut-off switch
Press button A fig. 81 to reactivate the
fuel cut off switch.
WARNING
29) If, after an impact, you smell fuel
or notice leaks from the fuel
system, do not reactivate the
switch to avoid the risk of fire.
30) Before reactivating the fuel
cut-off switch, carefully check for
fuel leaks or damage to the
vehicle's electrical devices (e.g.
headlights).
80
F1A0085
81
F1A0086
57