tyre pressure FIAT DUCATO 2014 Owner handbook (in English)
[x] Cancel search | Manufacturer: FIAT, Model Year: 2014, Model line: DUCATO, Model: FIAT DUCATO 2014Pages: 367, PDF Size: 20.39 MB
Page 199 of 367
138) The spare wheel supplied (for
versions/markets, where
provided) is specific for your
vehicle. Therefore, it must not be
used on other models. Do not
use spare wheels of other models
on your vehicle. The wheel bolts
are specific for your vehicle: do
not use them on different models
and do not use bolts from other
models on your car.
139) Have the wheel repaired and
refitted as soon as possible. Do
not apply grease to the bolt
threads before fitting: they could
come unscrewed.
140) Use the jack only to replace
wheels on the vehicle with which
it is supplied or on other vehicles
of the same model. Never use
the jack for other purposes, such
as lifting other car models. Never
use the jack to carry out repairs
under the vehicle. Incorrect
positioning of the jack may cause
the lifted vehicle to fall. Do not
use the jack for loads higher than
those shown on the label.
141) Never tamper with the inflation
valve. Never introduce tools of any
kind between rim and tyre. Check
tyre and spare wheel pressure
regularly, referring to the values
shown in the "Technical
specifications" section.142) No tools other than the crank
provided should be used with
the spare wheel lifting device; it
should be operated by hand only.
143) On versions equipped with
self-levelling air suspension, never
introduce the head or hands in
the wheel arch: the vehicle could
raise or lower automatically
depending on possible load or
temperature changes.
144) The device should only be
operated by hand, without using
any type of tool other than the
crank provided, like pneumatic or
electrical screwers.
145) The moving components of the
jack (screw and joints) can also
cause injuries: do not touch them.
If you come into contact with
lubricating grease, clean yourself
thoroughly.146) At the end of the operation of
raising/locking the spare wheel,
after having checked the correct
positioning of the wheel under the
platform (white notch inside the
window on the device), the key
must be extracted, taking care not
to turn it in the wrong direction
to facilitate the extraction of the
key itself, to prevent the
attachment device from being
released and the wheel assembly
not being securely retained fig.
188.
147) Each time the spare wheel is
moved, check that it is correctly
positioned in its housing under
the platform. If it is not correctly
positioned, this could adversely
affect safety.
195
Page 200 of 367
FIX&GO
AUTOMATIC QUICK
TYRE REPAIR KIT(for versions/markets, where provided)
The Fix & Go automatic quick tyre
repair kit is positioned at the front of the
vehicle passenger compartment and
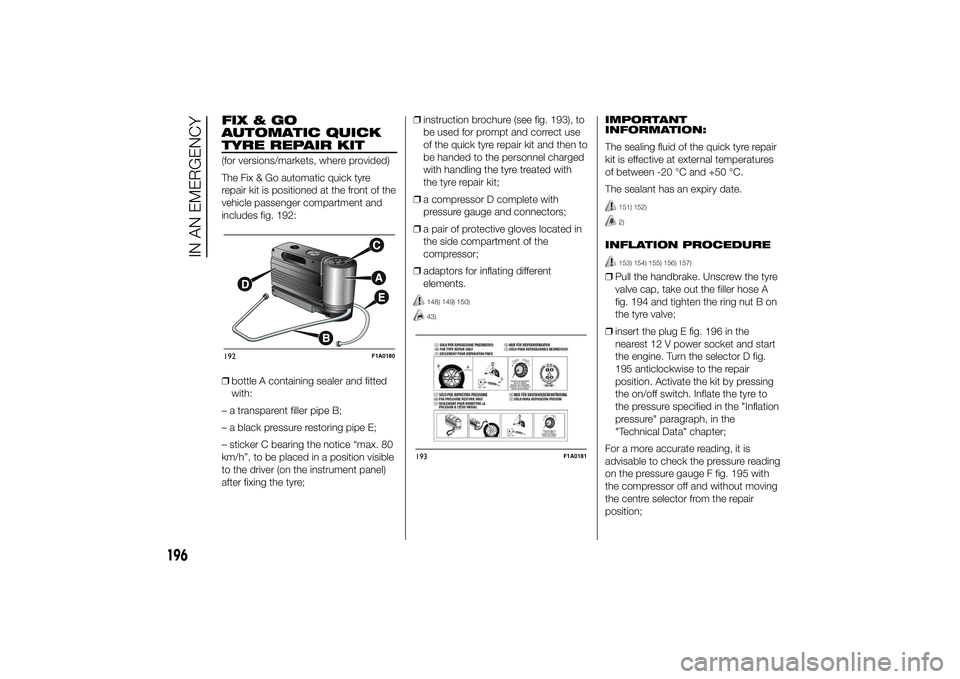
includes fig. 192:
❒bottle A containing sealer and fitted
with:
– a transparent filler pipe B;
– a black pressure restoring pipe E;
– sticker C bearing the notice “max. 80
km/h”, to be placed in a position visible
to the driver (on the instrument panel)
after fixing the tyre;❒instruction brochure (see fig. 193), to
be used for prompt and correct use
of the quick tyre repair kit and then to
be handed to the personnel charged
with handling the tyre treated with
the tyre repair kit;
❒a compressor D complete with
pressure gauge and connectors;
❒a pair of protective gloves located in
the side compartment of the
compressor;
❒adaptors for inflating different
elements.
148) 149) 150)43)
IMPORTANT
INFORMATION:
The sealing fluid of the quick tyre repair
kit is effective at external temperatures
of between -20 °C and +50 °C.
The sealant has an expiry date.
151) 152)2)
INFLATION PROCEDURE
153) 154) 155) 156) 157)
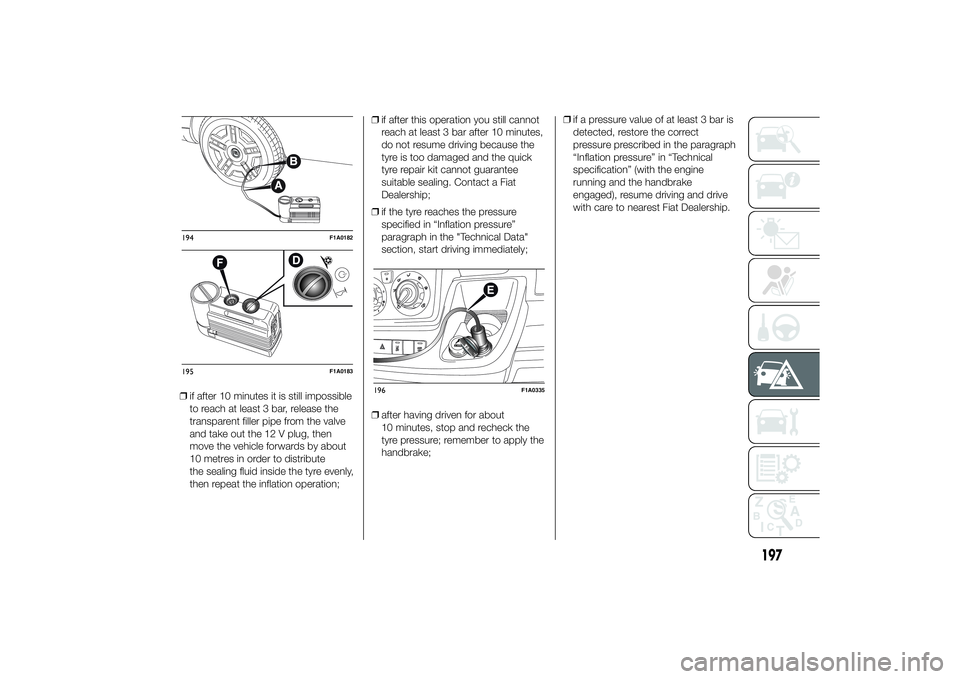
❒Pull the handbrake. Unscrew the tyre
valve cap, take out the filler hose A
fig. 194 and tighten the ring nut B on
the tyre valve;
❒insert the plug E fig. 196 in the
nearest 12 V power socket and start
the engine. Turn the selector D fig.
195 anticlockwise to the repair
position. Activate the kit by pressing
the on/off switch. Inflate the tyre to
the pressure specified in the "Inflation
pressure" paragraph, in the
"Technical Data" chapter;
For a more accurate reading, it is
advisable to check the pressure reading
on the pressure gauge F fig. 195 with
the compressor off and without moving
the centre selector from the repair
position;
192
F1A0180
193
F1A0181
196
IN AN EMERGENCY
Page 201 of 367
❒if after 10 minutes it is still impossible
to reach at least 3 bar, release the
transparent filler pipe from the valve
and take out the 12 V plug, then
move the vehicle forwards by about
10 metres in order to distribute
the sealing fluid inside the tyre evenly,
then repeat the inflation operation;❒if after this operation you still cannot
reach at least 3 bar after 10 minutes,
do not resume driving because the
tyre is too damaged and the quick
tyre repair kit cannot guarantee
suitable sealing. Contact a Fiat
Dealership;
❒if the tyre reaches the pressure
specified in “Inflation pressure”
paragraph in the "Technical Data"
section, start driving immediately;
❒after having driven for about
10 minutes, stop and recheck the
tyre pressure; remember to apply the
handbrake;❒if a pressure value of at least 3 bar is
detected, restore the correct
pressure prescribed in the paragraph
“Inflation pressure” in “Technical
specification” (with the engine
running and the handbrake
engaged), resume driving and drive
with care to nearest Fiat Dealership.194
F1A0182
195
F1A0183
196
F1A0335
197
Page 202 of 367
FOR CHECKING AND
RESTORING PRESSURE
ONLY
The compressor can also be used
solely for restoring pressure.
❒Pull the handbrake.
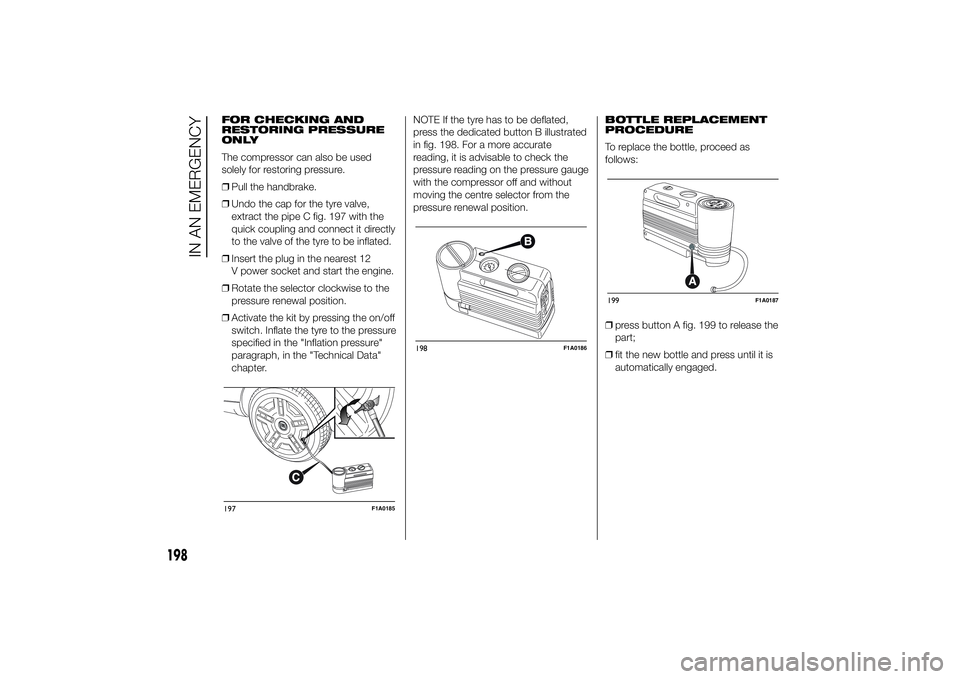
❒Undo the cap for the tyre valve,
extract the pipe C fig. 197 with the
quick coupling and connect it directly
to the valve of the tyre to be inflated.
❒Insert the plug in the nearest 12
V power socket and start the engine.
❒Rotate the selector clockwise to the
pressure renewal position.
❒Activate the kit by pressing the on/off
switch. Inflate the tyre to the pressure
specified in the "Inflation pressure"
paragraph, in the "Technical Data"
chapter.NOTE If the tyre has to be deflated,
press the dedicated button B illustrated
in fig. 198. For a more accurate
reading, it is advisable to check the
pressure reading on the pressure gauge
with the compressor off and without
moving the centre selector from the
pressure renewal position.BOTTLE REPLACEMENT
PROCEDURE
To replace the bottle, proceed as
follows:
❒press button A fig. 199 to release the
part;
❒fit the new bottle and press until it is
automatically engaged.197
F1A0185
198
F1A0186
199
F1A0187
198
IN AN EMERGENCY
Page 203 of 367
WARNING
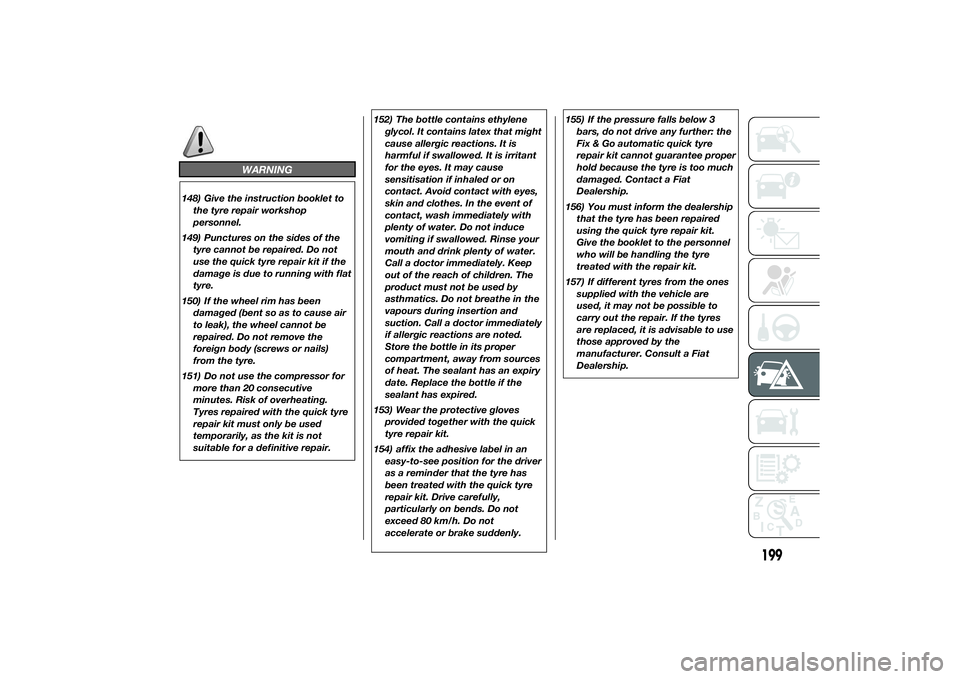
148) Give the instruction booklet to
the tyre repair workshop
personnel.
149) Punctures on the sides of the
tyre cannot be repaired. Do not
use the quick tyre repair kit if the
damage is due to running with flat
tyre.
150) If the wheel rim has been
damaged (bent so as to cause air
to leak), the wheel cannot be
repaired. Do not remove the
foreign body (screws or nails)
from the tyre.
151) Do not use the compressor for
more than 20 consecutive
minutes. Risk of overheating.
Tyres repaired with the quick tyre
repair kit must only be used
temporarily, as the kit is not
suitable for a definitive repair.152) The bottle contains ethylene
glycol. It contains latex that might
cause allergic reactions. It is
harmful if swallowed. It is irritant
for the eyes. It may cause
sensitisation if inhaled or on
contact. Avoid contact with eyes,
skin and clothes. In the event of
contact, wash immediately with
plenty of water. Do not induce
vomiting if swallowed. Rinse your
mouth and drink plenty of water.
Call a doctor immediately. Keep
out of the reach of children. The
product must not be used by
asthmatics. Do not breathe in the
vapours during insertion and
suction. Call a doctor immediately
if allergic reactions are noted.
Store the bottle in its proper
compartment, away from sources
of heat. The sealant has an expiry
date. Replace the bottle if the
sealant has expired.
153) Wear the protective gloves
provided together with the quick
tyre repair kit.
154) affix the adhesive label in an
easy-to-see position for the driver
as a reminder that the tyre has
been treated with the quick tyre
repair kit. Drive carefully,
particularly on bends. Do not
exceed 80 km/h. Do not
accelerate or brake suddenly.155) If the pressure falls below 3
bars, do not drive any further: the
Fix & Go automatic quick tyre
repair kit cannot guarantee proper
hold because the tyre is too much
damaged. Contact a Fiat
Dealership.
156) You must inform the dealership
that the tyre has been repaired
using the quick tyre repair kit.
Give the booklet to the personnel
who will be handling the tyre
treated with the repair kit.
157) If different tyres from the ones
supplied with the vehicle are
used, it may not be possible to
carry out the repair. If the tyres
are replaced, it is advisable to use
those approved by the
manufacturer. Consult a Fiat
Dealership.
199
Page 228 of 367
SCHEDULED
SERVICINGCorrect servicing is essential for
ensuring long vehicle life under the best
conditions.
This is why Fiat has planned a series of
checks and maintenance operations
every 48,000 km depending on the
engine version.
The scheduled maintenance does not,
however, cover all the needs of the
vehicle: also during the initial period,
before the 48,000 km service and
between one service and the next,
ordinary care such as systematic fluid
level checks with top ups and tyre
pressure checks, etc. remain
necessary.
IMPORTANT The Scheduled Servicing
services are set out by the
Manufacturer. Failure to have them
carried out may invalidate the warranty.
Scheduled Servicing can be carried
out by any Fiat Dealership, at
pre-established times.
If during each operation, in addition to
the ones scheduled, the need arises for
further replacements or repairs, these
may only be carried out with the
express agreement of the Customer.IMPORTANT It is advisable to inform a
Fiat Dealership of any small operating
irregularities without waiting for the next
service.
If your vehicle is used frequently for
towing, the interval between service
coupons must be reduced.
224
SERVICING AND MAINTENANCE
Page 229 of 367
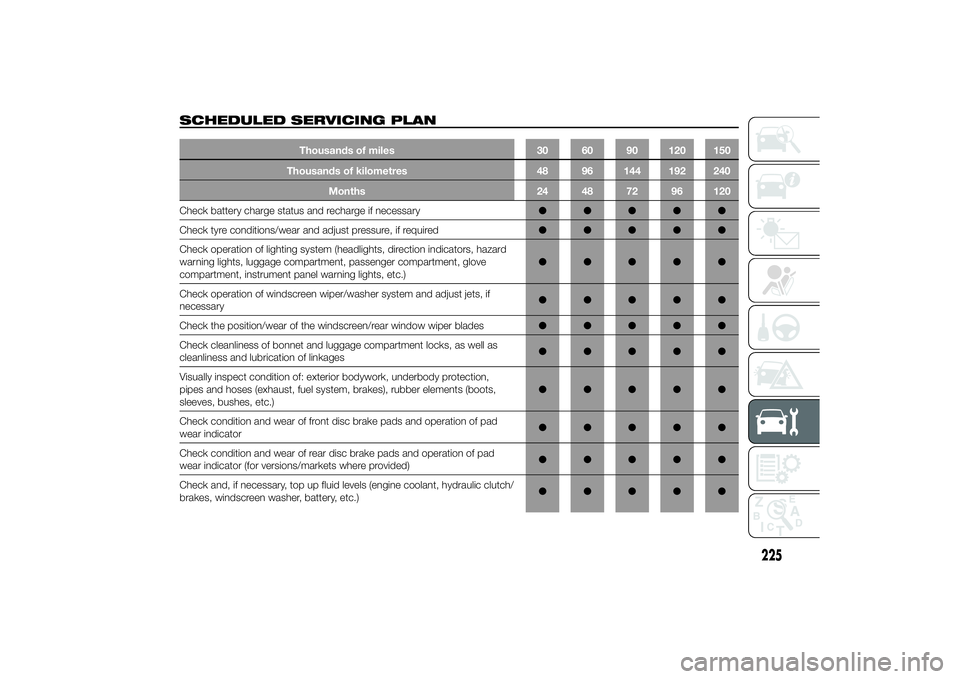
SCHEDULED SERVICING PLAN
Thousands of miles 30 60 90 120 150
Thousands of kilometres 48 96 144 192 240
Months 24 48 72 96 120
Check battery charge status and recharge if necessary●●●●●
Check tyre conditions/wear and adjust pressure, if required●●●●●
Check operation of lighting system (headlights, direction indicators, hazard
warning lights, luggage compartment, passenger compartment, glove
compartment, instrument panel warning lights, etc.)●●●●●
Check operation of windscreen wiper/washer system and adjust jets, if
necessary●●●●●
Check the position/wear of the windscreen/rear window wiper blades●●●●●
Check cleanliness of bonnet and luggage compartment locks, as well as
cleanliness and lubrication of linkages●●●●●
Visually inspect condition of: exterior bodywork, underbody protection,
pipes and hoses (exhaust, fuel system, brakes), rubber elements (boots,
sleeves, bushes, etc.)●●●●●
Check condition and wear of front disc brake pads and operation of pad
wear indicator●●●●●
Check condition and wear of rear disc brake pads and operation of pad
wear indicator (for versions/markets where provided)●●●●●
Check and, if necessary, top up fluid levels (engine coolant, hydraulic clutch/
brakes, windscreen washer, battery, etc.)●●●●●
225
Page 232 of 367
PERIODIC CHECKSBefore long journeys, check and, if
necessary, restore:
❒engine coolant level;
❒brake fluid level;
❒windscreen washer fluid level;
❒tyre inflation pressure and condition;
❒operation of lighting system
(headlamps, direction indicators,
hazard warning lights, etc.);
❒operation of screen washer/wiper
system and positioning/wear of
windscreen/rear window wiper
blades.
To ensure that the vehicle is always
efficient and well maintained, it is
advisable to make sure that you carry
out the above operations regularly
(approximately every 1000 km and
every 3000 km for checking and
topping up engine oil is advisable).
DEMANDING
VEHICLE USEIf the vehicle is mostly used in one of
the following conditions:
❒towing a trailer or caravan;
❒dusty roads;
❒short, repeated journeys (less than
7-8 km) at sub-zero outside
temperatures;
❒engine often idling or driving long
distances at low speeds or long
periods of inactivity;
the following checks must be carried
out more often than indicated in the
Scheduled Servicing Plan:
❒check front disc brake pad
conditions and wear;
❒check cleanliness of bonnet and boot
locks, cleanliness and lubrication of
linkage;
❒visually inspect conditions of: engine,
gearbox, transmission, pipes and
hoses (exhaust - fuel system -
brakes) and rubber elements (boots -
sleeves - bushes - etc.);
❒check battery charge and battery
fluid level (electrolyte);
❒visually inspect condition of the
accessory drive belts;❒check and, if necessary, change
engine oil and replace oil filter.
❒check and, if necessary, replace
pollen filter.
228
SERVICING AND MAINTENANCE
Page 244 of 367
WHEELS AND TYRESCheck the pressure of each tyre,
including the space-saver wheel,
approximately every two weeks and
before long journeys: the pressure
should be checked with the tyre rested
and cold.
It is normal for the pressure to increase
when the vehicle is used; for the correct
tyre inflation pressure, see “Wheels” in
the “Technical specifications” section.
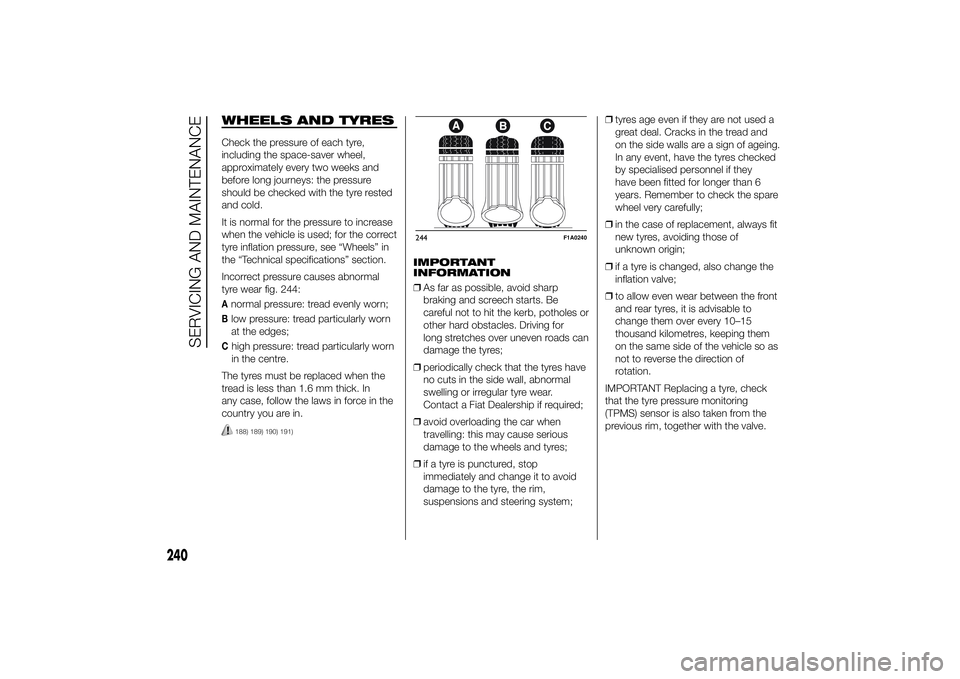
Incorrect pressure causes abnormal
tyre wear fig. 244:Anormal pressure: tread evenly worn;Blow pressure: tread particularly worn
at the edges;Chigh pressure: tread particularly worn
in the centre.
The tyres must be replaced when the
tread is less than 1.6 mm thick. In
any case, follow the laws in force in the
country you are in.188) 189) 190) 191)
IMPORTANT
INFORMATION
❒As far as possible, avoid sharp
braking and screech starts. Be
careful not to hit the kerb, potholes or
other hard obstacles. Driving for
long stretches over uneven roads can
damage the tyres;
❒periodically check that the tyres have
no cuts in the side wall, abnormal
swelling or irregular tyre wear.
Contact a Fiat Dealership if required;
❒avoid overloading the car when
travelling: this may cause serious
damage to the wheels and tyres;
❒if a tyre is punctured, stop
immediately and change it to avoid
damage to the tyre, the rim,
suspensions and steering system;❒tyres age even if they are not used a
great deal. Cracks in the tread and
on the side walls are a sign of ageing.
In any event, have the tyres checked
by specialised personnel if they
have been fitted for longer than 6
years. Remember to check the spare
wheel very carefully;
❒in the case of replacement, always fit
new tyres, avoiding those of
unknown origin;
❒if a tyre is changed, also change the
inflation valve;
❒to allow even wear between the front
and rear tyres, it is advisable to
change them over every 10–15
thousand kilometres, keeping them
on the same side of the vehicle so as
not to reverse the direction of
rotation.
IMPORTANT Replacing a tyre, check
that the tyre pressure monitoring
(TPMS) sensor is also taken from the
previous rim, together with the valve.244
F1A0240
240
SERVICING AND MAINTENANCE
Page 245 of 367
WARNING
188) Remember that the road
holding qualities of your vehicle
also depend on the correct
inflation pressure of the tyres.
189) If the pressure is too low, the
tyre will overheat and could be
seriously damaged.
190) Avoid switching the tyres from
the right side of the vehicle to the
left side and vice versa.
191) Never submit alloy rims to
repainting treatments requiring
the use of temperatures
exceeding 150°C. The mechanical
properties of the wheels could
be impaired.
RUBBER HOSESAs far as the brake system and fuel
supply system rubber hoses are
concerned, follow the "Scheduled
Servicing Plan" in this chapter carefully.
Ozone, high temperatures and
prolonged lack of fluid in the system
may cause hardening and cracking of
the hoses, with possible leaks. Careful
checking is therefore necessary.
WINDSCREEN
WIPERBLADES
Periodically clean the rubber part using
special products; TUTELA
PROFESSIONAL SC 35 is
recommended.
Replace the blades if the rubber edge is
deformed or worn. In any case, it is
advisable to replace them
approximately once a year.
A few simple precautions can reduce
the possibility of damage to the blades:
❒if the temperature falls below zero,
make sure that ice has not frozen
the rubber against the glass. Use a
de-icing product to release it if
required;
❒remove any snow from the glass: in
addition to protecting the blades,
this prevents effort on the motor and
overheating;
❒do not operate the windscreen and
rear window wipers on dry glass.
192)
241