Clock FIAT DUCATO 2014 Owner handbook (in English)
[x] Cancel search | Manufacturer: FIAT, Model Year: 2014, Model line: DUCATO, Model: FIAT DUCATO 2014Pages: 367, PDF Size: 20.39 MB
Page 213 of 367

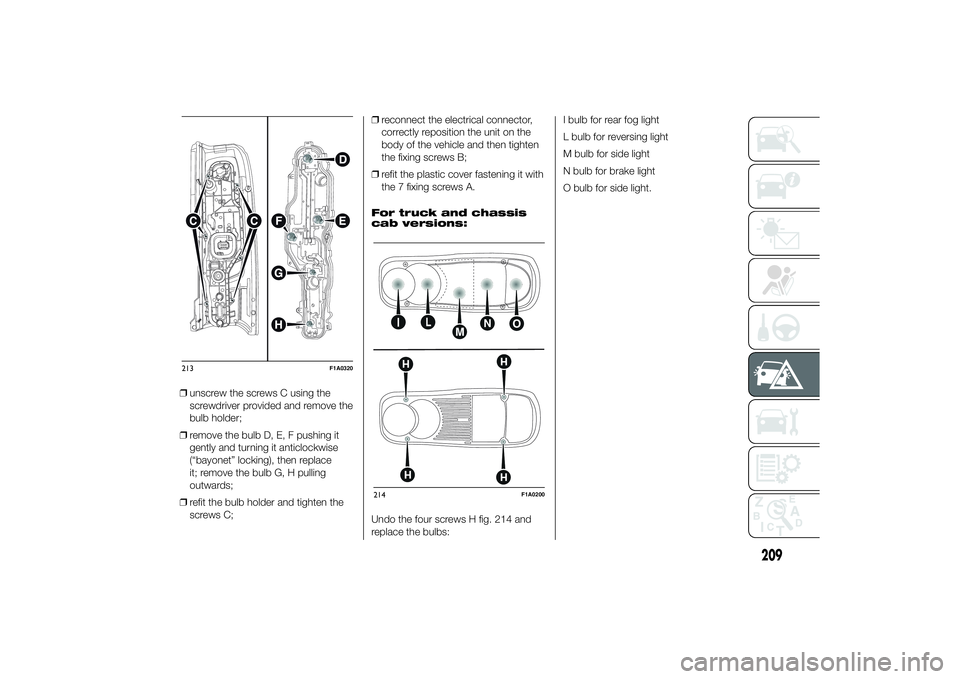
❒unscrew the screws C using the
screwdriver provided and remove the
bulb holder;
❒remove the bulb D, E, F pushing it
gently and turning it anticlockwise
(“bayonet” locking), then replace
it; remove the bulb G, H pulling
outwards;
❒refit the bulb holder and tighten the
screws C;❒reconnect the electrical connector,
correctly reposition the unit on the
body of the vehicle and then tighten
the fixing screws B;
❒refit the plastic cover fastening it with
the 7 fixing screws A.
For truck and chassis
cab versions:
Undo the four screws H fig. 214 and
replace the bulbs:I bulb for rear fog light
L bulb for reversing light
M bulb for side light
N bulb for brake light
O bulb for side light.213
F1A0320
214
F1A0200
209
Page 217 of 367

Engine compartment
fuse box
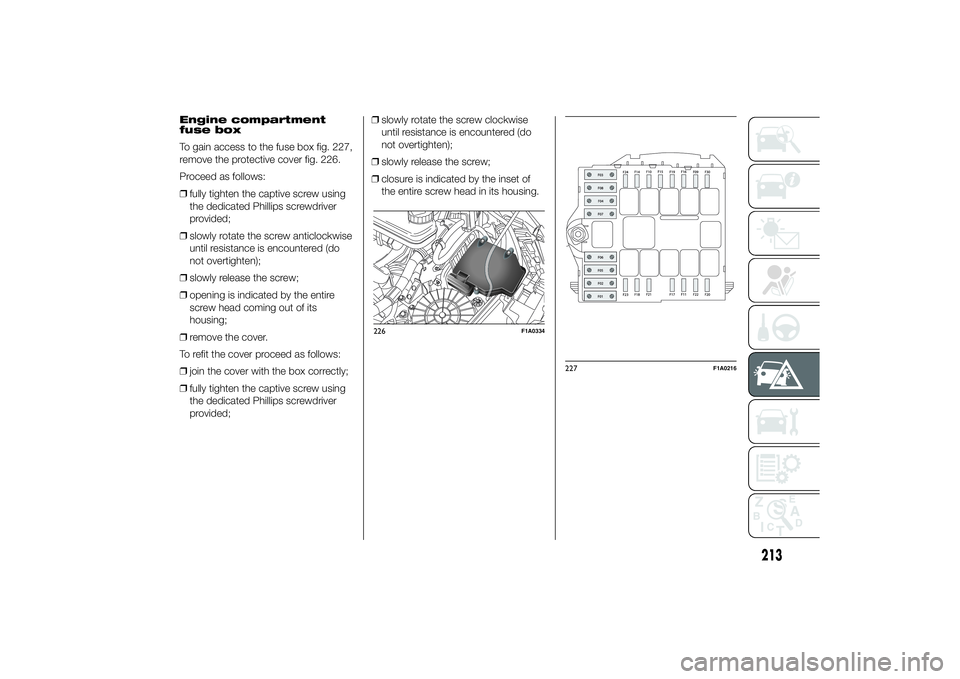
To gain access to the fuse box fig. 227,
remove the protective cover fig. 226.
Proceed as follows:
❒fully tighten the captive screw using
the dedicated Phillips screwdriver
provided;
❒slowly rotate the screw anticlockwise
until resistance is encountered (do
not overtighten);
❒slowly release the screw;
❒opening is indicated by the entire
screw head coming out of its
housing;
❒remove the cover.
To refit the cover proceed as follows:
❒join the cover with the box correctly;
❒fully tighten the captive screw using
the dedicated Phillips screwdriver
provided;❒slowly rotate the screw clockwise
until resistance is encountered (do
not overtighten);
❒slowly release the screw;
❒closure is indicated by the inset of
the entire screw head in its housing.
226
F1A0334
227
F1A0216
213
Page 225 of 367

The front ring is located in the tool box
beneath the passenger side seat. On
versions with Fix&Go kit and without
spare wheel, the tool box is available
only on request for versions/markets
where provided.
In the absence of the tool box the
vehicle front tow hook is housed in the
on-board documentation container,
together with the Owner Handbook.To use it, proceed as follows:
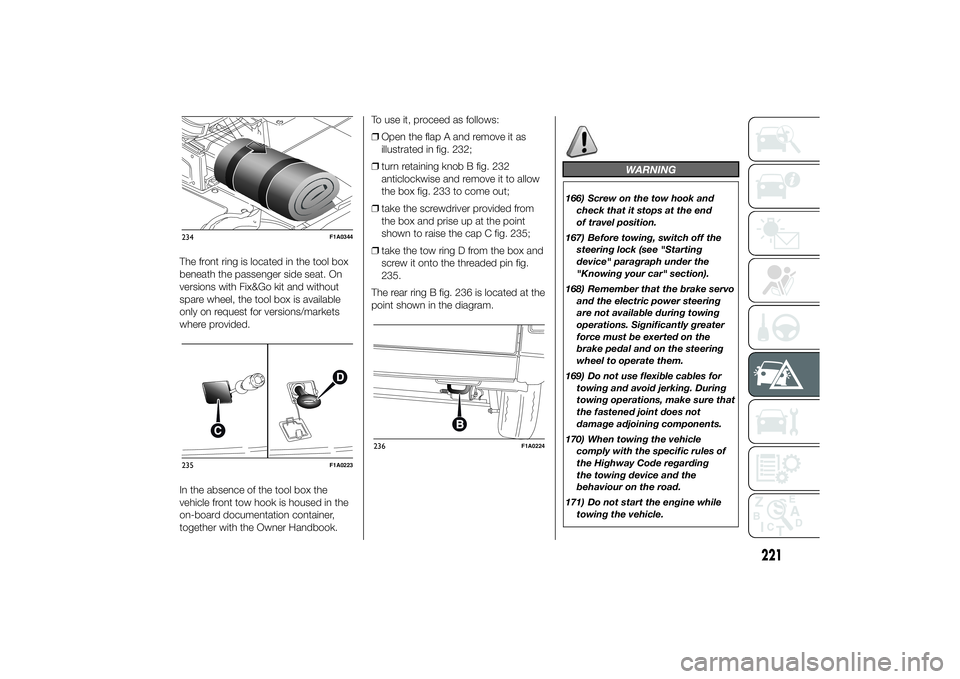
❒Open the flap A and remove it as
illustrated in fig. 232;
❒turn retaining knob B fig. 232
anticlockwise and remove it to allow
the box fig. 233 to come out;
❒take the screwdriver provided from
the box and prise up at the point
shown to raise the cap C fig. 235;
❒take the tow ring D from the box and
screw it onto the threaded pin fig.
235.
The rear ring B fig. 236 is located at the
point shown in the diagram.
WARNING
166) Screw on the tow hook and
check that it stops at the end
of travel position.
167) Before towing, switch off the
steering lock (see "Starting
device" paragraph under the
"Knowing your car" section).
168) Remember that the brake servo
and the electric power steering
are not available during towing
operations. Significantly greater
force must be exerted on the
brake pedal and on the steering
wheel to operate them.
169) Do not use flexible cables for
towing and avoid jerking. During
towing operations, make sure that
the fastened joint does not
damage adjoining components.
170) When towing the vehicle
comply with the specific rules of
the Highway Code regarding
the towing device and the
behaviour on the road.
171) Do not start the engine while
towing the vehicle.
234
F1A0344
235
F1A0223
236
F1A0224
221
Page 236 of 367

ENGINE OIL
47)
Check the oil level a few minutes (about
5) after the engine has stopped, with
the vehicle parked on level ground.
The oil level must be between the MIN
and MAX marks on the dipstick B
fig. 237 - fig. 238 - fig. 239.
The range between the MIN and MAX
marks corresponds to about 1 litre
of oil.
If the oil level is near or under the MIN
mark, add oil through the filler A fig. 237
- fig. 238 - fig. 239, until it reaches the
MAX mark.
The oil level must never exceed the
MAX mark.Engine oil consumption
The maximum engine oil consumption
is usually 400 grams every 1000 km.
When the vehicle is new, the engine
needs to be run in, therefore the engine
oil consumption can only be considered
stabilised after the first 5,000–6,000
km.
IMPORTANT The oil consumption
depends on driving style and the
conditions under which the vehicle is
used.
IMPORTANT After adding or changing
the oil, let the engine run for a few
seconds and wait a few minutes after
switching it off before checking the
level.
IMPORTANT Always top up using
engine oil of the same specifications as
that already in the engine.ENGINE COOLANT
48)
177)
The coolant level must be checked
when the engine is cold and must
range between the MIN and MAX
marks on the reservoir.
If the level is to low, operate as follows:
❒remove the plastic cover A fig. 240,
rotating the locking screws B fig.
240 counter-clockwise, to access the
filler of the reservoir;
❒slowly pour a mixture of 50%
demineralised water and 50%
PARAFLU
UP
from PETRONAS
LUBRICANTS through the reservoir
filler C fig. 237 - fig. 238 - fig. 239
until the level is close to MAX.
A 50-50 mixture of PARAFLU
UP
and
distilled water gives freeze protection
up to –35°C.
When the vehicle is used in particularly
harsh weather conditions, we
recommend using a 60-40 mixture of
PARAFLU
UP
and demineralised water.
232
SERVICING AND MAINTENANCE
Page 237 of 367

POWER STEERING FLUID
183)3)50)
Check that the liquid contained in the
tank is at the maximum level. This
operation must be carried out with the
vehicle level and with the engine off and
cold.
Proceed as follows:
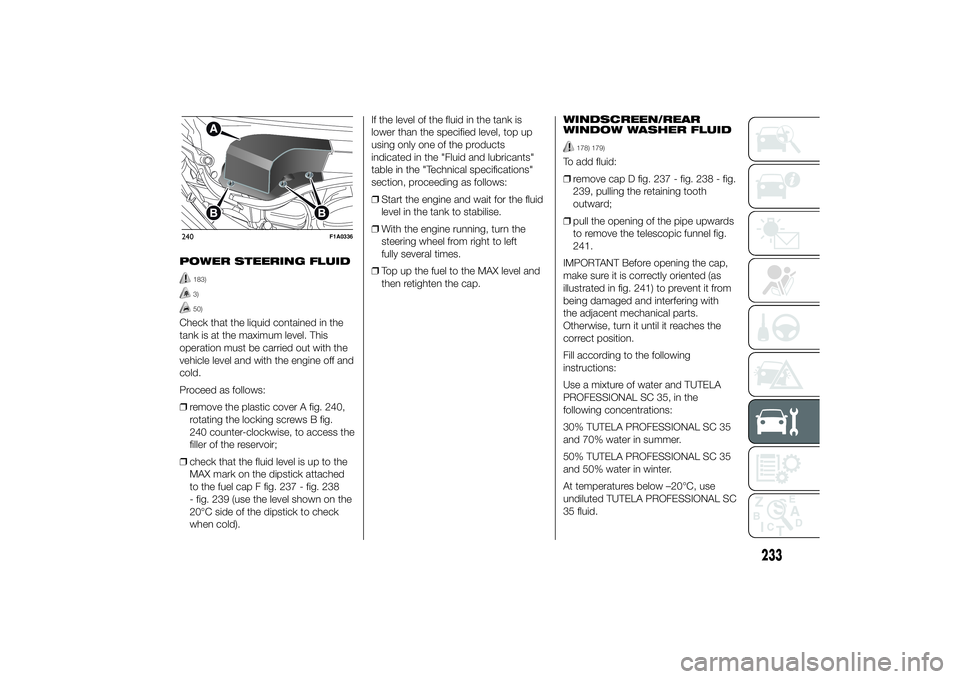
❒remove the plastic cover A fig. 240,
rotating the locking screws B fig.
240 counter-clockwise, to access the
filler of the reservoir;
❒check that the fluid level is up to the
MAX mark on the dipstick attached
to the fuel cap F fig. 237 - fig. 238
- fig. 239 (use the level shown on the
20°C side of the dipstick to check
when cold).If the level of the fluid in the tank is
lower than the specified level, top up
using only one of the products
indicated in the "Fluid and lubricants"
table in the "Technical specifications"
section, proceeding as follows:
❒Start the engine and wait for the fluid
level in the tank to stabilise.
❒With the engine running, turn the
steering wheel from right to left
fully several times.
❒Top up the fuel to the MAX level and
then retighten the cap.WINDSCREEN/REAR
WINDOW WASHER FLUID
178) 179)
To add fluid:
❒remove cap D fig. 237 - fig. 238 - fig.
239, pulling the retaining tooth
outward;
❒pull the opening of the pipe upwards
to remove the telescopic funnel fig.
241.
IMPORTANT Before opening the cap,
make sure it is correctly oriented (as
illustrated in fig. 241) to prevent it from
being damaged and interfering with
the adjacent mechanical parts.
Otherwise, turn it until it reaches the
correct position.
Fill according to the following
instructions:
Use a mixture of water and TUTELA
PROFESSIONAL SC 35, in the
following concentrations:
30% TUTELA PROFESSIONAL SC 35
and 70% water in summer.
50% TUTELA PROFESSIONAL SC 35
and 50% water in winter.
At temperatures below –20°C, use
undiluted TUTELA PROFESSIONAL SC
35 fluid.
240
F1A0336
233