seats FIAT DUCATO 2014 Owner handbook (in English)
[x] Cancel search | Manufacturer: FIAT, Model Year: 2014, Model line: DUCATO, Model: FIAT DUCATO 2014Pages: 367, PDF Size: 20.39 MB
Page 12 of 367
.
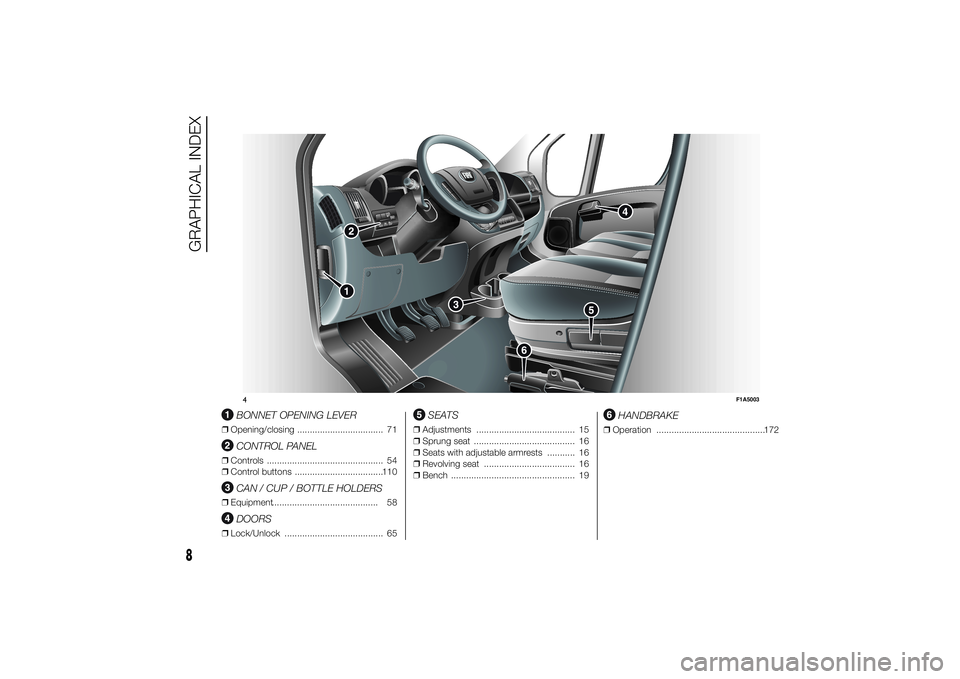
BONNET OPENING LEVER
❒Opening/closing .................................. 71
CONTROL PANEL
❒Controls .............................................. 54
❒Control buttons ...................................110
CAN / CUP / BOTTLE HOLDERS
❒Equipment.......................................... 58
DOORS
❒Lock/Unlock ....................................... 65
SEATS
❒Adjustments ....................................... 15
❒Sprung seat ........................................ 16
❒Seats with adjustable armrests ........... 16
❒Revolving seat .................................... 16
❒Bench ................................................. 19
HANDBRAKE
❒Operation ...........................................172
M
ODE
4
F1A5003
8
GRAPHICAL INDEX
Page 13 of 367
KNOW YOUR VEHICLE
In-depth knowledge of your new vehicle
starts here.
The booklet that you are reading simply
and directly explains how it is made
and how it works.
That’s why we advise you to read it
seated comfortably on board, so that
you can see what is described here for
yourself.SYMBOLS ...................................... 10
THE FIAT CODE SYSTEM ............... 10
THE KEYS....................................... 11
ELECTRONIC ALARM..................... 13
IGNITION SWITCH .......................... 14
SEATS ............................................ 15
HEAD RESTRAINTS ........................ 23
STEERING WHEEL ......................... 24
REAR VIEW MIRRORS .................... 24
HEATING AND VENTILATION.......... 27
DIFFUSERS..................................... 28
HEATING AND VENTILATION
CONTROLS .................................... 28
MANUAL CLIMATE CONTROL
SYSTEM ......................................... 30
AUTOMATIC CLIMATE CONTROL
SYSTEM ......................................... 33
ADDITIONAL HEATER ..................... 38
INDEPENDENT ADDITIONAL
HEATER .......................................... 39
EXTERNAL LIGHTS......................... 44
WINDOW CLEANING ...................... 48
CRUISE CONTROL ......................... 50
ROOF LIGHTS ................................ 53
CONTROLS .................................... 54
FUEL CUT-OFF SWITCH ................ 57
INTERIOR FITTINGS ...................... 58
TACHOGRAPH ............................... 63SPEED BLOCK ............................... 64
SELF-LEVELLING AIR
SUSPENSION ................................. 64
DOORS ........................................... 65
ELECTRIC WINDOWS .................... 70
BONNET ......................................... 71
ROOF RACK/SKI RACK .................. 72
HEADLIGHTS.................................. 73
ABS ................................................ 74
ESC (ELECTRONIC STABILITY
CONTROL) SYSTEM ....................... 75
TRACTION PLUS SYSTEM ............. 79
TPMS (TYRE PRESSURE
MONITORING SYSTEM) ................. 80
DRIVING ADVISOR ......................... 83
REAR CAMERA (PARKVIEW®
REAR BACK UP CAMERA) ............. 89
TRAFFIC SIGN RECOGNITION ....... 90
EOBD SYSTEM............................... 92
PARKING SENSORS....................... 93
START&STOP SYSTEM .................. 95
RADIO............................................. 98
ACCESSORIES PURCHASED BY
THE OWNER................................... 99
REFUELLING THE VEHICLE ...........100
PROTECTING THE
ENVIRONMENT ..............................101
9
Page 19 of 367
STEERING LOCK
Activation
When the key is at STOP, remove the
key and turn the steering wheel until
it locks.
Disengagement
Move the steering wheel slightly as you
turn the ignition key to MAR-ON
WARNING
2) If the ignition device has been
tampered with (e.g. an attempted
theft), have it checked over by a
Fiat Dealership before driving
again.
3) Always remove the key when you
leave your vehicle to prevent
someone from accidentally
operating the controls. Remember
to engage the handbrake.
Engage first gear if the vehicle is
parked uphill or reverse gear if the
vehicle is parked downhill. Never
leave children unattended in the
vehicle.4) Never extract the key while the
vehicle is moving. The steering
wheel will lock as soon as it is
turned. This also applies to cases
in which the vehicle is towed.
5) Under no circumstances should
aftermarket operations be carried
out involving steering system or
steering column modifications
(e.g. installation of anti-theft
device). This could negatively
affect performance and safety,
invalidate the warranty, cause
serious safety problems and also
result in vehicle non-compliance
with type-approval requirements.
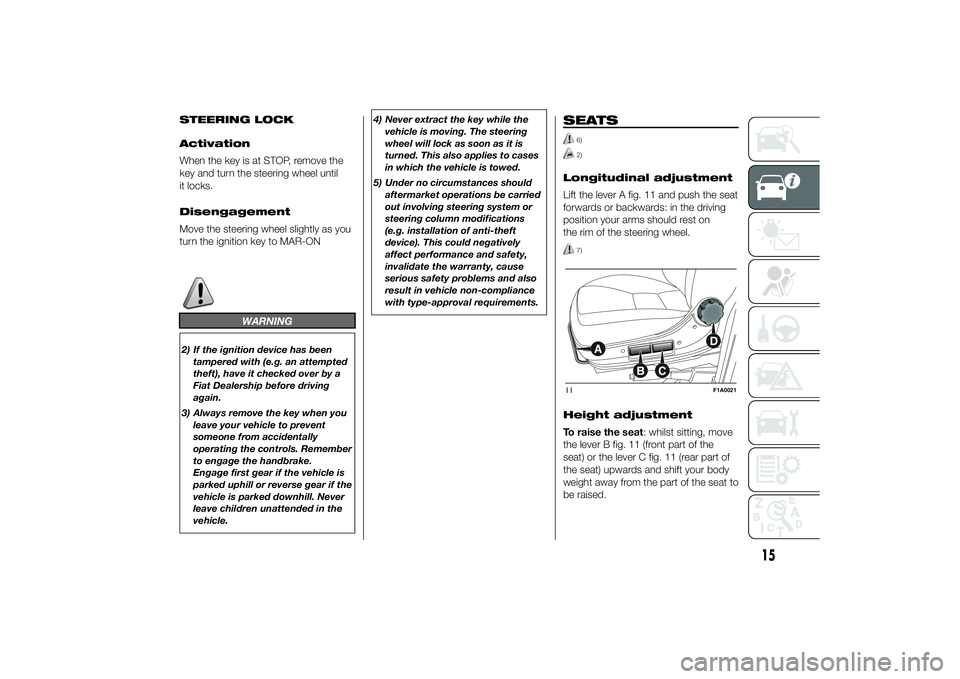
SEATS
6)2)
Longitudinal adjustment
Lift the lever A fig. 11 and push the seat
forwards or backwards: in the driving
position your arms should rest on
the rim of the steering wheel.
7)
Height adjustment
To raise the seat: whilst sitting, move
the lever B fig. 11 (front part of the
seat) or the lever C fig. 11 (rear part of
the seat) upwards and shift your body
weight away from the part of the seat to
be raised.11
F1A0021
15
Page 20 of 367
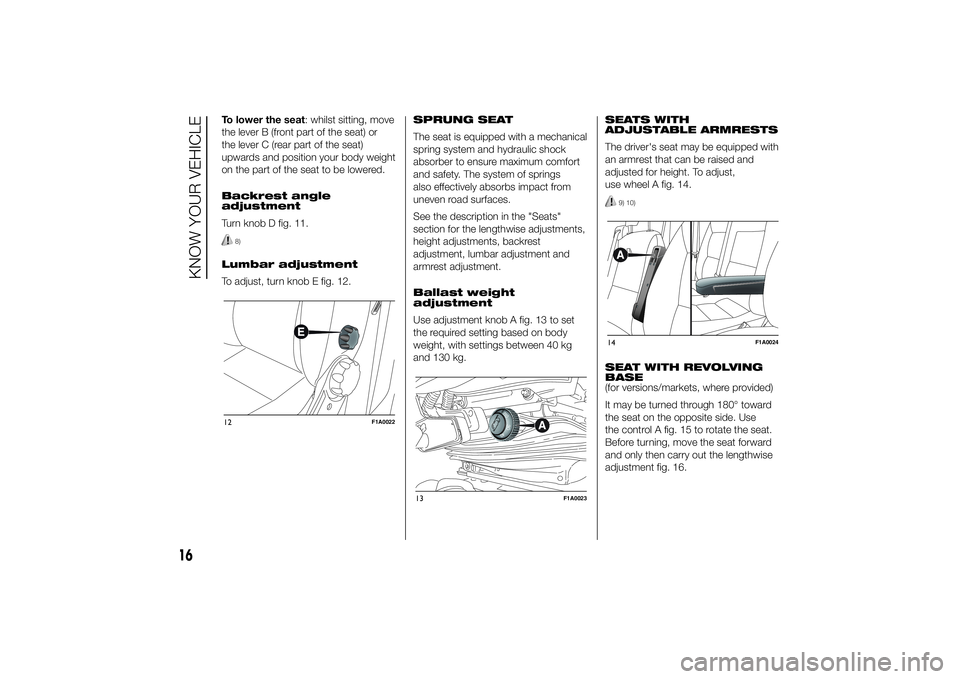
To lower the seat: whilst sitting, move
the lever B (front part of the seat) or
the lever C (rear part of the seat)
upwards and position your body weight
on the part of the seat to be lowered.
Backrest angle
adjustment
Turn knob D fig. 11.
8)
Lumbar adjustment
To adjust, turn knob E fig. 12.SPRUNG SEAT
The seat is equipped with a mechanical
spring system and hydraulic shock
absorber to ensure maximum comfort
and safety. The system of springs
also effectively absorbs impact from
uneven road surfaces.
See the description in the "Seats"
section for the lengthwise adjustments,
height adjustments, backrest
adjustment, lumbar adjustment and
armrest adjustment.
Ballast weight
adjustment
Use adjustment knob A fig. 13 to set
the required setting based on body
weight, with settings between 40 kg
and 130 kg.SEATS WITH
ADJUSTABLE ARMRESTS
The driver's seat may be equipped with
an armrest that can be raised and
adjusted for height. To adjust,
use wheel A fig. 14.
9) 10)
SEAT WITH REVOLVING
BASE
(for versions/markets, where provided)
It may be turned through 180° toward
the seat on the opposite side. Use
the control A fig. 15 to rotate the seat.
Before turning, move the seat forward
and only then carry out the lengthwise
adjustment fig. 16.
12
F1A0022
13
F1A0023
14
F1A0024
16
KNOW YOUR VEHICLE
Page 21 of 367
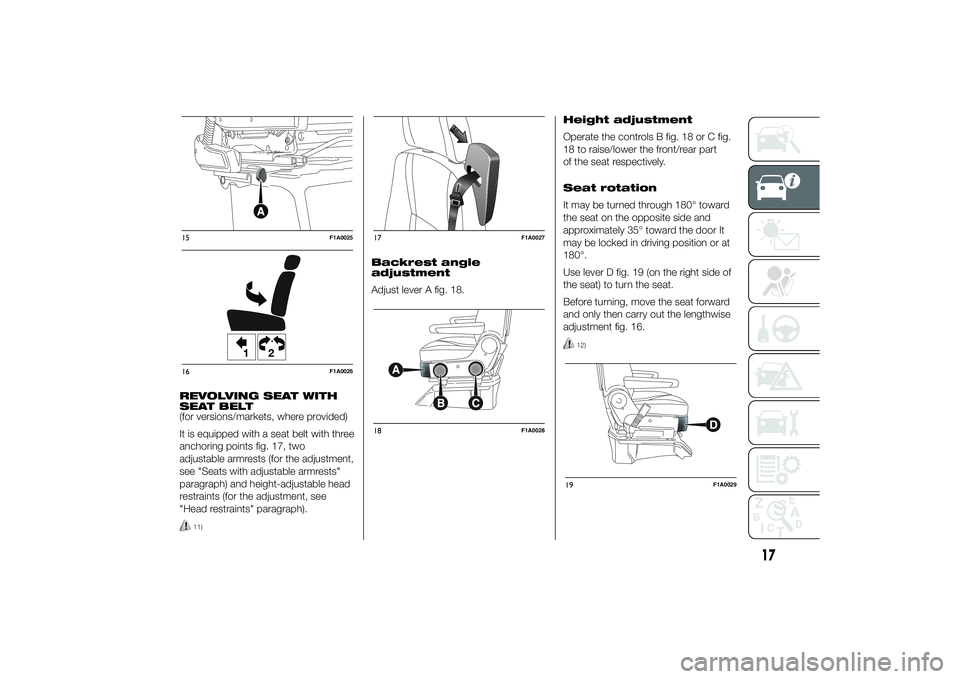
REVOLVING SEAT WITH
SEAT BELT
(for versions/markets, where provided)
It is equipped with a seat belt with three
anchoring points fig. 17, two
adjustable armrests (for the adjustment,
see "Seats with adjustable armrests"
paragraph) and height-adjustable head
restraints (for the adjustment, see
"Head restraints" paragraph).
11)
Backrest angle
adjustment
Adjust lever A fig. 18.Height adjustment
Operate the controls B fig. 18 or C fig.
18 to raise/lower the front/rear part
of the seat respectively.
Seat rotation
It may be turned through 180° toward
the seat on the opposite side and
approximately 35° toward the door It
may be locked in driving position or at
180°.
Use lever D fig. 19 (on the right side of
the seat) to turn the seat.
Before turning, move the seat forward
and only then carry out the lengthwise
adjustment fig. 16.
12)
15
F1A0025
12
16
F1A0026
17
F1A0027
18
F1A0028
19
F1A0029
17
Page 22 of 367
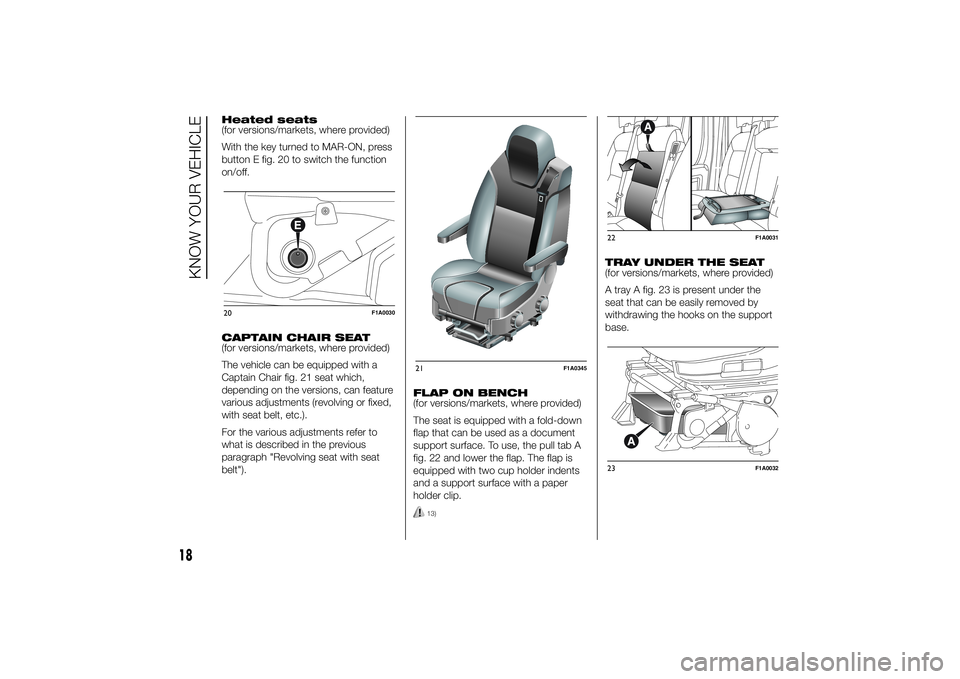
Heated seats
(for versions/markets, where provided)
With the key turned to MAR-ON, press
button E fig. 20 to switch the function
on/off.
CAPTAIN CHAIR SEAT
(for versions/markets, where provided)
The vehicle can be equipped with a
Captain Chair fig. 21 seat which,
depending on the versions, can feature
various adjustments (revolving or fixed,
with seat belt, etc.).
For the various adjustments refer to
what is described in the previous
paragraph "Revolving seat with seat
belt").FLAP ON BENCH
(for versions/markets, where provided)
The seat is equipped with a fold-down
flap that can be used as a document
support surface. To use, the pull tab A
fig. 22 and lower the flap. The flap is
equipped with two cup holder indents
and a support surface with a paper
holder clip.
13)
TRAY UNDER THE SEAT
(for versions/markets, where provided)
A tray A fig. 23 is present under the
seat that can be easily removed by
withdrawing the hooks on the support
base.
20
F1A0030
21
F1A0345
22
F1A0031
23
F1A0032
18
KNOW YOUR VEHICLE
Page 23 of 367
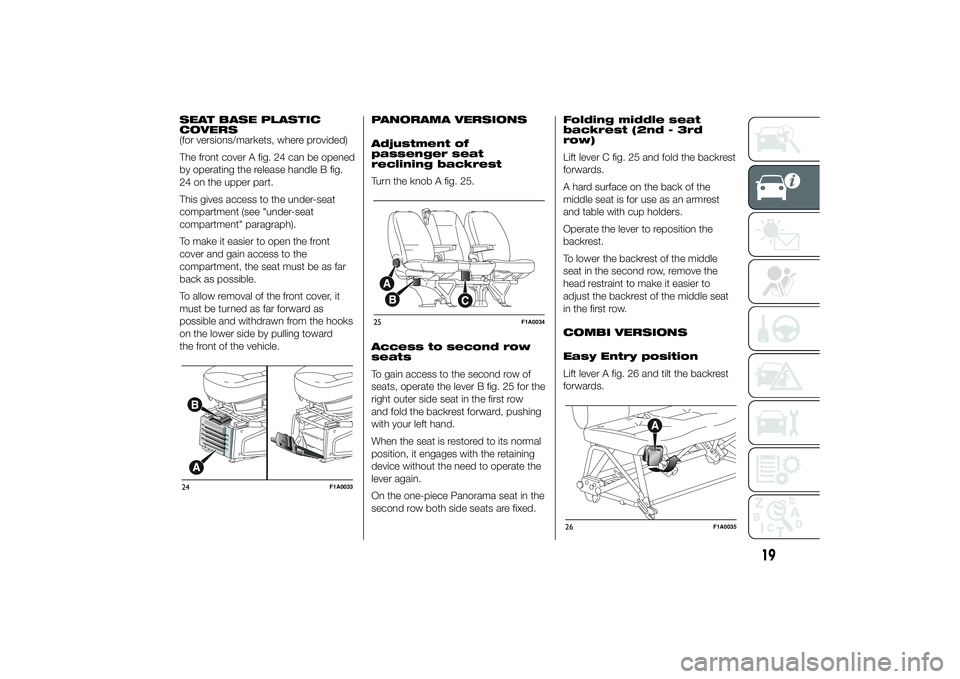
SEAT BASE PLASTIC
COVERS
(for versions/markets, where provided)
The front cover A fig. 24 can be opened
by operating the release handle B fig.
24 on the upper part.
This gives access to the under-seat
compartment (see "under-seat
compartment" paragraph).
To make it easier to open the front
cover and gain access to the
compartment, the seat must be as far
back as possible.
To allow removal of the front cover, it
must be turned as far forward as
possible and withdrawn from the hooks
on the lower side by pulling toward
the front of the vehicle.PANORAMA VERSIONS
Adjustment of
passenger seat
reclining backrest
Turn the knob A fig. 25.
Access to second row
seats
To gain access to the second row of
seats, operate the lever B fig. 25 for the
right outer side seat in the first row
and fold the backrest forward, pushing
with your left hand.
When the seat is restored to its normal
position, it engages with the retaining
device without the need to operate the
lever again.
On the one-piece Panorama seat in the
second row both side seats are fixed.Folding middle seat
backrest (2nd - 3rd
row)
Lift lever C fig. 25 and fold the backrest
forwards.
A hard surface on the back of the
middle seat is for use as an armrest
and table with cup holders.
Operate the lever to reposition the
backrest.
To lower the backrest of the middle
seat in the second row, remove the
head restraint to make it easier to
adjust the backrest of the middle seat
in the first row.
COMBI VERSIONS
Easy Entry position
Lift lever A fig. 26 and tilt the backrest
forwards.24
F1A0033
25
F1A0034
26
F1A0035
19
Page 31 of 367
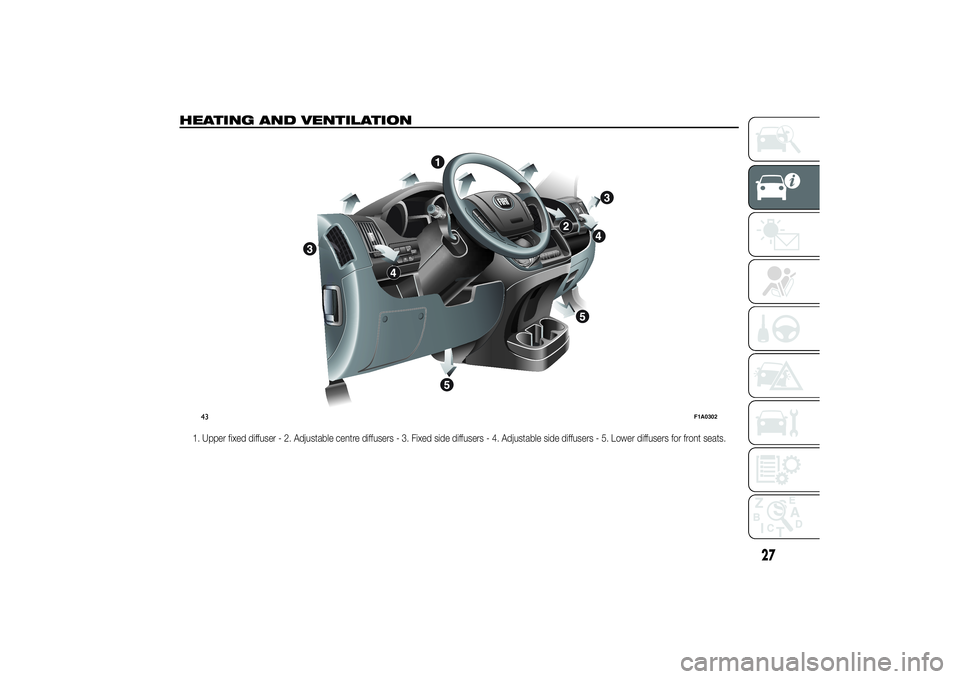
HEATING AND VENTILATION
1. Upper fixed diffuser - 2. Adjustable centre diffusers - 3. Fixed side diffusers - 4. Adjustable side diffusers - 5. Lower diffusers for front seats.
MODE
43
F1A0302
27
Page 47 of 367
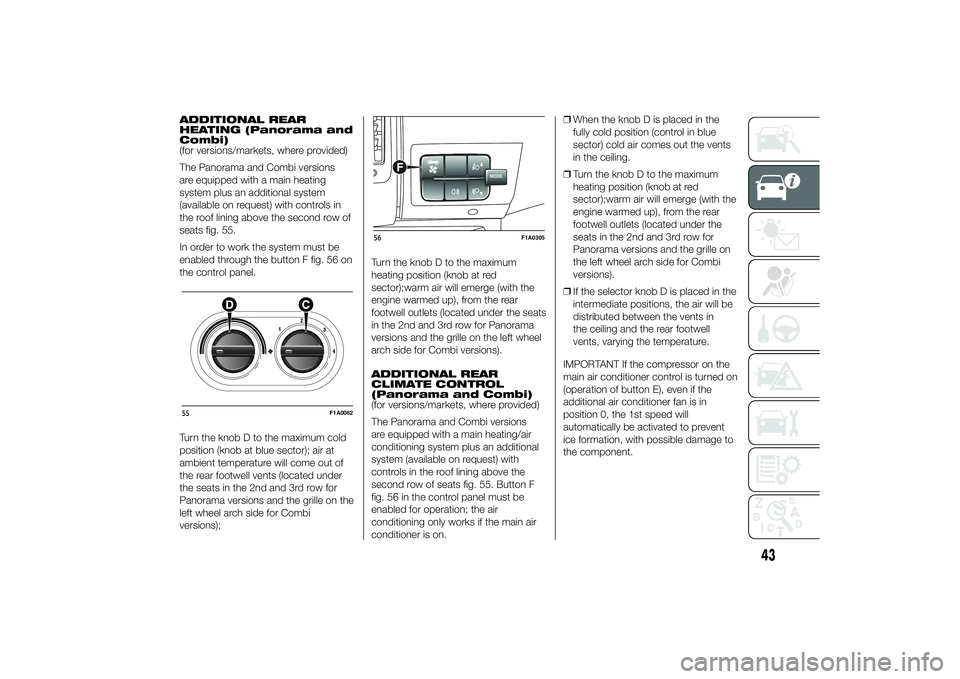
ADDITIONAL REAR
HEATING (Panorama and
Combi)
(for versions/markets, where provided)
The Panorama and Combi versions
are equipped with a main heating
system plus an additional system
(available on request) with controls in
the roof lining above the second row of
seats fig. 55.
In order to work the system must be
enabled through the button F fig. 56 on
the control panel.
Turn the knob D to the maximum cold
position (knob at blue sector); air at
ambient temperature will come out of
the rear footwell vents (located under
the seats in the 2nd and 3rd row for
Panorama versions and the grille on the
left wheel arch side for Combi
versions);Turn the knob D to the maximum
heating position (knob at red
sector);warm air will emerge (with the
engine warmed up), from the rear
footwell outlets (located under the seats
in the 2nd and 3rd row for Panorama
versions and the grille on the left wheel
arch side for Combi versions).
ADDITIONAL REAR
CLIMATE CONTROL
(Panorama and Combi)
(for versions/markets, where provided)
The Panorama and Combi versions
are equipped with a main heating/air
conditioning system plus an additional
system (available on request) with
controls in the roof lining above the
second row of seats fig. 55. Button F
fig. 56 in the control panel must be
enabled for operation; the air
conditioning only works if the main air
conditioner is on.❒When the knob D is placed in the
fully cold position (control in blue
sector) cold air comes out the vents
in the ceiling.
❒Turn the knob D to the maximum
heating position (knob at red
sector);warm air will emerge (with the
engine warmed up), from the rear
footwell outlets (located under the
seats in the 2nd and 3rd row for
Panorama versions and the grille on
the left wheel arch side for Combi
versions).
❒If the selector knob D is placed in the
intermediate positions, the air will be
distributed between the vents in
the ceiling and the rear footwell
vents, varying the temperature.
IMPORTANT If the compressor on the
main air conditioner control is turned on
(operation of button E), even if the
additional air conditioner fan is in
position 0, the 1st speed will
automatically be activated to prevent
ice formation, with possible damage to
the component.55
F1A0062
MODE
F
56
F1A0305
43
Page 153 of 367
WARNING
98) The pretensioner may be used
only once. After it is triggered,
have it replaced at a Fiat
Dealership.
99) The belt must not be twisted.
The upper part must pass over
the shoulder and cross the chest
diagonally. The lower part must
adhere to the pelvis (as shown in
fig. 155) rather than the abdomen
of the passenger. Never use
devices (clips, clamps, etc.) that
hold the seat belt away from your
body.
100) For maximum protection, keep
the backrest upright, lean back
into it and make sure the seat belt
fits closely across your chest
and pelvis. Always fasten the seat
belts on both the front and the
rear seats! Travelling without
wearing seat belts will increase
the risk of serious injury and even
death in the event of an accident.101) Removing or otherwise
tampering with seat belt and
pretensioner components is
strictly prohibited. Any operations
on these components must be
performed by qualified and
authorised technicians. Always go
to a Fiat Dealership.
102) If the belt has been subjected
to a high level of stress, for
example after an accident, it must
be completely replaced together
with the attachments, attachment
fixing screws and the
pretensioner. In fact, even if the
belt has no visible defects, it could
have lost its resilience.
103) Each seat belt must be used by
only one person. Never travel with
a child sitting on the passenger's
lap and a single belt to protect
them both fig. 156. In general, do
not place any objects between the
person and the belt.
IMPORTANT
25) Operations which lead to
impacts, vibrations or localised
heating (over 100°C for a
maximum of six hours) in the area
around the pretensioners may
damage or accidentally deploy
them. Contact a Fiat Dealership
should intervention be necessary
on these components.
149