instrument panel FIAT DUCATO 2015 Owner handbook (in English)
[x] Cancel search | Manufacturer: FIAT, Model Year: 2015, Model line: DUCATO, Model: FIAT DUCATO 2015Pages: 367, PDF Size: 19.73 MB
Page 184 of 367

STARTING THE
ENGINE
The vehicle is fitted with an
electronic engine lock device: if the
engine fails to start, see the
paragraph “The Fiat CODE system”
in section “Know your vehicle”.
27) 28)
129)
PROCEDURE
Proceed as follows:
❒engage the handbrake;
❒put the gear lever into neutral;
❒turn the ignition key to MAR-ON: the
warning lights
andon the
instrument panel will turn on;
❒wait for the warning lights
and
to switch off. The hotter the
engine is, the quicker this will
happen;
❒fully press the clutch pedal without
touching the accelerator;
❒turn the ignition key to AVV as soon
as warning light
switches off.
Waiting too long will waste the
heating work carried out by the glow
plugs.
Release the key as soon as the
engine starts.
If the engine does not start at the
first attempt, return the ignition key
to STOP before repeating the
starting procedure.
If, when the ignition key is at
MAR-ON the
warning light
remains lit, turn the key to STOP
and then back to MAR-ON; if
the warning light remains lit, try with
the other keys provided with the
car.
IMPORTANT Go to a Fiat
Dealership immediately if warning
light
stays on constantly on the
instrument panel.
IMPORTANT Never leave the
ignition key in MAR-ON position
when the engine is stopped.
29)
WARMING UP THE
ENGINE JUST AFTER
IT HAS STARTED
Proceed as follows:
❒drive off slowly, letting the engine turn
at medium revs. Do not accelerate
abruptly;❒do not demand full performance at
first. Wait until the engine coolant
temperature gauge starts moving.
30) 31)
STOPPING THE
ENGINE
Turn the ignition key to STOP while
the engine is idling.
32) 33)
IMPORTANT
27) It is advisable not to demand
maximum performance from
your vehicle (e.g. excessive
acceleration, long distances at
high speeds, excessively intense
braking, etc.) during the initial
period of use.
28) When the engine is off, do not
leave the ignition key turned to
MAR-ON to prevent unnecessary
electrical consumption from
draining the battery.
180
STARTING AND DRIVING
Page 186 of 367
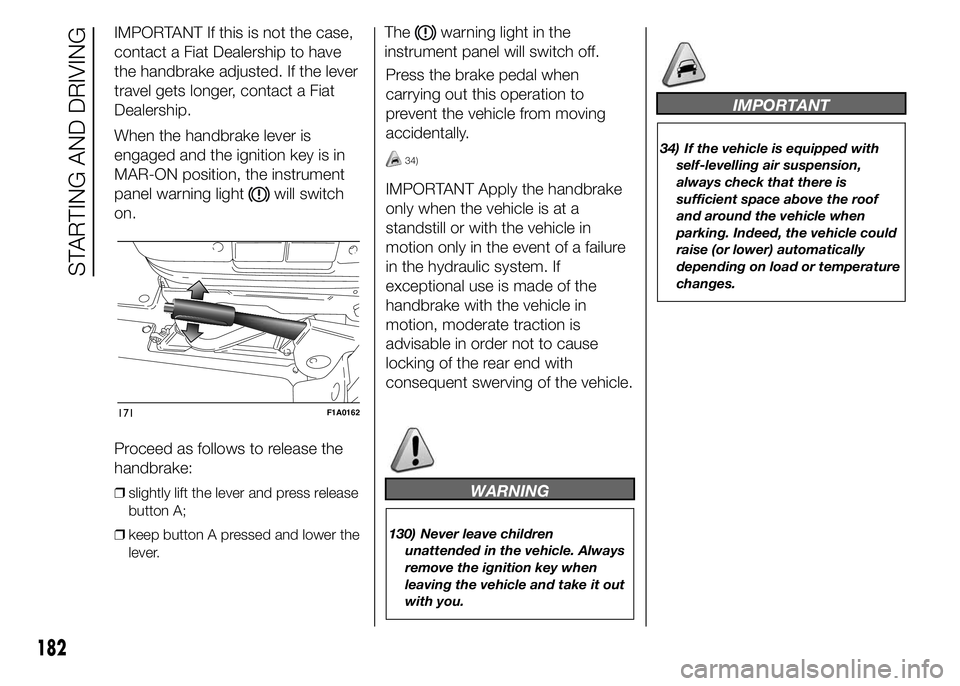
IMPORTANT If this is not the case,
contact a Fiat Dealership to have
the handbrake adjusted. If the lever
travel gets longer, contact a Fiat
Dealership.
When the handbrake lever is
engaged and the ignition key is in
MAR-ON position, the instrument
panel warning light
will switch
on.
Proceed as follows to release the
handbrake:
❒slightly lift the lever and press release
button A;
❒keep button A pressed and lower the
lever.
Thewarning light in the
instrument panel will switch off.
Press the brake pedal when
carrying out this operation to
prevent the vehicle from moving
accidentally.
34)
IMPORTANT Apply the handbrake
only when the vehicle is at a
standstill or with the vehicle in
motion only in the event of a failure
in the hydraulic system. If
exceptional use is made of the
handbrake with the vehicle in
motion, moderate traction is
advisable in order not to cause
locking of the rear end with
consequent swerving of the vehicle.
WARNING
130) Never leave children
unattended in the vehicle. Always
remove the ignition key when
leaving the vehicle and take it out
with you.
IMPORTANT
34) If the vehicle is equipped with
self-levelling air suspension,
always check that there is
sufficient space above the roof
and around the vehicle when
parking. Indeed, the vehicle could
raise (or lower) automatically
depending on load or temperature
changes.
171F1A0162
182
STARTING AND DRIVING
Page 202 of 367
STARTING THE
ENGINE
Go to a Fiat Dealership immediately
if warning light
stays on
constantly on the instrument panel.
JUMP STARTING
If the battery is flat, it is possible to
start the engine using an auxiliary
battery with the same capacity or a
little higher than the flat one.
It is advisable to contact a Fiat
Dealership to check/replace the
battery.
140)
Proceed as follows to start the
vehicle:
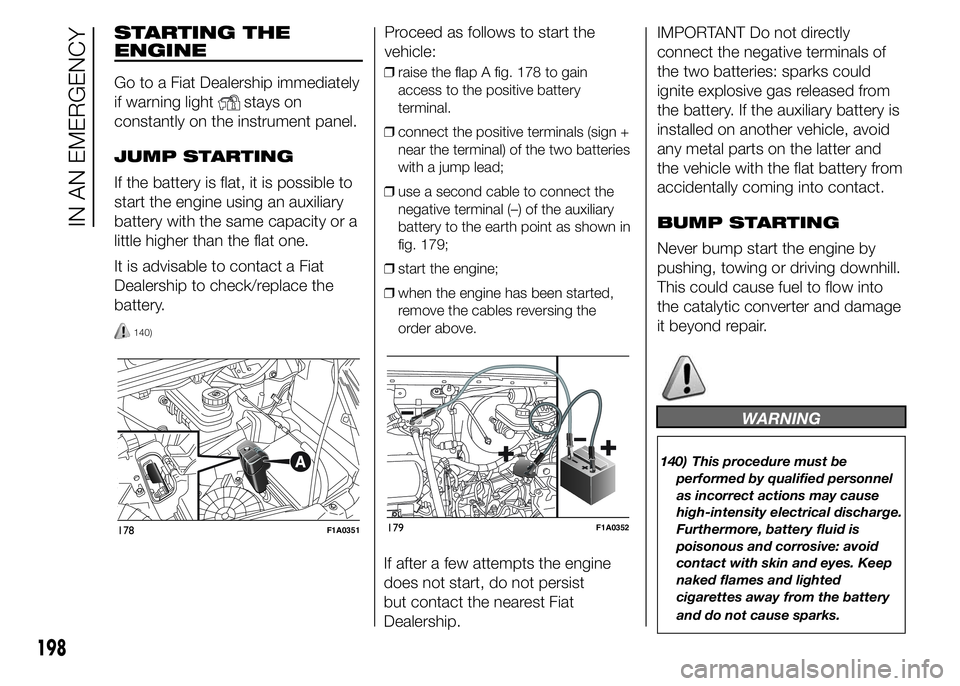
❒raise the flap A fig. 178 to gain
access to the positive battery
terminal.
❒connect the positive terminals (sign +
near the terminal) of the two batteries
with a jump lead;
❒use a second cable to connect the
negative terminal (–) of the auxiliary
battery to the earth point as shown in
fig. 179;
❒start the engine;
❒when the engine has been started,
remove the cables reversing the
order above.
If after a few attempts the engine
does not start, do not persist
but contact the nearest Fiat
Dealership.IMPORTANT Do not directly
connect the negative terminals of
the two batteries: sparks could
ignite explosive gas released from
the battery. If the auxiliary battery is
installed on another vehicle, avoid
any metal parts on the latter and
the vehicle with the flat battery from
accidentally coming into contact.
BUMP STARTING
Never bump start the engine by
pushing, towing or driving downhill.
This could cause fuel to flow into
the catalytic converter and damage
it beyond repair.
WARNING
140) This procedure must be
performed by qualified personnel
as incorrect actions may cause
high-intensity electrical discharge.
Furthermore, battery fluid is
poisonous and corrosive: avoid
contact with skin and eyes. Keep
naked flames and lighted
cigarettes away from the battery
and do not cause sparks.
178F1A0351179F1A0352
198
IN AN EMERGENCY
Page 208 of 367

151) Each time the spare wheel is
moved, check that it is correctly
positioned in its housing under
the platform. If it is not correctly
positioned, this could adversely
affect safety.
152) The spare wheel lifting device
is equipped with a clutch safety
system for its own protection; this
could activated if an excessive
load is applied on the
maneuvering screw.FIX&GO
AUTOMATIC QUICK
TYRE REPAIR KIT
(for versions/markets, where
provided)
The Fix & Go automatic quick tyre
repair kit is positioned at the front of
the vehicle passenger compartment
and includes fig. 194:
❒bottle A containing sealer and fitted
with:
– a transparent filler pipe B;
– a black pressure restoring pipe E;
– sticker C bearing the notice
“max. 80 km/h”, to be placed in a
position visible to the driver (on
the instrument panel) after fixing the
tyre;
❒instruction brochure (see fig. 195), to
be used for prompt and correct use
of the quick tyre repair kit and then to
be handed to the personnel charged
with handling the tyre treated with
the tyre repair kit;
❒a compressor D complete with
pressure gauge and connectors;
❒a pair of protective gloves located in
the side compartment of the
compressor;
❒adaptors for inflating different
elements.
153) 154) 155)
44)
194F1A0180
195F1A0181
204
IN AN EMERGENCY
Page 225 of 367

Dashboard fuse box
fig. 226 - fig. 227
DEVICE PROTECTED FUSE AMPERE
Right dipped beam headlight F12 7,5
Left dipped headlight F13 7,5
Engine compartment control unit relay, dashboard control unit relay (+key) F31 5
Lighting of roof lights in the passenger compartment (+battery) F32 7,5
Battery monitoring sensor for Start&Stop versions (+battery) F33 7,5
Minibus interior lights (emergency) F34 7,5
Radio, climate control, alarm, tachograph, battery disconnecting control unit,
Webasto timer (+battery)F36 10
Brake light control (main), third brake light, instrument panel (+key) F37 7,5
Door lock (+battery) F38 20
Windscreen wiper (+key) F43 20
Driver's side electric window F47 20
Passenger side electric window F48 20
Parking sensor control unit, radio, steering wheel controls, central control panel,
left control panel, auxiliary panel, battery disconnecting control unit (+key)F49 5
Climate control, power steering control unit, reverse lights, diesel filter water
sensor, flow meter, tachograph (+key)F51 5
Instrument panel (+battery) F53 7,5
AbsentF89 -
221
Page 235 of 367

SCHEDULED SERVICING PLAN
Thousands of miles 30 60 90 120 150
Thousands of kilometres 48 96 144 192 240
Years246810
Check battery charge status and recharge if necessary●●●●●
Check tyre conditions/wear and adjust pressure, if required●●●●●
Check operation of lighting system (headlights, direction indicators, hazard
warning lights, luggage compartment, passenger compartment, glove
compartment, instrument panel warning lights, etc.)●●●●●
Check operation of windscreen wiper/washer system and adjust jets, if
necessary●●●●●
Check the position/wear of the windscreen/rear window wiper blades●●●●●
Check cleanliness of bonnet and luggage compartment locks, as well as
cleanliness and lubrication of linkages●●●●●
Visually inspect condition of: exterior bodywork, underbody protection,
pipes and hoses (exhaust, fuel system, brakes), rubber elements (boots,
sleeves, bushes, etc.)●●●●●
Check condition and wear of front disc brake pads and operation of pad
wear indicator●●●●●
Check condition and wear of rear disc brake pads and operation of pad
wear indicator (for versions/markets where provided)●●●●●
Check and, if necessary, top up fluid levels (engine coolant, hydraulic clutch/
brakes, windscreen washer, battery, etc.)●●●●●
231
Page 237 of 367

Thousands of miles 30 60 90 120 150
Thousands of kilometres 48 96 144 192 240
Years246810
Replace toothed timing drive belt (*)(110(°)130-150 MultiJet versions)
Replace toothed timing drive belt (**)( 115 MultiJet versions(°))
Replace air cleaner cartridge (***)●●●●●
Change engine oil and replace oil filter (°°) (#)
Change brake fluid (or every 2 years)●●●●●
Replace pollen filter (or every 2 years)●●●●●
(*) Advised maximum mileage 192,000 km. Irrespective of the mileage, the timing drive belt must be changed every 4 years for heavy-duty use (cold climates, town
use, long periods of idling) or at least every 5 years.
(°)Version for specific markets
(**) Advised maximum mileage 144,000 km. Irrespective of the mileage, the timing drive belt must be changed every 4 years for heavy-duty use (cold climates, town
use, long periods of idling) or at least every 5 years.
(***) If the vehicle is equipped with a specific air cleaner for dusty areas: -every 20,000 km check and wash cleaner; every 40,000 km replace cleaner.
(°°) The actual interval for changing the oil and replacing the engine oil filter depends on the car usage conditions and is signalled by the warning light or message (if
present) on the instrument panel (see “Warning lights and messages” paragraph) and must never exceed 2 years.
(#) If the vehicle is driven mainly in towns, change engine oil and oil filter every 12 months.
233
Page 254 of 367

IMPORTANT
55) Some car washes with old-style
blades and/or in a poor state of
repair can damage the paintwork,
facilitating the formation of lines
that give the paint a dull/misty
appearance, especially on dark
colours. If this happens, lightly
polish the paintwork with
appropriate products.
IMPORTANT
5) Detergents cause water pollution.
The vehicle should be washed in
areas equipped for collecting
and purifying the liquid used in
the washing process.
INTERIORS
Regularly check that water is not
trapped under the mats (due to
water dripping off shoes, umbrellas,
etc.), as this could cause oxidation
of the sheet metal.
198) 199)
SEATS AND FABRIC
PARTS
Remove dust with a soft brush or a
vacuum cleaner. It is advisable to
use a moist brush on velvet
upholstery.
Rub the seats with a sponge
moistened with a solution of water
and mild soap.
PLASTIC PARTS
It is advisable to clean interior parts
with a moist cloth and a solution
of water and non-abrasive mild
soap. Use specific products for
cleaning plastic, without solvents
and specifically designed to prevent
damage to the appearance and
colour of the treated parts, to
remove grease and tough stains.IMPORTANT Do not use alcohol,
petrols or derivatives to clean
the instrument panel glass.
LEATHER STEERING
WHEEL/GEAR
KNOB/HANDBRAKE
(for versions/markets, where
provided)
These components must be
cleaned with mild soap and water
only. Never use alcohol or
alcohol-based products.
Read the product label carefully
before using specific products for
cleaning the interiors: make sure
that the product does not contain
spirits or alcohol-based
substances.
If, when cleaning the windscreen
with special products, window
cleaner accidentally drips onto the
leather of the steering wheel/gear
lever knob/handbrake, wipe away
immediately and then wash the
affected area with mild soap and
water.
250
SERVICING AND MAINTENANCE
Page 363 of 367

Engine oil level gauge ..................... 119
EOBD system ................................ 100
ESC (system) ................................. 83
External lights................................. 48
Fiat CODE system......................... 10
Fix&Go Automatic quick tyre
repair kit ........................ 204-205-206
Flap on bench ............................ 19-69
Flashing ......................................... 50
Flex Floor rear seat......................... 21
Fluids and lubricants ...................... 321
Fog lights ................................. 61-213
Follow Me Home device ................. 51
Follow me home ............................ 51
Front airbags .................................. 170
– Driver's side front airbag............ 170
– Manually deactivating the
front airbag and side bag........... 171
– Passenger side front airbag ....... 171
Front roof light (changing a bulb) .... 216
Fuel consumption .......................... 324
Fuel cut-off switch ......................... 63
Fuel level gauge ............................. 118
Fuel tank cap ................................. 110
Fuses (replacement) ....................... 218
Gearbox ....................................... 183
Gear lever ...................................... 183
Gear Shift Indicator ........................ 120
Glove compartment ....................... 64Glove compartment with lock......... 64
Hazard warning lights ................... 60
HBA (Hydraulic Brake Assist)
system ......................................... 85
HBA (system) ................................. 85
Headlight alignment corrector ........ 81
Headlights
– Headlight alignment corrector.... 81
– Light beam direction.................. 81
Headlight washers .................... 54-247
Head restraints
– Front ......................................... 24
Heated rear window ....................... 61
Heating and ventilation controls...... 29
Heating and ventilation ................... 28
Hill Descent Control System ........... 86
Hill Descent .................................... 86
Hill Holder system .......................... 84
Hill Holder (system) ........................ 84
Identification data .......................... 254
Ignition switch ................................ 15
Independent additional heater ........ 42
Inflation pressure ............................ 267
Inflation procedure ......................... 205
Instrument panel ............................ 114
Interior fittings ................................ 64
Interiors .......................................... 250
Isofix child restraint systems
(setup)– Arrangement possibilities for
child restraint system on
seats of vehicle.......................... 166
Jump starting ................................ 198
Lectern ......................................... 67
Lifting the vehicle ........................... 226
Light beam direction ...................... 81
Lights off ........................................ 48
Loading advice............................... 184
Main beam headlights............. 49-212
Maintenance and care - regular
checks ......................................... 234
Maintenance and care -
Scheduled Servicing .................... 230
Maintenance and care -
scheduled servicing plan .............. 231
Manual climate control system ....... 32
Manually deactivating the front
airbag and side bag ..................... 171
Moving footboard ........................... 75
MSR system .................................. 82
MSR (system)................................. 82
Multifunction display
– Control buttons ......................... 121
– Setup menu .............................. 121
Number plate lights....................... 215
On-board instruments................... 114
Parking ......................................... 181
Parking lights.............................. 50-61