automatic operation FIAT DUCATO 2018 Owner handbook (in English)
[x] Cancel search | Manufacturer: FIAT, Model Year: 2018, Model line: DUCATO, Model: FIAT DUCATO 2018Pages: 304, PDF Size: 14.93 MB
Page 179 of 304

position the jack at the lifting support
nearest the wheel to be replaced, at
the points shown in fig. 180. For short
wheelbase versions with a retractable
footboard, the jack must be position at
the lifting point shown in fig. 182,
turned by 45° so that it does
not interfere with the retractable
platform;
warn all bystanders that the vehicle
is about to be lifted. They must stay
clear and not touch the vehicle until it is
back on the ground.
for versions equipped with
self-levelling pneumatic suspension,
before using the jack to raise the
vehicle, press the buttons A and B fig.
183 simultaneously for at least 5
seconds. The operating mode for
raising the vehicle is activated: the
LEDs on the buttons come on
constantly. To exit this mode, press
buttons A and B simultaneously for
another 5 seconds; both LEDs on the
buttons will go out and full system
operation will be restored. This mode
deactivates automatically when the
speed of approx. 5 km/h is exceeded.
152)
lift the vehicle.
After lifting the vehicle:
for all versions, access the rear right
wheel arch, operate the screw A fig.
184 on the spare wheel retaining
device, using the supplied wrench
assembled correctly with the dedicated
extension B fig. 184.
turn the tool anticlockwise fig. 185
to allow the spare wheel to descend;
continue turning anticlockwise until
the stop point, indicated by the
stiffening of the manoeuvre or a click
from the clutch present in the device;
153) 154) 155) 156) 157)
after unwinding the whole cable of
the spare wheel lifting device, remove
the wheel from the vehicle;
undo the retaining knob D fig. 186
and free the wheel by sliding out the
support E.
182F1A0169
183F1A0170
184F1A0171
177
Page 182 of 304
147)The spare wheel supplied (for
versions/markets, where provided) is
specific for your vehicle. Therefore, it must
not be used on other models. Do not
use spare wheels of other models on your
vehicle. The wheel bolts are specific for
your vehicle: do not use them on different
models and do not use bolts from other
models on your car.
148)Repair and refit the standard wheel as
soon as possible. Do not apply grease to
the bolt threads before fitting: they could
come unscrewed.
149)Use the jack only to replace wheels
on the vehicle with which it is supplied
or on other vehicles of the same model.
Never use the jack for other purposes,
such as lifting other vehicle models. Never
use the jack to carry out repairs under
the vehicle. Incorrect positioning of the jack
may cause the lifted vehicle to fall. Do not
use the jack for loads higher than the
one shown on its label.
150)Never tamper with the inflation valve.
Never introduce tools of any kind between
rim and tyre. Check tyre and spare wheel
pressure regularly, referring to the values
shown in the "Technical specifications"
section.
151)No tools other than the crank
provided should be used with the spare
wheel lifting device; it should be operated
by hand only.
152)On versions equipped with self-
levelling air suspension, never introduce the
head or hands in the wheel arch: the
vehicle could raise or lower automatically
depending on possible load or temperature
changes.153)The device should only be operated
by hand, without using any type of tool
other than the crank provided like
pneumatic or electrical screwers.
154)The moving components of the jack
(screws and joints) can also cause injuries:
avoid touching them. If you come into
contact with lubricating grease, clean
yourself thoroughly.
155)The jack should be used on level firm
ground wherever possible.
156)It is recommended that the wheels of
the vehicle be chocked, and that no person
should remain in a vehicle that is being
jacked.
157)No person should place any portion of
their body under a vehicle that is
supported by a jack.
158)At the end of the operation of
raising/locking the spare wheel, after
checking that the wheel is positioned
correctly under the platform (yellow notch
inside the window on the device), extract
the operating wrench. Take care not to turn
the wrench in the wrong direction (as in
fig. 189) to facilitate extracting it, to prevent
the attachment device from being
released and to ensure that the wheel
assembly remains safely fastened.
159)Each time the spare wheel is moved,
check that it is correctly positioned in its
housing under the platform. If it is not
correctly positioned, this could adversely
affect safety.
160)The spare wheel lifting device is
equipped with a clutch safety system for its
own protection; this could activated if an
excessive load is applied on the
maneuvering screw.FIX&GO
AUTOMATIC QUICK
TYRE REPAIR KIT
(for versions/markets, where provided)
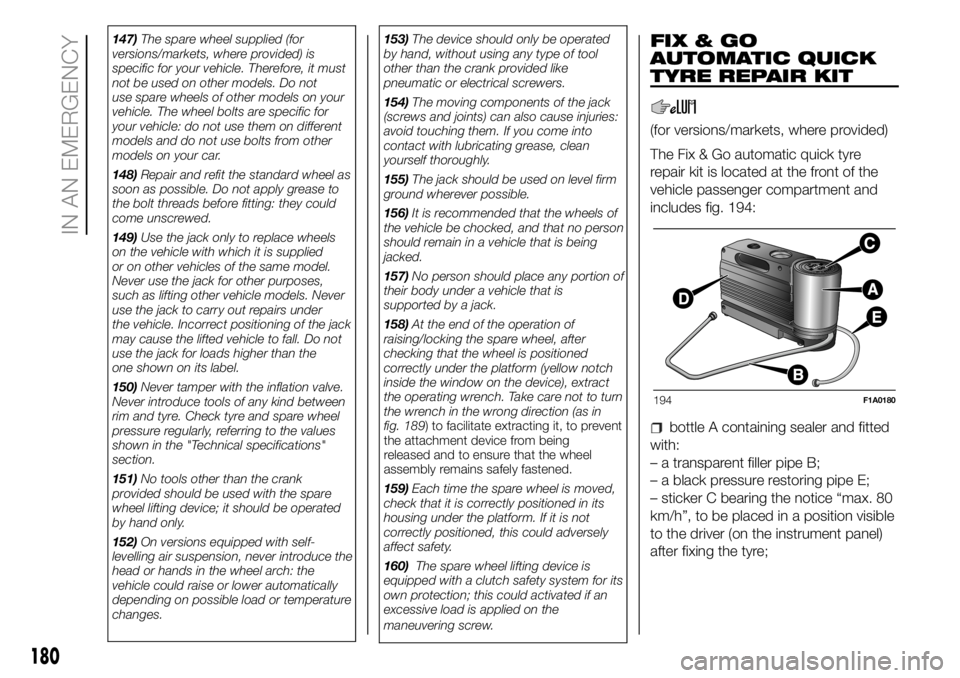
The Fix & Go automatic quick tyre
repair kit is located at the front of the
vehicle passenger compartment and
includes fig. 194:
bottle A containing sealer and fitted
with:
– a transparent filler pipe B;
– a black pressure restoring pipe E;
– sticker C bearing the notice “max. 80
km/h”, to be placed in a position visible
to the driver (on the instrument panel)
after fixing the tyre;
194F1A0180
180
IN AN EMERGENCY
Page 184 of 304

if after this operation it is still
impossible after 10 minutes to reach at
least 3 bar, do not start driving since
the tyre is excessively damaged and the
quick tyre repair kit cannot guarantee
proper hold, contact a Fiat Dealership;
if the tyre reaches the pressure
specified in “Inflation pressure”
paragraph in the "Technical Data"
section, start driving immediately;
after having driven for about 10
minutes, stop and recheck the tyre
pressure; remember to apply the
handbrake;
if a pressure value of at least 3 bar is
detected, restore the correct pressure
prescribed in the paragraph “Inflation
pressure” in “Technical specification”
(with the engine running and the
handbrake engaged), resume driving
and drive with care to nearest Fiat
Dealership.
WARNING
161)Give the booklet to the personnel who
will be handling the tyre treated with the
repair kit.
162)Holes and damage on the tyre side
walls cannot be repaired. Do not use
the quick tyre repair kit if the damage is
due to running with flat tyre.
163)Repairs are not possible in the case of
damage to the wheel rim (bad groove
distortion causing air loss). Do not remove
the foreign body (screws or nails) from
the tyre.
164)Never operate the compressor for
longer than 20 consecutive minutes. Risk
of overheating. Tyres repaired with the
quick tyre repair kit must only be used
temporarily, as the kit is not suitable for a
definitive repair.165)The bottle contains ethylene glycol. It
contains latex that might cause allergic
reactions. It is harmful if swallowed. Eye
irritant. It may cause sensitisation if inhaled
or on contact. Avoid contact with eyes,
skin and clothes. In the event of contact,
wash immediately with plenty of water.
In the event that it is swallowed, do not
induce vomiting. Rinse out your mouth,
drink large quantities of water and seek
immediate medical attention. Keep out of
the reach of children. The product must
not be used by asthmatics. Do not inhale
the vapours during insertion and suction.
Call a doctor immediately if allergic
reactions are noted. Store the bottle in its
proper compartment, away from sources
of heat. The sealing fluid has an expiry
date. Replace the bottle if the sealant has
expired.
166)Put on the protective gloves provided
together with the quick tyre repair kit.
167)Apply the adhesive label in a position
clearly visible by the driver as a reminder
that the tyre has been treated with the
quick repair kit. Drive carefully, particularly
on bends. Do not exceed 80 km/h. Avoid
sudden acceleration or braking.
168)If the pressure falls below 3 bar, do
not drive any further: the Fix & Go
automatic quick tyre repair kit cannot
guarantee suitable sealing because the tyre
is too damaged. Contact a Fiat Dealership.
169)Inform the Dealership that the tyre
has been repaired using the quick tyre
repair kit. Give the booklet to the personnel
who will be handling the tyre treated with
the repair kit.
198F1A0335
182
IN AN EMERGENCY
Page 194 of 304

SERVICE SCHEDULE
The checks listed in the Service Schedule, after reaching 144,000 km/6 years (130 - 150 - 180 Multijet 2 versions) 192,000
km/8 years (115 Multijet 2 versions), must be cyclically repeated starting from the first interval, thus following the same intervals
as before.
The checks listed in the Service Schedule, after reaching 90,000 mi/6 years (130 - 150 - 180 Multijet 2 versions) 120,000 mi/8
years (115 Multijet 2 versions), must be cyclically repeated starting from the first interval, thus following the same intervals as
before.
Thousands of miles 30 60 90 120 150
Thousands of kilometres 48 96 144 192 240
Years 2 4 6 8 10
Check battery charge status and possibly recharge●●●●●
Check tyre condition/wear and adjust pressure, if necessary; check the
expiry date of the “Fix & Go Automatic” repair kit (for versions/markets,
where provided)●●●●●
Check operation of lighting system (headlights, direction indicators, hazard
warning lights, boot, passenger compartment, glove compartment,
instrument panel warning lights, etc.)●●●●●
Check operation of the windscreen wiper/washer system and adjust jets, if
necessary●●●●●
Check windscreen/rearscreen wiper blade position/wear (for markets/
versions, where provided)●●●●●
Check cleanliness of bonnet and luggage compartment locks, cleanliness
and lubrication of linkage●●●●●
Visually inspect conditions of: exterior bodywork, underbody protection,
pipes and hoses (exhaust, fuel system, brakes), rubber elements (gaiters,
sleeves, bushes, etc.)●●●●●
192
SERVICING AND CARE
Page 195 of 304

Thousands of miles 30 60 90 120 150
Thousands of kilometres 48 96 144 192 240
Years 2 4 6 8 10
Check condition and wear of front disc brake pads and operation of pad
wear indicator●●●●●
Checkcondition and wear of rear disc brake pads and operation of pad
wear indicator (for versions/markets where provided)●●●●●
Check and, if necessary, top up fluid levels (1) (2)●●●●●
Check COMFORT-MATIC transmission hydraulic system fluid level (3) (*)●●●●●
Check oil for hydraulic clutch activation system (for versions with
COMFORT-MATIC transmission) (3) (*)●●●●●
Change oil for hydraulic clutch activation system (for versions with
COMFORT-MATIC transmission) (4) (*)●●
Visual check of accessory drive belt(s) (versions without automatic
tensioner) (130 - 150 - 180 Multijet 2 versions)●●
Check tension of accessory drive belt (versions without automatic tensioner)
(5)●●
(1) Always only use the liquids shown in the handbook for topping up after having checked that the system is not damaged.
(2) Consumption of additive for emissions (UREA) depends on the condition of use of the vehicle and is indicated by a warning light and message on the instrument
panel (for versions/markets, where provided).
(3) Check to be performed every year in case of use in cold climates.
(*) NOTE (for COMFORT-MATIC versions): to check the transmission fluid level and to check/change the clutch hydraulic system fluid, go to a Fiat Dealership.
(4) Or every 2 years
(5) When the engine oil is changed for the first time, check the tension of the accessory drive belt
193
Page 196 of 304

Thousands of miles 30 60 90 120 150
Thousands of kilometres 48 96 144 192 240
Years 2 4 6 8 10
Check tension of auxiliary drive belt (versions without automatic tensioner)
(115 MultiJet 2versions) (5)●●●
Check condition of toothed timing drive belt (130-150-180 Multijet 2
versions)●●
Check condition of toothed timing drive belt (115 Multijet 2 versions)●●●●●
Check handbrake lever travel and adjust, if necessary●●●●●
Check exhaust emissions●●●●●
Use the diagnosis socket to check fuel/engine management system
operation and engine oil decay (the latter for versions/markets, where
provided)●●●●●
Check cleanliness of sliding side door lower guides for versions with S.S.D.
(or every 6 months)●●●●●
Replace fuel filter cartridge●●●●●
Replace accessory drive belt(s) (130-150-180 Multijet 2 versions)●
Replace the accessory drive belt(s) (115 Multijet 2 versions)●●
Replace timing belt (130-150-180 Multijet 2 versions)(6)
(5) When the engine oil is changed for the first time, check the tension of the accessory drive belt
(6) Advised maximum mileage 192,000 km. Irrespective of the mileage, the timing drive belt must be changed every 4 years for heavy-duty use (cold climates, town
use, long periods of idling) or at least every 5 years.
194
SERVICING AND CARE
Page 199 of 304

Thousands of miles 25 50 75 100 125
Thousands of kilometres 40 80 120 160 200
Years246810
Visual checking the conditions of the belt/and accessories command (for
versions without automatictensioner)●●
Check tension of accessory drive belt (versions without automatic tensioner)●●
Check handbrake lever travel and adjust, if necessary●●●●●
Check exhaust emissions●●●●●
Check operation of engine management systems (using diagnosis socket)●●●●●
Check cleanliness of sliding side door lower guides for versions with S.S.D.
(or every 6 months)●●●●●
Spark plug replacement●●●●●
Replace accessory drive belt/s●
Replace air cleaner cartridge (1)●●●●●
Change engine oil and replace oil filter (2)●●●●●
Change the brake fluid(3)
Replace the passenger compartment cleaner●●●●●
Visually inspect the condition of the methane pipes and fittings, methane
tank fastening, possible restoration●●●●●
(1) If the vehicle is equipped with a special air filter for dusty areas: - every 20,000 km, check and clean the filter
(2) If the vehicle annual mileage is less than 10,000 km, the engine oil and filter must be replaced every 12 months.
(3) The brake fluid replacement has to be done every two years, irrespective of the mileage.
197
Page 209 of 304
USEFUL ADVICE FOR
EXTENDING THE LIFE OF
YOUR BATTERY
To avoid draining your battery and
make it last longer, observe the
following instructions:
when you park the vehicle, ensure
that the doors, tailgate and bonnet are
closed properly, to prevent any roof
lights from remaining on inside the
passenger's compartment;
switch off all roof lights inside the
vehicle: the vehicle is however
equipped with a system which switches
all internal lights off automatically;
do not keep accessories (e.g. radio,
hazard warning lights, etc.) switched
on for a long time when the engine
is not running;
before carrying out any operation on
the electrical system, disconnect the
negative battery cable through the
suitable terminal;
completely tighten the battery
terminals.IMPORTANT After turning the ignition
key to STOP and having closed the
driver side door, wait at least one
minute before disconnecting the
electrical supply from the battery. When
reconnecting the electrical supply to
the battery, make sure that the ignition
key is in the STOP position and the
driver side door is closed.
IMPORTANT If the charge level remains
under 50% for a long time, the battery
is damaged by sulphation, reducing
its capacity and efficiency at start-up.
The battery will also be more at risk
of freezing (this can happen already at
-10°C).
Refer to the paragraph "Car inactivity"
in "Starting and driving" if the car is
left parked for a long time.If, after buying the vehicle, you want to
install electrical accessories which
require permanent electric supply
(alarm, etc.) or accessories that in any
case burden the electrical supply,
contact a Fiat Dealership, whose
qualified personnel, in addition
to suggesting the most suitable devices
from Lineaccessori MOPAR, will
evaluate the overall electrical
consumption, checking whether the
vehicle electrical system is capable of
withstanding the load required, or
whether it should be integrated with a
more powerful battery.
Since some of these devices continue
to consume electricity even when
the engine is off, they gradually run
down the battery.
IMPORTANT If a tachograph is fitted, if
the vehicle is parked for a long period
of 5 days, it is advisable to disconnect
the negative battery terminal to
maintain its charge.
If the vehicle is equipped with a battery
disconnection function (disconnector),
see the description of the procedure
in the "Controls" paragraph in the
"Dashboard and controls" section.
207
Page 276 of 304
OPERATION
SWITCHING THE SYSTEM
ON/OFF
The system is switched on/off by
pressing the
button/knob.
The electronic volume adjustment
control rotates continuously (360°) in
both directions, without stop positions.
Turn the button/knob clockwise to
increase the radio volume or
anticlockwise to decrease it.
RADIO (TUNER) MODE
The system is equipped with the
following tuners: AM, FM and DAB (for
versions/markets, where provided).
Radio mode selection
Press the RADIO button on the front
panel to activate radio mode.
Selecting a frequency band
The different tuning modes can be
selected by pressing the RADIO button
on the front panel.
Displayed information
After the desired radio station is
selected on the display, the following
information is shown (INFO mode
activated):
In the upper part:the preset station,
the time and the other active radio
settings are highlighted (e.g.: TA).In the central part:the name of the
current station, the frequency and
the radio text information (if any) are
highlighted.
FM station list
Press the BROWSE ENTER button/
knob to display the complete list of the
FM stations that can be received.
TheA-B-Cbutton can be used,
depending on the chosen letter, to jump
alphabetically to the first of the
FM/DAB stations available for that
letter.
AM/FM radio station storage
(Where provided)
The preset stations are available in all
system modes and are selected by
touching one of the presetting buttons
1-2-3-4-5-6on the front panel.
If you are tuned to a radio station that
you wish to store, hold down the button
on the display which corresponds to
the desired preset until an acoustic
confirmation signal is emitted.
The system can store up to 18 radio
stations in each mode.AM/FM radio station selection
To search for the desired radio station
press the
orbuttons, use
the wheel on the steering wheel
controls
or turn the "BROWSE/
ENTER" knob.
Previous/next radio station search
Briefly press the
orbutton
or use the wheel on the steering wheel
controls
: when the button is
released the previous or next
radio station is displayed.
When searching forwards, if the system
reaches the end of the band, it will
automatically stop on the station where
the search has started from.
Previous/next radio station fast
search
Hold down the
orbutton to
start the fast search: when the button is
released, the first tunable radio is
played.
DAB station list
Press the BROWSE ENTER button/
knob to display:
the list of all DAB stations;
the list of stations filtered by
"Genres";
the list of stations filtered by
"Ensembles" (broadcast group).
274
MULTIMEDIA
Page 279 of 304
when prompted by the mobile
phone, use its keypad to enter the PIN
code shown on the system display
or confirm on the mobile phone the PIN
displayed;
from the "Settings" menu you can
always pair a mobile phone by selecting
"Phone menu/Add phone", then
proceed as described above;
during the pairing stage a screen is
displayed showing the progress of
the operation;
NOTE The priority for the automatic
reconnection is determined according
to the order of connection. The last
phone connected will have the highest
priority.
Making a phone call
The operations described below can
only be accessed if supported by
the mobile phone in use.
For all functions available, refer to the
mobile phone owner's handbook.
A call can be made by:
selecting "Contacts" (Phonebook
......);
selecting "Recent Calls list";
selecting "Keypad".Dialling the phone number using
the "keypad" on the display
Enter the phone number using the
graphic keypad displayed. Proceed as
follows:
press the PHONE button on the
front panel;
select "Keypad" on the display and
use the right "BROWSE/ENTER" knob
to enter the number
select the icon to make the call.
Dialling the phone number using
the mobile phone
It is possible to dial a phone number
with the mobile phone and continue
using the system (never allow yourself
to be distracted while driving).
When a phone number is dialled with
the keypad of the mobile phone, the
audio of the call is played over your
vehicle's sound system.
WARNING
277
209)When connecting a device (USB or
iPod) to the USB port, make sure that
it does not obstruct the operation of the
handbrake lever.
210)When connecting a device to the AUX
socket (for versions/markets where
provided), make sure that it does not
obstruct the operation of the handbrake
lever.