automatic operation FIAT DUCATO 2018 Owner handbook (in English)
[x] Cancel search | Manufacturer: FIAT, Model Year: 2018, Model line: DUCATO, Model: FIAT DUCATO 2018Pages: 304, PDF Size: 14.93 MB
Page 96 of 304

vehicle direction getting constantly
closer to the lane demarcation lines (the
vehicle trajectory is within the lane
demarcation lines);
vehicle not constantly next to the
lane demarcation line.
ACTIVATING/
DEACTIVATING THE
SYSTEM
When the system is active, if the vehicle
gets close to one of the side
demarcation lines or one of the two
lane demarcation lines, the driver is
warned with an acoustic signal (coming
from the crossed line side if the vehicle
is equipped with the radio navigation
system) along with the corresponding
direction warning light (
or) lighting
up.
If the driver turns on the direction
indicator in order to change lanes or for
overtaking, then the system will switch
off the driver warning.
If the driver keeps deliberately with the
lane change manoeuvre, the system
interrupts the warning, remaining
enabled if the operating conditions are
not satisfied or active if the operating
conditions are exceeded (see the
dedicated paragraph).SWITCHING OFF THE
SYSTEM
Manual mode
The system can be switched off by
pressing button A fig. 104 on the
dashboard.
The LED on the button switches on and
a message appears on the display to
confirm that the system has been
switched off.
Automatic mode
If the Start&Stop is active the system
deactivates automatically. The system
will reactivate and check its operating
conditions again after the vehicle has
been started.
SYSTEM FAILURE
In the event of malfunction, the system
signals the fault to the driver with a
message on the display, an acoustic
warning and by turning on the
icon
on the display (for versions/markets,
where provided).
IMPORTANT NOTES
The Driving Advisor cannot operate due
to a not perfectly balanced and
excessive load.The operation of the system can be
adversely affected in some cases
by the morphology of the territory/road
being driven on (e.g. driving over
humps), poor visibility conditions (e.g.
fog, rain, snow), extreme light
conditions (e.g. glare of the sun,
darkness), lack of cleanliness
or damage, even partial, to the
windscreen in the area in front of the
camera.
The Driving Advisor cannot operate
following a malfunction of the following
safety systems: ABS, ESC, ASR and
Traction Plus.
The operation of the system can be
adversely affected by poor visibility
conditions (e.g. fog, rain, snow),
extreme light conditions (glare of the
sun, darkness), lack of cleaning or
damage, even partial, to the
windscreen in the area in front the
camera.
The area of the windscreen by the
camera must not be partly or totally
obscured by objects (e.g. stickers,
protective film, etc.).
94
SAFETY
Page 122 of 304

PROCEDURE FOR
NATURAL POWER
VERSIONS
(For versions/markets, where provided)
The various engine cranking methods
are described below:
METHANE tank not on reserve –
petrol tank not empty:
the engine is always started in methane
mode;
METHANE tank empty – petrol tank
not empty:
the engine is forced to start on petrol
and it will not switch to methane until
the methane tank has been filled. At the
same time, the reserve warning light
will turn on and the "REFUELLING
REQUIRED" message will be shown on
the instrument panel display;
METHANE tank not on reserve –
petrol tank empty:
the engine is always started in methane
mode.
17) 18) 19) 20) 21)
WARNING
116)It is dangerous to run the engine in
enclosed areas. The engine consumes
oxygen and engine exhaust contains
carbon dioxide, carbon monoxide and
other toxic gasses.
WARNING
14)It is advisable not to demand maximum
performance from your vehicle (e.g.
excessive acceleration, long distances at
high speeds, excessive intense braking,
etc.) during the initial period of use.
15)When the engine is switched off never
leave the key turned to MAR-ON to prevent
useless current absorption from draining
the battery.
16)If the engine fails to start with a gear
engaged, the potentially dangerous
situation due to the fact that the
transmission is automatically placed in
neutral will be signalled by a buzzer.
17)
If the warning light
flashes for 60
seconds after starting or during an
extended towing period, this indicates a
problem in the glow plug preheating
system. Use the vehicle normally if the
engine starts, but contact a Fiat Dealership
as soon as possible. 18)
Remember that the brake servo and
power steering are not operational until the
engine has been started, so you need to
apply much more force than usual to
the brake pedal and steering wheel. 19)
Never bump start the engine by
pushing, towing or coasting downhill. This
could cause fuel to flow into the catalytic
converter and damage it beyond repair. 20)A quick burst on the accelerator before
stopping the engine serves no practical
purpose; it wastes fuel and is especially
damaging to turbocharged engines. 21)
In some cases, when the engine
switches off, the fan could activate for max.
120 seconds.
120
STARTING AND DRIVING
Page 124 of 304

When necessary, you can engage
1st ,RorNwith the engine off, the key
in the MAR-ON position and the brake
pressed. In this case, gear shifts must
be made allowing at least 5 minutes
to elapse between one gear shift and
the next to safeguard the operation
of the hydraulic system and the pump
in particular;
for hill starts, accelerating gradually
but fully straight after having released
the handbrake or the brake pedal
allows the engine to greatly increase the
number of revs and tackle steeper
slopes with more torque at the wheels.
on gradients > 5% it is prohibited
to engage the 2ndgear with vehicle
stationary.
HANDBRAKE
Handbrake engagement:The
handbrake lever is located to the left of
the driver's seat. Pull the lever upwards
to engage the handbrake and ensure
that the vehicle does not move.
Handbrake disengagement:slightly
raise the lever, hold the button A
pressed and check that the
warning light switches off on the
instrument panel.
Press the brake pedal when carrying
out this operation to prevent the vehicle
from moving accidentally.IMPORTANT Make sure that the
handbrake is engaged in such a way as
to ensure the stationing of the vehicle,
especially in the case of steep slopes
and full load.
IMPORTANT Apply the handbrake only
when the vehicle is at a standstill or
with the vehicle in motion only in the
event of a failure in the hydraulic
system. If exceptional use is made of
the handbrake with the vehicle in
motion, moderate traction is advisable
in order not to cause locking of the
rear end with consequent swerving of
the vehicle.
WARNING
117)Never leave children unattended in
the vehicle. Always remove the ignition key
when leaving the vehicle and take it out
with you.
WARNING
22)If the vehicle is equipped with
self-levelling air suspension, always check
that there is sufficient space above the roof
and around the vehicle when parking.
Indeed, the vehicle could raise (or lower)
automatically depending on load or
temperature changes.
MANUAL
TRANSMISSION
To engage the gears, press the clutch
pedal fully and put the shift lever into
the required position (the diagram
is shown on the knob A fig. 126).
To engage 6th gear (where provided),
operate the lever by pressing it towards
the right in order to avoid engaging
4th gear by mistake. The action is
similar for shifting from 6th gear to 5th
gear.
IMPORTANT Reverse may only be
engaged when the vehicle is at a
standstill. With the engine running, wait
for at least 2 seconds with the clutch
pedal fully pressed before engaging
reverse to prevent damage to the gears
and grating.
126F1A0163
122
STARTING AND DRIVING
Page 126 of 304

push the shift lever towards(+)(shift
up) to engage first gear (if starting
fromNorR, simply move the lever to
the middle position), orRto engage
reverse fig. 128;
release the brake pedal and press
the accelerator pedal;
when driving, push the shift lever
towards(+)to engage a higher gear or
towards(–)to engage a lower gear.
AUTOMATIC MODE
IMPORTANT To use the system
correctly, it is advisable to only use your
right foot to operate the pedals.
Press the brake pedal;
start the engine;
push the shift lever toA/Mfig. 129
to enable automatic mode; push the
shift lever towards(+)(shift up) to
engage first gear (if starting fromNor
R, simply move the lever to the middle
position), orRto engage reverse.
Release the brake pedal and press
the accelerator pedal.
AUTOMATIC OPERATION
(AUTO with UP function
on)
TheUPfunction can be turned on by
pressing theUPfig. 130 button located
among the dashboard controls. After
turning this function on, the warning
light
on the instrument panel turns
on, together with a confirmation
message on the reconfigurable
multifunction display.
With theUPfunction on, the system
will select the most suitable gear
depending on the vehicle speed, the
engine speed and the intensity with
which the accelerator pedal is pressed,
with the aim of tackling roads with
steep gradients in a smooth and
comfortable manner.If necessary, (for example when
overtaking), after pressing the
accelerator pedal fully, the system shifts
down one or more gears to provide
suitable torque and power for the
acceleration requested by the driver
(this all takes place automatically
whether theUPfunction is on or off).
24)
WARNING
24)Avoid keeping your hand placed on this
lever in between gear changes or
Auto/Manual mode.
129F0N0345M130F0N0348M
124
STARTING AND DRIVING
Page 127 of 304

START&STOP
SYSTEM
IN BRIEF
The Start&Stop device automatically
stops the engineeach time the
vehicle is stationary and all the
conditions for automatic switch-off
have been met, and starts it again
when the driver wants to move off.
This improves the efficiency of the
vehicle by reducing fuel consumption,
the emission of harmful gases and
noise pollution.
OPERATING MODE
Stopping the engine
Versions with manual transmission
With the vehicle stationary, the engine
stops with the gearbox in neutral and
the clutch pedal released.
Versions with Comfort-matic
transmission
With car at a standstill and brake pedal
pressed, the engine switches off if the
gear lever is in a position other thanR.In the event of stops uphill, engine
switching off is disabled to make the
"Hill Holder" function available (works
only with the engine running).
The warning light on the instrument
panel switches on to signal that the
engine has stopped.
Restarting the engine
Versions with manual transmission
Depress the clutch pedal to restart
the engine.
Versions with Comfort-matic
transmission
Releasing the brake pedal the engine
restarts automatically; the icon
switches off on the display.
If the engine is restarted with the “Hill
Holder” function off, move the lever
towards (+), (-)orRand the engine
restarts.
MANUAL ACTIVATION
AND DEACTIVATION OF
THE SYSTEM
To activate/deactivate the system
manually, press the
button on the
dashboard control panel.
25)
SAFETY FUNCTIONS
In engine cut-out conditions through
the Start&Stop system, if the driver
unfastens his/her seat belt and opens
the driver's door or the passenger door,
the engine can be restarted only by
using the key. The driver is notified of
this condition by a buzzer, through the
instrument panel warning light
flashing and, where provided, by a
message in the display.
119) 120)
WARNING
25)If the vehicle is equipped with manual
climate control, if you want to favour
climate comfort, the Start&Stop system
can be deactivated for continuous climate
control system operation.
WARNING
119)The vehicle should always be
evacuated after the key has been removed
or turned to the STOP position. When
refuelling, make sure that the car is
switched off with the key in the STOP
position.
120)If the battery needs to be replaced,
always contact a Fiat Dealership. The
replacement battery should be of the same
type (L6 105Ah/850A) and should have
the same characteristics.
125
Page 130 of 304
SPEED BLOCK
(for versions/markets, where provided)
The vehicle is equipped with a speed
limitation function that can be set at the
user's request to one of 4 predefined
values: 90, 100, 110, 130 km/h.
To activate/deactivate this function,
contact a Fiat Dealership.
Following the operation, a sticker will be
applied to the windscreen showing the
maximum speed setting.
IMPORTANT The speedometer could
indicate a higher maximum speed than
the effective one, set by the Dealership,
in accordance with the regulations in
force.
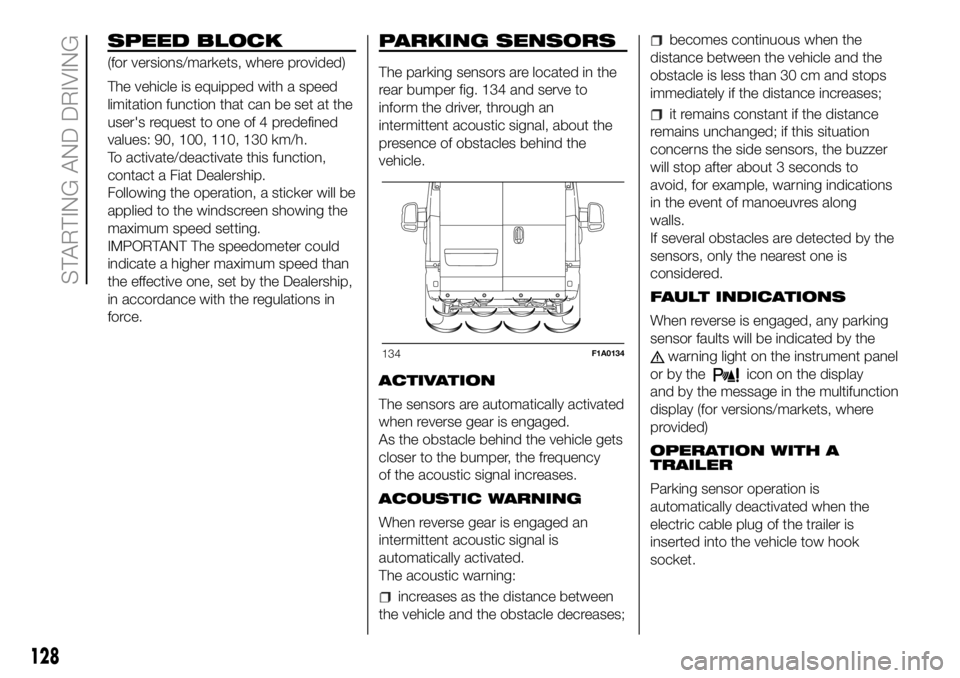
PARKING SENSORS
The parking sensors are located in the
rear bumper fig. 134 and serve to
inform the driver, through an
intermittent acoustic signal, about the
presence of obstacles behind the
vehicle.
ACTIVATION
The sensors are automatically activated
when reverse gear is engaged.
As the obstacle behind the vehicle gets
closer to the bumper, the frequency
of the acoustic signal increases.
ACOUSTIC WARNING
When reverse gear is engaged an
intermittent acoustic signal is
automatically activated.
The acoustic warning:
increases as the distance between
the vehicle and the obstacle decreases;
becomes continuous when the
distance between the vehicle and the
obstacle is less than 30 cm and stops
immediately if the distance increases;
it remains constant if the distance
remains unchanged; if this situation
concerns the side sensors, the buzzer
will stop after about 3 seconds to
avoid, for example, warning indications
in the event of manoeuvres along
walls.
If several obstacles are detected by the
sensors, only the nearest one is
considered.
FAULT INDICATIONS
When reverse is engaged, any parking
sensor faults will be indicated by the
warning light on the instrument panel
or by the
icon on the display
and by the message in the multifunction
display (for versions/markets, where
provided)
OPERATION WITH A
TRAILER
Parking sensor operation is
automatically deactivated when the
electric cable plug of the trailer is
inserted into the vehicle tow hook
socket.
134F1A0134
128
STARTING AND DRIVING
Page 131 of 304

The sensors are automatically
reactivated when the trailer's cable plug
is removed.
123)
26)
IMPORTANT If you wish to leave the
tow hook fitted without towing a trailer,
it is advisable to contact a Fiat
Dealership for the relevant system
update operations because the tow
hook could be detected as an obstacle
by the central sensors.
When using special washing equipment
such as high pressure jets or steam
cleaning, clean the sensors very quickly
keeping the jet more than 10 cm away.
IMPORTANT NOTES
Do not apply stickers to the sensors.
When parking, take the utmost
care over obstacles that may be above
or under the sensor.
Objects close to the vehicle, in
certain circumstances are not detected
and could therefore cause damage to
the vehicle or be damaged.
The following conditions may influence
the performance of the parking
assistance system:
Reduced sensor sensitivity and a
reduction in the parking assistance
system performance could be due to
the presence on the surface of the
sensor of: ice, snow, mud, thick paint.
The sensor may detect a non-
existent obstacle (echo noise) due to
mechanical noises, for example when
washing the vehicle, in case of rain,
strong wind, hail.
The warnings sent by the sensor
can also be altered by the presence of
ultrasonic systems (e.g. pneumatic
brakes of trucks or pneumatic drills)
near the car.
The performance of the parking
assistance system may also be affected
by the position of the sensors. For
example by a change in the ride setting
(caused by the wear of the shock
absorbers, suspension), changing the
tyres, overloading the vehicle and
carrying out specific tuning operations
that require the vehicle to be lowered.
Detection of obstacles in the upper
part of the vehicle (particularly in the
case of vans or chassis cabs) may not
be guaranteed because the system
detects obstacles that could strike the
lower part of the vehicle.
WARNING
123)The driver is always responsible for
parking and other dangerous manoeuvres.
While carrying out these manoeuvres,
always make sure that no people
(especially children) or animals are in the
area concerned. The parking sensors
are used to assist the driver, who must
never allow his attention to lapse during
potentially dangerous manoeuvres, even
those executed at low speeds.
WARNING
26)For correct operation of the system,
sensors must always be clean from mud,
dirt, snow or ice. Be careful not to scratch
or damage the sensors while cleaning
them. Avoid using dry, rough or hard
cloths. The sensors must be washed using
clean water, with the addition of vehicle
shampoo if necessary.
129
Page 135 of 304

REFUELLING THE
VEHICLE
IN BRIEF
Stop the engine before refuelling.
PETROL ENGINES
Only usepetrol with an octane number
(RON) no lower than 95 (EN228
specification).
DIESEL ENGINES
Refuel the vehicle exclusively with diesel
for motor vehicles in compliance with
European specification EN590.
OPERATION AT LOW
TEMPERATURES
When using or parking the vehicle for a
long time in the mountains or cold
areas, it is advisable to refuel using
locally available diesel fuel. In this case,
it is also advisable to keep the tank
over 50% full.
35)
TANK CAPACITY
To ensure that you fill the tank
completely, top up twice after the first
click of the fuel supply gun. Further
top-ups could cause faults in the fuel
feeding system.
FUEL TANK CAP
To refuel, open the flap A fig. 137
located on the left side of the vehicle
and then unscrew the cap B fig. 137 by
turning it anticlockwise.
For versions / markets where provided,
insert the ignition key in the lock of
the cap. Turn the key counter-clockwise
and remove the cap by gripping the
key. Do not remove the key from the
cap during refuelling. While refuelling,
the cap can be hung on the flap A (fig.
137).The sealing may cause a slight pressure
increase in the tank. A little breathing
off, while slackening the cap is
absolutely normal.
In case of loss or damage to the fuel
tank cap, make sure that the
replacement cap is for the appropriate
vehicle.
Tighten the cap of the fuel tank filler
until you hear a "click". This sound
shows that the cap of the fuel tank filler
is properly tightened.
For versions / markets where provided,
turn the key clockwise until it stops. It
is not necessary to apply an additional
load on the key to complete the
tightening of the cap. Only in the case
where the cap has been tightened
properly, it will be possible to remove
the ignition key from the cap.
After each refuelling, make sure the fuel
filler cap is securely tightened.
IMPORTANT
When the gun distributor fuel "snaps" or
interrupts the supply, the tank is nearly full
and you can run two additional top-ups
after shooting automatic.
129) 130) 131)
137F1A5004
133
Page 140 of 304

ADDITIVE FOR
DIESEL EMISSIONS
ADBLUE (UREA)
System description
The vehicle is equipped with an UREA
fuel injection system and a Selective
Catalytic Reduction catalyst to meet the
emission standards.
These two systems ensure compliance
with the diesel emissions requirements;
at the same it maintains fuel saving
levels, driveability, torque and power.
For the system messages and warnings
refer to the "Warning lights and
messages" paragraph in the "Knowing
the instrument panel" section.
Notes
When you stop the vehicle you
could hear a distinct click coming from
under the vehicle due to the UREA
injection system, this is normal.
The UREA injection system pump
continues to operate for a short period
of time after the engine is switched
off, to purge the circuit. This is normal,
and you can still hear its noise from
under the vehicle.
VERSION WITH
METHANE SYSTEM
(Natural Power)
38) 39)
INTRODUCTION
The "Natural Power" version of the Fiat
Ducato features two fuel system, one
primary natural gas (methane) system
and one emergency petrol system.
METHANE CYLINDERS
The vehicle is equipped with five
cylinders (total capacity of about 218
litres) located under the vehicle floor
and protected by two special shields.
The cylinders are the tank that contains
the methane in its compressed
gaseous state (nominal pressure of 200
bar at 15°C). The methane, stored in
the cylinders at high pressure, flows
through a dedicated pipe to reach the
pressure regulator/reduction unit which
supplies the 4 methane injectors at
low pressure (about 6 bar).
The cylinders must be inspected, in
accordance with ECE Regulation
Procedure no. 110, every 4 years
from the vehicle registration date or
in accordance with specific
regulations in individual countries.IMPORTANT If gas is smelled, switch
from methane operation to petrol
operation and immediately go to a Fiat
Dealership to have the vehicle checked
and possible system faults excluded.
FUEL SWITCHING
LOGICS
Management of switching between the
two different fuel supplies is fully
automatic, and carried out by the
engine control unit.
When the residual amount of methane
drops below 1/5 of the cylinder
capacity, the lowest level and the edges
of the other levels flash to indicate the
reserve state and that refuelling fig. 140
is required.
If the methane runs out, it is
automatically switched to petrol; on the
display, all the empty segments stop
flashing and then the
indicator near
the CNG icon fig. 141 turns on.
Having reached the reserve methane
pressure threshold, and completely
filled the methane tank, the system
forces the switch to petrol for 5
seconds, with the aim of keeping the
petrol fuel supply system fully efficient.
138
STARTING AND DRIVING
Page 148 of 304

Please note that the tow bar can be
installed only when in these conditions.
If the locking mechanism of the tow
bar is disengaged before the
installation, or at any other time, and is
in the locked position, it must be
pre-loaded. The locked position can be
identified by the green mark of the
flywheel coinciding with the green mark
of the tow bar and by the flywheel in
the stop position on the tow bar,
namely without slot (see figure).
The locking mechanism is pre-loaded
as follows: with the key inserted and
the lock open, extract the flywheel
following the direction of the arrow and,
to pre-load, rotate according to the
direction of the arrow b until the stop.
The release lever is engaged and the
locking mechanism remains in the
pre-loading position even when the
flywheel is released. The tow bar must
be inserted in the housing pipe with the
coupling pin for the installation. Insert
from the bottom and push upwards.
The mechanism then locks
automatically. Keep your hands far from
the flywheel, as it rotates during the
locking procedure.2. The tow bar must be inserted in the
housing pipe with the coupling pin
for the installation. Insert from the
bottom and push upwards. The
mechanism then locks automatically.
Keep your hands far from the flywheel,
as it rotates during the locking
procedure.
3. Close the lock and always remove
the key. The key cannot be removed
when the lock is released. Apply the
protection cap on the lock.
Removing the tow bar
1. Remove the protection cap from the
lock and press it on the key grip. Open
the lock with the key.
2. Hold the tow bar firmly, remove the
flywheel following the direction of the
arrow and rotate according to the
direction of the arrow b until stopping,
so as to remove till the extracted
position. Then remove the tow bar from
the housing pipe. The flywheel can
then be released; it autonomously
stops in the released position.
3. Arrange the tow bar in the luggage
compartment so that it cannot be
dirtied or damaged by other
transported objects.
4. Insert the suitable plug in the
mounting pipe.
WARNING
41)The removable ball head bar must be
repaired and taken apart by the
manufacturer only.
42)The accompanying plate must be in a
highly visible point of the vehicle, near
the mounting pipe or inside the luggage
compartment.
43)To ensure correct operation of the
system, periodically remove all dirt deposits
from the ball head bar and from the
mounting pipe. The mechanical
components must be serviced at the
specified intervals. The lock must only be
treated with graphite.
44)Periodically lubricate the joints, the
sliding surfaces and the balls with grease
without resin or oil. Lubrication is also a
further corrosion protection.
45)If the vehicle is washed with high-
pressure jets, the ball head bar must be
removed and the dedicated cap fitted. The
ball head bar must never be treated with
steam jets.
46)Two keys are supplied together with
the removable ball tow bar. Note down the
key number on the pawl for any following
order and keep it.
146
STARTING AND DRIVING