display FIAT DUCATO 244 2002 3.G Connect NavPlus Manual
[x] Cancel search | Manufacturer: FIAT, Model Year: 2002, Model line: DUCATO 244, Model: FIAT DUCATO 244 2002 3.GPages: 246, PDF Size: 3.39 MB
Page 8 of 246
ADVICE
ROAD SAFETY
You are recommended to learn how
to use the different functions of the
system and in particular of the radio
(e.g. storing stations) before starting
to drive.
IMPORTANTWhen receiving
traffic information the volume might
be higher than normal.
CARE AND MAINTENANCE
The structure of the system ensures
long years of operation with no need
for particular maintenance. In the
event of a fault, contact Fiat Deal-
ership.Some care must however be taken
to ensure the complete efficiency of
the system:
– the monitor is sensitive to scratch-
ing, liquid detergents and UV rays;
– liquids that penetrate inside may
damage the device irreparably.
Clean the front panel and display on-
ly using a soft, dry antistatic cloth.
Cleaning and polishing products may
damage the surface. RECEPTION CONDITIONS
Reception conditions change con-
stantly when driving. Reception can be
disturbed by the presence of moun-
tains, buildings, bridges particularly
when far away from the broadcaster
received.
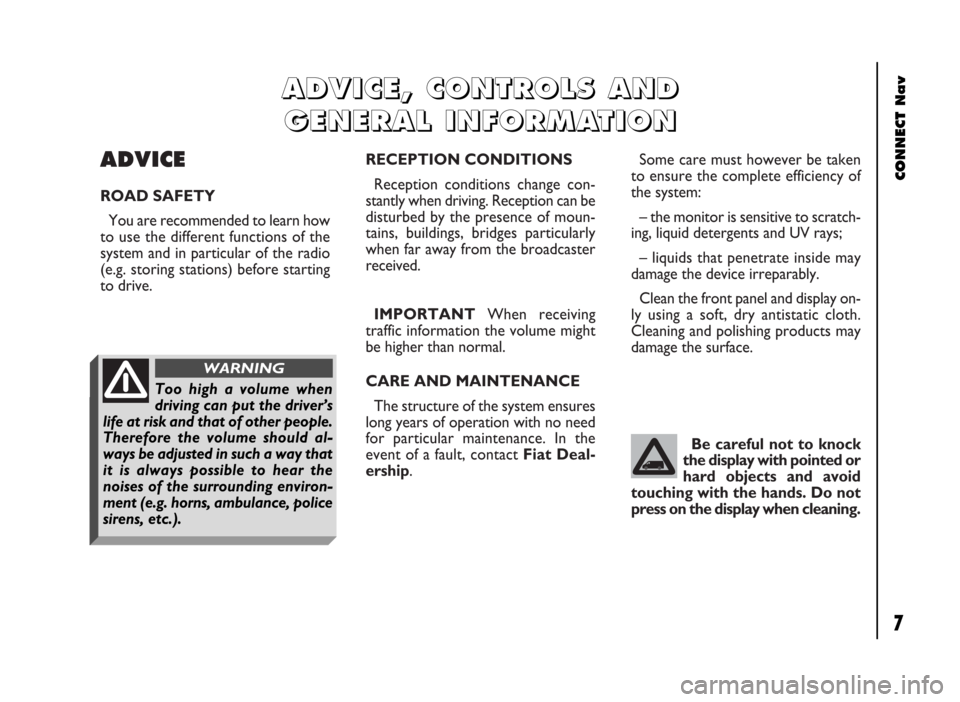
Be careful not to knock
the display with pointed or
hard objects and avoid
touching with the hands. Do not
press on the display when cleaning.
A A
D D
V V
I I
C C
E E
, ,
C C
O O
N N
T T
R R
O O
L L
S S
A A
N N
D D
G G
E E
N N
E E
R R
A A
L L
I I
N N
F F
O O
R R
M M
A A
T T
I I
O O
N N
CONNECT Nav
7
Too high a volume when
driving can put the driver’s
life at risk and that of other people.
Therefore the volume should al-
ways be adjusted in such a way that
it is always possible to hear the
noises of the surrounding environ-
ment (e.g. horns, ambulance, police
sirens, etc.).
WARNING
Page 9 of 246
CONNECT Nav
8
– Never use chemical products for
cleaning (e.g. spray cans, antistatics or
thinners) as they might damage the
surface of Compact Discs.
– After listening to them put Com-
pact Discs back in their boxes to avoid
marking or scoring which could cause
skipping when playing.
– Do not expose Compact Discs to
direct sunlight, high temperatures or
damp for prolonged lengths of time to
prevent them from bending.
– Do not stick labels or write on the
recorded surface of Compact Discs.
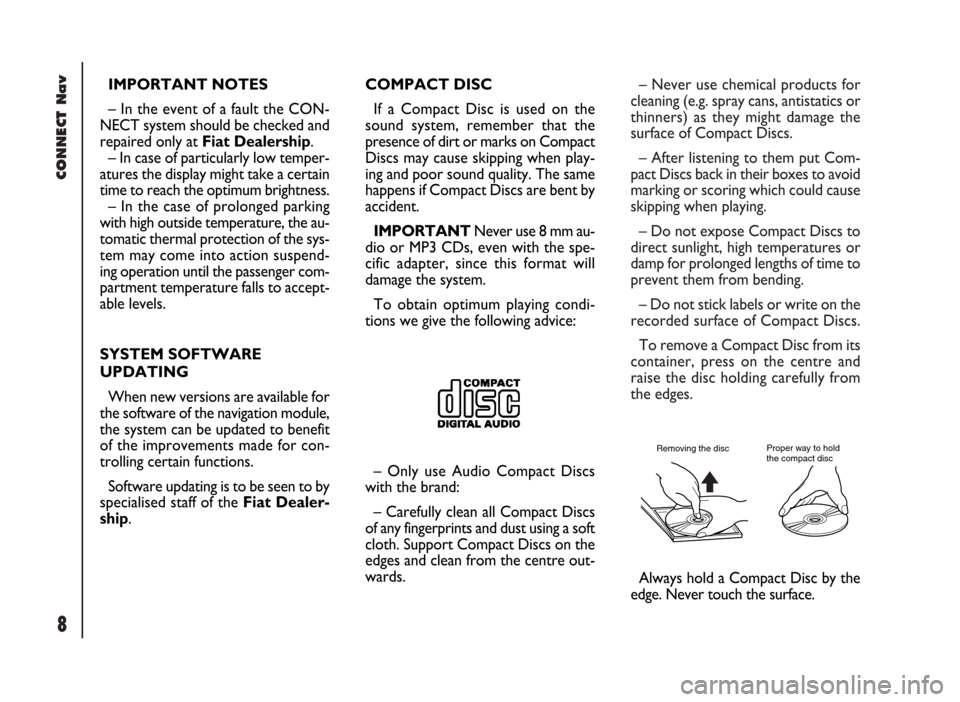
To remove a Compact Disc from its
container, press on the centre and
raise the disc holding carefully from
the edges.
Proper way to hold
the compact discRemoving the disc
IMPORTANT NOTES
– In the event of a fault the CON-
NECT system should be checked and
repaired only at Fiat Dealership.
– In case of particularly low temper-
atures the display might take a certain
time to reach the optimum brightness.
– In the case of prolonged parking
with high outside temperature, the au-
tomatic thermal protection of the sys-
tem may come into action suspend-
ing operation until the passenger com-
partment temperature falls to accept-
able levels.
SYSTEM SOFTWARE
UPDATING
When new versions are available for
the software of the navigation module,
the system can be updated to benefit
of the improvements made for con-
trolling certain functions.
Software updating is to be seen to by
specialised staff of the Fiat Dealer-
ship.COMPACT DISC
If a Compact Disc is used on the
sound system, remember that the
presence of dirt or marks on Compact
Discs may cause skipping when play-
ing and poor sound quality. The same
happens if Compact Discs are bent by
accident.
IMPORTANTNever use 8 mm au-
dio or MP3 CDs, even with the spe-
cific adapter, since this format will
damage the system.
To obtain optimum playing condi-
tions we give the following advice:
– Only use Audio Compact Discs
with the brand:
– Carefully clean all Compact Discs
of any fingerprints and dust using a soft
cloth. Support Compact Discs on the
edges and clean from the centre out-
wards.
Always hold a Compact Disc by the
edge. Never touch the surface.
Page 11 of 246
CONNECT Nav
10
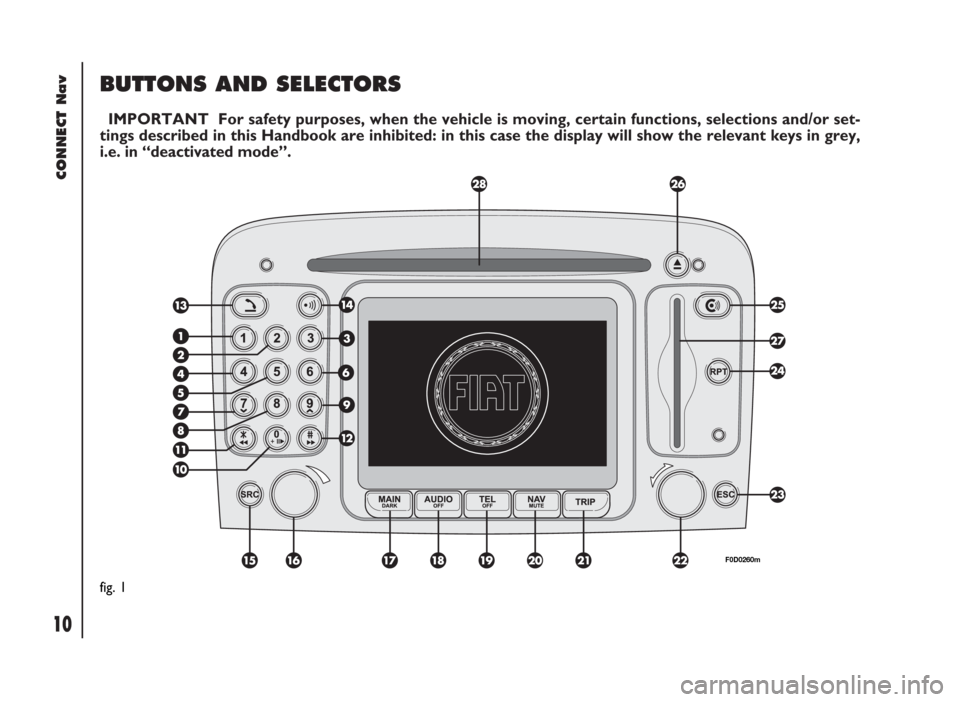
BUTTONS AND SELECTORS
IMPORTANT For safety purposes, when the vehicle is moving, certain functions, selections and/or set-
tings described in this Handbook are inhibited: in this case the display will show the relevant keys in grey,
i.e. in “deactivated mode”.
fig. 1
F0D0260m
Page 13 of 246
CONNECT Nav
12
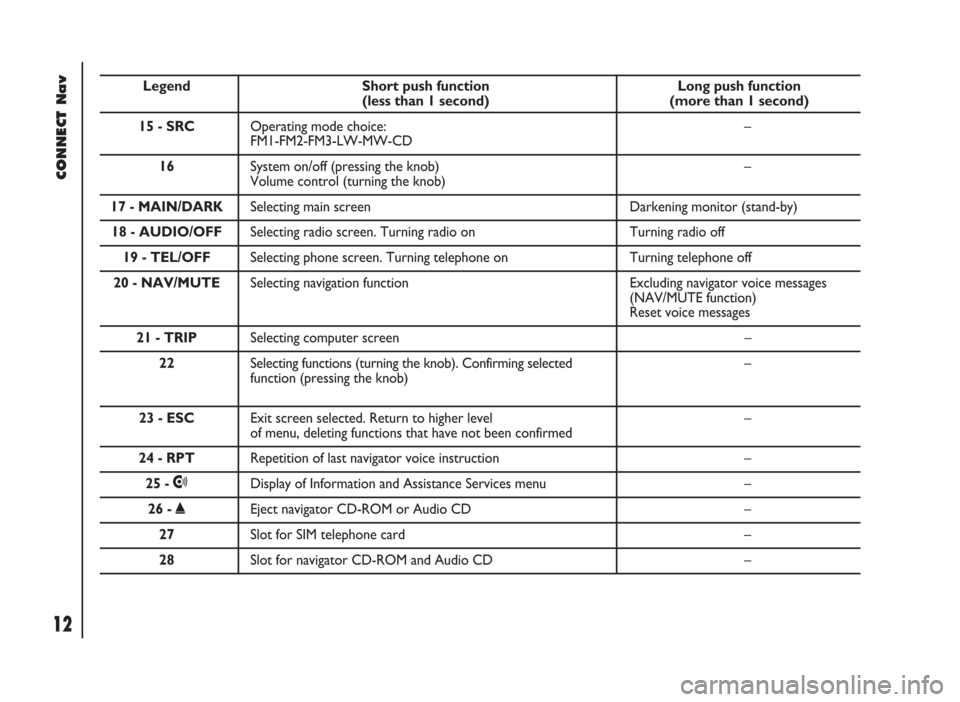
Legend Short push function Long push function (less than 1 second) (more than 1 second)
15 - SRCOperating mode choice: –
FM1-FM2-FM3-LW-MW-CD
16 System on/off (pressing the knob) –
Volume control (turning the knob)
17 - MAIN/DARKSelecting main screen Darkening monitor (stand-by)
18 - AUDIO/OFFSelecting radio screen. Turning radio on Turning radio off
19 - TEL/OFFSelecting phone screen. Turning telephone on Turning telephone off
20 - NAV/MUTESelecting navigation function Excluding navigator voice messages
(NAV/MUTE function)
Reset voice messages
21 - TRIPSelecting computer screen –
22 Selecting functions (turning the knob). Confirming selected –
function (pressing the knob)
23 - ESCExit screen selected. Return to higher level –of menu, deleting functions that have not been confirmed
24 - RPTRepetition of last navigator voice instruction –
25 -•Display of Information and Assistance Services menu –
26 -˚Eject navigator CD-ROM or Audio CD –
27Slot for SIM telephone card –
28Slot for navigator CD-ROM and Audio CD –
Page 14 of 246
CONNECT Nav
13
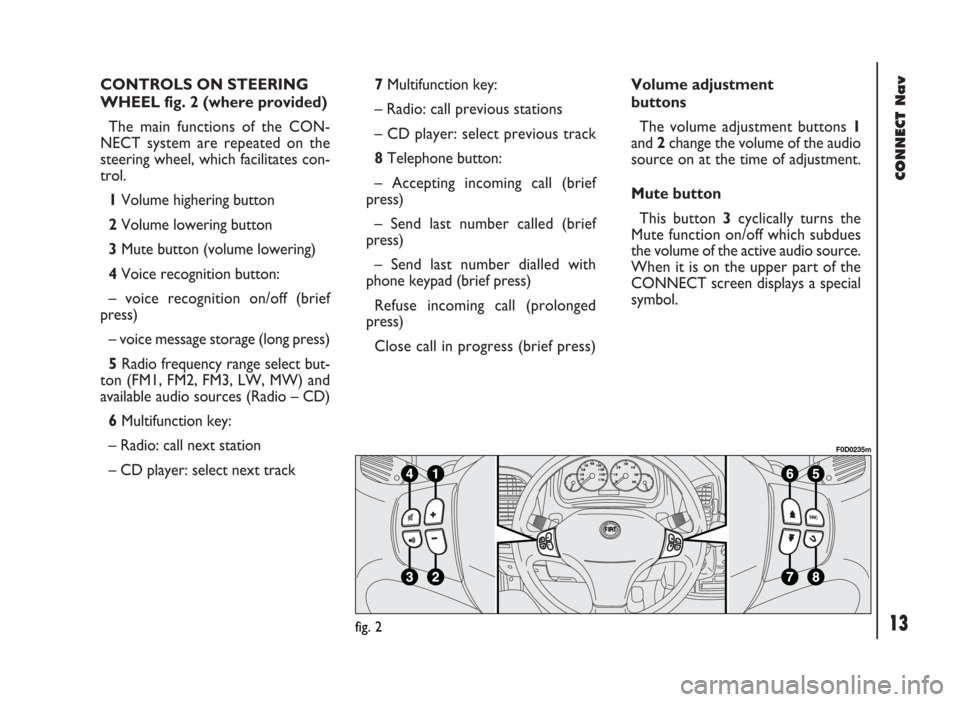
CONTROLS ON STEERING
WHEEL fig. 2 (where provided)
The main functions of the CON-
NECT system are repeated on the
steering wheel, which facilitates con-
trol.
1Volume highering button
2Volume lowering button
3Mute button (volume lowering)
4Voice recognition button:
– voice recognition on/off (brief
press)
– voice message storage (long press)
5Radio frequency range select but-
ton (FM1, FM2, FM3, LW, MW) and
available audio sources (Radio – CD)
6Multifunction key:
– Radio: call next station
– CD player: select next track 7Multifunction key:
– Radio: call previous stations
– CD player: select previous track
8Telephone button:
– Accepting incoming call (brief
press)
– Send last number called (brief
press)
– Send last number dialled with
phone keypad (brief press)
Refuse incoming call (prolonged
press)
Close call in progress (brief press)Volume adjustment
buttons
The volume adjustment buttons 1
and 2change the volume of the audio
source on at the time of adjustment.
Mute button
This button 3cyclically turns the
Mute function on/off which subdues
the volume of the active audio source.
When it is on the upper part of the
CONNECT screen displays a special
symbol.
fig. 2
F0D0235m
Page 17 of 246
CONNECT Nav
16
Manual switching on
With ignition key at STOPpress
knob 16-fig. 1, to switch the system
on, thus making available the following
modules:
– MAIN,
– AUDIO,
– NAV,
– TEL,
– Targasys
•.
IMPORTANTIn this mode, the
SETUP and TRIP modules can be ac-
tivated; however, it will not be possi-
ble to validate any operation con-
cerning parameter change, language
change, units change and any other
type of adjustment provided by the
system. These limitations are normal
when switching the system on manu-
ally by the knob 16-fig. 1, since with
engine off (key at STOP) the vehicle
data transmission devices are not op-
erating.
Turning the ignition key to MAR, will
make all system functions active.SYSTEM POWER OFF
The CONNECT system can be
switched off according to two differ-
ent modes:
– deactivation independentof ig-
nition key
– deactivation dependenton ig-
nition key
To choose the power-off mode, see
the Power OFF submenu in the SET-
UP menu.
Deactivation independent
of ignition key
With this mode active, the system
can be turned off by pressing the knob
16-fig. 1.
The display will show the message
“PLEASE WAIT WHILE SYSTEM
TURNS OFF”.
IMPORTANTWith ignition key at
STOP, deactivation is delayed and will
take place after 20 minutes if the sys-
tem has a destination set or a phone
call is in progress.Deactivation dependent
on ignition key
With this mode active, the system
can be switched off by turning the ig-
nition key to STOPor pressing the
knob 16-fig. 1.
IMPORTANTDeactivation with
ignition key to STOPis delayed and
will take place after 20 minutes if the
system has a destination set or a
phone call is in progress.
Page 19 of 246
CONNECT Nav
18
MAIN MODE
The MAIN mode is activated by
pushing the “MAIN” button 17-fig. 1
on the front panel.
It is possible to access the Set-up
menu from the MAIN mode.
To access the Set-up menu, display
the page MAIN then push on knob 22-
fig.1. Set-up functions will be ac-
cessed (refer to the SET-UP chapter).
Depress several times “ESC” 23-
fig.1 for returning to the display of
MAIN.STANDARD INFORMATION
The display shows information rele-
vant to the main system modules:
– AUDIO
– TELEPHONE
– NAVIGATOR
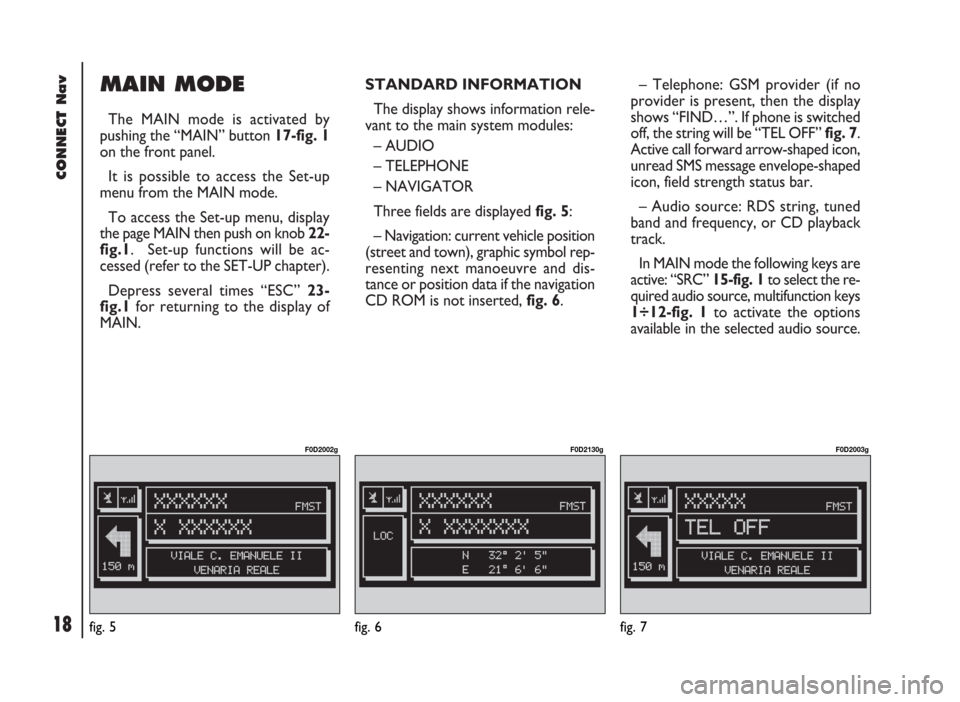
Three fields are displayed fig. 5:
– Navigation: current vehicle position
(street and town), graphic symbol rep-
resenting next manoeuvre and dis-
tance or position data if the navigation
CD ROM is not inserted, fig. 6.– Telephone: GSM provider (if no
provider is present, then the display
shows “FIND…”. If phone is switched
off, the string will be “TEL OFF” fig. 7.
Active call forward arrow-shaped icon,
unread SMS message envelope-shaped
icon, field strength status bar.
– Audio source: RDS string, tuned
band and frequency, or CD playback
track.
In MAIN mode the following keys are
active: “SRC” 15-fig. 1to select the re-
quired audio source, multifunction keys
1÷12-fig. 1to activate the options
available in the selected audio source.
fig. 5
F0D2002g
fig. 6
F0D2130g
fig. 7
F0D2003g
Page 20 of 246
CONNECT Nav
19
“SETUP” FUNCTION
The SETUP mode enables to set dif-
ferent vehicle and CONNECT system
operating modes and parameters.
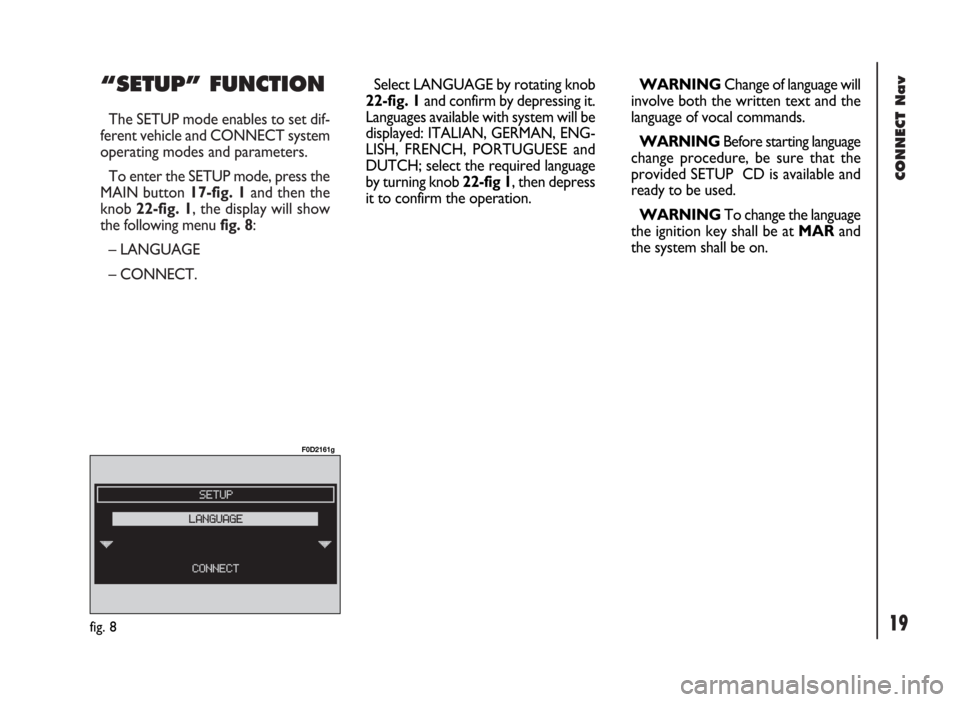
To enter the SETUP mode, press the
MAIN button 17-fig. 1and then the
knob 22-fig. 1, the display will show
the following menu fig. 8:
– LANGUAGE
– CONNECT.
fig. 8
F0D2161g
Select LANGUAGE by rotating knob
22-fig. 1and confirm by depressing it.
Languages available with system will be
displayed: ITALIAN, GERMAN, ENG-
LISH, FRENCH, PORTUGUESE and
DUTCH; select the required language
by turning knob 22-fig 1, then depress
it to confirm the operation.WARNINGChange of language will
involve both the written text and the
language of vocal commands.
WARNINGBefore starting language
change procedure, be sure that the
provided SETUP CD is available and
ready to be used.
WARNINGTo change the language
the ignition key shall be at MARand
the system shall be on.
Page 21 of 246
CONNECT Nav
20
VIDEO
Selecting and confirming “VIDEO” by
rotating and pressing the knob 22-
fig. 1will allow the following settings:
1)“DAYTIME BRIGHTNESS”: en-
ables to adjust the display brightness
in day mode. To perform the adjust-
ment, select and confirm this option
by rotating and pressing the knob 22-
fig. 1. Rotate the knob 22-fig. 1
clockwise to increase brightness and
counterclockwise to decrease it.
2)“DAYTIME CONTRAST”: to ad-
just contrast in daytime brightness
mode. To perform the adjustment, se-
lect and confirm this option by rotat-
ing and pressing the knob 22-fig. 1.
Rotate the knob 22-fig. 1clockwise
to increase contrast and counter-
clockwise to decrease it. A special message will then be dis-
played, asking the user to insert the
provided SETUP CD or to wait if the
SETUP CD is already inserted. A series
of messages will inform the user about
procedure progress and end: it is es-
sential to not “disturb” the system dur-
ing this operation.
Do not start the engine or disconnect
the battery during the language change
operation.
Should this take place, the first time
you turn the system on, a special mes-
sage will be displayed communicating
that the language change operation shall
be concluded inserting the SETUP CD:
“WARNING: LANGUAGE CHANGE
FAILED. PLEASE REPEAT PROCE-
DURE”.Selecting CONNECT by turning and
pressing the knob 22-fig. 1, the display
will show the following submenu:
– VIDEO
– POWER OFF
– SERIAL DATA INTERFACE
– FLEET MANAGEMENT.
Page 22 of 246
CONNECT Nav
21
3)“NIGHTTIME BRIGHTNESS”:
enables to adjust the display brightness
in night mode. To perform the ad-
justment, select and confirm this op-
tion by rotating and pressing the knob
22-fig. 1. Rotate the knob 22-fig. 1
clockwise to increase brightness and
counterclockwise to decrease it.
4)“NIGHTTIME CONTRAST”: to
adjust contrast in nighttime brightness
mode. To perform the adjustment, se-
lect and confirm this option by rotat-
ing and pressing the knob 22-fig. 1.
Rotate the knob 22-fig. 1clockwise
to increase contrast and counter-
clockwise to decrease it.5)“MODE, DIMMING, CON-
TRAST”: selecting and confirming this
option by rotating and pressing the
knob 22-fig. 1, the following settings
are possible:
“AUTOMATIC”: enables to adjust
automatically the day/night mode de-
pending on vehicle lights switching
on/off.
“DAY”: activates day mode.
“NIGHT”: activates night mode.
After selecting the required setting,
press the knob 22-fig. 1to confirm.
If the automatic mode is “DAY” on-
ly day adjustment is displayed and the
night one is deactivated.
If the automatic mode is “NIGHT”
only night adjustment is displayed and
the day one is deactivated.POWER OFF
Select and confirm “POWER OFF”
by rotating and pressing the knob 22-
fig. 1to access the type of setting that
determines CONNECT switching off
(dependent on or independent of ig-
nition key).
Possible settings, only with ignition
key at MAR, are the following:
– “key-dependent auto-off”
– “key-independent auto-off”
Current activated setting will be high-
lighted.
Select and confirm the required set-
ting by rotating and pressing the knob
22-fig. 1.