sat nav FIAT DUCATO 244 2002 3.G Connect NavPlus Manual
[x] Cancel search | Manufacturer: FIAT, Model Year: 2002, Model line: DUCATO 244, Model: FIAT DUCATO 244 2002 3.GPages: 246, PDF Size: 3.39 MB
Page 62 of 246
CONNECT Nav
61
In main telephone mode screen,
press the knob 22-fig. 1, to display the
following menu:
FREQUENT NUMBERS
LAST CALLS RECEIVED
LAST NUMBERS CALLED
DIRECTORY
WAP
VOICE MEMO
MESSAGES
PHONE OPTIONS
PHONE SETTINGSPress “ESC” 23-fig. 1to return to
main telephone screen.
There is another “ESC” mode, if
CONNECT is already on (e.g.: audio
mode), to enter the telephone mode:
– press shortly button ò13-fig. 1,
the display will show for few seconds
the last dialled number;
– press again button ò13-fig. 1to
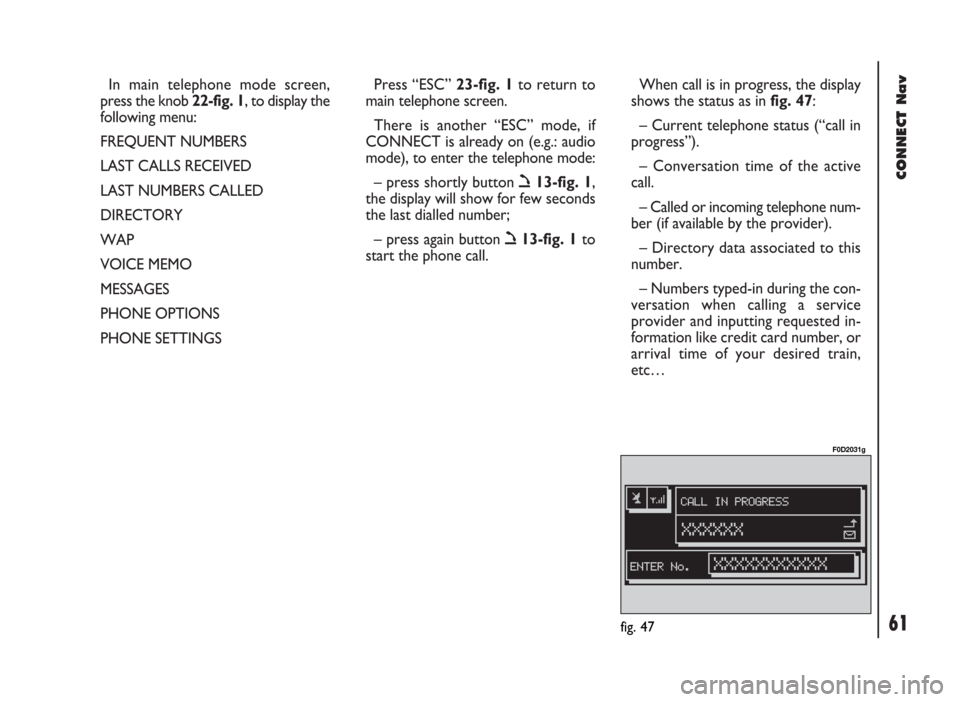
start the phone call.When call is in progress, the display
shows the status as in fig. 47:
– Current telephone status (“call in
progress”).
– Conversation time of the active
call.
– Called or incoming telephone num-
ber (if available by the provider).
– Directory data associated to this
number.
– Numbers typed-in during the con-
versation when calling a service
provider and inputting requested in-
formation like credit card number, or
arrival time of your desired train,
etc…
fig. 47
F0D2031g
Page 65 of 246
CONNECT Nav
64
To accept the call, proceed as
follows:
– short push on button ò13-fig. 1;
dialog box disappears and ring stops,
the display shows the string “call in
progress”.
To close the conversation,
proceed as follows:
– press button ò13-fig. 1; the sys-
tem returns automatically to the pre-
vious mode and the display shows the
relevant status.
To refuse the call, proceed as
follows:
– long push on button ò13-fig. 1;
dialog box disappears and ring stops.
In this case the screen will remain the
one shown before the incoming call.
IMPORTANT: dialog box disap-
pears and ring stops also if the line is
unwillingly lost.OUTGOING CALLS
To start a call, proceed as
follows:
– enter the telephone mode as pre-
viously described;
– dial the required number using the
multifunction keys 1 ÷ 12-fig. 1;
– to enter the international prefix
(“+” char), push button “*/+” at
length;
dialled number is shown in the input
box on the display; max. 20 digits can
be input and in case there is no enough
space to keep the whole string, the in-
terface will provide a left string scroll;
– to start a call, press button ò13-
fig. 1; active screen becomes the one
shown in fig. 47.
To enter a phone number, follow
these instructions:
Press briefly one of the multifunction
keys 1 ÷ 12-fig. 1to enter the cor-
responding digit or character;More particularly keys “*” and “#”
can be used.
Press continuously button “+” to en-
ter the international prefix (“+” char);
Press continuously keys 1 ÷ 9-fig. 1
to select the corresponding frequent
number set (see paragraph “Frequent
Numbers”);
Short push on “ESC” 23-fig. 1clears
the last input digit;
Long push on “ESC” 23-fig. 1clears
all entered digits;
DIALLING A SERVICE
NUMBER
Following the instructions given in
the previous paragraph, the user can
dial service numbers (e.g.: ←#
xxxxx←) according to ETSI Standard
GSM 02.30.
Page 90 of 246
CONNECT Nav
89
– “REDIAL”: in case of busy line, re-
dials automatically the called number
(for a preset number of times); to stop
redialling press key 2-fig. 1at length.
– “CALL FORWARDING”: enables
or disables call divert;
– “CALL FORWARDING NO.”: al-
lows input of the phone number to
which call is diverted.
– “ENABLE CALL WAITING”: en-
ables or disables incoming call an-
nouncement;A beep will be heard to indicate an
incoming call during an active phone
conversation. To accept the incoming
call press the knob 22-fig. 1; the first
call will wait until the second conver-
sation is ended or until the first caller
hangs up the phone.
To refuse the incoming call press
“ESC” 23-fig. 1; no interference with
the active call will be generated.
– “OK”: to accept and store settings.When the user modifies the call for-
warding settings, the display shows
“WARNING! OPERATION IN
PROGRESS: PLEASE WAIT …”.
When this operation is ended, the dis-
play shows “CALL FORWARDING -
OPERATION CONCLUDED”.
Should it be impossible to modify set-
tings, the display shows “CALL FOR-
WARDING” – “OPERATION NOT
PERFORMED”.
Page 91 of 246
90
CONNECT Nav
GENERAL
INFORMATION
The navigator integrated in the
CONNECT system allows you to
reach the chosen destination by visu-
al and voice instructions. Use of the
navigation system is quick, convenient,
safe and above all very flexible because
it allows you to call up already pro-
grammed destinations or points of ref-
erence such as hotels, monuments,
public structures, fuel stations orFi-
at Dealerships.
The vehicle position is determined
through the GPS system (Global Posi-
tioning System) installed on the vehi-
cle. The GPS system is fitted with an
antenna and a reception module inte-
grated in the telematic system. This
system configuration dynamically
processes the satellite signals and
those provided by the vehicle system,
integrating them with the current po-
sition of the vehicle to obtain an “es-
timated vehicle point”.The navigation system helps the dri-
ver while he drives by suggesting vo-
cally and graphically the optimum rout-
ing to reach the preset destination.
The navigation system suggestions do
not exempt the driver from full re-
sponsibility due to his driving behav-
iour and to compliance with road and
other traffic regulations. The respon-
sibility for road safety always and in
any case lies with the vehicle driver.IMPORTANT NOTES
– GPS reception is difficult under
trees, among tall buildings, in multi-lev-
el car parks, tunnels and everywhere
reception of the satellite antenna may
be hindered.
– The GPS system needs about 15
minutes for activation if the vehicle
battery is disconnected.
– The GPS system needs a few min-
utes to determine the new position of
the vehicle if it is turned off and the ve-
hicle is moved with the system off (e.g.:
on ferryboat).
– The GPS satellite aerial must not
be covered with metal or damp ob-
jects.
The instantaneous vehicle position is
identified in the CD-ROM and shown
on the display together with the topo-
graphic characteristics of the area
memorised on the CD-ROM. Access
to data on the CD-ROM requires a
few moments waiting for the map dis-
plays.
N N
A A
V V
I I
G G
A A
T T
O O
R R
( (
N N
A A
V V
) )
Page 94 of 246
93
CONNECT Nav
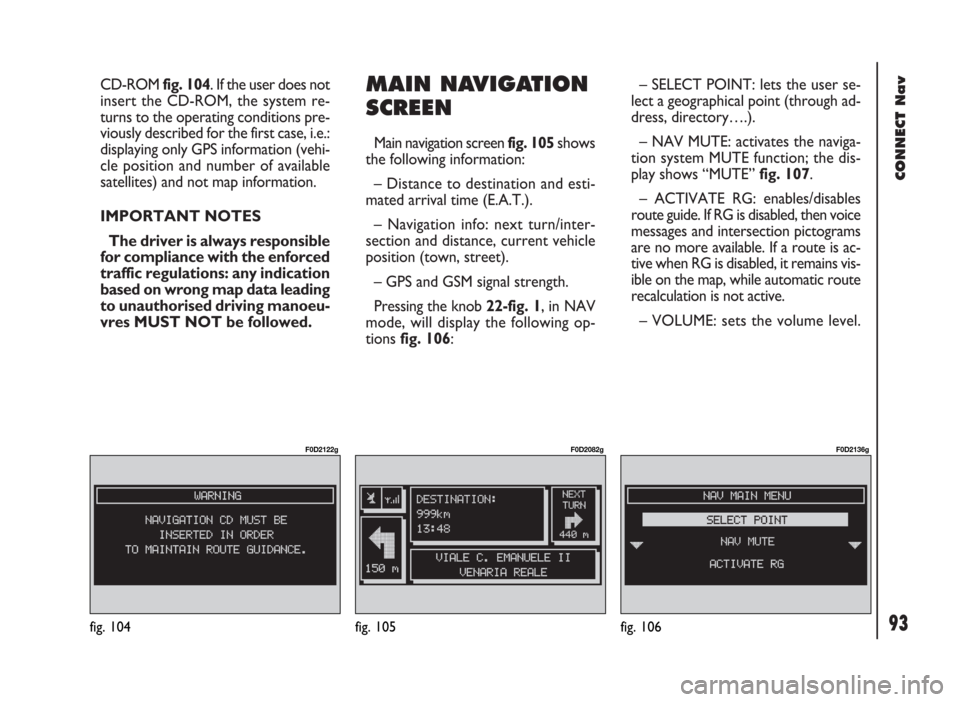
CD-ROM fig. 104. If the user does not
insert the CD-ROM, the system re-
turns to the operating conditions pre-
viously described for the first case, i.e.:
displaying only GPS information (vehi-
cle position and number of available
satellites) and not map information.
IMPORTANT NOTES
The driver is always responsible
for compliance with the enforced
traffic regulations: any indication
based on wrong map data leading
to unauthorised driving manoeu-
vres MUST NOT be followed.MAIN NAVIGATION
SCREEN
Main navigation screen fig. 105 shows
the following information:
– Distance to destination and esti-
mated arrival time (E.A.T.).
– Navigation info: next turn/inter-
section and distance, current vehicle
position (town, street).
– GPS and GSM signal strength.
Pressing the knob 22-fig. 1, in NAV
mode, will display the following op-
tions fig. 106:– SELECT POINT: lets the user se-
lect a geographical point (through ad-
dress, directory….).
– NAV MUTE: activates the naviga-
tion system MUTE function; the dis-
play shows “MUTE” fig. 107.
– ACTIVATE RG: enables/disables
route guide. If RG is disabled, then voice
messages and intersection pictograms
are no more available. If a route is ac-
tive when RG is disabled, it remains vis-
ible on the map, while automatic route
recalculation is not active.
– VOLUME: sets the volume level.
fig. 104
F0D2122g
fig. 105
F0D2082g
fig. 106
F0D2136g
Page 106 of 246
105
CONNECT Nav
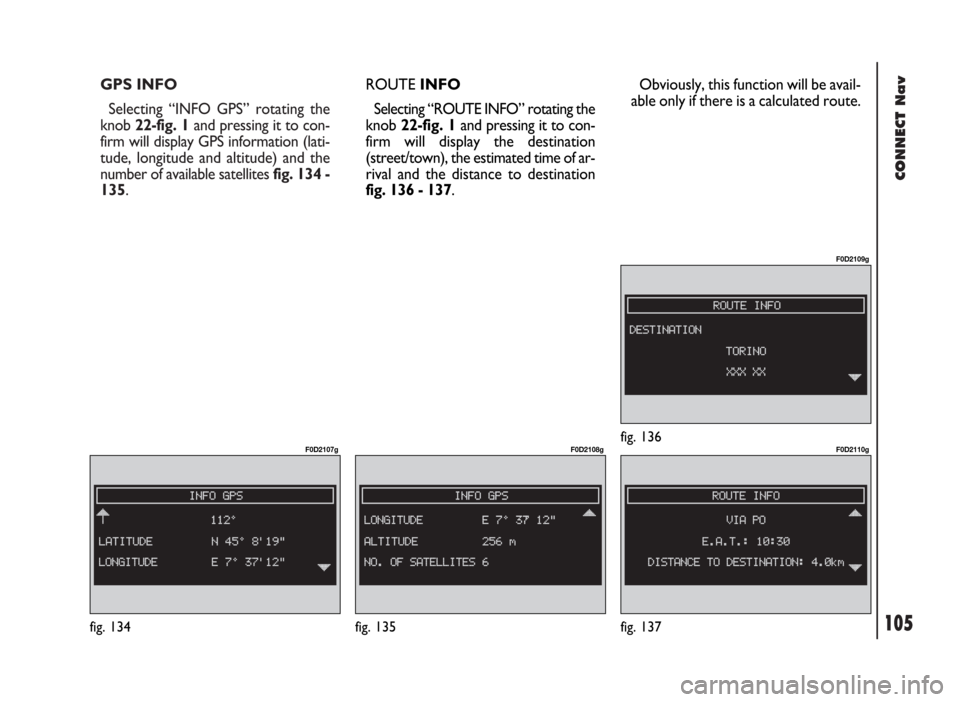
GPS INFO
Selecting “INFO GPS” rotating the
knob 22-fig. 1and pressing it to con-
firm will display GPS information (lati-
tude, longitude and altitude) and the
number of available satellites fig. 134 -
135.
fig. 135
F0D2108g
fig. 137
F0D2110g
ROUTEINFO
Selecting “ROUTE INFO” rotating the
knob 22-fig. 1and pressing it to con-
firm will display the destination
(street/town), the estimated time of ar-
rival and the distance to destination
fig. 136 - 137.
fig. 136
F0D2109g
Obviously, this function will be avail-
able only if there is a calculated route.
fig. 134
F0D2107g
Page 122 of 246
CONNECT Nav
121
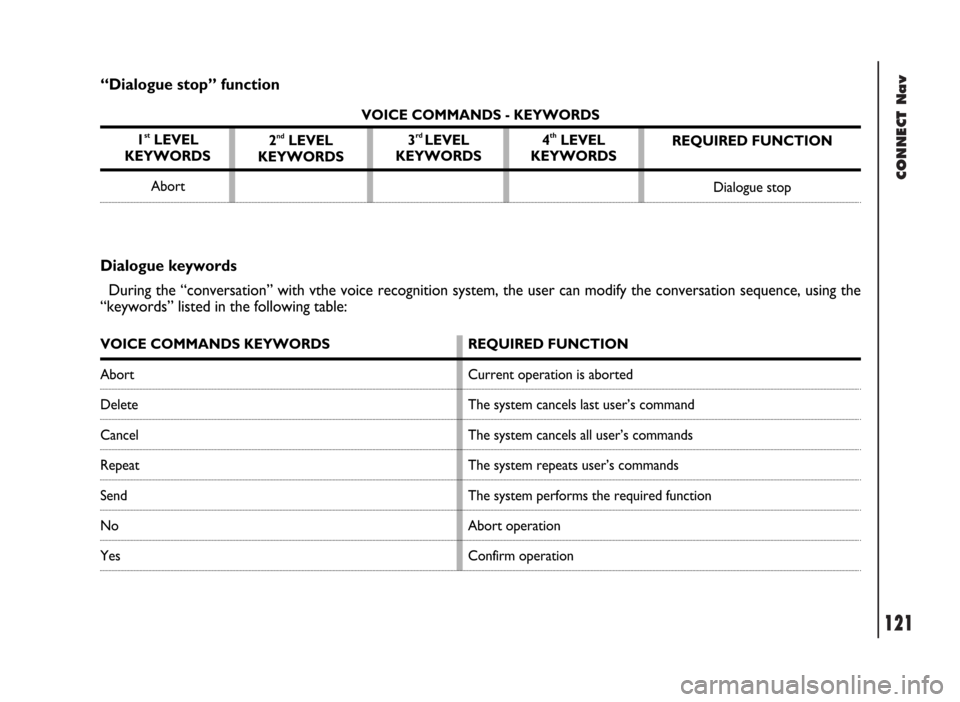
“Dialogue stop” function
VOICE COMMANDS - KEYWORDS
1
stLEVEL
KEYWORDS
Abort
Dialogue keywords
During the “conversation” with vthe voice recognition system, the user can modify the conversation sequence, using the
“keywords” listed in the following table:
VOICE COMMANDS KEYWORDS
Abort
Delete
Cancel
Repeat
Send
No
YesREQUIRED FUNCTION
Current operation is aborted
The system cancels last user’s command
The system cancels all user’s commands
The system repeats user’s commands
The system performs the required function
Abort operation
Confirm operation 2
ndLEVEL
KEYWORDS3rd LEVEL
KEYWORDS4thLEVEL
KEYWORDSREQUIRED FUNCTION
Dialogue stop
Page 144 of 246

CONNECT Nav+
143
– end of conversation ....................................................... 190
– hands-free feature .......................................................... 190
MAIN MENU FUNCTIONS ........................................... 190
Frequent numbers function ............................................. 191
Directory function ............................................................. 192
Last calls received function .............................................. 193
Last numbers called function .......................................... 193
Messages function .............................................................. 194
Network operator function ............................................ 195
PIN function ........................................................................ 195
Settings function ................................................................. 196
Information function ......................................................... 197
NAVIGATOR (NAV).................................................. 198
GENERAL INFORMATION ........................................... 198
SCREEN OPTIONS AND FUNCTIONS .................... 200
GRAPHIC INSTRUCTIONS .......................................... 200
VOICE INSTRUCTIONS ................................................. 201
NAVIGATION CD-ROM PLAYER ............................... 201Navigation system menu .................................................. 202
Address – destination entry ............................................ 203
Points of interest – useful services files ....................... 208
Last destinations ................................................................. 209
Destination directory ....................................................... 210
RDS TMC – information of general interest .............. 210
Atlas – destination entry in the map ............................. 213
Cahange display – information on display ................... 214
Alternative route ............................................................... 215
Delete destinations ............................................................ 215
Enable route calculation ................................................... 215
Map options ......................................................................... 216
Route options ..................................................................... 217
ON-BOARD COMPUTER (TRIP)....................... 218
GENERAL INFORMATION ........................................... 218
Average speed .................................................................... 218
Distance traveled ............................................................... 218
Trip time .............................................................................. 218
Distance to destination .................................................... 218
Page 160 of 246

CONNECT Nav+
159
COMPACT DISC
PLAYER (CD)
When the CD player is working the
display shows the following:
– track number (number of track be-
ing played);
– “TA” if the traffic information re-
ception function is on.
TELEPHONE
When the telephone is working the
following are shown on the display:
– name of telephone network access
provider and field strength;
– name or telephone number and du-
ration of conversation during a call;
– remaining credit available on phone
card (if available by network provider);
– symbols and wordings associated
with the phone settings:
call ringer off
“forwarding” function on
“disable” function on
telephone off or no network
SMS message received, not read;– display of “SIM absent” warning if
the SIM card is not inserted;
– display of “enter PIN” or “faulty
card” or “seek network” or “emer-
gency only” or “enter PUK” message
depending on the case;
– display of “dialling interrupted”
warning in the case of momentary in-
terruption of call;
– display of “call over” warning;
– display of “no connection” warning
for interruption of connection from
the network;
– display of “number busy” warning;
– display of “no answer” warning.
Page 191 of 246
CONNECT Nav+
190
MAIN MENU
FUNCTIONS
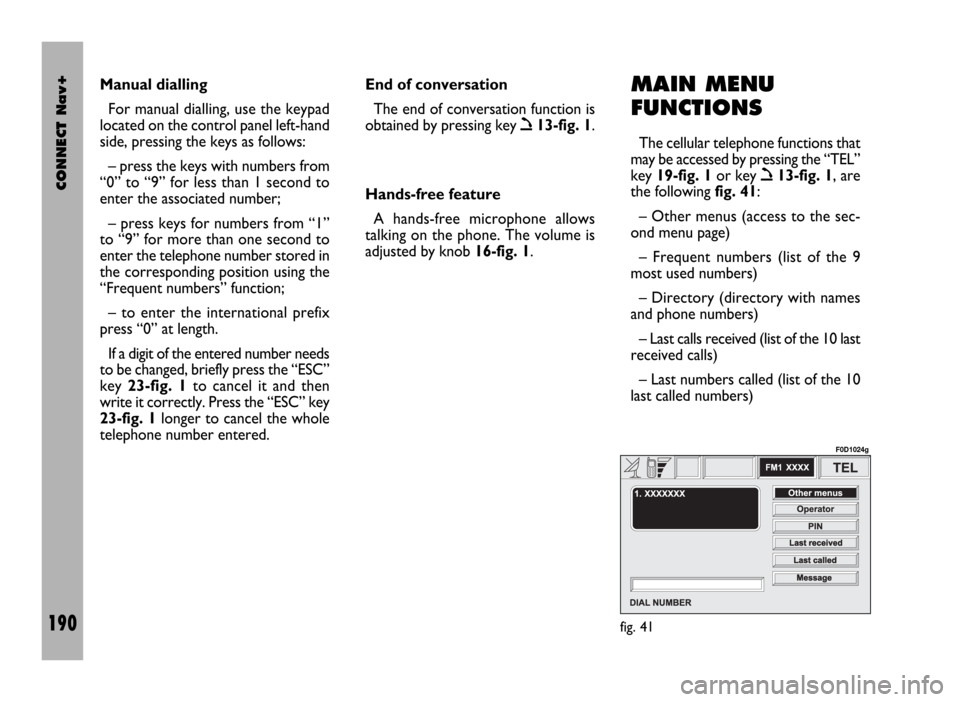
The cellular telephone functions that
may be accessed by pressing the “TEL”
key 19-fig. 1or key
ò13-fig. 1, are
the following fig. 41:
– Other menus (access to the sec-
ond menu page)
– Frequent numbers (list of the 9
most used numbers)
– Directory (directory with names
and phone numbers)
– Last calls received (list of the 10 last
received calls)
– Last numbers called (list of the 10
last called numbers) Manual dialling
For manual dialling, use the keypad
located on the control panel left-hand
side, pressing the keys as follows:
– press the keys with numbers from
“0” to “9” for less than 1 second to
enter the associated number;
– press keys for numbers from “1”
to “9” for more than one second to
enter the telephone number stored in
the corresponding position using the
“Frequent numbers” function;
– to enter the international prefix
press “0” at length.
If a digit of the entered number needs
to be changed, briefly press the “ESC”
key 23-fig. 1to cancel it and then
write it correctly. Press the “ESC” key
23-fig. 1longer to cancel the whole
telephone number entered. End of conversation
The end of conversation function is
obtained by pressing key
ò13-fig. 1.
Hands-free feature
A hands-free microphone allows
talking on the phone. The volume is
adjusted by knob 16-fig. 1.
fig. 41
F0D1024g