ECU FIAT DUCATO 244 2005 3.G Owners Manual
[x] Cancel search | Manufacturer: FIAT, Model Year: 2005, Model line: DUCATO 244, Model: FIAT DUCATO 244 2005 3.GPages: 258, PDF Size: 4.05 MB
Page 25 of 258
24GETTING TO KNOW YOUR VEHICLE
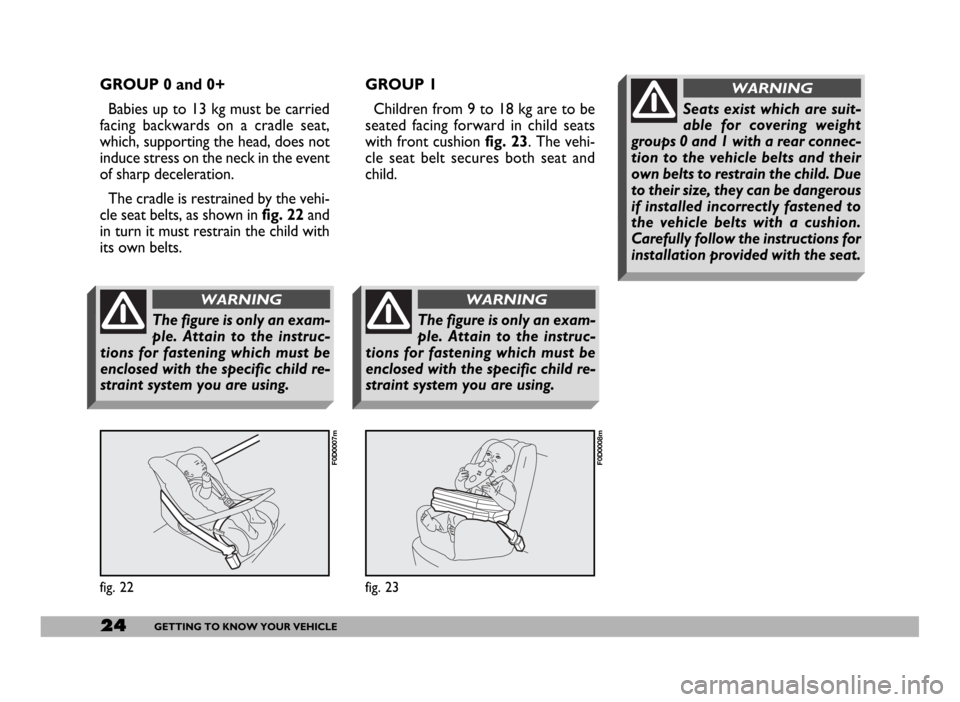
GROUP 0 and 0+
Babies up to 13 kg must be carried
facing backwards on a cradle seat,
which, supporting the head, does not
induce stress on the neck in the event
of sharp deceleration.
The cradle is restrained by the vehi-
cle seat belts, as shown infig. 22and
in turn it must restrain the child with
its own belts.GROUP 1
Children from 9 to 18 kg are to be
seated facing forward in child seats
with front cushionfig. 23. The vehi-
cle seat belt secures both seat and
child.
fig. 22
F0D0007m
fig. 23
F0D0008m
The figure is only an exam-
ple. Attain to the instruc-
tions for fastening which must be
enclosed with the specific child re-
straint system you are using.
WARNING
The figure is only an exam-
ple. Attain to the instruc-
tions for fastening which must be
enclosed with the specific child re-
straint system you are using.
WARNING
Seats exist which are suit-
able for covering weight
groups 0 and 1 with a rear connec-
tion to the vehicle belts and their
own belts to restrain the child. Due
to their size, they can be dangerous
if installed incorrectly fastened to
the vehicle belts with a cushion.
Carefully follow the instructions for
installation provided with the seat.
WARNING
Page 49 of 258
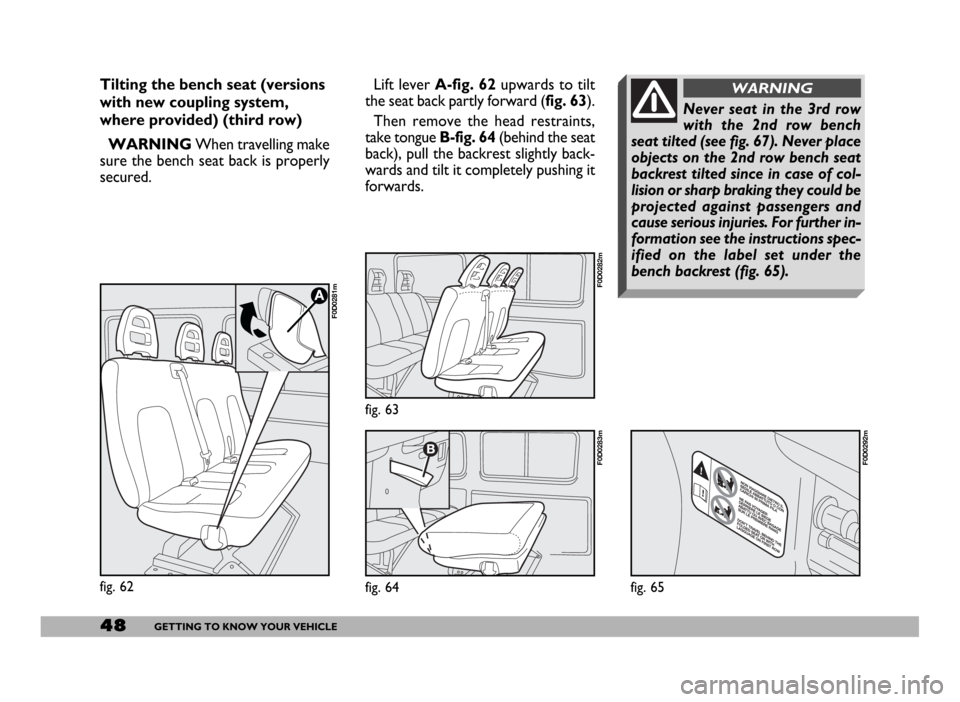
Lift lever A-fig. 62upwards to tilt
the seat back partly forward (fig. 63).
Then remove the head restraints,
take tongue B-fig. 64(behind the seat
back), pull the backrest slightly back-
wards and tilt it completely pushing it
forwards.
fig. 63
F0D0282m
fig. 64
F0D0283m
48GETTING TO KNOW YOUR VEHICLE
fig. 62
F0D0281m
Tilting the bench seat (versions
with new coupling system,
where provided) (third row)
WARNINGWhen travelling make
sure the bench seat back is properly
secured.
fig. 65
F0D0292m
Never seat in the 3rd row
with the 2nd row bench
seat tilted (see fig. 67). Never place
objects on the 2nd row bench seat
backrest tilted since in case of col-
lision or sharp braking they could be
projected against passengers and
cause serious injuries. For further in-
formation see the instructions spec-
ified on the label set under the
bench backrest (fig. 65).
WARNING
Page 100 of 258
99GETTING TO KNOW YOUR VEHICLE
IMPORTANT The cables are se-
cured to the heater cables bundle with
adhesive tape to cut out noise.
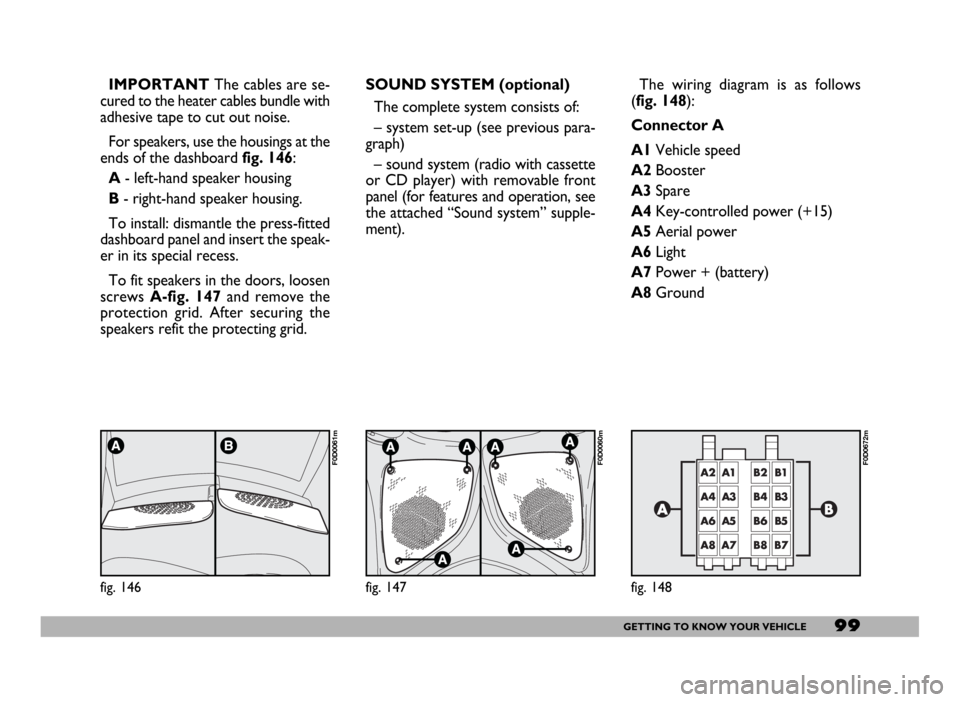
For speakers, use the housings at the
ends of the dashboard fig. 146:
A- left-hand speaker housing
B- right-hand speaker housing.
To install: dismantle the press-fitted
dashboard panel and insert the speak-
er in its special recess.
To fit speakers in the doors, loosen
screws A-fig. 147and remove the
protection grid. After securing the
speakers refit the protecting grid.
fig. 146
F0D0061m
SOUND SYSTEM (optional)
The complete system consists of:
– system set-up (see previous para-
graph)
– sound system (radio with cassette
or CD player) with removable front
panel (for features and operation, see
the attached “Sound system” supple-
ment).
fig. 147
F0D0060m
The wiring diagram is as follows
(fig. 148):
Connector A
A1Vehicle speed
A2Booster
A3Spare
A4Key-controlled power (+15)
A5Aerial power
A6Light
A7Power + (battery)
A8Ground
fig. 148
F0D0672m
Page 104 of 258
103GETTING TO KNOW YOUR VEHICLE
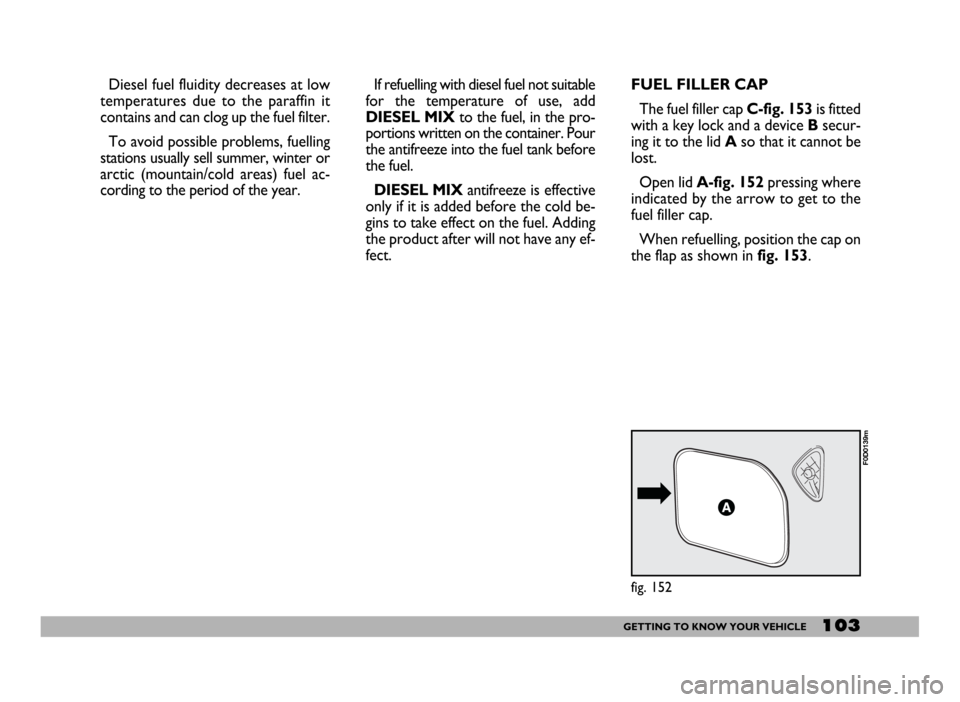
FUEL FILLER CAP
The fuel filler cap C-fig. 153is fitted
with a key lock and a device Bsecur-
ing it to the lid Aso that it cannot be
lost.
Open lid A-fig. 152pressing where
indicated by the arrow to get to the
fuel filler cap.
When refuelling, position the cap on
the flap as shown in fig. 153.
fig. 152
F0D0139m
Diesel fuel fluidity decreases at low
temperatures due to the paraffin it
contains and can clog up the fuel filter.
To avoid possible problems, fuelling
stations usually sell summer, winter or
arctic (mountain/cold areas) fuel ac-
cording to the period of the year. If refuelling with diesel fuel not suitable
for the temperature of use, add
DIESEL MIXto the fuel, in the pro-
portions written on the container. Pour
the antifreeze into the fuel tank before
the fuel.
DIESEL MIXantifreeze is effective
only if it is added before the cold be-
gins to take effect on the fuel. Adding
the product after will not have any ef-
fect.
Page 127 of 258
126GETTING THE BEST OUT OF YOUR VEHICLE
CONDITIONS OF USE
Cold starting
Frequent cold starting will not enable
the engine to reach optimal running
temperature. It follows, therefore,
that consumption will be higher (from
+15 to +30% in towns) as will the
production of toxic emissions.
Traffic and road conditions
Heavy traffic and higher consumption
are synonymous: for example, when
driving slowly with frequent use of low-
er gears or in towns where there are
numerous traffic lights.
Winding roads, mountain roads and
bumpy roads also have a negative effect
on consumption.
Enforced halts
During prolonged stops (traffic lights,
level crossings, etc.) the engine should
be switched off.LOAD
RECOMMENDATIONS
The version of the Ducato you are
driving has been designed and ap-
proved on the basis of several set
maximum weights (see the tables
“Weights” in section “Technical spec-
ifications”):
– kerb weight
– payload
– total weight
– total weight on the front axle
– total weight on the rear axle
– towable weight
fig. 10
F0D0047m
Each of these limits must be
borne in mind and MUST
NEVER BE EXCEEDED under any
circumstances. In particular, never
exceed the maximum weight per-
mitted on the front and rear axles
when arranging loads in vehicle (es-
pecially for special version vehicles).
WARNING
Chance knocks or sudden
braking can cause sudden
shifts of the load which could jeop-
ardise the safety of the driver and
the passengers: before you start off
make sure the load is firmly secured
by using the hooks built into the
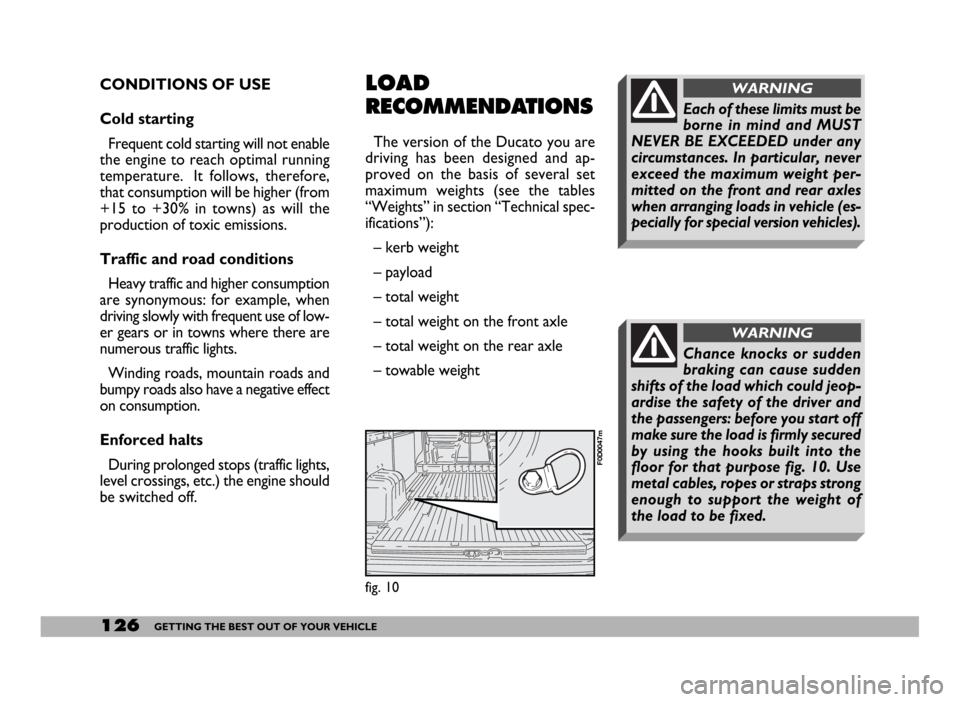
floor for that purpose fig. 10. Use
metal cables, ropes or straps strong
enough to support the weight of
the load to be fixed.
WARNING
Page 128 of 258
127GETTING THE BEST OUT OF YOUR VEHICLE
In addition to these general precau-
tions, some simple measures could en-
hance driving safety, comfort and the
length of the vehicle’s life:
– distribute the load evenly over the
load floor: if you need to concentrate
it all in one point choose the part be-
tween the axles;
– remember that the lower the load
is, the lower the vehicle’s centre of
gravity will be, contributing to a safe
drive; you should therefore always po-
sition the heavier goods at the bottom;
– finally, remember that the way in
which the vehicle moves is influenced
by the weight being carried. In partic-
ular, stopping distance lengthens par-
ticularly at high speed.CHEAP RUNNING
THAT RESPECTS
THE ENVIRONMENT
Environmental protection has been
one of the guiding principles in the
production of the Ducato. It is no ac-
cident that its pollution control equip-
ment is much more effective than that
required by current legislation.
Nonetheless, the environment can-
not get by without a concerted effort
from everyone. By following a few sim-
ple rules you can avoid harming the
environment and often cut down fuel
consumption at the same time.
On this subject, a few useful tips have
been given below to supplement those
marked by symbol #at various points
of the handbook. You are asked to
read both the former and latter care-
fully.
Even if the vehicle is sta-
tionary on a steep hill or
sideways incline, goods not proper-
ly secured could fall out when the
back or side doors are opened.
WARNING
Observe the enforced rules
if you need to carry a spare
can of petrol. Only use a homolo-
gated can and secure it to the load
anchoring eyebolts. Even given
these precautions, the risk of fire in
the event of an accident is in-
creased.
WARNING
Page 131 of 258
130GETTING THE BEST OUT OF YOUR VEHICLE
The electrical brake or other device
(electrical winch, etc.) must be pow-
ered directly from the battery by
means of a lead with a cross-section
area not smaller than 2.5 mm
2.
In addition to the electrical connec-
tions, only the power wire for an ad-
ditional electrical brake and for inter-
nal trailer lighting with a power not
exceeding 15W can be connected to
the vehicle’s electrical system.
FITTING DIAGRAM
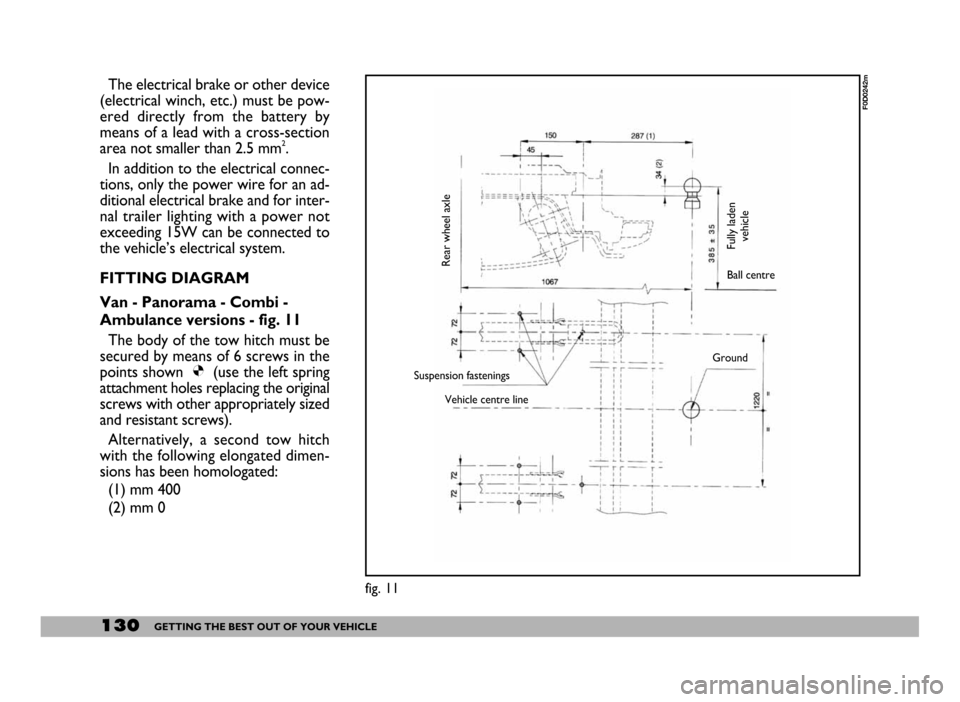
Van - Panorama - Combi -
Ambulance versions - fig. 11
The body of the tow hitch must be
secured by means of 6 screws in the
points shown Ø(use the left spring
attachment holes replacing the original
screws with other appropriately sized
and resistant screws).
Alternatively, a second tow hitch
with the following elongated dimen-
sions has been homologated:
(1) mm 400
(2) mm 0
fig. 11
F0D0242m
Rear wheel axle
Fully laden
vehicleBall centre
Suspension fastenings
Vehicle centre lineGround