door switch FIAT DUCATO 244 2005 3.G Owners Manual
[x] Cancel search | Manufacturer: FIAT, Model Year: 2005, Model line: DUCATO 244, Model: FIAT DUCATO 244 2005 3.GPages: 258, PDF Size: 4.05 MB
Page 8 of 258
7GETTING TO KNOW YOUR VEHICLE
SYMBOLS
Special coloured labels have been at-
tached near or actually on some of
the components of your Ducato.
These labels bear symbols that remind
you of the precautions to be taken as
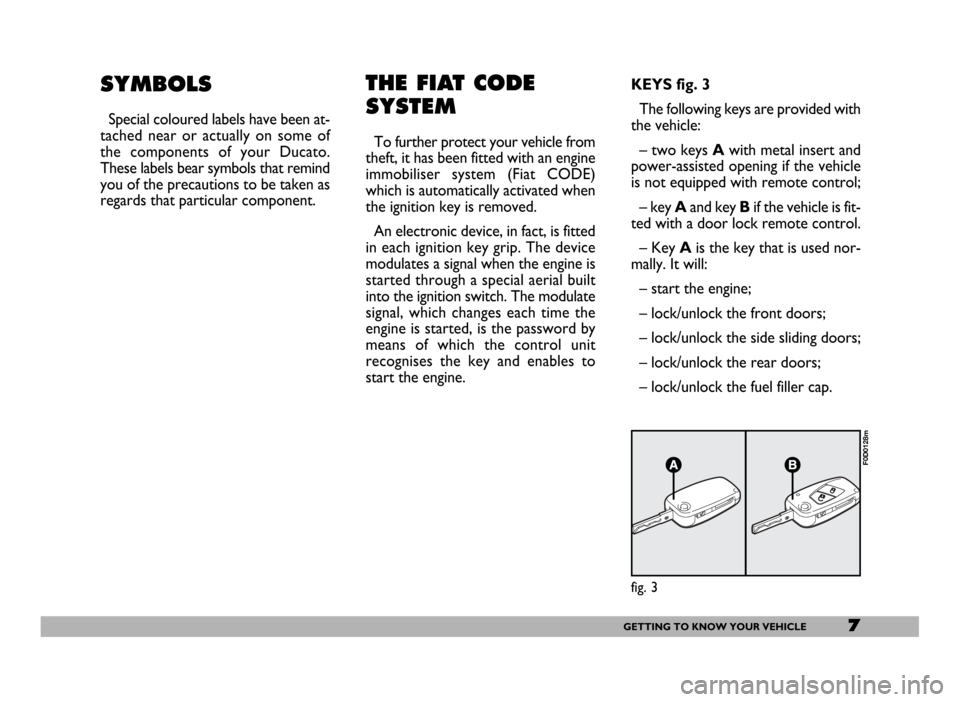
regards that particular component.KEYS fig. 3
The following keys are provided with
the vehicle:
– two keys Awith metal insert and
power-assisted opening if the vehicle
is not equipped with remote control;
– key Aand key Bif the vehicle is fit-
ted with a door lock remote control.
– Key Ais the key that is used nor-
mally. It will:
– start the engine;
– lock/unlock the front doors;
– lock/unlock the side sliding doors;
– lock/unlock the rear doors;
– lock/unlock the fuel filler cap.
fig. 3
F0D0128m
THE FIAT CODE
SYSTEM
To further protect your vehicle from
theft, it has been fitted with an engine
immobiliser system (Fiat CODE)
which is automatically activated when
the ignition key is removed.
An electronic device, in fact, is fitted
in each ignition key grip. The device
modulates a signal when the engine is
started through a special aerial built
into the ignition switch. The modulate
signal, which changes each time the
engine is started, is the password by
means of which the control unit
recognises the key and enables to
start the engine.
Page 10 of 258

9GETTING TO KNOW YOUR VEHICLE
DUPLICATE KEYS
When additional keys are required,
go to your Fiat Dealership, taking all
the keys in your possession and the
CODE card with you. The Fiat Deal-
ershipwill store the old and new keys
(up to eight) in the system. The Fiat
Dealershipmay ask you to demon-
strate that you own the vehicle.
The codes of any keys that are not
available when the new storage pro-
cedure is carried out will be deleted
from the memory to prevent any lost
or stolen keys being used to start the
engine.
All the keys and the CODE card
must be handed over to the new own-
er when selling the vehicle.DOOR LOCK
REMOTE CONTROL
The radio-frequency remote control
is built into the ignition key.
The key fig. 6includes the following:
– a metal insert Athat can be en-
closed in the key grip
– a button Efor power-assisted
opening of the metal insert
– a button Cfor remote door un-
locking and electronic alarm deactiva-
tion (where provided) at the same
time, and timed switching on of the in-
ternal ceiling lights;
– a button Dfor remote door lock-
ing and electronic alarm activation
(where provided) at the same time,
and switching off of the internal ceiling
lights;
– led Bindicating control sending to
electronic alarm system receiver. If you are still unable to start the en-
gine, perform the emergency start-up
procedure (see “In an emergency”)
and call your Fiat Dealership.
When the vehicle is travelling and the
key is at MAR:
1)If the Ywarning light comes on
while the vehicle is moving, this means
that the system is running a self-test
(e.g. due to a voltage drop).
2)If the Ywarning light flashes, the
vehicle is not protected by the engine
immobiliser. Contact a Fiat Dealer-
shipimmediately and get them to
store the codes of all the keys in the
memory.
IMPORTANTThe electronic com-
ponents inside the key may be dam-
aged if the key is subjected to sharp
knocks.
IMPORTANTEach key provided
with the vehicle has its own code, dif-
ferent from all the others, which must
be stored in the memory of the sys-
tem control unit.
Page 14 of 258

13GETTING TO KNOW YOUR VEHICLE
SYSTEM SELF-TEST
If the beep is followed after one sec-
ond by another beep when the elec-
tronic alarm is switched on, check
whether the doors, the bonnet and
the load compartment are perfectly
closed. Try to switch the alarm on
again. If the situation persists, contact
a Fiat Dealership.WHAT SETS
THE ALARM OFF
The electronic alarm will be set off if:
1) a door, the bonnet or the load
compartment is opened;
2) the battery is disconnected or the
electronic alarm power supply cables
are cut;
3) something moves in the passen-
ger compartment (volumetric surveil-
lance);
4) the key is turned to MAR.
When the alarm is triggered, a siren
will sound for about 26 seconds (for a
maximum of 3 cycles with 5 second
pauses, if the cause of the alarm per-
sists) and the direction indicators will
flash for about 5 minutes (only in the
countries where this is allowed).
Once the alarm situation has been
resolved, the alarm will return to its
normal surveillance function. PROGRAMMING
THE SYSTEM
The electronic alarm will have been
programmed by Fiat Dealership.
Any subsequent programming should
also be carried out by a Fiat Deal-
ership.
If additional remote control is re-
quired for any reasons, go to a Fiat
Dealership, taking all the keys you
own and the CODE card with you.
IMPORTANTThe electronic
alarm operation is prepared according
to the laws of the specific country.
This operation is only to be carried
out by a Fiat Dealershipto avoid
damaging the electronic memory stor-
age system.
Page 15 of 258
14GETTING TO KNOW YOUR VEHICLE
Do not leave the key inserted in the
switch. Cover the keyhole with the
rubber cap to prevent dust and wa-
ter getting in.
Emergency keys should be left in the
car coupled with the switch.
HOW TO KNOW IF THE
ALARM HAS GONE OFF
After deactivating the system, led A-
fig. 9will indicate the theft attempt
specifying also the cause of the alarm:
fixed light:remote control bat-
tery down
1 blink:right-hand door
2 blinks:left-hand door
5 blinks:volumetric sensors
(indicate a movement
inside the passenger’s
compartment)
6 blinks:bonnet To cut off the alarm before this,
press the remote control button; if
this is unsuccessful, turn the emer-
gency key to OFF(see next paragraph
“How to turn the alarm off”)
HOW TO TURN
THE ALARM OFF
If the remote control batteries run
down, or the car alarm system is
faulty, the electronic alarm can be cut
out by using one of the two emer-
gency keys supplied set on the system
deactivation control unit (that is
housed in the fuse box on the right
side of the dashboard).
To do this, open the fuse box, take
off the switch rubber cap, insert the
key and turn it counterclockwise
(OFFposition); the system is now de-
activated.
To turn the system back on, turn the
key clockwise (ONposition).7 blinks:load
compartment
8 blinks:tampering with
ignition switch
9 blinks:alarm wires cut
10 blinks:at least three causes
of alarm.
The led goes off when turning the
key to MAR or after about 2 minutes
blinking.
Since the electronic car
alarm absorbs electricity,
if you will not be using
your car for more than a month,
switch the system off with the re-
mote control and turn the emer-
gency key to OFF.
Page 72 of 258
71GETTING TO KNOW YOUR VEHICLE
CONTROLS
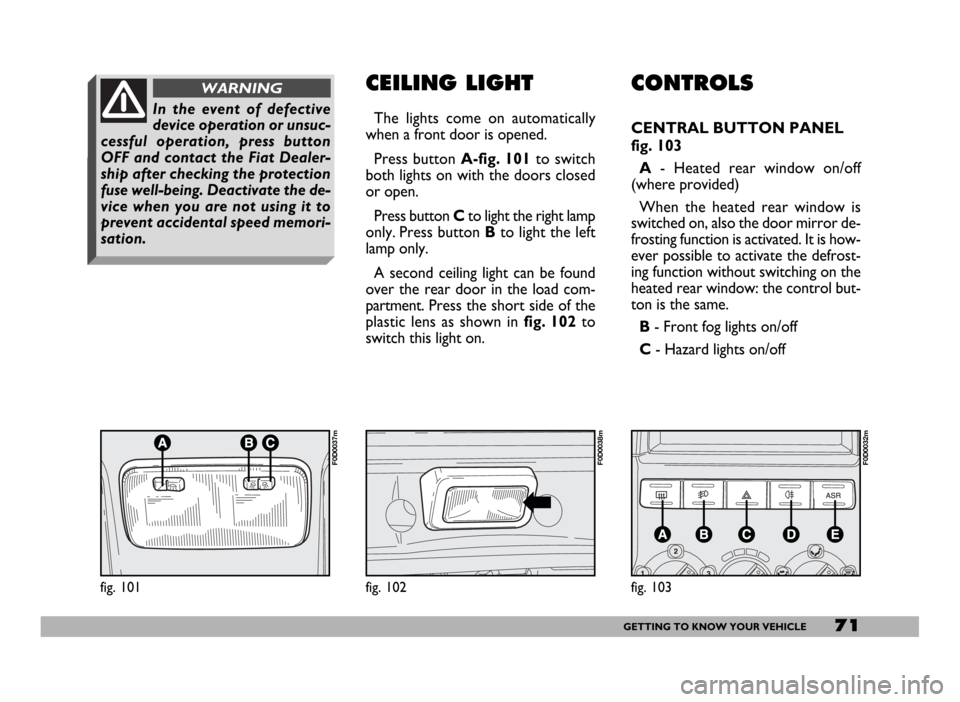
CENTRAL BUTTON PANEL
fig. 103
A- Heated rear window on/off
(where provided)
When the heated rear window is
switched on, also the door mirror de-
frosting function is activated. It is how-
ever possible to activate the defrost-
ing function without switching on the
heated rear window: the control but-
ton is the same.
B - Front fog lights on/off
C- Hazard lights on/off
CEILING LIGHT
The lights come on automatically
when a front door is opened.
Press button A-fig. 101to switch
both lights on with the doors closed
or open.
Press button Cto light the right lamp
only. Press button Bto light the left
lamp only.
A second ceiling light can be found
over the rear door in the load com-
partment. Press the short side of the
plastic lens as shown in fig. 102to
switch this light on.
fig. 101
F0D0037m
fig. 102
F0D0038m
In the event of defective
device operation or unsuc-
cessful operation, press button
OFF and contact the Fiat Dealer-
ship after checking the protection
fuse well-being. Deactivate the de-
vice when you are not using it to
prevent accidental speed memori-
sation.
WARNING
fig. 103
F0D0032m
Page 93 of 258
92GETTING TO KNOW YOUR VEHICLE
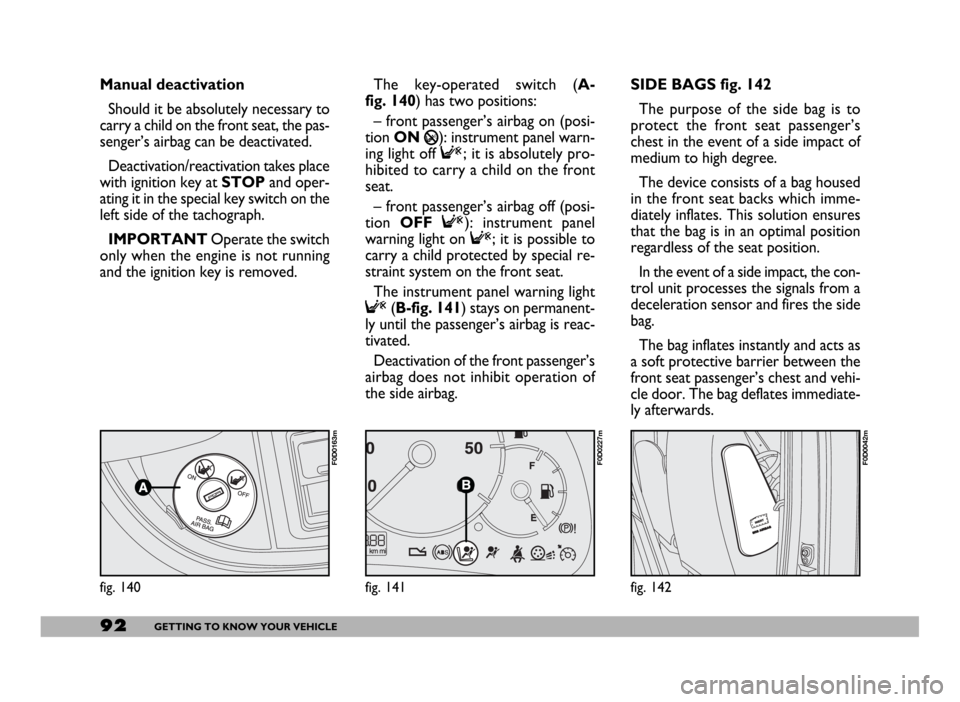
SIDE BAGS fig. 142
The purpose of the side bag is to
protect the front seat passenger’s
chest in the event of a side impact of
medium to high degree.
The device consists of a bag housed
in the front seat backs which imme-
diately inflates. This solution ensures
that the bag is in an optimal position
regardless of the seat position.
In the event of a side impact, the con-
trol unit processes the signals from a
deceleration sensor and fires the side
bag.
The bag inflates instantly and acts as
a soft protective barrier between the
front seat passenger’s chest and vehi-
cle door. The bag deflates immediate-
ly afterwards.
fig. 142
F0D0042m
fig. 140
F0D0163m
Manual deactivation
Should it be absolutely necessary to
carry a child on the front seat, the pas-
senger’s airbag can be deactivated.
Deactivation/reactivation takes place
with ignition key at STOPand oper-
ating it in the special key switch on the
left side of the tachograph.
IMPORTANTOperate the switch
only when the engine is not running
and the ignition key is removed.The key-operated switch (A-
fig. 140) has two positions:
– front passenger’s airbag on (posi-
tion ON
P): instrument panel warn-
ing light off F; it is absolutely pro-
hibited to carry a child on the front
seat.
– front passenger’s airbag off (posi-
tion OFF F): instrument panel
warning light on F; it is possible to
carry a child protected by special re-
straint system on the front seat.
The instrument panel warning light
F(B-fig. 141) stays on permanent-
ly until the passenger’s airbag is reac-
tivated.
Deactivation of the front passenger’s
airbag does not inhibit operation of
the side airbag.
fig. 141
F0D0227m
Page 101 of 258
100GETTING TO KNOW YOUR VEHICLE
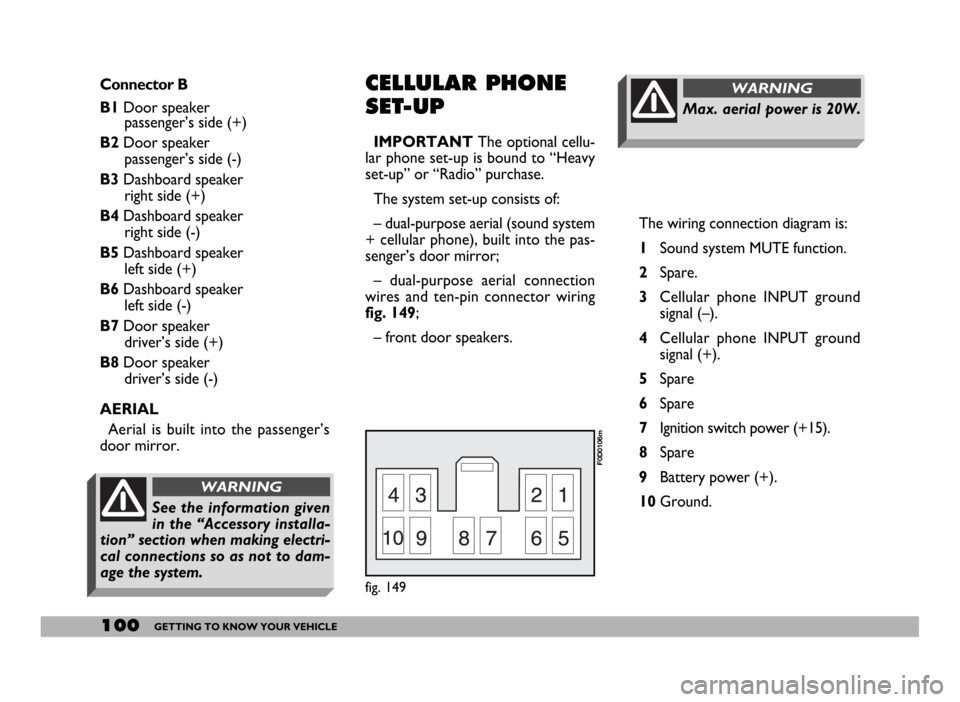
The wiring connection diagram is:
1Sound system MUTE function.
2Spare.
3Cellular phone INPUT ground
signal (–).
4Cellular phone INPUT ground
signal (+).
5Spare
6Spare
7Ignition switch power (+15).
8Spare
9Battery power (+).
10Ground.
Max. aerial power is 20W.
WARNINGConnector B
B1Door speaker
passenger’s side (+)
B2Door speaker
passenger’s side (-)
B3Dashboard speaker
right side (+)
B4Dashboard speaker
right side (-)
B5Dashboard speaker
left side (+)
B6Dashboard speaker
left side (-)
B7Door speaker
driver’s side (+)
B8Door speaker
driver’s side (-)
AERIAL
Aerial is built into the passenger’s
door mirror.CELLULAR PHONE
SET-UP
IMPORTANTThe optional cellu-
lar phone set-up is bound to “Heavy
set-up” or “Radio” purchase.
The system set-up consists of:
– dual-purpose aerial (sound system
+ cellular phone), built into the pas-
senger’s door mirror;
– dual-purpose aerial connection
wires and ten-pin connector wiring
fig. 149;
– front door speakers.
fig. 149
F0D0106m
See the information given
in the “Accessory installa-
tion” section when making electri-
cal connections so as not to dam-
age the system.
WARNING
Page 111 of 258
110GETTING THE BEST OUT OF YOUR VEHICLE
STARTING
After starting the engine, with the en-
gine idling and keeping the brake ped-
al pressed, move the gearshift lever to
position D. Release the brake pedal
and gradually press the accelerator
pedal.
IMPORTANT Movement of the
lever from position Pis allowed only
with the ignition key at MARand the
button on the lever and the brake ped-
al pressed. STOPPING THE VEHICLE
To stop the vehicle, simply press the
brake pedal regardless of the position
of the gearshift lever.
IMPORTANTRemoving the igni-
tion key is only allowed with the
gearshift lever in position Pand for a
maximum time of 30 seconds from
when the engine is turned off P, when
the door is opened a buzzer will sound
for about 15 seconds to alert the dri-
ver.
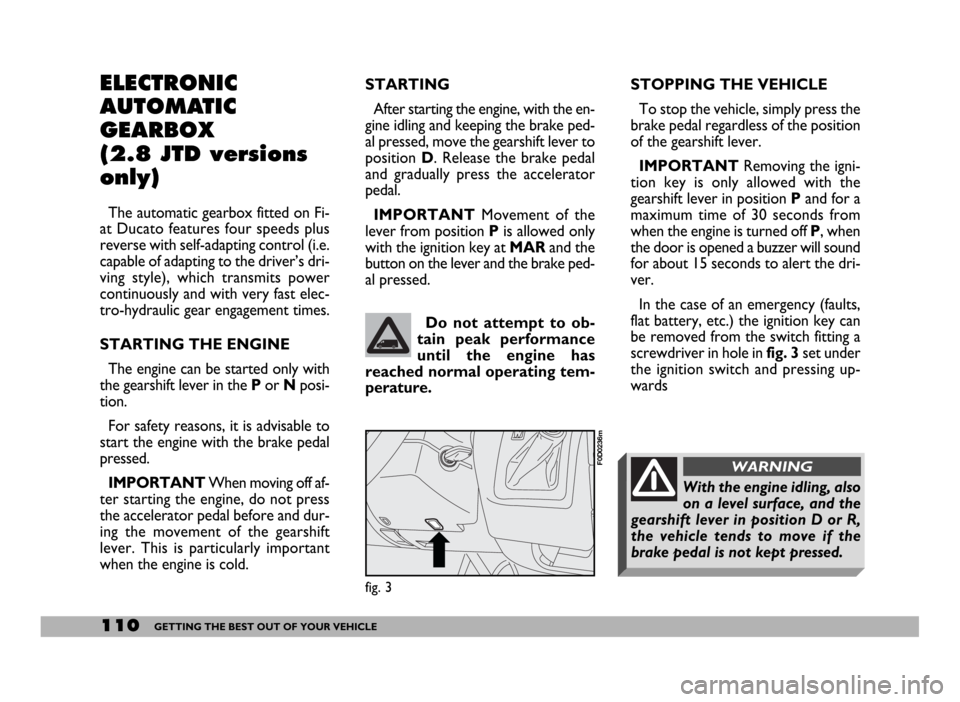
In the case of an emergency (faults,
flat battery, etc.) the ignition key can
be removed from the switch fitting a
screwdriver in hole infig. 3set under
the ignition switch and pressing up-
wards Do not attempt to ob-
tain peak performance
until the engine has
reached normal operating tem-
perature.
fig. 3
F0D0236m
With the engine idling, also
on a level surface, and the
gearshift lever in position D or R,
the vehicle tends to move if the
brake pedal is not kept pressed.
WARNING
ELECTRONIC
AUTOMATIC
GEARBOX
(2.8 JTD versions
only)
The automatic gearbox fitted on Fi-
at Ducato features four speeds plus
reverse with self-adapting control (i.e.
capable of adapting to the driver’s dri-
ving style), which transmits power
continuously and with very fast elec-
tro-hydraulic gear engagement times.
STARTING THE ENGINE
The engine can be started only with
the gearshift lever in the P or Nposi-
tion.
For safety reasons, it is advisable to
start the engine with the brake pedal
pressed.
IMPORTANTWhen moving off af-
ter starting the engine, do not press
the accelerator pedal before and dur-
ing the movement of the gearshift
lever. This is particularly important
when the engine is cold.
Page 113 of 258
112GETTING THE BEST OUT OF YOUR VEHICLE
IMPORTANTRemoving the igni-
tion key is only allowed with the
gearshift lever in position Pand for a
maximum time of 30 seconds from
when the engine is turned off P, when
the door is opened a buzzer will sound
for about 15 seconds to alert the dri-
ver.
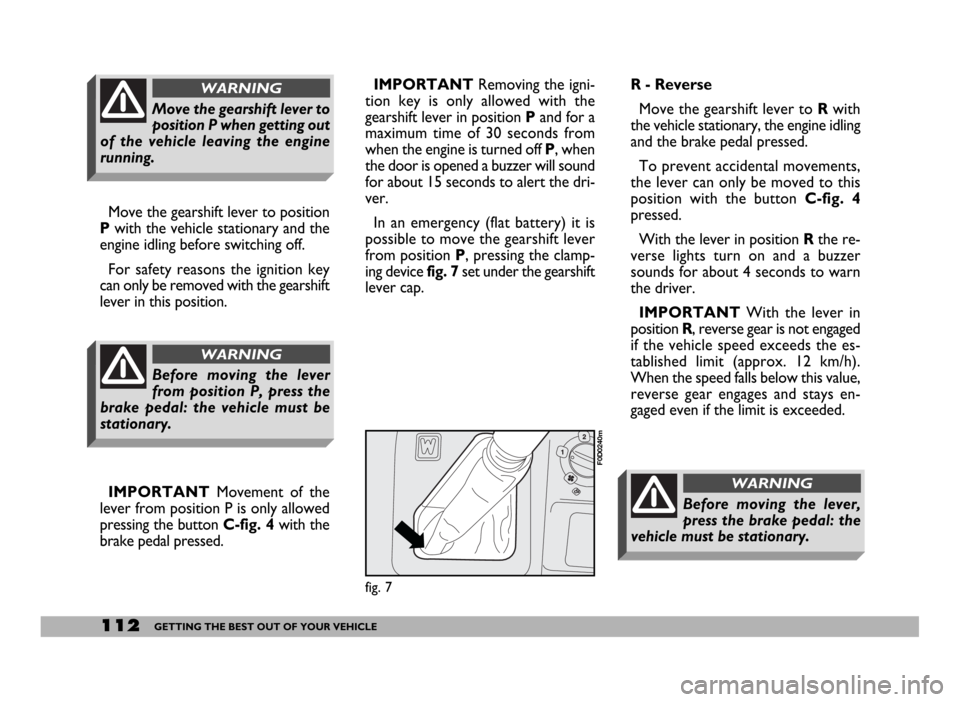
In an emergency (flat battery) it is
possible to move the gearshift lever
from position P, pressing the clamp-
ing device fig. 7set under the gearshift
lever cap.R - Reverse
Move the gearshift lever to Rwith
the vehicle stationary, the engine idling
and the brake pedal pressed.
To prevent accidental movements,
the lever can only be moved to this
position with the button C-fig. 4
pressed.
With the lever in position Rthe re-
verse lights turn on and a buzzer
sounds for about 4 seconds to warn
the driver.
IMPORTANTWith the lever in
position R, reverse gear is not engaged
if the vehicle speed exceeds the es-
tablished limit (approx. 12 km/h).
When the speed falls below this value,
reverse gear engages and stays en-
gaged even if the limit is exceeded.
fig. 7
F0D0240m
Before moving the lever,
press the brake pedal: the
vehicle must be stationary.
WARNING
Move the gearshift lever to position
Pwith the vehicle stationary and the
engine idling before switching off.
For safety reasons the ignition key
can only be removed with the gearshift
lever in this position.
IMPORTANTMovement of the
lever from position P is only allowed
pressing the button C-fig. 4with the
brake pedal pressed.
Move the gearshift lever to
position P when getting out
of the vehicle leaving the engine
running.
WARNING
Before moving the lever
from position P, press the
brake pedal: the vehicle must be
stationary.
WARNING
Page 176 of 258
175VEHICLE MAINTENANCE
When working on the bat-
tery or near it, always wear
the proper goggles.
WARNING
Running the battery with
low fluid level can damage
the battery beyond repair and
could also cause its explosion.
WARNING
If the vehicle is to stand for
a long time in the cold, re-
move the battery and store it in a
warm place to avoid it freezing.
WARNINGCHECKING THE CHARGE
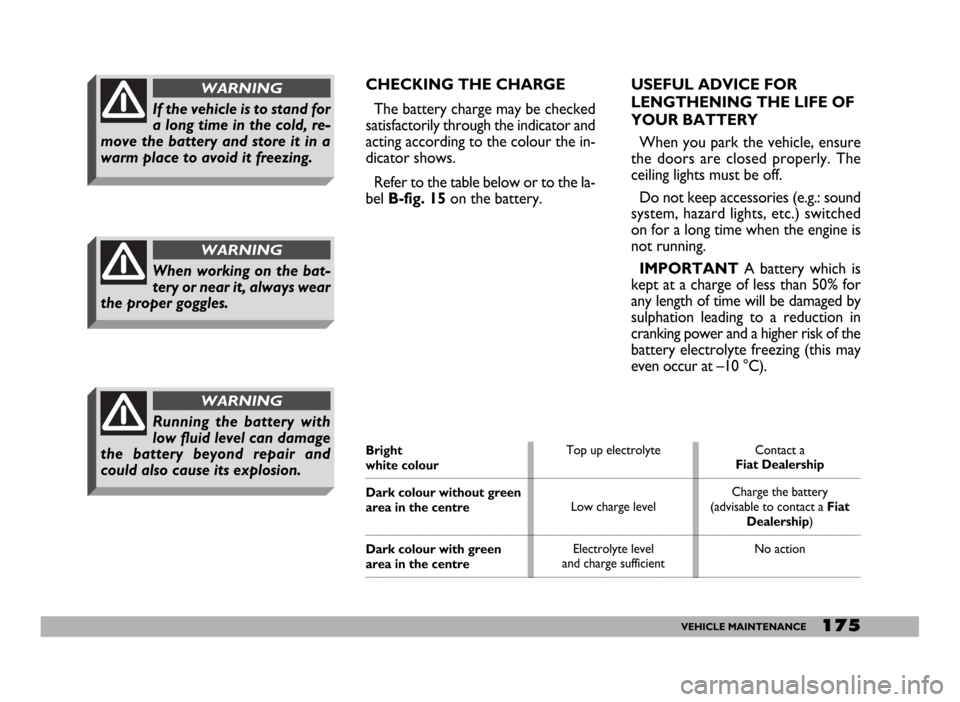
The battery charge may be checked
satisfactorily through the indicator and
acting according to the colour the in-
dicator shows.
Refer to the table below or to the la-
belB-fig. 15on the battery.USEFUL ADVICE FOR
LENGTHENING THE LIFE OF
YOUR BATTERY
When you park the vehicle, ensure
the doors are closed properly. The
ceiling lights must be off.
Do not keep accessories (e.g.: sound
system, hazard lights, etc.) switched
on for a long time when the engine is
not running.
IMPORTANTA battery which is
kept at a charge of less than 50% for
any length of time will be damaged by
sulphation leading to a reduction in
cranking power and a higher risk of the
battery electrolyte freezing (this may
even occur at –10 °C).
Bright white colour
Dark colour without green
area in the centre
Dark colour with green
area in the centreTop up electrolyte
Low charge level
Electrolyte level
and charge sufficientContact a
Fiat Dealership
Charge the battery
(advisable to contact a Fiat
Dealership)
No action