bonnet FIAT DUCATO 244 2005 3.G Owners Manual
[x] Cancel search | Manufacturer: FIAT, Model Year: 2005, Model line: DUCATO 244, Model: FIAT DUCATO 244 2005 3.GPages: 258, PDF Size: 4.05 MB
Page 12 of 258
11GETTING TO KNOW YOUR VEHICLE
REQUEST FOR ADDITIONAL
REMOTE CONTROLS
The receiver will acknowledge up to
eight remote controls.
If additional remote control are re-
quired or any reasons, go to a Fiat
Dealership, taking all the keys you
own and the CODE card with you.
REPLACING THE BATTERIES
If when button (Cor D-fig. 6) is
pressed, the key led B-fig. 6flashes
once only, change the battery with a
new one.
To replace the battery:
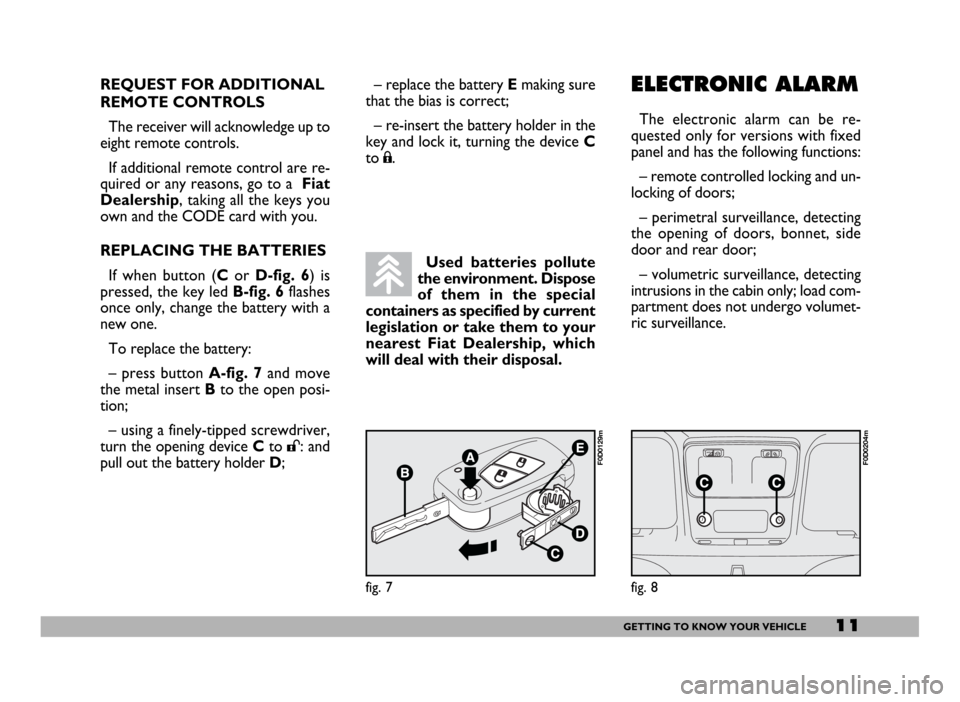
– press button A-fig. 7and move
the metal insert Bto the open posi-
tion;
– using a finely-tipped screwdriver,
turn the opening device Cto
:: and
pull out the battery holder D;
ELECTRONIC ALARM
The electronic alarm can be re-
quested only for versions with fixed
panel and has the following functions:
– remote controlled locking and un-
locking of doors;
– perimetral surveillance, detecting
the opening of doors, bonnet, side
door and rear door;
– volumetric surveillance, detecting
intrusions in the cabin only; load com-
partment does not undergo volumet-
ric surveillance. Used batteries pollute
the environment. Dispose
of them in the special
containers as specified by current
legislation or take them to your
nearest Fiat Dealership, which
will deal with their disposal.
fig. 7
F0D0129m
fig. 8
F0D0204m
– replace the battery Emaking sure
that the bias is correct;
– re-insert the battery holder in the
key and lock it, turning the device C
to
;.
Page 14 of 258
13GETTING TO KNOW YOUR VEHICLE
SYSTEM SELF-TEST
If the beep is followed after one sec-
ond by another beep when the elec-
tronic alarm is switched on, check
whether the doors, the bonnet and
the load compartment are perfectly
closed. Try to switch the alarm on
again. If the situation persists, contact
a Fiat Dealership.WHAT SETS
THE ALARM OFF
The electronic alarm will be set off if:
1) a door, the bonnet or the load
compartment is opened;
2) the battery is disconnected or the
electronic alarm power supply cables
are cut;
3) something moves in the passen-
ger compartment (volumetric surveil-
lance);
4) the key is turned to MAR.
When the alarm is triggered, a siren
will sound for about 26 seconds (for a
maximum of 3 cycles with 5 second
pauses, if the cause of the alarm per-
sists) and the direction indicators will
flash for about 5 minutes (only in the
countries where this is allowed).
Once the alarm situation has been
resolved, the alarm will return to its
normal surveillance function. PROGRAMMING
THE SYSTEM
The electronic alarm will have been
programmed by Fiat Dealership.
Any subsequent programming should
also be carried out by a Fiat Deal-
ership.
If additional remote control is re-
quired for any reasons, go to a Fiat
Dealership, taking all the keys you
own and the CODE card with you.
IMPORTANTThe electronic
alarm operation is prepared according
to the laws of the specific country.
This operation is only to be carried
out by a Fiat Dealershipto avoid
damaging the electronic memory stor-
age system.
Page 15 of 258
14GETTING TO KNOW YOUR VEHICLE
Do not leave the key inserted in the
switch. Cover the keyhole with the
rubber cap to prevent dust and wa-
ter getting in.
Emergency keys should be left in the
car coupled with the switch.
HOW TO KNOW IF THE
ALARM HAS GONE OFF
After deactivating the system, led A-
fig. 9will indicate the theft attempt
specifying also the cause of the alarm:
fixed light:remote control bat-
tery down
1 blink:right-hand door
2 blinks:left-hand door
5 blinks:volumetric sensors
(indicate a movement
inside the passenger’s
compartment)
6 blinks:bonnet To cut off the alarm before this,
press the remote control button; if
this is unsuccessful, turn the emer-
gency key to OFF(see next paragraph
“How to turn the alarm off”)
HOW TO TURN
THE ALARM OFF
If the remote control batteries run
down, or the car alarm system is
faulty, the electronic alarm can be cut
out by using one of the two emer-
gency keys supplied set on the system
deactivation control unit (that is
housed in the fuse box on the right
side of the dashboard).
To do this, open the fuse box, take
off the switch rubber cap, insert the
key and turn it counterclockwise
(OFFposition); the system is now de-
activated.
To turn the system back on, turn the
key clockwise (ONposition).7 blinks:load
compartment
8 blinks:tampering with
ignition switch
9 blinks:alarm wires cut
10 blinks:at least three causes
of alarm.
The led goes off when turning the
key to MAR or after about 2 minutes
blinking.
Since the electronic car
alarm absorbs electricity,
if you will not be using
your car for more than a month,
switch the system off with the re-
mote control and turn the emer-
gency key to OFF.
Page 85 of 258
84GETTING TO KNOW YOUR VEHICLE
Improper use of the electri-
cal windows can be danger-
ous. Before and during their oper-
ation ensure that any passengers in
the vehicle are not at risk from the
moving glass either by personal ob-
jects getting caught in the mecha-
nism or by being injured by it di-
rectly.
WARNING
Always remove the ignition
key when you get out of the
vehicle to prevent the electric win-
dows being operated accidentally
and constituting a danger to the
people left in the vehicle
WARNING
BONNET
OPENING
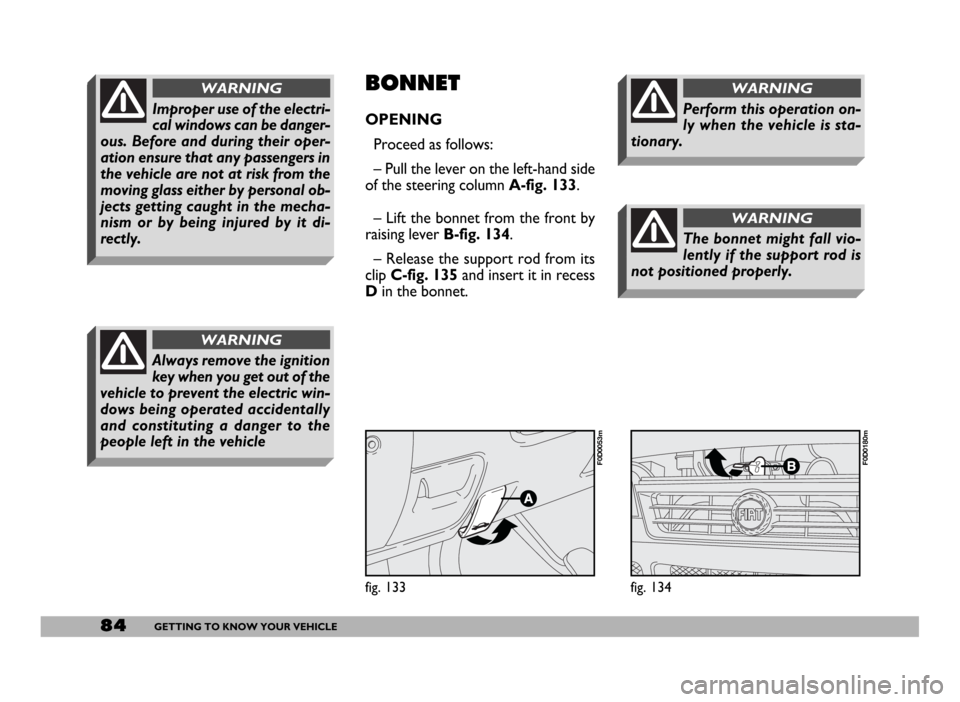
Proceed as follows:
– Pull the lever on the left-hand side
of the steering column A-fig. 133.
– Lift the bonnet from the front by
raising lever B-fig. 134.
– Release the support rod from its
clipC-fig. 135and insert it in recess
Din the bonnet.
fig. 133
F0D0053m
fig. 134
F0D0180m
The bonnet might fall vio-
lently if the support rod is
not positioned properly.
WARNING
Perform this operation on-
ly when the vehicle is sta-
tionary.
WARNING
Page 86 of 258
85GETTING TO KNOW YOUR VEHICLE
Be very cautious operating
the engine compartment
when the engine is hot - danger of
burns! Wait until the engine cools.
WARNING
Scarves, ties and other
loose articles of clothing
could easily get caught up in mov-
ing parts. This can be extremely
dangerous for the wearer.
WARNINGCLOSING
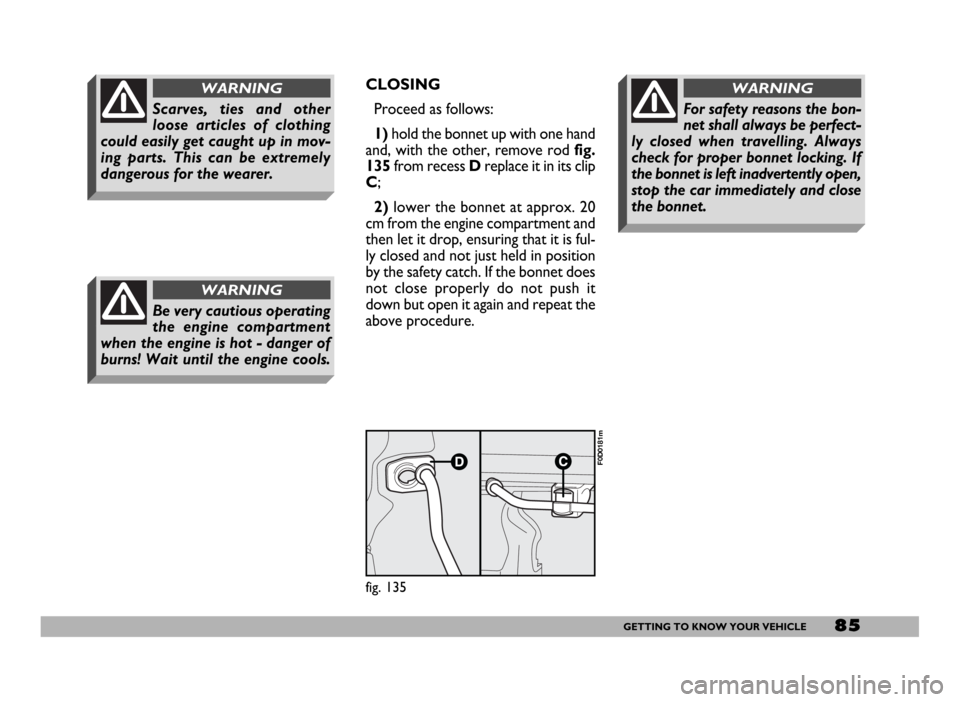
Proceed as follows:
1)hold the bonnet up with one hand
and, with the other, remove rodfig.
135from recess Dreplace it in its clip
C;
2)lower the bonnet at approx. 20
cm from the engine compartment and
then let it drop, ensuring that it is ful-
ly closed and not just held in position
by the safety catch. If the bonnet does
not close properly do not push it
down but open it again and repeat the
above procedure.
For safety reasons the bon-
net shall always be perfect-
ly closed when travelling. Always
check for proper bonnet locking. If
the bonnet is left inadvertently open,
stop the car immediately and close
the bonnet.
WARNING
fig. 135
F0D0181m
Page 163 of 258
162VEHICLE MAINTENANCE
V V
E E
H H
I I
C C
L L
E E
M M
A A
I I
N N
T T
E E
N N
A A
N N
C C
E E
SCHEDULED
SERVICING
Correct maintenance of the vehicle
is essential for ensuring it stays in tip-
top condition for a long time to come.
This is why Fiat has programmed a
number of service checks and opera-
tions carried out every 30,000 kilo-
metres.
It is however important to remem-
ber that "Scheduled Servicing" is not
all your vehicle requires. Regular
checks - also in the initial period be-
fore the 30,000 kilometre coupon and
later between coupons - ordinary care
is required, such as checking fluid lev-
els and topping up, checking tyre in-
flation pressure, checking cleanness of
bonnet and boot locks, cleaning and
lubricating levers, etc...If it is seen that further replacements
or repairs are necessary in addition to
the work being carried out, these will
only be done after the customer has
given his/her consent.
IMPORTANTYou are recom-
mended to get in touch with a Fiat
Dealershipimmediately if any small
running problems crop up without
waiting for the next coupon.
If the vehicle is fre-
quently used to tow trail-
ers, carry out the sched-
uled service operations more fre-
quently than shown.
IMPORTANTThe Manufacturer
requires the Service Schedule coupon
related checks to be carried out. Fail-
ure to do so could result in the war-
ranty being cancelled for those defects
that can be attributed to such failure.
Scheduled Servicing is performed at
all Fiat Dealershipsand there is a set
time scale for such operations.
Page 166 of 258

165VEHICLE MAINTENANCE
ANNUAL
INSPECTION
SCHEDULE
The following annual inspection
schedule is required for vehicles trav-
elling 15,000 Kmapprox. a year. The
schedule includes the following oper-
ations:
– check tyre condition and wear and
adjust pressure, if required (including
spare wheel);
– check operation of lights (head-
lights, direction indicators, hazard
lights, boot light, passenger compart-
ment light, instrument panel lights,
etc.);
– check windscreen wiper/washer
and adjust nozzles;
– check position and wear of wind-
screen/rear window wiper blades;
– check front pad conditions and
wear;
– check for bonnet and boot lock
cleanness, lever cleanness and lubri-
cation;– inspect conditions of: engine, gear-
box, transmission, piping (exhaust, fu-
el feed, brakes), rubber parts (boots,
sleeves, bushings, etc.), brake and fu-
el line hoses;
– check battery charge status;
– check conditions of various control
belts;
– check and top up fluid levels (en-
gine coolant, brakes, windscreen
washer, battery, etc.);
– check and top up engine oil;
– replace pollen filter.
ADDITIONAL
CHECKS
Every 1,000 km or before long
trips, check and top up as necessary:
– engine coolant level
– brake fluid level
– power steering fluid level
– battery electrolyte level
– windscreen washer fluid
– tyre pressure and conditions.
Every 3,000 km or before long
trips, check and top up as necessary:
engine oil
Every 10,000 kmor at cwarning
light coming on (diesel engines only):
bleed water from fuel filter.
You are recommended to use FL
Seleniaproducts designed and pro-
duced for Fiat vehicles (see the “Ca-
pacities” table in the “Technical Spec-
ifications” section).
Page 170 of 258
169VEHICLE MAINTENANCE
Do not add oil with dif-
ferent specifications from
the oil already in the en-
gine.
ENGINE OIL
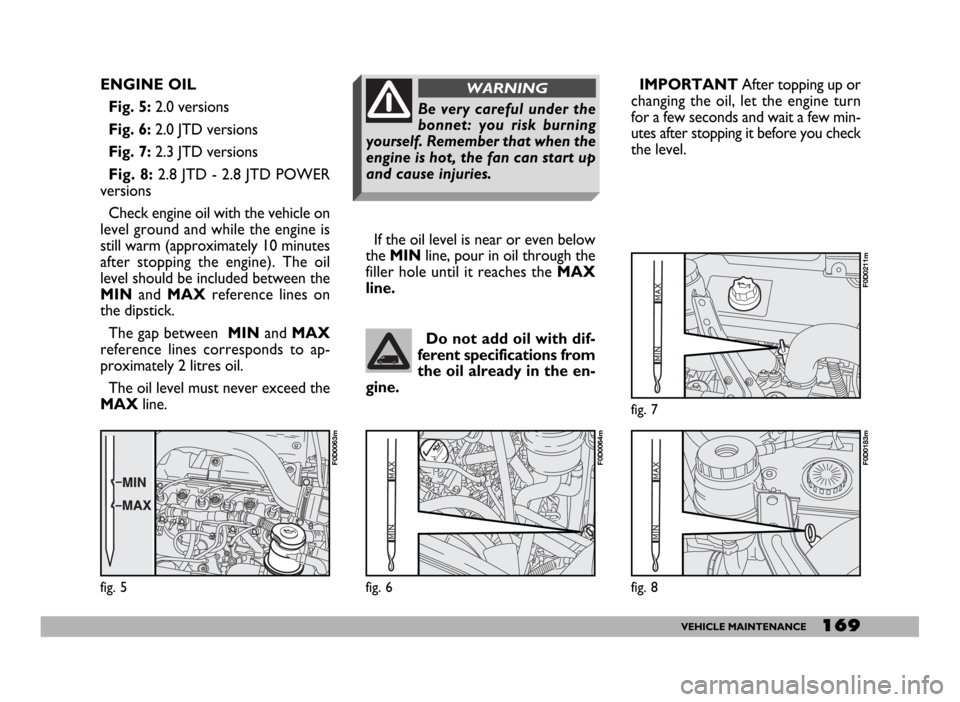
Fig. 5:2.0 versions
Fig. 6:2.0 JTD versions
Fig. 7:2.3 JTD versions
Fig. 8: 2.8 JTD - 2.8 JTD POWER
versions
Check engine oil with the vehicle on
level ground and while the engine is
still warm (approximately 10 minutes
after stopping the engine). The oil
level should be included between the
MINand MAXreference lines on
the dipstick.
The gap between MINand MAX
reference lines corresponds to ap-
proximately 2 litres oil.
The oil level must never exceed the
MAXline.If the oil level is near or even below
the MINline, pour in oil through the
filler hole until it reaches the MAX
line.
fig. 5
F0D0063m
fig. 6
F0D0064m
fig. 7
F0D0211m
fig. 8
F0D0183m
Be very careful under the
bonnet: you risk burning
yourself. Remember that when the
engine is hot, the fan can start up
and cause injuries.
WARNINGIMPORTANT After topping up or
changing the oil, let the engine turn
for a few seconds and wait a few min-
utes after stopping it before you check
the level.
Page 184 of 258
183VEHICLE MAINTENANCE
Do not wash the vehicle after it has
been parked in the sun or while the
bonnet is hot: it could take the shine
off the paint.
Outside plastic parts must be
cleaned following the usual vehicle
washing procedure.
Where possible avoid parking the
vehicle under trees; the resinous sub-
stances that certain species of tree
shed dull the paintwork and increase
the possibility of rust forming.To better protect the paintwork,
polish with protective wax from time
to time, that leaves a protective layer
on the paintwork.
When the paintwork tends to lose
its shine because of the build-up of
smog, use a wax (polish) which has a
slightly abrasive as well as protective
action.
Front headlights
IMPORTANTNever use aromat-
ic substances (e.g.: petrol) or ketones
(e.g.: acetone) for cleaning front head-
light plastic lens.
Windows
Use specific window cleaners to
clean the windows. Use very clean
cloths to avoid scratching the glass or
damaging its transparency.
IMPORTANTTo prevent damage
to the electric heater element, wipe
the inside of the heated rear window
(where fitted) gently in the same di-
rection as the elements.Engine compartment
At the end of each winter season,
carefully clean the engine compart-
ment. Have this done at a garage.
IMPORTANTThe engine com-
partment should be washed while the
engine is cold and with the ignition key
at STOP. After washing, make sure
that the various protections (e.g. rub-
ber boots and various guards) have
not be removed or damaged.
Detergents pollute wa-
ter. For this reason, the
vehicle must be washed
in an area equipped for the col-
lection and purification of the liq-
uids used while washing.
IMPORTANTBird droppings
must be washed off immediately and
with great care as their acid is partic-
ularly aggressive.
Detergents pollute wa-
ter. The vehicle must
therefore be washed in an
area equipped for the collection
and purification of the liquids
used while washing.
Page 187 of 258
186TECHNICAL SPECIFICATIONS
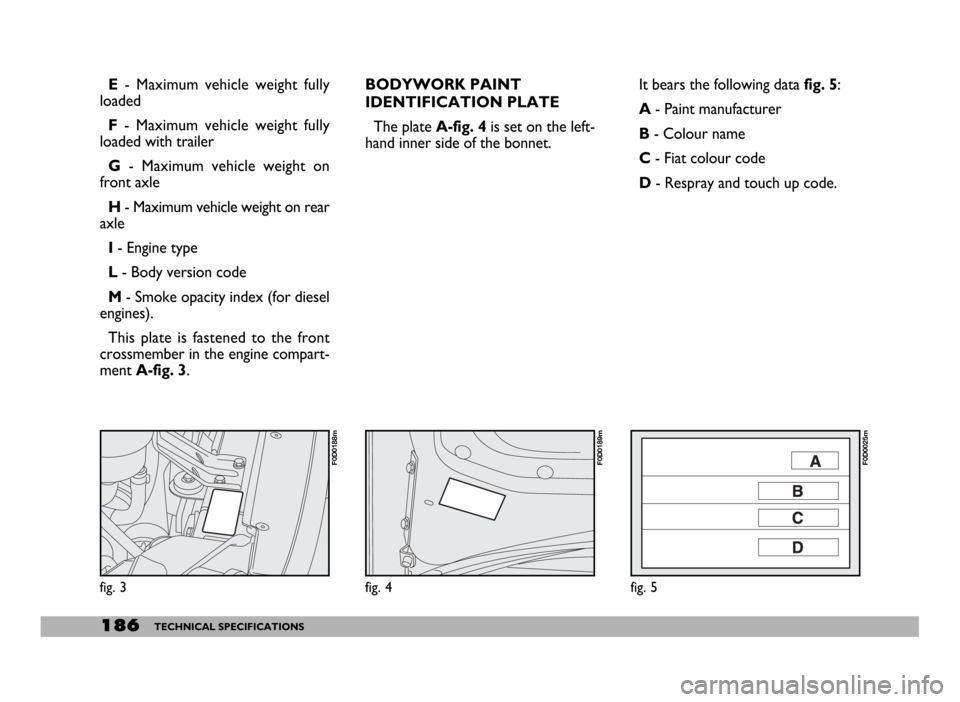
E- Maximum vehicle weight fully
loaded
F - Maximum vehicle weight fully
loaded with trailer
G - Maximum vehicle weight on
front axle
H - Maximum vehicle weight on rear
axle
I - Engine type
L - Body version code
M - Smoke opacity index (for diesel
engines).
This plate is fastened to the front
crossmember in the engine compart-
ment A-fig. 3.BODYWORK PAINT
IDENTIFICATION PLATE
The plateA-fig. 4 is set on the left-
hand inner side of the bonnet.It bears the following data fig. 5:
A - Paint manufacturer
B - Colour name
C - Fiat colour code
D- Respray and touch up code.
fig. 3
F0D0188m
fig. 4
F0D0189m
fig. 5
F0D0025m