low beam FIAT DUCATO 244 2005 3.G Owners Manual
[x] Cancel search | Manufacturer: FIAT, Model Year: 2005, Model line: DUCATO 244, Model: FIAT DUCATO 244 2005 3.GPages: 258, PDF Size: 4.05 MB
Page 42 of 258
41GETTING TO KNOW YOUR VEHICLE
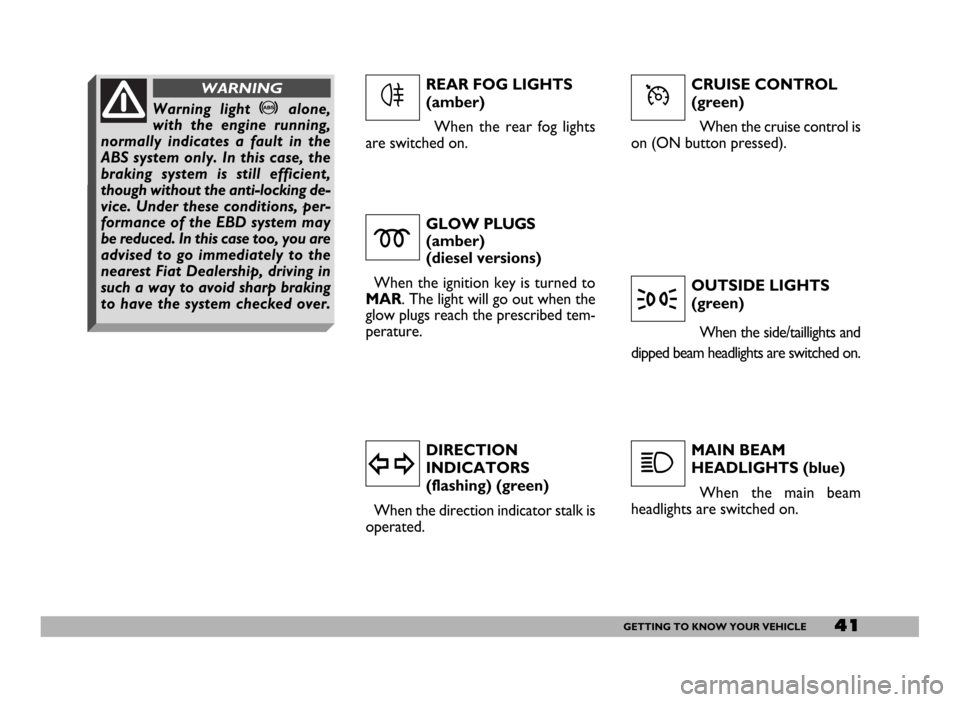
CRUISE CONTROL
(green)
When the cruise control is
on (ON button pressed).
GLOW PLUGS
(amber)
(diesel versions)
When the ignition key is turned to
MAR. The light will go out when the
glow plugs reach the prescribed tem-
perature.
DIRECTION
INDICATORS
(flashing) (green)
When the direction indicator stalk is
operated.OUTSIDE LIGHTS
(green)
When the side/taillights and
dipped beam headlights are switched on.
MAIN BEAM
HEADLIGHTS (blue)
When the main beam
headlights are switched on.
m
y
3
1
REAR FOG LIGHTS
(amber)
When the rear fog lights
are switched on.
4ÜWarning light >alone,
with the engine running,
normally indicates a fault in the
ABS system only. In this case, the
braking system is still efficient,
though without the anti-locking de-
vice. Under these conditions, per-
formance of the EBD system may
be reduced. In this case too, you are
advised to go immediately to the
nearest Fiat Dealership, driving in
such a way to avoid sharp braking
to have the system checked over.
WARNING
Page 87 of 258
86GETTING TO KNOW YOUR VEHICLE
HEADLIGHTS
ADJUSTING THE FRONT
HEADLIGHT BEAM
The correct positioning of the head-
light beams is very important for the
comfort and safety, not only of the
person driving the vehicle but also all
other road users.
This is also covered by a specific law.
To ensure you and other drivers
have the best visibility conditions when
travelling with the headlights on, the
headlights must be set properly.
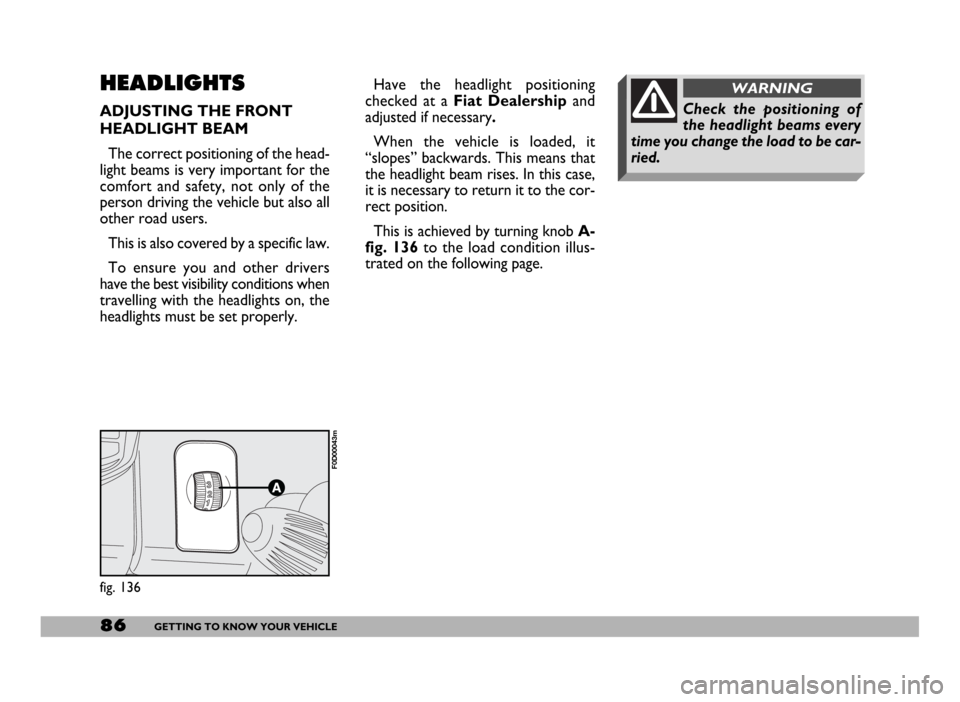
fig. 136
F0D00043m
Check the positioning of
the headlight beams every
time you change the load to be car-
ried.
WARNINGHave the headlight positioning
checked at aFiat Dealership and
adjusted if necessary.
When the vehicle is loaded, it
“slopes” backwards. This means that
the headlight beam rises. In this case,
it is necessary to return it to the cor-
rect position.
This is achieved by turning knob A-
fig. 136to the load condition illus-
trated on the following page.
Page 122 of 258
121GETTING THE BEST OUT OF YOUR VEHICLE
– Do not drive too many hours at a
time but stop at intervals to stretch
your legs and recoup your energy;
– make sure the air in the passenger’s
compartment is being changed
continuously;
– never coast downhill (i.e. with the
engine off): if you do, you lose the aid
of engine braking, power brakes and
power steering so that braking re-
quires greater effort on the pedal and
steering requires greater effort on the
steering wheel.DRIVING AT NIGHT
These are the main rules to follow
when you are driving at night:
– drive especially carefully: it is hard-
er to drive at night;
– slow down especially if the road is
not lit;
– at the first signs of sleepiness, stop:
continuing would be a risk for yourself
and everybody else. Only start driving
again when you have had enough rest;
– keep a greater safety distance from
the vehicles in front of you than dur-
ing daylight hours: it is hard to judge
how fast other vehicles are going when
all you can see are their lights;
– make sure the headlights beams are
properly positioned: if they are too
low, they reduce visibility and strain
your eyes. If they are too high they can
dazzle other drivers. Adjust headlight
beam according to transported load;
– only use main beam headlights
when you are driving outside town
and when you are sure they do not an-
noy other drivers. dip your headlights
Water, ice or salt sprinkled
on the road can deposit on
the brake discs and reduce effi-
ciency of the first braking.
WARNING
Do not drive with objects
on the floor in front of the
driver’s seat: they could caught un-
der the pedals making braking or
accelerating impossible.
WARNING
Pay attention to the mats:
even a small problem to the
braking system may require in-
creased brake pedal stroke with re-
spect to normal.
WARNING
Page 123 of 258
122GETTING THE BEST OUT OF YOUR VEHICLE
as soon as you see vehicles coming in
the other direction and pass them with
the headlights dipped;
– keep all lights clean;
– be careful of animals crossing the
road when driving in the country. Slow
down to avoid the risk of running
them over.
DRIVING IN THE RAIN
Rain and wet road surfaces spell dan-
ger. All manoeuvres are more difficult
on a wet road because the grip of the
wheels on the tarmac is greatly re-
duced. This is why braking distances
are much longer and road-holding is
lower.
Here is some advice for driving in the
rain:
– reduce speed and maintain a
greater safety distance from the vehi-
cles in front;
– If it is raining particularly heavily,
visibility is also reduced. In these cas-
es, switch on the dipped headlights
even if it is still daylight so you can be
seen more easily;– Do not drive through puddles at
speed and hold on tightly to the wheel
if you do: a puddle taken at high speed
might cause you to lose control of the
vehicle (aquaplaning);
– Position the ventilation controls for
demisting (see section “Getting to
know your vehicle”), to prevent visi-
bility from worsening;
– Routinely check the conditions of
the windscreen wiper blades.
DRIVING IN FOG
– If the fog is thick, do not start out
on a journey unless you absolutely
have to.
If driving in mist, blanket fog or when
there is the danger of fog patches:
– keep your speed down;
– turn on the dipped headlights, rear
fog lights and front fog lights, if fitted,
even during the day. Do not drive with
your headlights at main beam.IMPORTANT On stretches of
road with good visibility, switch off
your rear foglights; the brightness of
these lights could annoy the people
travelling in the vehicles behind.
– Remember that fog also means the
taramac is wet and therefore ma-
noeuvres of all kinds are more difficult
and stopping distances are longer;
– keep a good distance from the ve-
hicles in front of you;
– as far as possible, avoid spurts of
speed or sudden deceleration;
– do not overtake other vehicles if
possible;
Page 124 of 258

123GETTING THE BEST OUT OF YOUR VEHICLE
– if you are forced to stop your ve-
hicle (breakdown, limited visibility,
etc.) try to stop off the road. Turn on
the hazard lights and, if possible, the
dipped beam headlights. Rhythmically
sound the horn if you release anoth-
er vehicle is coming.
DRIVING IN THE
MOUNTAINS
– Check fluid levels (oil, brake fluid,
coolant) and tyre wear before driving
in the mountains;
– when driving downhill use the en-
gine braking effect by engaging a low
gear so as not to overheat the brakes;
– under no circumstances should you
drive downhill with the engine off or
with the gear in neutral, let alone with
the ignition key out;
– drive at moderate speed and avoid
“cutting” corners;
– remember that overtaking while
going uphill is slower and therefore re-
quires more free road. If you are be-
ing overtaken while driving uphill,
make it easier for the other vehicle
to pass.DRIVING ON SNOW
AND ICE
Here are some tips for driving in
these conditions:
– keep your speed down;
– use chains if the roads are covered
with snow;
– do not park the vehicle with the
engine running for long periods of
time: snow could divert exhaust fumes
into the passenger compartment;
– mainly use the braking effect of the
engine and under all circumstances
avoid braking sharply;
– when braking a vehicle not fitted
with ABS, reduce the possibility of the
wheels locking by varying the pressure
you exert on the brake pedal;
– do not accelerate suddenly and
avoid swerving;– in the winter, even apparently dry
roads may have icy patches. Be care-
ful therefore when driving over
stretches that do not get much expo-
sure to the sun or are lined with trees
or rocks where ice might not have
melted;
– keep a good distance from the ve-
hicles in front.
DRIVING WITH ABS
– ABS is a braking system that es-
sentially offers two advantages:
1) It prevents wheel lock and con-
sequent skidding in emergency stops,
particularly when the road does not
offer much grip.
2) it makes it possible to brake and
steer at the same time and direct the
vehicle where you want while braking.
Page 142 of 258
141IN AN EMERGENCY
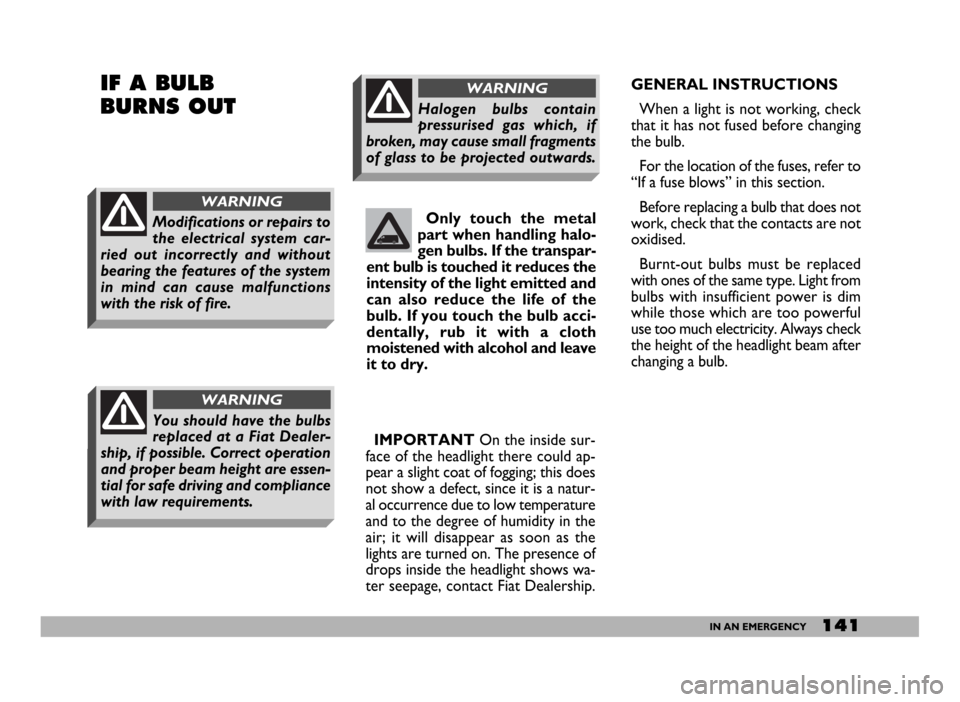
GENERAL INSTRUCTIONS
When a light is not working, check
that it has not fused before changing
the bulb.
For the location of the fuses, refer to
“If a fuse blows” in this section.
Before replacing a bulb that does not
work, check that the contacts are not
oxidised.
Burnt-out bulbs must be replaced
with ones of the same type. Light from
bulbs with insufficient power is dim
while those which are too powerful
use too much electricity. Always check
the height of the headlight beam after
changing a bulb. Only touch the metal
part when handling halo-
gen bulbs. If the transpar-
ent bulb is touched it reduces the
intensity of the light emitted and
can also reduce the life of the
bulb. If you touch the bulb acci-
dentally, rub it with a cloth
moistened with alcohol and leave
it to dry.IF A BULB
BURNS OUT
Modifications or repairs to
the electrical system car-
ried out incorrectly and without
bearing the features of the system
in mind can cause malfunctions
with the risk of fire.
WARNING
You should have the bulbs
replaced at a Fiat Dealer-
ship, if possible. Correct operation
and proper beam height are essen-
tial for safe driving and compliance
with law requirements.
WARNING
Halogen bulbs contain
pressurised gas which, if
broken, may cause small fragments
of glass to be projected outwards.
WARNING
IMPORTANTOn the inside sur-
face of the headlight there could ap-
pear a slight coat of fogging; this does
not show a defect, since it is a natur-
al occurrence due to low temperature
and to the degree of humidity in the
air; it will disappear as soon as the
lights are turned on. The presence of
drops inside the headlight shows wa-
ter seepage, contact Fiat Dealership.
Page 144 of 258
143IN AN EMERGENCY
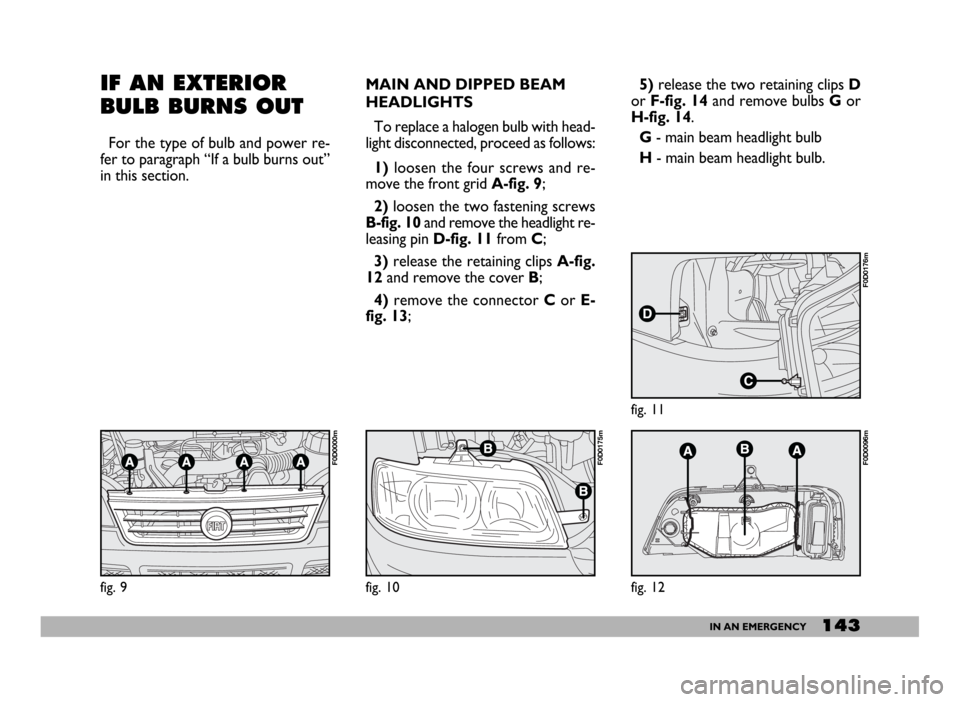
MAIN AND DIPPED BEAM
HEADLIGHTS
To replace a halogen bulb with head-
light disconnected, proceed as follows:
1)loosen the four screws and re-
move the front grid A-fig. 9;
2)loosen the two fastening screws
B-fig. 10and remove the headlight re-
leasing pin D-fig. 11from C;
3)release the retaining clips A-fig.
12and remove the cover B;
4)remove the connector Cor E-
fig. 13;5)release the two retaining clips D
or F-fig. 14and remove bulbs Gor
H-fig. 14.
G- main beam headlight bulb
H- main beam headlight bulb.
fig. 12
F0D0096m
fig. 11
F0D0176m
fig. 10
F0D0175m
IF AN EXTERIOR
BULB BURNS OUT
For the type of bulb and power re-
fer to paragraph “If a bulb burns out”
in this section.
fig. 9
F0D0000m
Page 157 of 258
156IN AN EMERGENCY
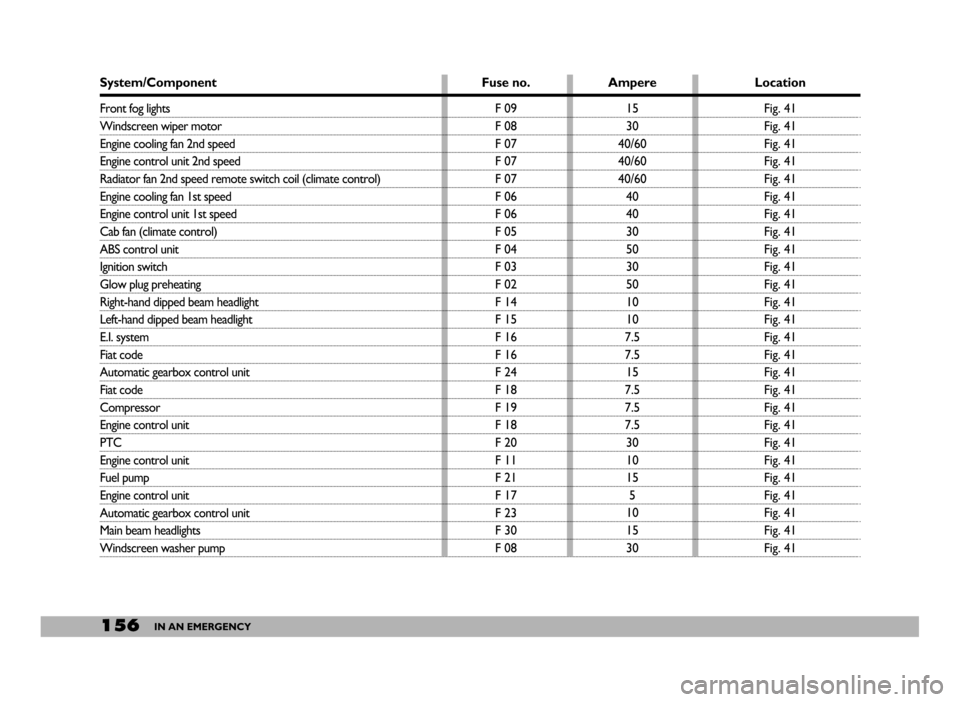
System/Component
Front fog lights
Windscreen wiper motor
Engine cooling fan 2nd speed
Engine control unit 2nd speed
Radiator fan 2nd speed remote switch coil (climate control)
Engine cooling fan 1st speed
Engine control unit 1st speed
Cab fan (climate control)
ABS control unit
Ignition switch
Glow plug preheating
Right-hand dipped beam headlight
Left-hand dipped beam headlight
E.I. system
Fiat code
Automatic gearbox control unit
Fiat code
Compressor
Engine control unit
PTC
Engine control unit
Fuel pump
Engine control unit
Automatic gearbox control unit
Main beam headlights
Windscreen washer pumpFuse no.
F 09
F 08
F 07
F 07
F 07
F 06
F 06
F 05
F 04
F 03
F 02
F 14
F 15
F 16
F 16
F 24
F 18
F 19
F 18
F 20
F 11
F 21
F 17
F 23
F 30
F 08Ampere
15
30
40/60
40/60
40/60
40
40
30
50
30
50
10
10
7.5
7.5
15
7.5
7.5
7.5
30
10
15
5
10
15
30Location
Fig. 41
Fig. 41
Fig. 41
Fig. 41
Fig. 41
Fig. 41
Fig. 41
Fig. 41
Fig. 41
Fig. 41
Fig. 41
Fig. 41
Fig. 41
Fig. 41
Fig. 41
Fig. 41
Fig. 41
Fig. 41
Fig. 41
Fig. 41
Fig. 41
Fig. 41
Fig. 41
Fig. 41
Fig. 41
Fig. 41