mirror FIAT DUCATO 244 2005 3.G Owners Manual
[x] Cancel search | Manufacturer: FIAT, Model Year: 2005, Model line: DUCATO 244, Model: FIAT DUCATO 244 2005 3.GPages: 258, PDF Size: 4.05 MB
Page 52 of 258
51GETTING TO KNOW YOUR VEHICLE
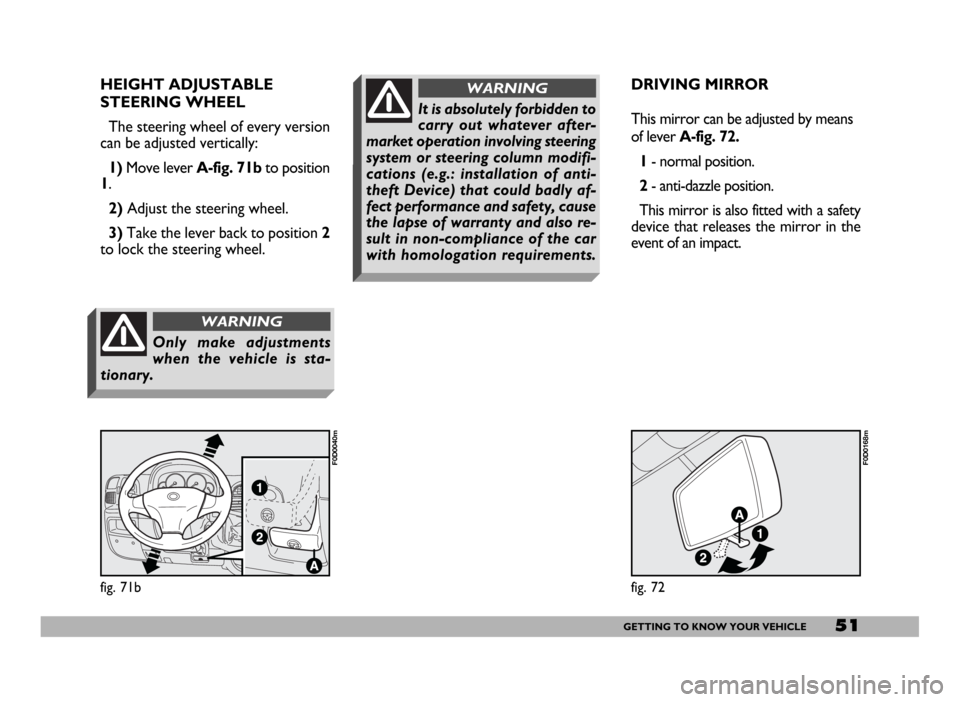
HEIGHT ADJUSTABLE
STEERING WHEEL
The steering wheel of every version
can be adjusted vertically:
1)Move lever A-fig. 71b to position
1.
2)Adjust the steering wheel.
3)Take the lever back to position 2
to lock the steering wheel.
fig. 71b
F0D0040m
Only make adjustments
when the vehicle is sta-
tionary.
WARNING
DRIVING MIRROR
This mirror can be adjusted by means
of lever A-fig. 72.
1- normal position.
2- anti-dazzle position.
This mirror is also fitted with a safety
device that releases the mirror in the
event of an impact.
fig. 72
F0D0168m
It is absolutely forbidden to
carry out whatever after-
market operation involving steering
system or steering column modifi-
cations (e.g.: installation of anti-
theft Device) that could badly af-
fect performance and safety, cause
the lapse of warranty and also re-
sult in non-compliance of the car
with homologation requirements.
WARNING
Page 53 of 258
52GETTING TO KNOW YOUR VEHICLE
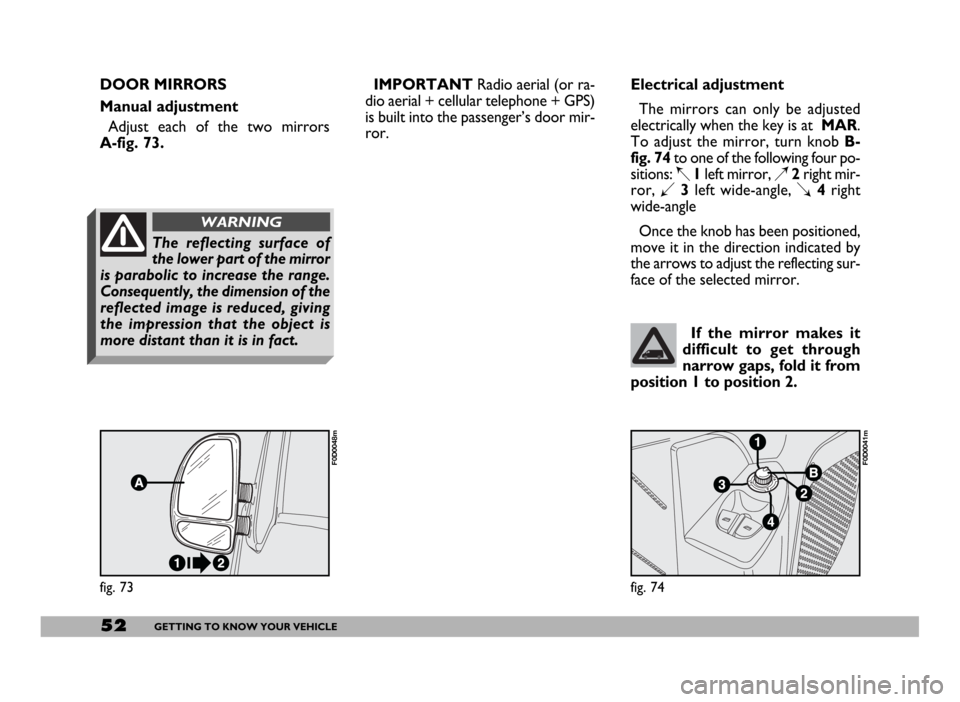
fig. 73
F0D0048m
fig. 74
F0D0041m
If the mirror makes it
difficult to get through
narrow gaps, fold it from
position 1 to position 2.
Electrical adjustment
The mirrors can only be adjusted
electrically when the key is at MAR.
To adjust the mirror, turn knob B-
fig. 74to one of the following four po-
sitions: Í1left mirror, È2right mir-
ror, Î3left wide-angle, Ï4right
wide-angle
Once the knob has been positioned,
move it in the direction indicated by
the arrows to adjust the reflecting sur-
face of the selected mirror.
The reflecting surface of
the lower part of the mirror
is parabolic to increase the range.
Consequently, the dimension of the
reflected image is reduced, giving
the impression that the object is
more distant than it is in fact.
WARNING
DOOR MIRRORS
Manual adjustment
Adjust each of the two mirrors
A-fig. 73.IMPORTANTRadio aerial (or ra-
dio aerial + cellular telephone + GPS)
is built into the passenger’s door mir-
ror.
Page 72 of 258
71GETTING TO KNOW YOUR VEHICLE
CONTROLS
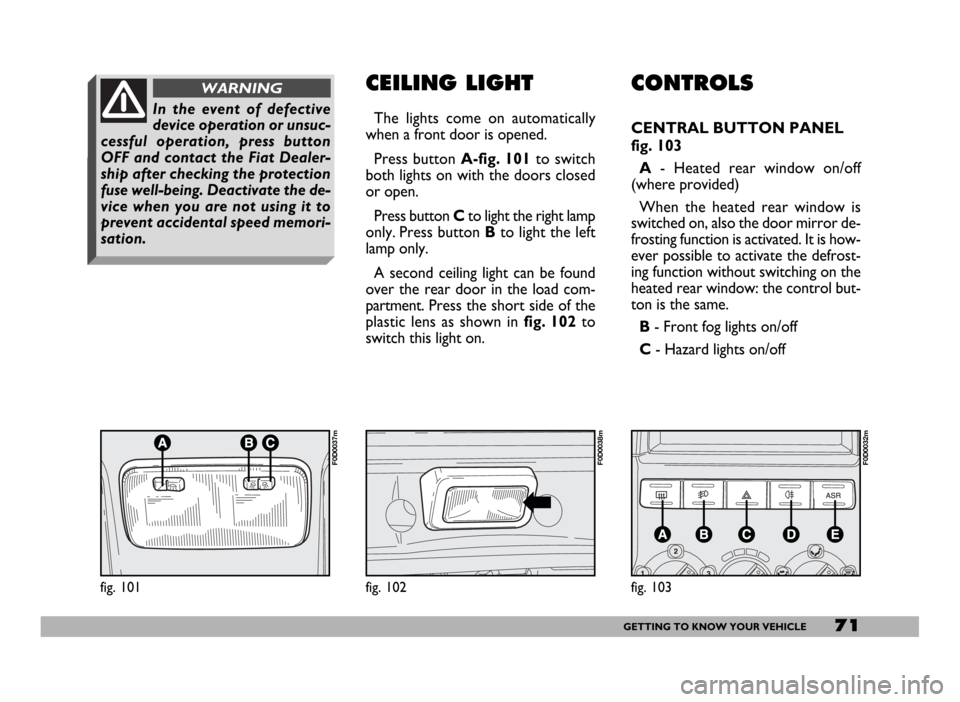
CENTRAL BUTTON PANEL
fig. 103
A- Heated rear window on/off
(where provided)
When the heated rear window is
switched on, also the door mirror de-
frosting function is activated. It is how-
ever possible to activate the defrost-
ing function without switching on the
heated rear window: the control but-
ton is the same.
B - Front fog lights on/off
C- Hazard lights on/off
CEILING LIGHT
The lights come on automatically
when a front door is opened.
Press button A-fig. 101to switch
both lights on with the doors closed
or open.
Press button Cto light the right lamp
only. Press button Bto light the left
lamp only.
A second ceiling light can be found
over the rear door in the load com-
partment. Press the short side of the
plastic lens as shown in fig. 102to
switch this light on.
fig. 101
F0D0037m
fig. 102
F0D0038m
In the event of defective
device operation or unsuc-
cessful operation, press button
OFF and contact the Fiat Dealer-
ship after checking the protection
fuse well-being. Deactivate the de-
vice when you are not using it to
prevent accidental speed memori-
sation.
WARNING
fig. 103
F0D0032m
Page 79 of 258
78GETTING TO KNOW YOUR VEHICLE
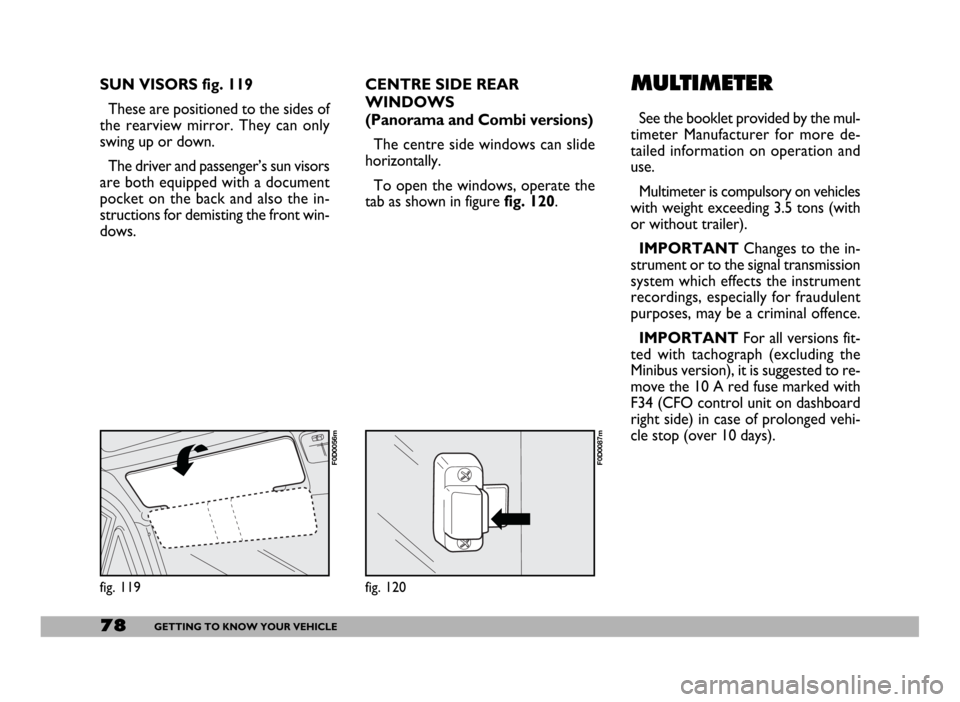
SUN VISORS fig. 119
These are positioned to the sides of
the rearview mirror. They can only
swing up or down.
The driver and passenger’s sun visors
are both equipped with a document
pocket on the back and also the in-
structions for demisting the front win-
dows.
fig. 119
F0D0056m
CENTRE SIDE REAR
WINDOWS
(Panorama and Combi versions)
The centre side windows can slide
horizontally.
To open the windows, operate the
tab as shown in figure fig. 120.
fig. 120
F0D0087m
MULTIMETER
See the booklet provided by the mul-
timeter Manufacturer for more de-
tailed information on operation and
use.
Multimeter is compulsory on vehicles
with weight exceeding 3.5 tons (with
or without trailer).
IMPORTANTChanges to the in-
strument or to the signal transmission
system which effects the instrument
recordings, especially for fraudulent
purposes, may be a criminal offence.
IMPORTANTFor all versions fit-
ted with tachograph (excluding the
Minibus version), it is suggested to re-
move the 10 A red fuse marked with
F34 (CFO control unit on dashboard
right side) in case of prolonged vehi-
cle stop (over 10 days).
Page 101 of 258
100GETTING TO KNOW YOUR VEHICLE
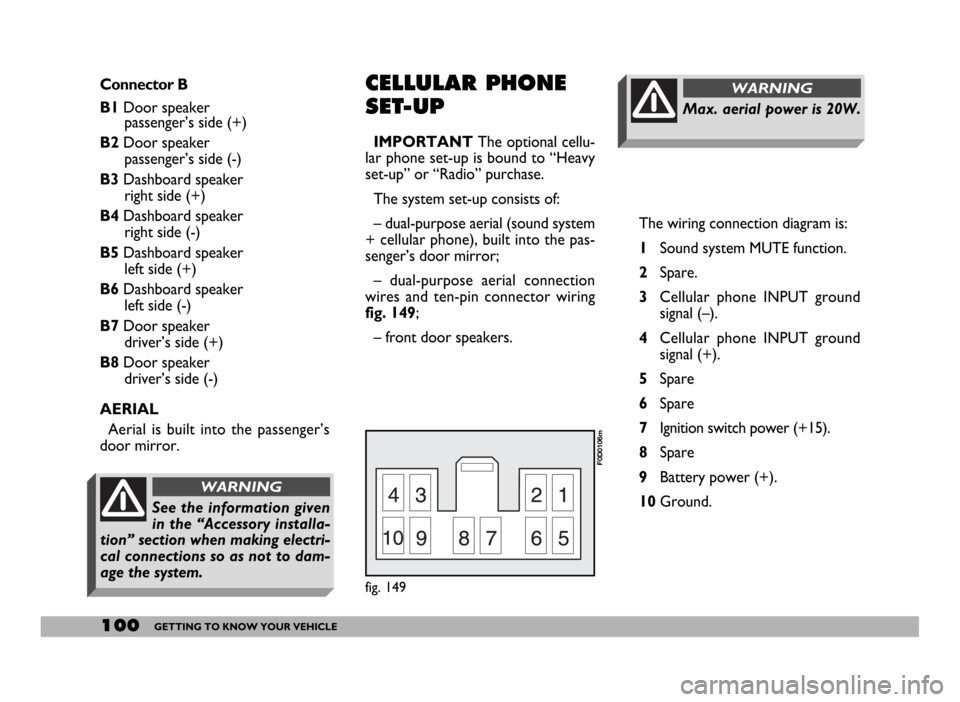
The wiring connection diagram is:
1Sound system MUTE function.
2Spare.
3Cellular phone INPUT ground
signal (–).
4Cellular phone INPUT ground
signal (+).
5Spare
6Spare
7Ignition switch power (+15).
8Spare
9Battery power (+).
10Ground.
Max. aerial power is 20W.
WARNINGConnector B
B1Door speaker
passenger’s side (+)
B2Door speaker
passenger’s side (-)
B3Dashboard speaker
right side (+)
B4Dashboard speaker
right side (-)
B5Dashboard speaker
left side (+)
B6Dashboard speaker
left side (-)
B7Door speaker
driver’s side (+)
B8Door speaker
driver’s side (-)
AERIAL
Aerial is built into the passenger’s
door mirror.CELLULAR PHONE
SET-UP
IMPORTANTThe optional cellu-
lar phone set-up is bound to “Heavy
set-up” or “Radio” purchase.
The system set-up consists of:
– dual-purpose aerial (sound system
+ cellular phone), built into the pas-
senger’s door mirror;
– dual-purpose aerial connection
wires and ten-pin connector wiring
fig. 149;
– front door speakers.
fig. 149
F0D0106m
See the information given
in the “Accessory installa-
tion” section when making electri-
cal connections so as not to dam-
age the system.
WARNING
Page 121 of 258
120GETTING THE BEST OUT OF YOUR VEHICLE
BEFORE GETTING BEHIND
THE WHEEL
– Make sure all light, including the
headlights, are working properly;
– adjust the position of seats and dri-
ving and door mirrors properly for the
best driving position;
– make sure that nothing (mats, etc.)
gets in the way of the pedals when
they are pushed down;
– make sure that any child restraint
systems (child seats, cradles, etc.) are
properly fixed;
– place any objects in the load com-
partment in such a way that they can-
not be thrown forwards in the event
of an accident;
– light eating will help keep your re-
flexes prompt. Above all, do not have
anything alcoholic to drink.
Remember to periodically check:
– tyre pressure,
– engine oil level,
– engine coolant level and cooling
system conditions,– brake fluid level,
– windscreen washer fluid level.
WHEN TRAVELLING
– The first rule of safe driving is pru-
dence;
– prudence also means putting your-
self into a position where you can pre-
dict wrong or imprudent behaviour
from other drivers;
– stick closely to the rules of the
road in the particular country where
the vehicle is being driven and, above
all, do not exceed speed limits;
– ensure that, besides yourself, all the
other passengers in the vehicle have
their seat belts fastened, that children
are sitting in the appropriate child
seats and any animals in the vehicle are
placed in suitable compartment;
– you should be physically fit and
mentally alert before setting out on
long journeys.
Always fasten both front
and back seat belts
(Panorama, Minibus, Combi and
Crew Cab versions). Travelling with
the seat belts unfastened increas-
es the risk of injury or death if you
are in a collision.
WARNING
Driving while drunk or un-
der the influence of drugs
or certain medicines is dangerous
for both you and other road users.
WARNING
Page 130 of 258
129GETTING THE BEST OUT OF YOUR VEHICLE
TOWING A TRAILER
IMPORTANT
The vehicle must be fitted with a ho-
mologated tow hitch and suitable elec-
trical system for towing a caravan or
trailer. Have the tow hitch fitted by an
expert who will issue specific docu-
mentation for use on roads.
Fit special wing mirrors in accor-
dance with the highway code.
Remember that towing a trailer
makes it harder for the vehicle to
climb the maximum gradients speci-
fied, increases braking and overtaking
distance, proportionally to the overall
weight of the trailer.
Engage a low gear when driving
downhill rather than constantly brak-
ing.
The weight the trailer exerts on the
vehicle’s tow hitch coupling reduces
the vehicle’s payload by the same
amount.In order to be sure you are not ex-
ceeding the maximum towing weight
(shown in the log book) you have to
take into account the trailer weight ful-
ly laden including the accessories and
personal luggage.
Do not exceed the speed limits for
towing a trailer in the country you are
driving in. In any case, do not exceed
the top speed of 100 km/h.TOW HITCH INSTALLATION
The tow hitch must be fixed to the
body by an expert in accordance with
the following instructions and re-
specting the additional and/or integra-
tive information provided by the tow
hitch manufacturer.
The tow hitch to be fitted must com-
ply with the current regulations in
force, with reference to Directive
94/20/CEE and subsequent modifica-
tions.
Use a tow hitch suited for the maxi-
mum towable load of the vehicle version
on which the tow hitch is to be fitted.
Use a unified coupling for the elec-
trical connections. The coupling is gen-
erally fitted on a specific mount fas-
tened to the tow hitch.
For the electrical connections, a 7 or
13 pole 12VDC coupling must be used
(CUNA/UNI and ISO/DIN standards).
Follow the instructions provided by
the manufacturer of the vehicle and/or
the tow hitch.
For the electric connections use the
proper trailer light control unit.
Under no circumstances
modify the vehicle’s braking
system for trailer braking control.
The trailer braking system must be
completely independent from the
vehicle hydraulic system.
WARNING
Where your vehicle is
equipped with ABS, re-
member that this has no effect over
the trailer braking system. Particu-
lar care must be taken on slippery
surfaces.
WARNING
Page 154 of 258
153IN AN EMERGENCY
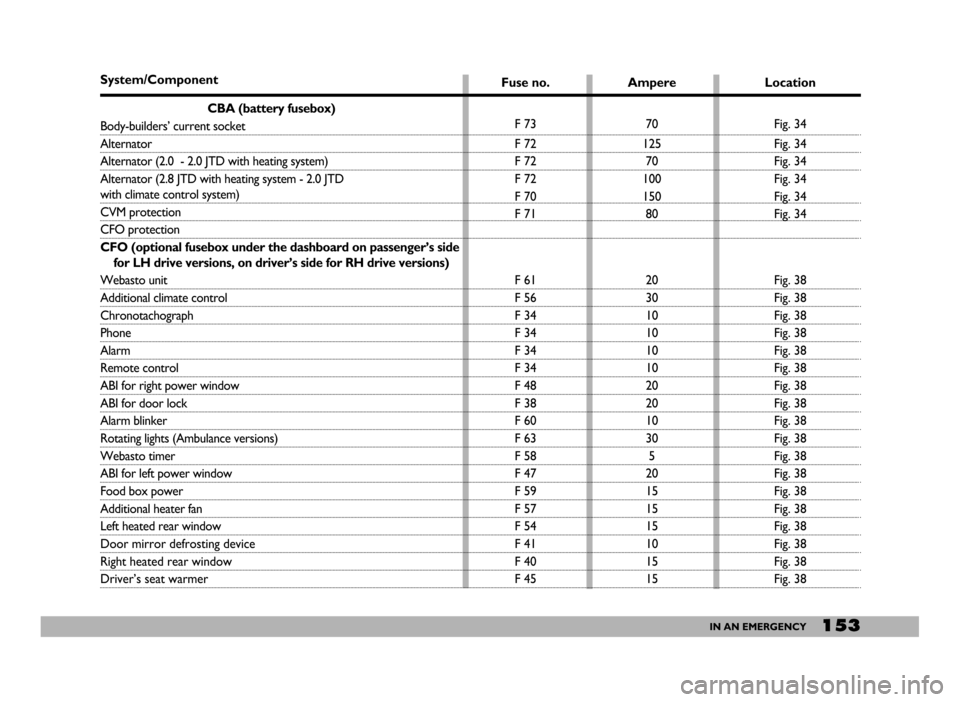
System/Component
CBA (battery fusebox)
Body-builders’ current socket
Alternator
Alternator (2.0 - 2.0 JTD with heating system)
Alternator (2.8 JTD with heating system - 2.0 JTD
with climate control system)
CVM protection
CFO protection
CFO (optional fusebox under the dashboard on passenger’s side
for LH drive versions, on driver’s side for RH drive versions)
Webasto unit
Additional climate control
Chronotachograph
Phone
Alarm
Remote control
ABI for right power window
ABI for door lock
Alarm blinker
Rotating lights (Ambulance versions)
Webasto timer
ABI for left power window
Food box power
Additional heater fan
Left heated rear window
Door mirror defrosting device
Right heated rear window
Driver’s seat warmerFuse no.
F 73
F 72
F 72
F 72
F 70
F 71
F 61
F 56
F 34
F 34
F 34
F 34
F 48
F 38
F 60
F 63
F 58
F 47
F 59
F 57
F 54
F 41
F 40
F 45Ampere
70
125
70
100
150
80
20
30
10
10
10
10
20
20
10
30
5
20
15
15
15
10
15
15Location
Fig. 34
Fig. 34
Fig. 34
Fig. 34
Fig. 34
Fig. 34
Fig. 38
Fig. 38
Fig. 38
Fig. 38
Fig. 38
Fig. 38
Fig. 38
Fig. 38
Fig. 38
Fig. 38
Fig. 38
Fig. 38
Fig. 38
Fig. 38
Fig. 38
Fig. 38
Fig. 38
Fig. 38
Page 156 of 258
155IN AN EMERGENCY
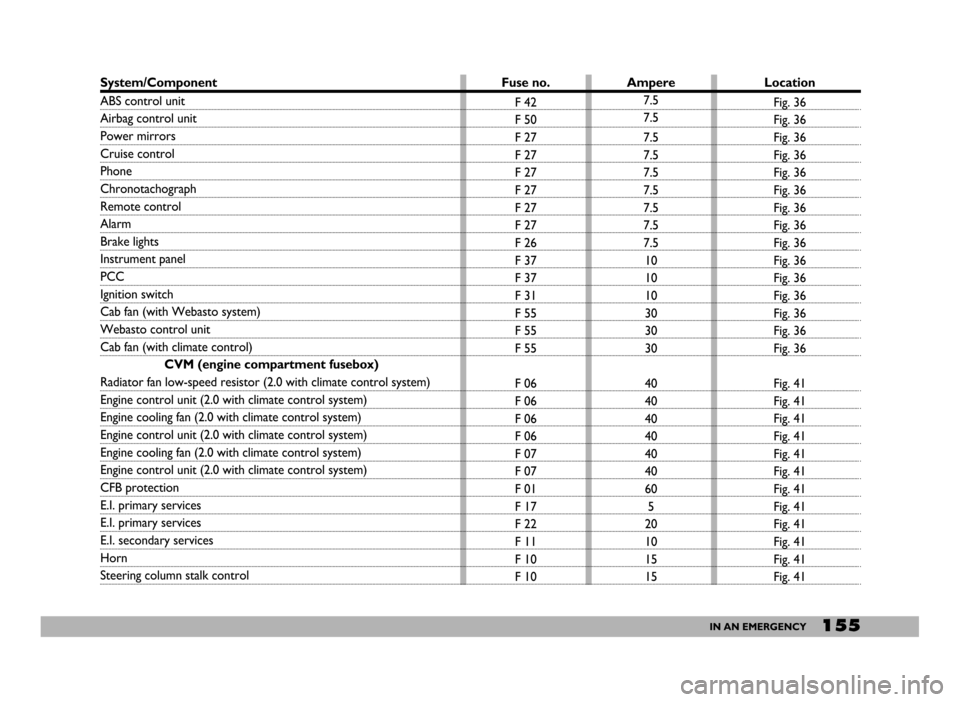
System/Component
ABS control unit
Airbag control unit
Power mirrors
Cruise control
Phone
Chronotachograph
Remote control
Alarm
Brake lights
Instrument panel
PCC
Ignition switch
Cab fan (with Webasto system)
Webasto control unit
Cab fan (with climate control)
CVM (engine compartment fusebox)
Radiator fan low-speed resistor (2.0 with climate control system)
Engine control unit (2.0 with climate control system)
Engine cooling fan (2.0 with climate control system)
Engine control unit (2.0 with climate control system)
Engine cooling fan (2.0 with climate control system)
Engine control unit (2.0 with climate control system)
CFB protection
E.I. primary services
E.I. primary services
E.I. secondary services
Horn
Steering column stalk controlFuse no.
F 42
F 50
F 27
F 27
F 27
F 27
F 27
F 27
F 26
F 37
F 37
F 31
F 55
F 55
F 55
F 06
F 06
F 06
F 06
F 07
F 07
F 01
F 17
F 22
F 11
F 10
F 10Ampere
7.5
7.5
7.5
7.5
7.5
7.5
7.5
7.5
7.5
10
10
10
30
30
30
40
40
40
40
40
40
60
5
20
10
15
15Location
Fig. 36
Fig. 36
Fig. 36
Fig. 36
Fig. 36
Fig. 36
Fig. 36
Fig. 36
Fig. 36
Fig. 36
Fig. 36
Fig. 36
Fig. 36
Fig. 36
Fig. 36
Fig. 41
Fig. 41
Fig. 41
Fig. 41
Fig. 41
Fig. 41
Fig. 41
Fig. 41
Fig. 41
Fig. 41
Fig. 41
Fig. 41
Page 250 of 258
249INDEX
Glove compartment/oddment
compartment ............................. 73
Headlight washer ...................... 181
Headlights
- beam adjustment .................... 86
Head restraints ............................ 50
Heat flange .................................... 106
Heating .......................................... 56
Heating and ventilation .............. 54
Identification data ...................... 185
If a bulb burns out ...................... 141
If an accident occurs .................. 160
If anyone is injured
(during accidents) ..................... 161
If an exterior light burns out ... 143
If an interior light burns out .... 148
Ignition switch ............................. 28
In an emergency..................... 135
Individual settings ........................ 42
Instrument panel ......................... 29Instruments .................................. 30
Interior equipment ..................... 73
Interiors ........................................ 184
Jacking the vehicle .................... 158
Jump starting ........................... 136-157
Keys ............................................ 7
Load recommendations .......... 126
Main beam headlights ............ 65
- bulb replacement ................... 143
Manual gearbox ........................... 109
Mobile foot board ....................... 80
Model plate ................................... 185
Multimeter .................................... 78
Number plate light
replacement ............................... 147
Object holder/
food box ..................................... 75
Oddment compartments............ 73
Odometer ...................................... 31
Paintwork .................................... 182
Parking ............................................ 108
Parking sensors ............................. 67
Performance .................................. 226
Pollen filter .................................... 173
Power steering fluid level ........... 171
Pretensioners ................................ 18
Protecting the environment ...... 104
Radio transmitters
and cellular phones .................. 101
Reading/writing desk .................. 74
Rear fog light replacement ....... 145
Rearview camera ........................ 67
Rearview mirrors ................ 51-52
Recharging the battery .............. 157
Remote control ........................... 9