steering wheel FIAT DUCATO BASE CAMPER 2014 Owner handbook (in English)
[x] Cancel search | Manufacturer: FIAT, Model Year: 2014, Model line: DUCATO BASE CAMPER, Model: FIAT DUCATO BASE CAMPER 2014Pages: 367, PDF Size: 20.39 MB
Page 130 of 367
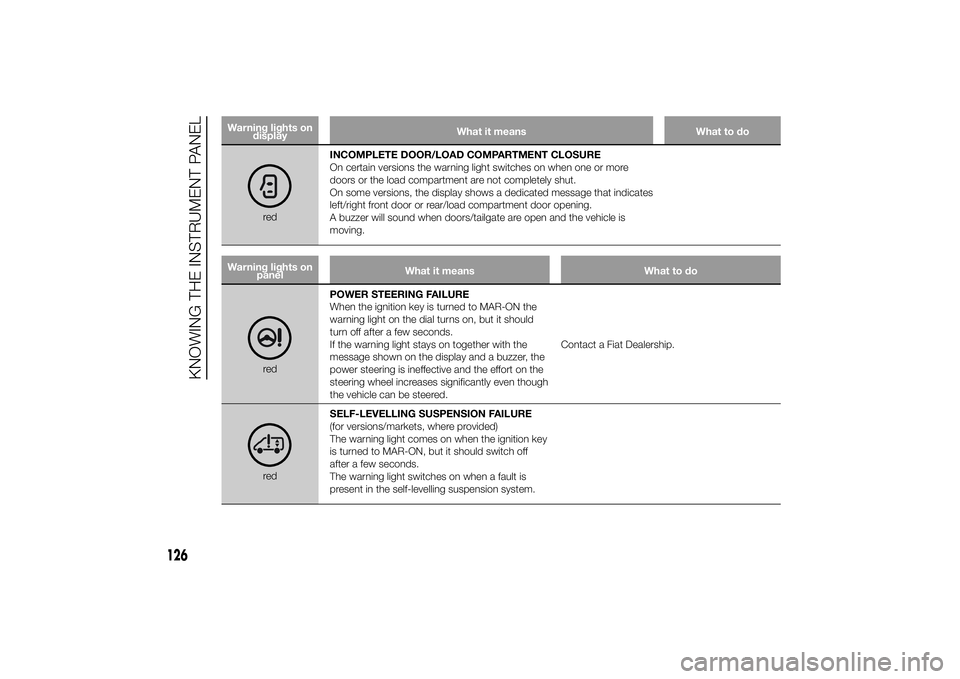
Warning lights on
displayWhat it means What to do
redINCOMPLETE DOOR/LOAD COMPARTMENT CLOSURE
On certain versions the warning light switches on when one or more
doors or the load compartment are not completely shut.
On some versions, the display shows a dedicated message that indicates
left/right front door or rear/load compartment door opening.
A buzzer will sound when doors/tailgate are open and the vehicle is
moving.
Warning lights on
panelWhat it means What to do
redPOWER STEERING FAILURE
When the ignition key is turned to MAR-ON the
warning light on the dial turns on, but it should
turn off after a few seconds.
If the warning light stays on together with the
message shown on the display and a buzzer, the
power steering is ineffective and the effort on the
steering wheel increases significantly even though
the vehicle can be steered.Contact a Fiat Dealership.redSELF-LEVELLING SUSPENSION FAILURE
(for versions/markets, where provided)
The warning light comes on when the ignition key
is turned to MAR-ON, but it should switch off
after a few seconds.
The warning light switches on when a fault is
present in the self-levelling suspension system.
126
KNOWING THE INSTRUMENT PANEL
Page 164 of 367
FRONT AIRBAGSThe vehicle is provided with front
airbags for the driver and the
passenger.
The front driver/passenger airbags have
been designed to protect the front
seat occupants in the event of frontal
impacts of medium-high severity, by
placing the bag between the occupant
and the steering wheel or dashboard.
Therefore, non-activation in other types
of collisions (side collisions, rear shunts,
roll-overs, etc.) is not a system
malfunction.
An electronic control unit will make the
bag inflate in the event of a frontal
impact.
The bag will inflate instantaneously
placing itself between the front
occupants body and the structures
which could cause injury. It will deflate
immediately afterwards.
Driver and passenger front airbags are
not a replacement of but
complementary to the belts, which you
are recommended to always wear, as
specified by law in Europe and most
non-European countries.The volume of the front airbags at
maximum inflation fills most of
the space between the steering wheel
and the driver and between the
dashboard and the passenger.
In the event of an impact, someone not
wearing a seat belt will move forward
and come into contact with the bag
which is still in the opening stage. The
protection offered by the bag is
compromised in these circumstances.
Front airbags may not activate in the
following situations:
❒frontal impacts against highly
deformable objects not involving the
front surface of the vehicle (e.g.
wing collision against guard rail, etc.);
❒jamming of the vehicle underneath
other vehicles or protective barriers
(e.g. underneath a truck or a guard
rail); in this case, the bags would offer
no additional protection with respect
to the seat belt and their deployment
is unnecessary. In these cases,
non-deployment does not indicate a
system malfunction.
110)
The airbags are not deployed in the
event of minor frontal collisions (for
which the restraining action of the seat
belts is sufficient). Safety belts must
always be worn. In the event of frontal
collisions they guarantee correct
positioning of the passenger.
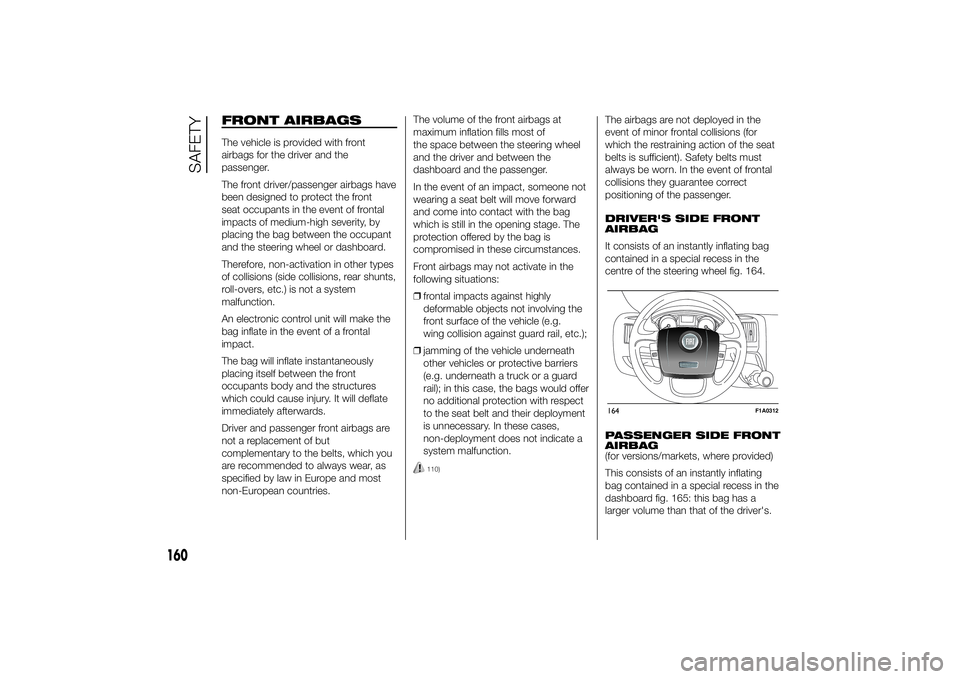
DRIVER'S SIDE FRONT
AIRBAG
It consists of an instantly inflating bag
contained in a special recess in the
centre of the steering wheel fig. 164.
PASSENGER SIDE FRONT
AIRBAG
(for versions/markets, where provided)
This consists of an instantly inflating
bag contained in a special recess in the
dashboard fig. 165: this bag has a
larger volume than that of the driver's.164
F1A0312
160
SAFETY
Page 168 of 367
WARNING
110) Do not apply stickers or other objects to the steering wheel, the dashboard in the passenger side airbag area and
the seats. Never put objects (e.g. mobile phones) on the passenger side of the dashboard since they could interfere
with correct inflation of the passenger airbag and also cause serious injury to the passengers.
111) When an active passenger airbag is fitted, DO NOT install rear facing child restraint systems on the front seat.
Deployment of the airbag in an accident could cause fatal injuries to the child regardless of the severity of the
impact. Therefore, always deactivate the passenger airbag when a rear facing child restraint system is installed on
the front passenger seat. The front passenger seat must also be positioned back as far as possible in order to prevent
the child restraint system from coming into contact with the dashboard. Immediately reactivate the passenger airbag
as soon as the child restraint system has been removed.
164
SAFETY
Page 170 of 367
IMPORTANT The front airbags and/or
side bags may be deployed if the
vehicle is subject to heavy knocks or
accidents involving the underbody area,
such as for example violent shocks,
against steps, kerbs or low obstacles,
vehicle falling into big potholes or
depressions in the road.
IMPORTANT A small amount of dust
will be released when the airbags
are deployed. The dust is not harmful
and does not indicate the beginning of
a fire. Furthermore, the surface of the
deployed bag and the interior of the
vehicle may be covered in a dusty
residue: this may irritate your skin and
eyes. Wash with mild soap and water in
the event of exposure.
IMPORTANT Should an accident occur
in which any of the safety devices are
activated, take the vehicle to a Fiat
Dealership to have the activated
devices replaced and to have the whole
system checked.
Every control, repair and replacement
operation concerning the airbags must
only be carried out at a Fiat Dealership.If you are having the vehicle scrapped,
have the system deactivated at a Fiat
Dealership first. If the vehicle changes
ownership, the new owner must be
informed of how to use the airbags and
the above warnings and also be given
this "Owner Handbook".
IMPORTANT Pretensioners, front
airbags and front side bags are
deployed differently according to the
type of collision. Failure to deploy
of one of the devices does not
necessarily indicate a system
malfunction.
WARNING
112) Never rest your head, arms or
elbows on the doors, on the
windows or in the window bag
area as this could cause injuries
during the inflation phase.
113) Never lean your head, arms and
elbows out of the window.114) If when turning the key to
MAR-ON the warning light
does not turn on or if it stays
on when travelling (together with
the message on the multifunction
display, for versions/markets
where provided), there could be a
fault in the safety systems; in
this event, airbags or
pretensioners may not trigger in
the case of impact or, in a lower
number of cases, they could be
triggered accidentally. Contact a
Fiat Dealership immediately to
have the system checked.
115) Do not cover the backrest of
the front or rear seats with covers
which are not suitable for use
with side bags.
116) Do not travel carrying objects in
your lap, in front of your chest or
between your lips (pipe, pencils,
etc.). They could cause severe
injury if the airbag is deployed.
117) Always drive keeping your
hands on the steering wheel rim
so that the airbag can inflate
freely if necessary. Do not drive
with your body bent forward.
Keep your back straight against
the backrest.
166
SAFETY
Page 175 of 367
STOPPING THE ENGINE
Turn the ignition key to STOP while the
engine is idling.
31) 32)
IMPORTANT
26) It is advisable not to demand
maximum performance from
your vehicle (e.g. excessive
acceleration, long distances at
high speeds, excessively intense
braking, etc.) during the initial
period of use.
27) When the engine is off, do not
leave the ignition key turned to
MAR-ON to prevent unnecessary
electrical consumption from
draining the battery.
28) If the
warning light flashes
for about 60 seconds after
starting or during prolonged
cranking, this indicates a fault in
the glow plug preheating system.
Use the vehicle normally if the
engine starts, but contact a Fiat
Dealership as soon as possible.29) Remember that the brake servo
and power steering are not
operational until the engine has
been started, so you need to apply
much more force than usual to
the brake pedal and steering
wheel.
30) Never start the engine by
pushing, towing or driving
downhill. This could cause fuel to
flow into the catalytic converter
and damage it beyond repair.
31) A quick burst on the accelerator
before turning off the engine
serves absolutely no practical
purpose; it wastes fuel and is
especially damaging to
turbocharged engines.
32) In some cases, when the engine
switches off, the fan could
activate for max. 120 seconds.
WARNING
125) It is dangerous to run the
engine in enclosed areas. The
engine takes in oxygen and
releases carbon dioxide, carbon
monoxide and other toxic gases.
171
Page 219 of 367
Dashboard fuse box
fig. 224 - fig. 225DEVICE PROTECTED FUSE AMPERERight dipped beam headlight F12 7,5
Left dipped headlight F13 7,5
Engine compartment control unit relay, dashboard control unit relay (+key) F31 5
Lighting of roof lights in the passenger compartment (+battery) F32 7,5
Battery monitoring sensor for Start&Stop versions (+battery) F33 7,5
Minibus interior lights (emergency) F34 7,5
Radio, climate control, alarm, tachograph, battery disconnecting control unit,
Webasto timer (+battery)F36 10
Brake light control (main), third brake light, instrument panel (+key) F37 7,5
Door lock (+battery) F38 20
Windscreen wiper (+key) F43 20
Driver's side electric window F47 20
Passenger side electric window F48 20
Parking sensor control unit, radio, steering wheel controls, central control panel,
left control panel, auxiliary panel, battery disconnecting control unit (+key)F49 5
Climate control, power steering control unit, reverse lights, diesel filter water
sensor, flow meter, tachograph (+key)F51 5
Instrument panel (+battery) F53 7,5
AbsentF89 -
215
Page 225 of 367
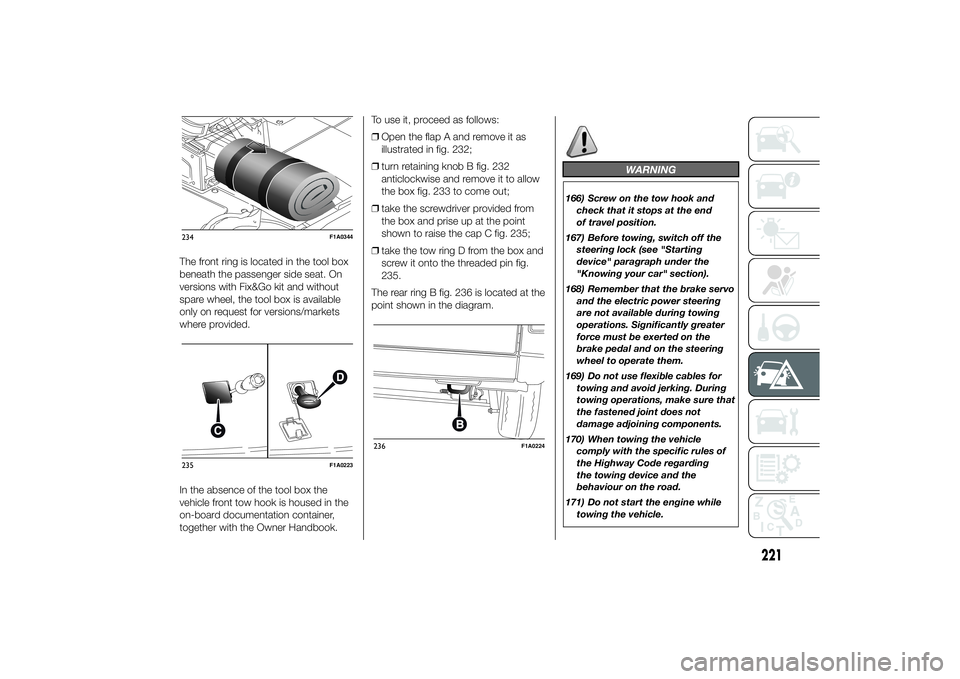
The front ring is located in the tool box
beneath the passenger side seat. On
versions with Fix&Go kit and without
spare wheel, the tool box is available
only on request for versions/markets
where provided.
In the absence of the tool box the
vehicle front tow hook is housed in the
on-board documentation container,
together with the Owner Handbook.To use it, proceed as follows:
❒Open the flap A and remove it as
illustrated in fig. 232;
❒turn retaining knob B fig. 232
anticlockwise and remove it to allow
the box fig. 233 to come out;
❒take the screwdriver provided from
the box and prise up at the point
shown to raise the cap C fig. 235;
❒take the tow ring D from the box and
screw it onto the threaded pin fig.
235.
The rear ring B fig. 236 is located at the
point shown in the diagram.
WARNING
166) Screw on the tow hook and
check that it stops at the end
of travel position.
167) Before towing, switch off the
steering lock (see "Starting
device" paragraph under the
"Knowing your car" section).
168) Remember that the brake servo
and the electric power steering
are not available during towing
operations. Significantly greater
force must be exerted on the
brake pedal and on the steering
wheel to operate them.
169) Do not use flexible cables for
towing and avoid jerking. During
towing operations, make sure that
the fastened joint does not
damage adjoining components.
170) When towing the vehicle
comply with the specific rules of
the Highway Code regarding
the towing device and the
behaviour on the road.
171) Do not start the engine while
towing the vehicle.
234
F1A0344
235
F1A0223
236
F1A0224
221
Page 237 of 367
POWER STEERING FLUID
183)3)50)
Check that the liquid contained in the
tank is at the maximum level. This
operation must be carried out with the
vehicle level and with the engine off and
cold.
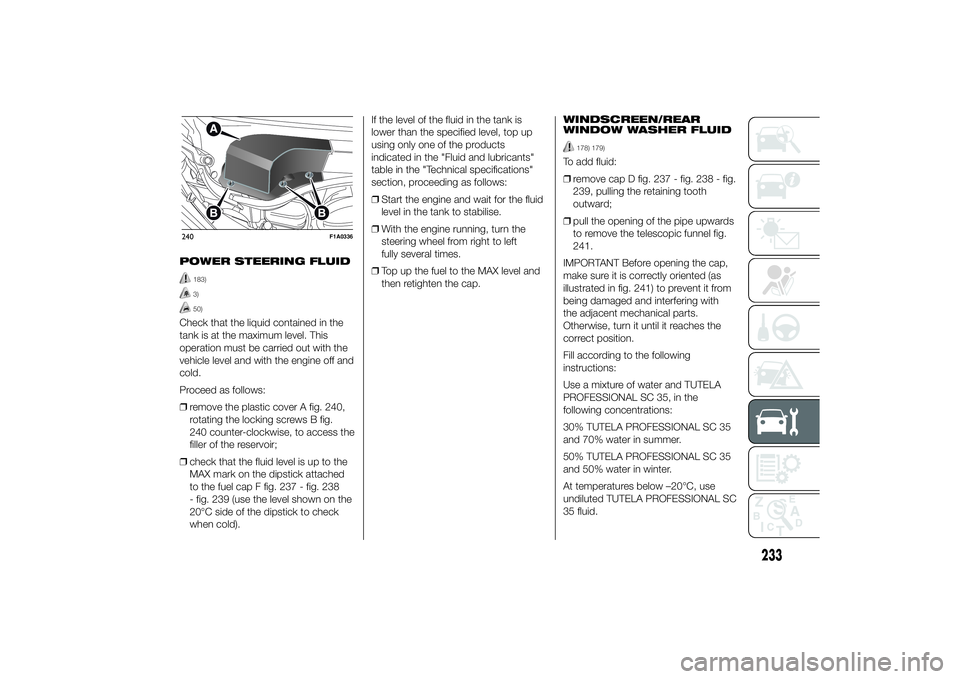
Proceed as follows:
❒remove the plastic cover A fig. 240,
rotating the locking screws B fig.
240 counter-clockwise, to access the
filler of the reservoir;
❒check that the fluid level is up to the
MAX mark on the dipstick attached
to the fuel cap F fig. 237 - fig. 238
- fig. 239 (use the level shown on the
20°C side of the dipstick to check
when cold).If the level of the fluid in the tank is
lower than the specified level, top up
using only one of the products
indicated in the "Fluid and lubricants"
table in the "Technical specifications"
section, proceeding as follows:
❒Start the engine and wait for the fluid
level in the tank to stabilise.
❒With the engine running, turn the
steering wheel from right to left
fully several times.
❒Top up the fuel to the MAX level and
then retighten the cap.WINDSCREEN/REAR
WINDOW WASHER FLUID
178) 179)
To add fluid:
❒remove cap D fig. 237 - fig. 238 - fig.
239, pulling the retaining tooth
outward;
❒pull the opening of the pipe upwards
to remove the telescopic funnel fig.
241.
IMPORTANT Before opening the cap,
make sure it is correctly oriented (as
illustrated in fig. 241) to prevent it from
being damaged and interfering with
the adjacent mechanical parts.
Otherwise, turn it until it reaches the
correct position.
Fill according to the following
instructions:
Use a mixture of water and TUTELA
PROFESSIONAL SC 35, in the
following concentrations:
30% TUTELA PROFESSIONAL SC 35
and 70% water in summer.
50% TUTELA PROFESSIONAL SC 35
and 50% water in winter.
At temperatures below –20°C, use
undiluted TUTELA PROFESSIONAL SC
35 fluid.
240
F1A0336
233
Page 244 of 367
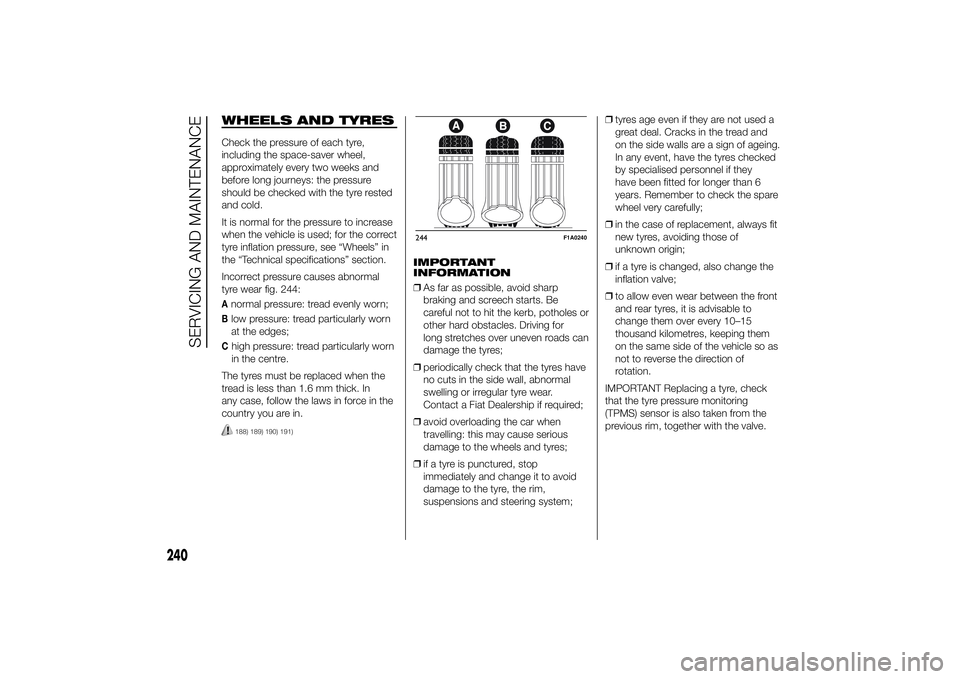
WHEELS AND TYRESCheck the pressure of each tyre,
including the space-saver wheel,
approximately every two weeks and
before long journeys: the pressure
should be checked with the tyre rested
and cold.
It is normal for the pressure to increase
when the vehicle is used; for the correct
tyre inflation pressure, see “Wheels” in
the “Technical specifications” section.
Incorrect pressure causes abnormal
tyre wear fig. 244:Anormal pressure: tread evenly worn;Blow pressure: tread particularly worn
at the edges;Chigh pressure: tread particularly worn
in the centre.
The tyres must be replaced when the
tread is less than 1.6 mm thick. In
any case, follow the laws in force in the
country you are in.188) 189) 190) 191)
IMPORTANT
INFORMATION
❒As far as possible, avoid sharp
braking and screech starts. Be
careful not to hit the kerb, potholes or
other hard obstacles. Driving for
long stretches over uneven roads can
damage the tyres;
❒periodically check that the tyres have
no cuts in the side wall, abnormal
swelling or irregular tyre wear.
Contact a Fiat Dealership if required;
❒avoid overloading the car when
travelling: this may cause serious
damage to the wheels and tyres;
❒if a tyre is punctured, stop
immediately and change it to avoid
damage to the tyre, the rim,
suspensions and steering system;❒tyres age even if they are not used a
great deal. Cracks in the tread and
on the side walls are a sign of ageing.
In any event, have the tyres checked
by specialised personnel if they
have been fitted for longer than 6
years. Remember to check the spare
wheel very carefully;
❒in the case of replacement, always fit
new tyres, avoiding those of
unknown origin;
❒if a tyre is changed, also change the
inflation valve;
❒to allow even wear between the front
and rear tyres, it is advisable to
change them over every 10–15
thousand kilometres, keeping them
on the same side of the vehicle so as
not to reverse the direction of
rotation.
IMPORTANT Replacing a tyre, check
that the tyre pressure monitoring
(TPMS) sensor is also taken from the
previous rim, together with the valve.244
F1A0240
240
SERVICING AND MAINTENANCE
Page 250 of 367
INTERIORSRegularly check that water is not
trapped under the mats (due to water
dripping off shoes, umbrellas, etc.),
as this could cause oxidation of the
sheet metal.
193) 194)
SEATS AND FABRIC
PARTS
Remove dust with a soft brush or a
vacuum cleaner. It is advisable to use a
moist brush on velvet upholstery.
Rub the seats with a sponge moistened
with a solution of water and mild soap.PLASTIC PARTS
It is advisable to clean interior parts with
a moist cloth and a solution of water
and non-abrasive mild soap. Use
specific products for cleaning plastic,
without solvents and specifically
designed to prevent damage to the
appearance and colour of the treated
parts, to remove grease and tough
stains.
IMPORTANT Do not use alcohol,
petrols or derivatives to clean
the instrument panel glass.LEATHER STEERING
WHEEL/GEAR
KNOB/HANDBRAKE
(for versions/markets, where provided)
These components must be cleaned
with mild soap and water only. Never
use alcohol or alcohol-based products.
Read the product label carefully before
using specific products for cleaning
the interiors: make sure that the
product does not contain spirits or
alcohol-based substances.
If, when cleaning the windscreen with
special products, window cleaner
accidentally drips onto the leather of
the steering wheel/gear lever
knob/handbrake, wipe away
immediately and then wash the affected
area with mild soap and water.
IMPORTANT Be careful when using a
steering wheel lock device, where
applicable, to avoid damaging
the leather upholstery by rubbing.
246
SERVICING AND MAINTENANCE