engine FIAT DUCATO BASE CAMPER 2014 Owner handbook (in English)
[x] Cancel search | Manufacturer: FIAT, Model Year: 2014, Model line: DUCATO BASE CAMPER, Model: FIAT DUCATO BASE CAMPER 2014Pages: 367, PDF Size: 20.39 MB
Page 228 of 367
SCHEDULED
SERVICINGCorrect servicing is essential for
ensuring long vehicle life under the best
conditions.
This is why Fiat has planned a series of
checks and maintenance operations
every 48,000 km depending on the
engine version.
The scheduled maintenance does not,
however, cover all the needs of the
vehicle: also during the initial period,
before the 48,000 km service and
between one service and the next,
ordinary care such as systematic fluid
level checks with top ups and tyre
pressure checks, etc. remain
necessary.
IMPORTANT The Scheduled Servicing
services are set out by the
Manufacturer. Failure to have them
carried out may invalidate the warranty.
Scheduled Servicing can be carried
out by any Fiat Dealership, at
pre-established times.
If during each operation, in addition to
the ones scheduled, the need arises for
further replacements or repairs, these
may only be carried out with the
express agreement of the Customer.IMPORTANT It is advisable to inform a
Fiat Dealership of any small operating
irregularities without waiting for the next
service.
If your vehicle is used frequently for
towing, the interval between service
coupons must be reduced.
224
SERVICING AND MAINTENANCE
Page 229 of 367
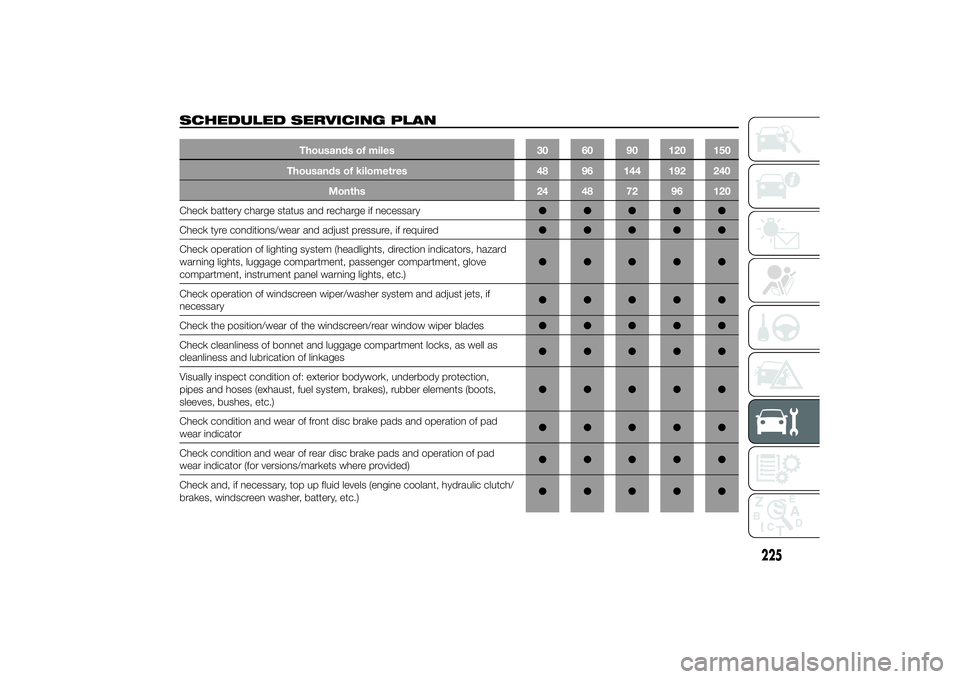
SCHEDULED SERVICING PLAN
Thousands of miles 30 60 90 120 150
Thousands of kilometres 48 96 144 192 240
Months 24 48 72 96 120
Check battery charge status and recharge if necessary●●●●●
Check tyre conditions/wear and adjust pressure, if required●●●●●
Check operation of lighting system (headlights, direction indicators, hazard
warning lights, luggage compartment, passenger compartment, glove
compartment, instrument panel warning lights, etc.)●●●●●
Check operation of windscreen wiper/washer system and adjust jets, if
necessary●●●●●
Check the position/wear of the windscreen/rear window wiper blades●●●●●
Check cleanliness of bonnet and luggage compartment locks, as well as
cleanliness and lubrication of linkages●●●●●
Visually inspect condition of: exterior bodywork, underbody protection,
pipes and hoses (exhaust, fuel system, brakes), rubber elements (boots,
sleeves, bushes, etc.)●●●●●
Check condition and wear of front disc brake pads and operation of pad
wear indicator●●●●●
Check condition and wear of rear disc brake pads and operation of pad
wear indicator (for versions/markets where provided)●●●●●
Check and, if necessary, top up fluid levels (engine coolant, hydraulic clutch/
brakes, windscreen washer, battery, etc.)●●●●●
225
Page 230 of 367
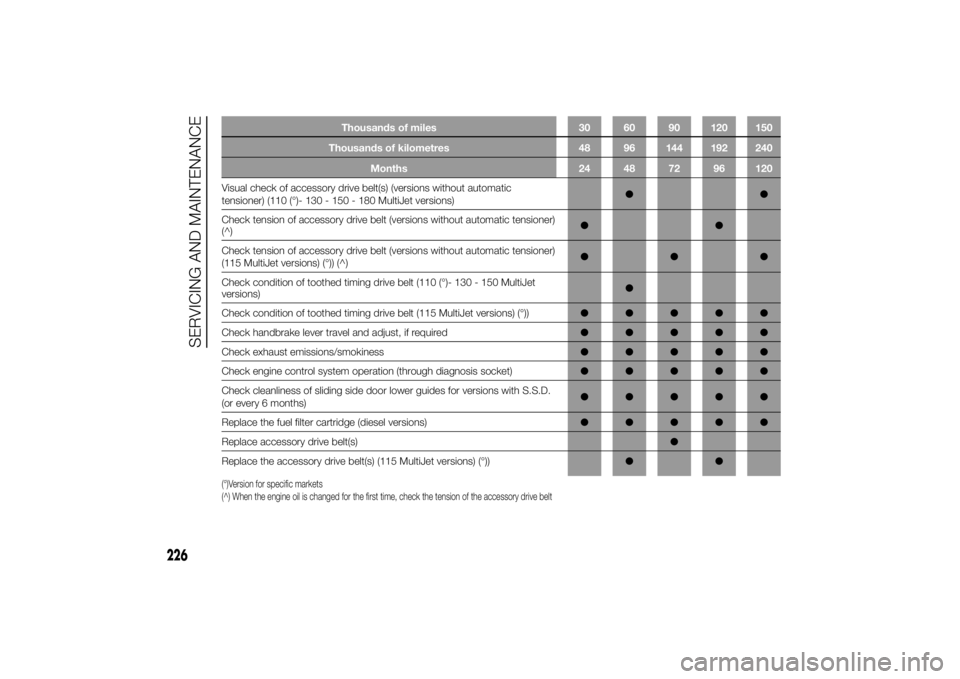
Thousands of miles 30 60 90 120 150
Thousands of kilometres 48 96 144 192 240
Months 24 48 72 96 120
Visual check of accessory drive belt(s) (versions without automatic
tensioner) (110 (°)- 130 - 150 - 180 MultiJet versions)●●
Check tension of accessory drive belt (versions without automatic tensioner)
(^)●●
Check tension of accessory drive belt (versions without automatic tensioner)
(115 MultiJet versions) (°)) (^)●●●
Check condition of toothed timing drive belt (110 (°)- 130 - 150 MultiJet
versions)●
Check condition of toothed timing drive belt (115 MultiJet versions) (°))●●●●●
Check handbrake lever travel and adjust, if required●●●●●
Check exhaust emissions/smokiness●●●●●
Check engine control system operation (through diagnosis socket)●●●●●
Check cleanliness of sliding side door lower guides for versions with S.S.D.
(or every 6 months)●●●●●
Replace the fuel filter cartridge (diesel versions)●●●●●
Replace accessory drive belt(s)●
Replace the accessory drive belt(s) (115 MultiJet versions) (°))●●(°)Version for specific markets
(^) When the engine oil is changed for the first time, check the tension of the accessory drive belt
226
SERVICING AND MAINTENANCE
Page 231 of 367
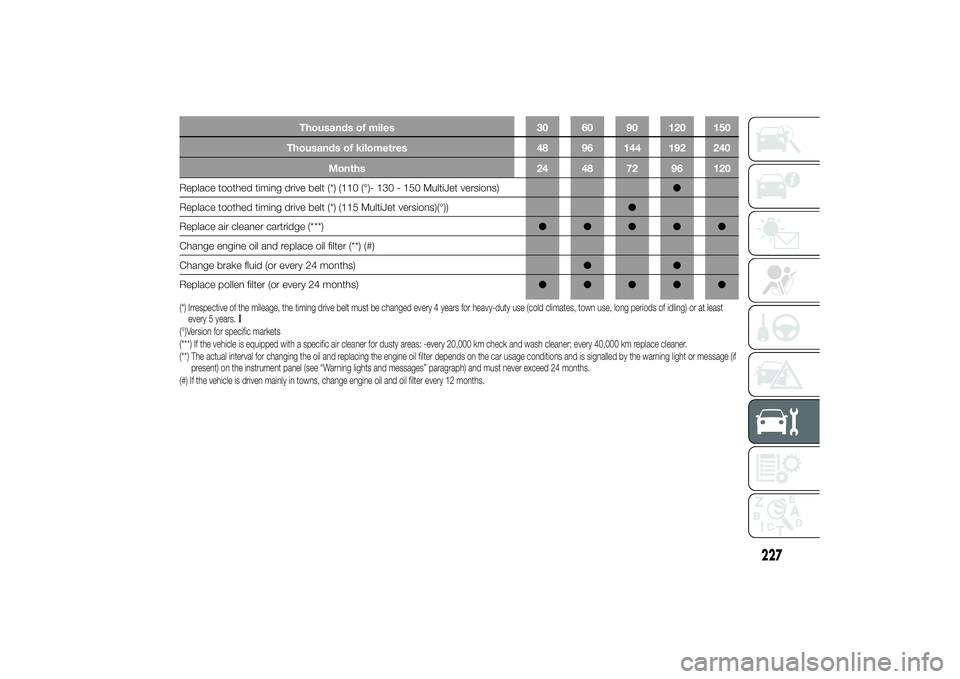
Thousands of miles 30 60 90 120 150
Thousands of kilometres 48 96 144 192 240
Months 24 48 72 96 120
Replace toothed timing drive belt (*) (110 (°)- 130 - 150 MultiJet versions)●
Replace toothed timing drive belt (*) (115 MultiJet versions)(°))●
Replace air cleaner cartridge (***)●●●●●
Change engine oil and replace oil filter (**) (#)
Change brake fluid (or every 24 months)●●
Replace pollen filter (or every 24 months)●●●●●(*) Irrespective of the mileage, the timing drive belt must be changed every 4 years for heavy-duty use (cold climates, town use, long periods of idling) or at least
every 5 years.
I
(°)Version for specific markets
(***) If the vehicle is equipped with a specific air cleaner for dusty areas: -every 20,000 km check and wash cleaner; every 40,000 km replace cleaner.
(**) The actual interval for changing the oil and replacing the engine oil filter depends on the car usage conditions and is signalled by the warning light or message (if
present) on the instrument panel (see “Warning lights and messages” paragraph) and must never exceed 24 months.
(#) If the vehicle is driven mainly in towns, change engine oil and oil filter every 12 months.
227
Page 232 of 367
PERIODIC CHECKSBefore long journeys, check and, if
necessary, restore:
❒engine coolant level;
❒brake fluid level;
❒windscreen washer fluid level;
❒tyre inflation pressure and condition;
❒operation of lighting system
(headlamps, direction indicators,
hazard warning lights, etc.);
❒operation of screen washer/wiper
system and positioning/wear of
windscreen/rear window wiper
blades.
To ensure that the vehicle is always
efficient and well maintained, it is
advisable to make sure that you carry
out the above operations regularly
(approximately every 1000 km and
every 3000 km for checking and
topping up engine oil is advisable).
DEMANDING
VEHICLE USEIf the vehicle is mostly used in one of
the following conditions:
❒towing a trailer or caravan;
❒dusty roads;
❒short, repeated journeys (less than
7-8 km) at sub-zero outside
temperatures;
❒engine often idling or driving long
distances at low speeds or long
periods of inactivity;
the following checks must be carried
out more often than indicated in the
Scheduled Servicing Plan:
❒check front disc brake pad
conditions and wear;
❒check cleanliness of bonnet and boot
locks, cleanliness and lubrication of
linkage;
❒visually inspect conditions of: engine,
gearbox, transmission, pipes and
hoses (exhaust - fuel system -
brakes) and rubber elements (boots -
sleeves - bushes - etc.);
❒check battery charge and battery
fluid level (electrolyte);
❒visually inspect condition of the
accessory drive belts;❒check and, if necessary, change
engine oil and replace oil filter.
❒check and, if necessary, replace
pollen filter.
228
SERVICING AND MAINTENANCE
Page 233 of 367
CHECKING LEVELS
.
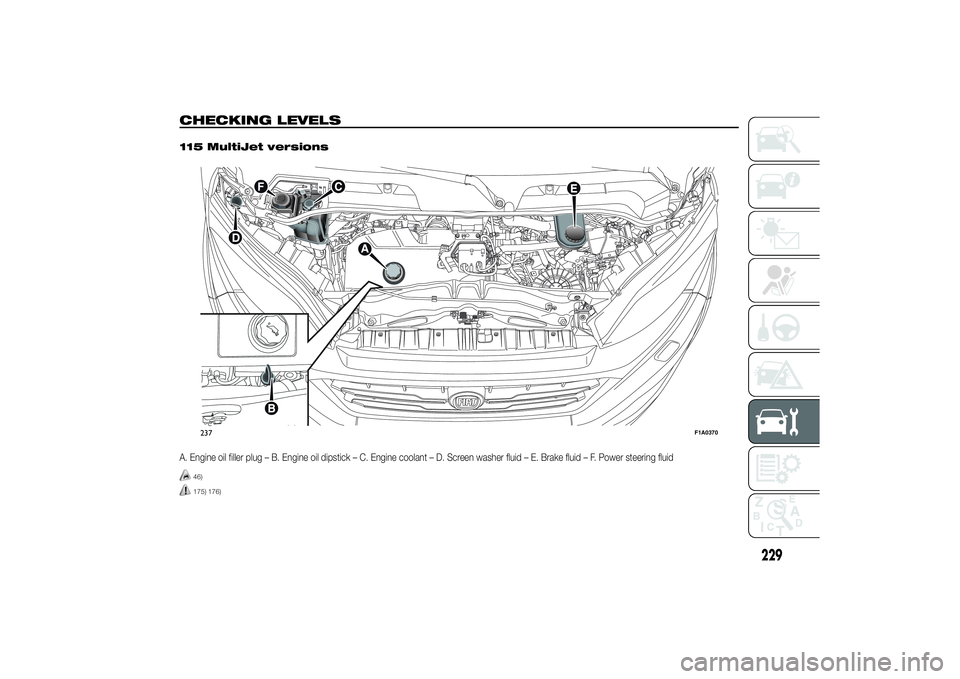
115 MultiJet versionsA. Engine oil filler plug – B. Engine oil dipstick – C. Engine coolant – D. Screen washer fluid – E. Brake fluid – F. Power steering fluid
46)175) 176)237
F1A0370
229
Page 234 of 367
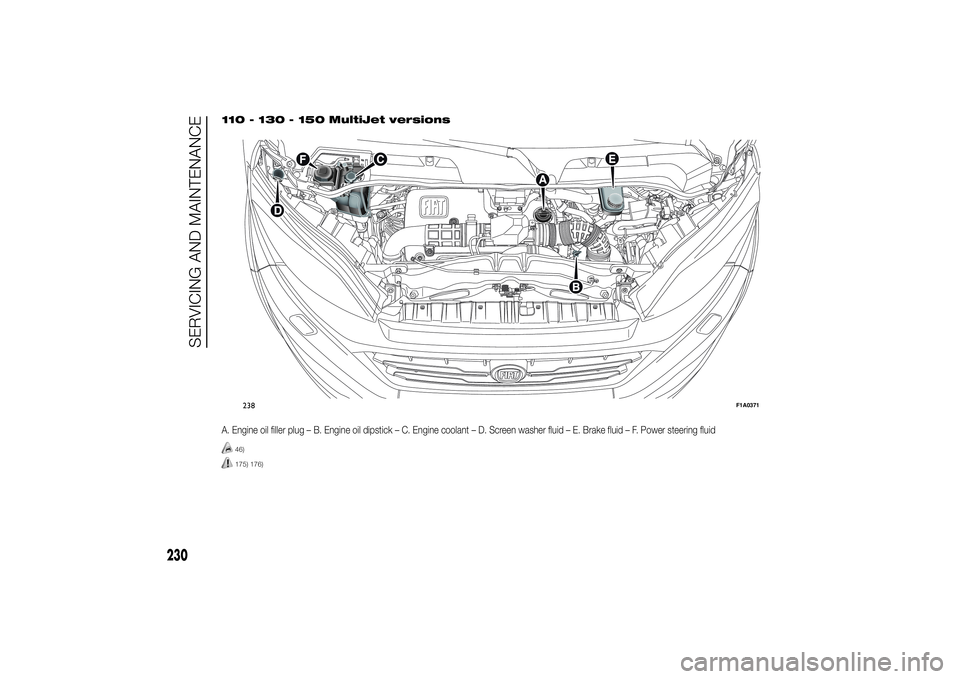
110 - 130 - 150 MultiJet versionsA. Engine oil filler plug – B. Engine oil dipstick – C. Engine coolant – D. Screen washer fluid – E. Brake fluid – F. Power steering fluid
46)175) 176)238
F1A0371
230
SERVICING AND MAINTENANCE
Page 235 of 367
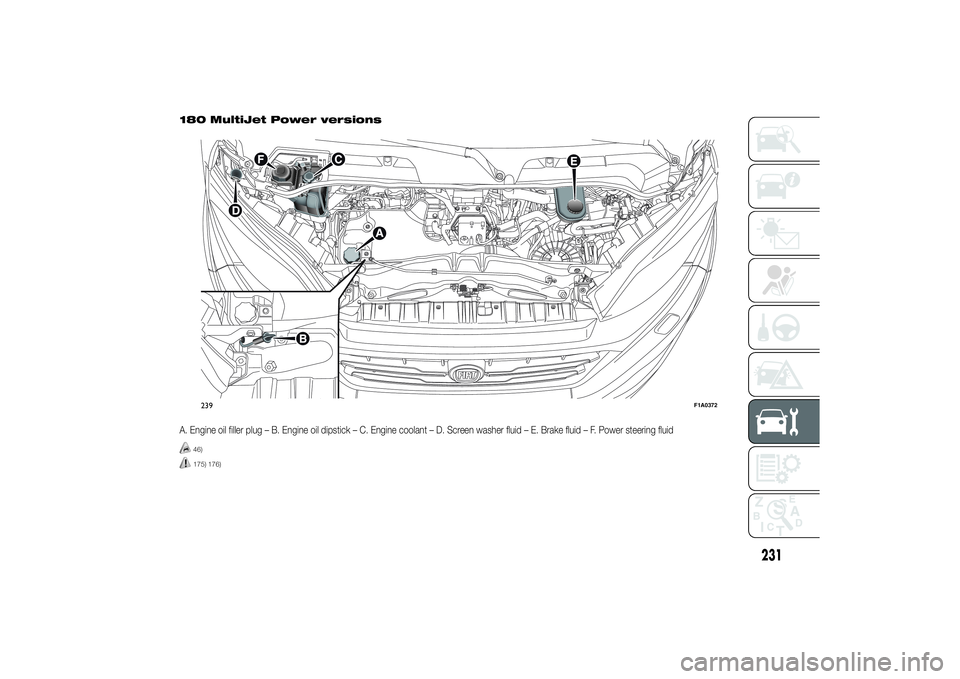
180 MultiJet Power versionsA. Engine oil filler plug – B. Engine oil dipstick – C. Engine coolant – D. Screen washer fluid – E. Brake fluid – F. Power steering fluid
46)175) 176)239
F1A0372
231
Page 236 of 367
ENGINE OIL
47)
Check the oil level a few minutes (about
5) after the engine has stopped, with
the vehicle parked on level ground.
The oil level must be between the MIN
and MAX marks on the dipstick B
fig. 237 - fig. 238 - fig. 239.
The range between the MIN and MAX
marks corresponds to about 1 litre
of oil.
If the oil level is near or under the MIN
mark, add oil through the filler A fig. 237
- fig. 238 - fig. 239, until it reaches the
MAX mark.
The oil level must never exceed the
MAX mark.Engine oil consumption
The maximum engine oil consumption
is usually 400 grams every 1000 km.
When the vehicle is new, the engine
needs to be run in, therefore the engine
oil consumption can only be considered
stabilised after the first 5,000–6,000
km.
IMPORTANT The oil consumption
depends on driving style and the
conditions under which the vehicle is
used.
IMPORTANT After adding or changing
the oil, let the engine run for a few
seconds and wait a few minutes after
switching it off before checking the
level.
IMPORTANT Always top up using
engine oil of the same specifications as
that already in the engine.ENGINE COOLANT
48)
177)
The coolant level must be checked
when the engine is cold and must
range between the MIN and MAX
marks on the reservoir.
If the level is to low, operate as follows:
❒remove the plastic cover A fig. 240,
rotating the locking screws B fig.
240 counter-clockwise, to access the
filler of the reservoir;
❒slowly pour a mixture of 50%
demineralised water and 50%
PARAFLU
UP
from PETRONAS
LUBRICANTS through the reservoir
filler C fig. 237 - fig. 238 - fig. 239
until the level is close to MAX.
A 50-50 mixture of PARAFLU
UP
and
distilled water gives freeze protection
up to –35°C.
When the vehicle is used in particularly
harsh weather conditions, we
recommend using a 60-40 mixture of
PARAFLU
UP
and demineralised water.
232
SERVICING AND MAINTENANCE
Page 237 of 367
POWER STEERING FLUID
183)3)50)
Check that the liquid contained in the
tank is at the maximum level. This
operation must be carried out with the
vehicle level and with the engine off and
cold.
Proceed as follows:
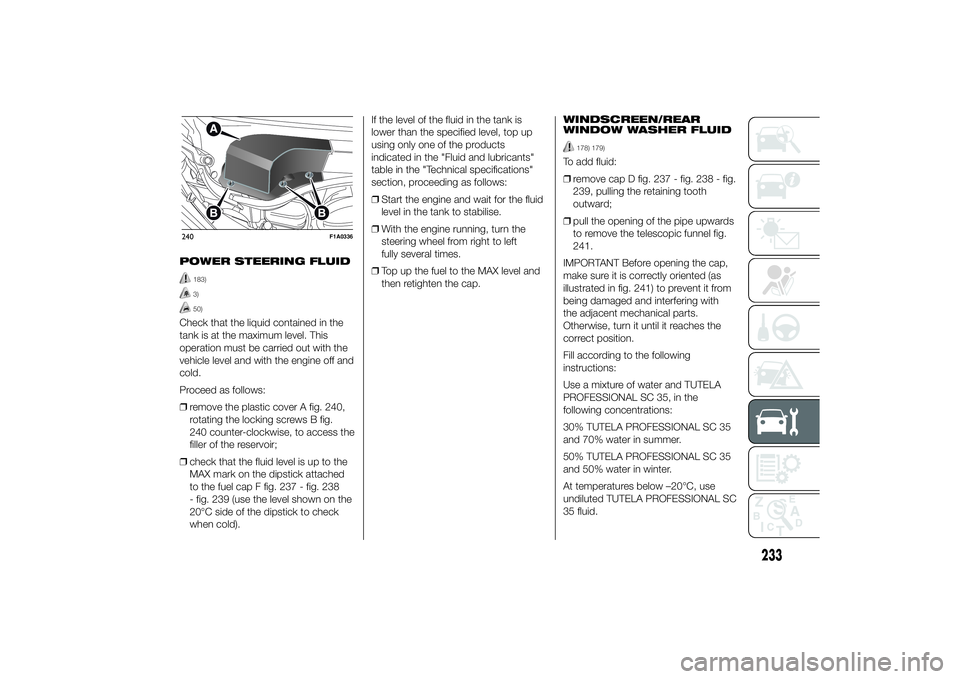
❒remove the plastic cover A fig. 240,
rotating the locking screws B fig.
240 counter-clockwise, to access the
filler of the reservoir;
❒check that the fluid level is up to the
MAX mark on the dipstick attached
to the fuel cap F fig. 237 - fig. 238
- fig. 239 (use the level shown on the
20°C side of the dipstick to check
when cold).If the level of the fluid in the tank is
lower than the specified level, top up
using only one of the products
indicated in the "Fluid and lubricants"
table in the "Technical specifications"
section, proceeding as follows:
❒Start the engine and wait for the fluid
level in the tank to stabilise.
❒With the engine running, turn the
steering wheel from right to left
fully several times.
❒Top up the fuel to the MAX level and
then retighten the cap.WINDSCREEN/REAR
WINDOW WASHER FLUID
178) 179)
To add fluid:
❒remove cap D fig. 237 - fig. 238 - fig.
239, pulling the retaining tooth
outward;
❒pull the opening of the pipe upwards
to remove the telescopic funnel fig.
241.
IMPORTANT Before opening the cap,
make sure it is correctly oriented (as
illustrated in fig. 241) to prevent it from
being damaged and interfering with
the adjacent mechanical parts.
Otherwise, turn it until it reaches the
correct position.
Fill according to the following
instructions:
Use a mixture of water and TUTELA
PROFESSIONAL SC 35, in the
following concentrations:
30% TUTELA PROFESSIONAL SC 35
and 70% water in summer.
50% TUTELA PROFESSIONAL SC 35
and 50% water in winter.
At temperatures below –20°C, use
undiluted TUTELA PROFESSIONAL SC
35 fluid.
240
F1A0336
233