change time FIAT DUCATO BASE CAMPER 2014 Owner handbook (in English)
[x] Cancel search | Manufacturer: FIAT, Model Year: 2014, Model line: DUCATO BASE CAMPER, Model: FIAT DUCATO BASE CAMPER 2014Pages: 367, PDF Size: 20.39 MB
Page 2 of 367
We really know your vehicle because we invented,
designed and built it: we really know every single detail. At Fiat Professional Service authorised workshops
you can find technicians directly trained by us, offering quality and professionalism for all service operations.
Fiat Professional workshops are always close to you for the regular servicing operations,
season checks and practical recommendations by our experts.
With Fiat Professional Genuine Parts you keep the reliability, comfort and performance
features of your new vehicle unchanged in time: that's why you bought it for.
Always ask for Genuine Parts for the components used on our vehicles; we recommend them because they come from
our steady commitment in research and development of highly innovative technologies.
For all these reasons:
rely on Genuine Parts, because they are the only ones designed by Fiat Professional for your vehicle.
SAFETY:
BRAKING SYSTEMENVIRONMENT: PARTICULATE FILTERS,
CLIMATE CONTROL SYSTEM MAINTENANCECOMFORT:
SUSPENSION AND WINDSCREEN WIPERSPERFORMANCE:
SPARK PLUGS, INJECTORS
AND BATTERIESLINEACCESSORI:
ROOF RACK BARS, WHEEL RIMS
WHY CHOOSING
GENUINE PARTS
Page 14 of 367
SYMBOLSSome vehicle components have
coloured labels whose symbols indicate
precautions to be observed when
using this component. Under the
bonnet there is also a label that
summarises all the symbols.
THE FIAT CODE
SYSTEM
IN BRIEF
This is an electrical engine locking
system which increases protection
against attempted theft of the vehicle.
It is automatically activated when
the ignition key is removed.
Each key contains an electronic
device which modulates the signal
emitted during ignition by an antenna
built into the ignition device. The
signal, which changes each time the
engine is started, is the “password”,
by means of which the control unit
recognises the key and enables
starting.
1)
Operation
Each time the vehicle is started turning
the ignition key toMAR-ON, the Fiat
CODE system control unit sends a
recognition code to the Powertrain
Control Module to deactivate the
immobiliser.The acknowledgement code is sent
only if the Fiat CODE system control
unit has recognised the code
transmitted from the key.
Each time the ignition key is turned to
STOP, the Fiat CODE system
deactivates the functions of the
Powertrain Control Module.
Irregular operation
If, during starting, the code has not
been recognised correctly the warning
light
on the instrument panel turns
on accompanied by the related
message on the display (see section
“Warning lights and messages”).
In this case, turn the key toSTOPand
then back toMAR-ON; if the lock
continues, try with the other keys
provided with the vehicle. Contact a
Fiat Dealership if you still cannot start
the engine.
IMPORTANT Each key has its own
code which must be stored by the
system's control unit. Contact the Fiat
Dealership to have new keys (up to
eight) stored with the code.
10
KNOW YOUR VEHICLE
Page 38 of 367
The system allows the following
parameters and functions to be set or
altered manually: air temperature,
fan speed (continuous variation); air
distribution in seven positions;
compressor enablement; fast
defrosting/demisting function; air
recirculation; switching off the system;
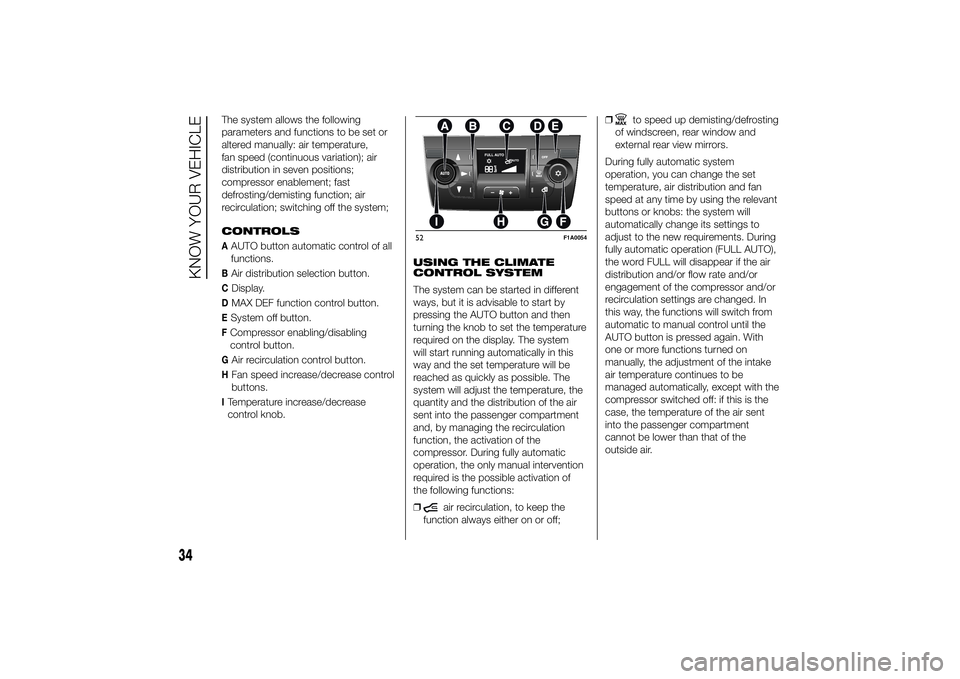
CONTROLSAAUTO button automatic control of all
functions.BAir distribution selection button.CDisplay.DMAX DEF function control button.ESystem off button.FCompressor enabling/disabling
control button.GAir recirculation control button.HFan speed increase/decrease control
buttons.ITemperature increase/decrease
control knob.USING THE CLIMATE
CONTROL SYSTEM
The system can be started in different
ways, but it is advisable to start by
pressing the AUTO button and then
turning the knob to set the temperature
required on the display. The system
will start running automatically in this
way and the set temperature will be
reached as quickly as possible. The
system will adjust the temperature, the
quantity and the distribution of the air
sent into the passenger compartment
and, by managing the recirculation
function, the activation of the
compressor. During fully automatic
operation, the only manual intervention
required is the possible activation of
the following functions:
❒
air recirculation, to keep the
function always either on or off;❒
to speed up demisting/defrosting
of windscreen, rear window and
external rear view mirrors.
During fully automatic system
operation, you can change the set
temperature, air distribution and fan
speed at any time by using the relevant
buttons or knobs: the system will
automatically change its settings to
adjust to the new requirements. During
fully automatic operation (FULL AUTO),
the word FULL will disappear if the air
distribution and/or flow rate and/or
engagement of the compressor and/or
recirculation settings are changed. In
this way, the functions will switch from
automatic to manual control until the
AUTO button is pressed again. With
one or more functions turned on
manually, the adjustment of the intake
air temperature continues to be
managed automatically, except with the
compressor switched off: if this is the
case, the temperature of the air sent
into the passenger compartment
cannot be lower than that of the
outside air.
52
F1A0054
34
KNOW YOUR VEHICLE
Page 43 of 367
INDEPENDENT
ADDITIONAL
HEATER(for versions/markets, where provided)
The vehicle is available, on request,
with two different independent heaters:
one fully automatic, the other which
can be programmed.
AUTOMATIC VERSION
The additional heater is turned on in
automatic mode when the engine
is started and the required outside
temperature and coolant conditions are
present. Deactivation is always
automatic.
21)
IMPORTANT During periods with low
outdoor temperatures when the device
cuts in, check that the fuel level is
always higher than the reserve level.
Otherwise the device could lock and
require the assistance of a Fiat
Dealership.
PROGRAMMABLE
VERSION
The additional heater operates
completely independently of engine
operation and allows the following:❒heating the passenger compartment
with the engine off
❒defrosting the windows;
❒heat the engine coolant and then the
engine itself prior to starting.
The system consists of:
❒a diesel burner for heating the water
with an exhaust silencer for the
combustion gases;
❒a metering pump connected to the
reservoir pipes for supplying the
burner;
❒a heat exchanger connected to the
engine cooling system pipes;
❒a control unit connected to the
passenger compartment
heating/ventilation system to allow
automatic operation;
❒an electronic control unit for
controlling and adjusting the built-in
burner;
❒a digital timer fig. 54 for turning the
heater on manually or for
programming the time that it comes
on.The additional heater (during winter)
heats, maintains the temperature of and
circulates engine coolant for a set time
period in order to ensure optimum
engine and passenger compartment
conditions at engine start-up.
The heater can operate automatically
when programmed with a digital timer
or manually by pressing the 'immediate
heating' button on the timer.
After heater activation, whether
programmed or manually, the electronic
control unit operates the coolant pump
and turns on the burner in accordance
with pre-set, controlled procedures.
The circulation pump output is also
controlled by the electronic control unit
in order to minimise the initial heating
time.
When the system operates, the control
unit turns on the passenger
compartment heater unit fan at the
second speed.
The thermal power of the boiler is
regulated automatically by the
electronic control unit depending on the
temperature of the engine coolant.
39
Page 45 of 367
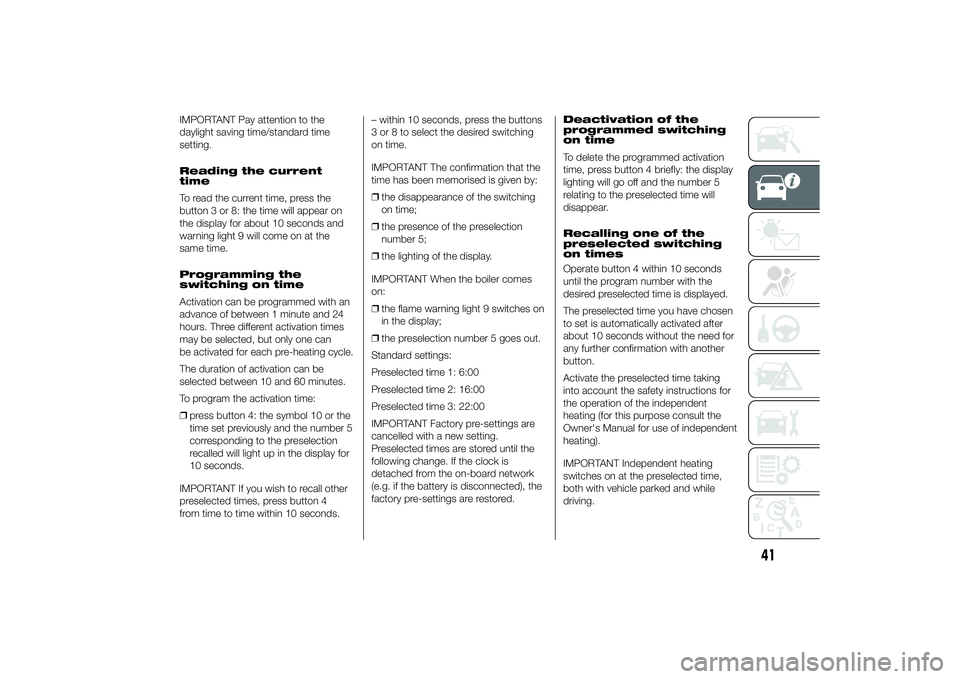
IMPORTANT Pay attention to the
daylight saving time/standard time
setting.
Reading the current
time
To read the current time, press the
button 3 or 8: the time will appear on
the display for about 10 seconds and
warning light 9 will come on at the
same time.
Programming the
switching on time
Activation can be programmed with an
advance of between 1 minute and 24
hours. Three different activation times
may be selected, but only one can
be activated for each pre-heating cycle.
The duration of activation can be
selected between 10 and 60 minutes.
To program the activation time:
❒press button 4: the symbol 10 or the
time set previously and the number 5
corresponding to the preselection
recalled will light up in the display for
10 seconds.
IMPORTANT If you wish to recall other
preselected times, press button 4
from time to time within 10 seconds.– within 10 seconds, press the buttons
3 or 8 to select the desired switching
on time.
IMPORTANT The confirmation that the
time has been memorised is given by:
❒the disappearance of the switching
on time;
❒the presence of the preselection
number 5;
❒the lighting of the display.
IMPORTANT When the boiler comes
on:
❒the flame warning light 9 switches on
in the display;
❒the preselection number 5 goes out.
Standard settings:
Preselected time 1: 6:00
Preselected time 2: 16:00
Preselected time 3: 22:00
IMPORTANT Factory pre-settings are
cancelled with a new setting.
Preselected times are stored until the
following change. If the clock is
detached from the on-board network
(e.g. if the battery is disconnected), the
factory pre-settings are restored.Deactivation of the
programmed switching
on time
To delete the programmed activation
time, press button 4 briefly: the display
lighting will go off and the number 5
relating to the preselected time will
disappear.
Recalling one of the
preselected switching
on times
Operate button 4 within 10 seconds
until the program number with the
desired preselected time is displayed.
The preselected time you have chosen
to set is automatically activated after
about 10 seconds without the need for
any further confirmation with another
button.
Activate the preselected time taking
into account the safety instructions for
the operation of the independent
heating (for this purpose consult the
Owner's Manual for use of independent
heating).
IMPORTANT Independent heating
switches on at the preselected time,
both with vehicle parked and while
driving.
41
Page 50 of 367
If the stalk is pulled again in this
condition, to request main beam
headlight deactivation, the function
remains off and the main beam
headlights switch off.
Rotate the ring nut to the position
fig. 58 to deactivate the automatic
function.25) 24)
PARKING LIGHTS
These lights can only be turned on with
ignition key in STOP position or
removed, by moving the left stalk ring
nut first to positionOand then to
position
or
.
The
warning light switches on in
the instrument panel.
DIRECTION INDICATORS
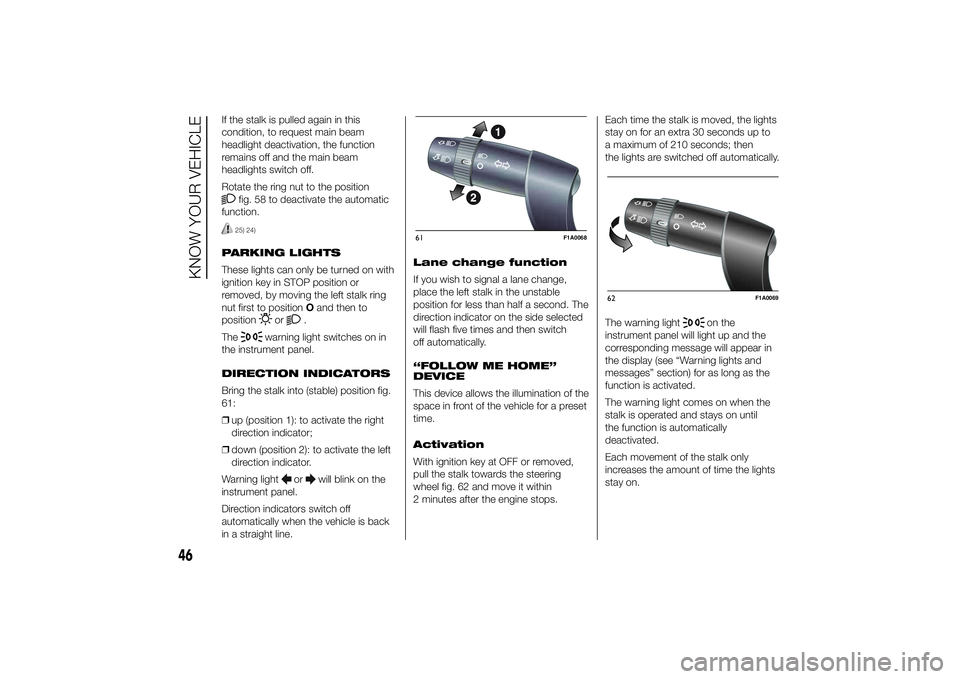
Bring the stalk into (stable) position fig.
61:
❒up (position 1): to activate the right
direction indicator;
❒down (position 2): to activate the left
direction indicator.
Warning light
or
will blink on the
instrument panel.
Direction indicators switch off
automatically when the vehicle is back
in a straight line.Lane change function
If you wish to signal a lane change,
place the left stalk in the unstable
position for less than half a second. The
direction indicator on the side selected
will flash five times and then switch
off automatically.
“FOLLOW ME HOME”
DEVICE
This device allows the illumination of the
space in front of the vehicle for a preset
time.
Activation
With ignition key at OFF or removed,
pull the stalk towards the steering
wheel fig. 62 and move it within
2 minutes after the engine stops.Each time the stalk is moved, the lights
stay on for an extra 30 seconds up to
a maximum of 210 seconds; then
the lights are switched off automatically.
The warning light
on the
instrument panel will light up and the
corresponding message will appear in
the display (see “Warning lights and
messages” section) for as long as the
function is activated.
The warning light comes on when the
stalk is operated and stays on until
the function is automatically
deactivated.
Each movement of the stalk only
increases the amount of time the lights
stay on.
61
F1A0068
62
F1A0069
46
KNOW YOUR VEHICLE
Page 54 of 367
CRUISE CONTROL(for versions/markets, where provided)
IN BRIEF
This is an electronic driving aid that
allows you to drive at a speed of
above 30 km/h on long and straight
dry roads with few driving changes
(e.g. motorways) at a preset speed
without having to press the
accelerator pedal. It is therefore not
recommended to use this device
on extra-urban roads with traffic. Do
not use it in town.
Switching the device on
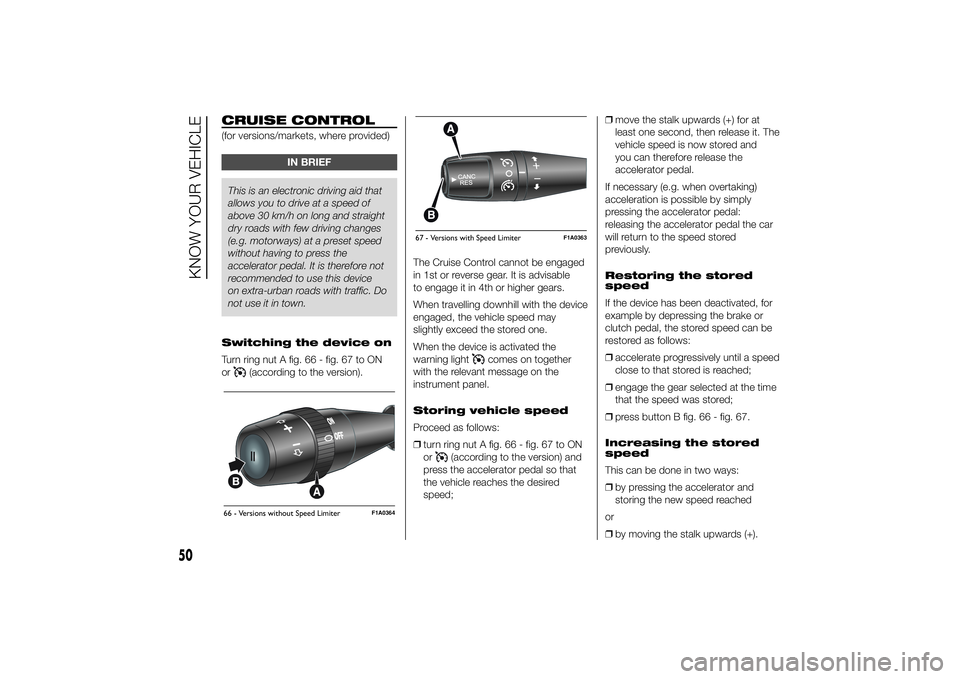
Turn ring nut A fig. 66 - fig. 67 to ON
or
(according to the version).The Cruise Control cannot be engaged
in 1st or reverse gear. It is advisable
to engage it in 4th or higher gears.
When travelling downhill with the device
engaged, the vehicle speed may
slightly exceed the stored one.
When the device is activated the
warning light
comes on together
with the relevant message on the
instrument panel.
Storing vehicle speed
Proceed as follows:
❒turn ring nut A fig. 66 - fig. 67 to ON
or
(according to the version) and
press the accelerator pedal so that
the vehicle reaches the desired
speed;❒move the stalk upwards (+) for at
least one second, then release it. The
vehicle speed is now stored and
you can therefore release the
accelerator pedal.
If necessary (e.g. when overtaking)
acceleration is possible by simply
pressing the accelerator pedal:
releasing the accelerator pedal the car
will return to the speed stored
previously.
Restoring the stored
speed
If the device has been deactivated, for
example by depressing the brake or
clutch pedal, the stored speed can be
restored as follows:
❒accelerate progressively until a speed
close to that stored is reached;
❒engage the gear selected at the time
that the speed was stored;
❒press button B fig. 66 - fig. 67.
Increasing the stored
speed
This can be done in two ways:
❒by pressing the accelerator and
storing the new speed reached
or
❒by moving the stalk upwards (+).
66 - Versions without Speed Limiter
F1A0364
67 - Versions with Speed Limiter
F1A0363
50
KNOW YOUR VEHICLE
Page 77 of 367
WARNING
44) After travelling for a few
kilometres, check to ensure that
the fixing screws for the
attachments are well tightened.
45) Evenly distribute the load and
take into account, when driving,
the increased responsiveness
of the vehicle to side wind.
IMPORTANT
5) The size of the loads you
transport must strictly comply
with currently applicable
regulations.
6) Never exceed the maximum
permitted loads (see “Technical
specifications” section).
HEADLIGHTSLIGHT BEAM ALIGNMENT
The correct alignment of the headlights
is essential for the comfort and safety
of the driver and other road users.
To ensure the best visibility when
travelling with the headlights on, the
headlight alignment must be correct.
Contact a Fiat Dealership to have
the headlights checked and adjusted.
HEADLIGHT ALIGNMENT
CORRECTOR
This device works with the ignition key
in the MAR-ON position and the dipped
beam headlights on.
The vehicle tilts backwards when it is
laden, raising the beam.
The beams must therefore be realigned
in this case.
Headlight alignment
adjustment
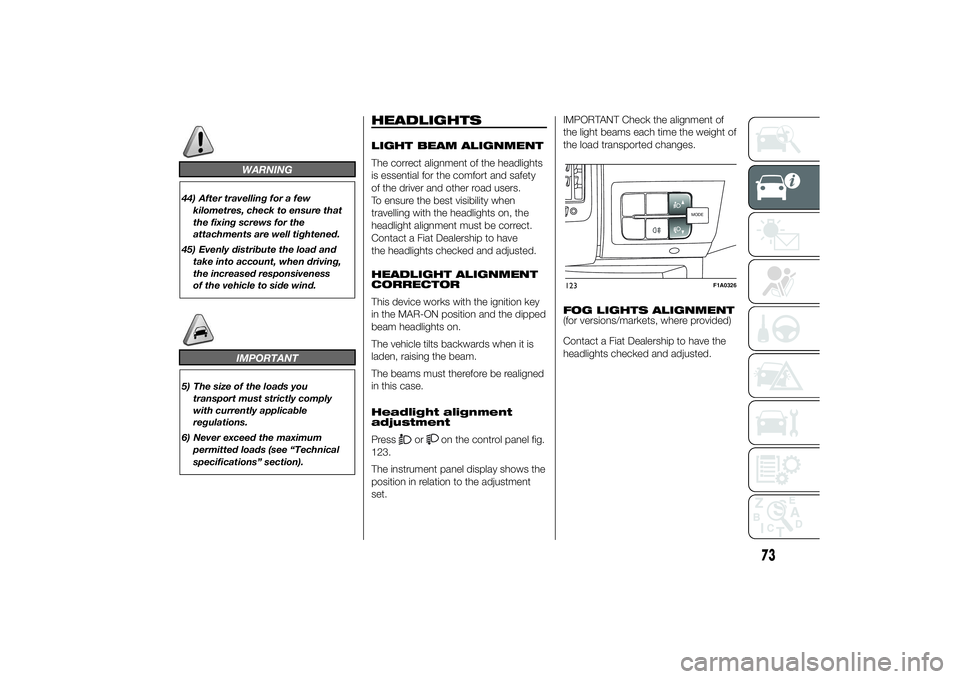
Press
or
on the control panel fig.
123.
The instrument panel display shows the
position in relation to the adjustment
set.IMPORTANT Check the alignment of
the light beams each time the weight of
the load transported changes.
FOG LIGHTS ALIGNMENT
(for versions/markets, where provided)
Contact a Fiat Dealership to have the
headlights checked and adjusted.
MODEMODE
123
F1A0326
73
Page 113 of 367
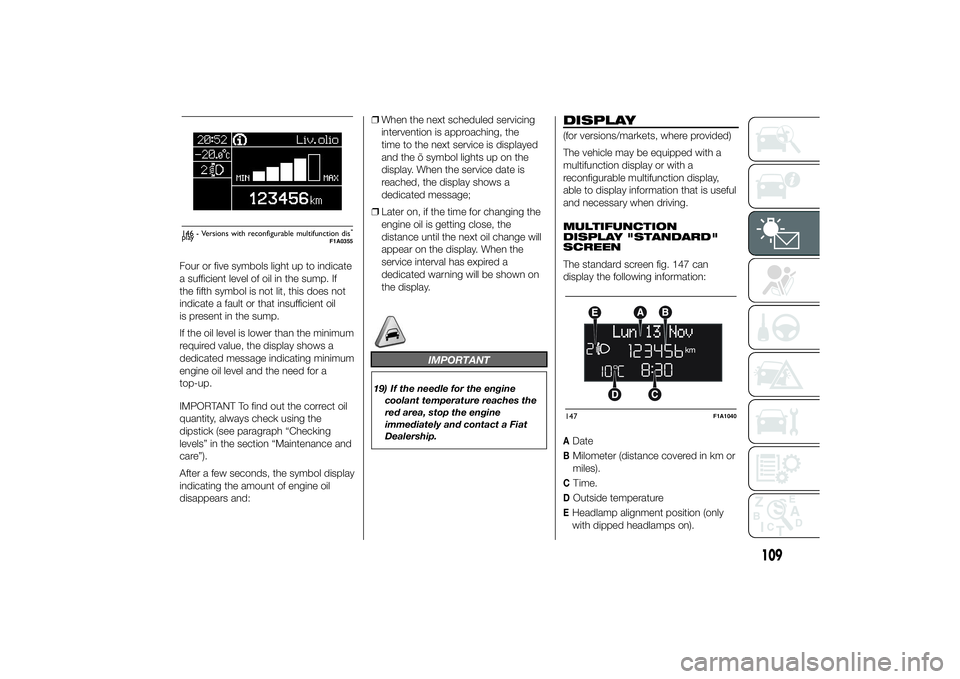
Four or five symbols light up to indicate
a sufficient level of oil in the sump. If
the fifth symbol is not lit, this does not
indicate a fault or that insufficient oil
is present in the sump.
If the oil level is lower than the minimum
required value, the display shows a
dedicated message indicating minimum
engine oil level and the need for a
top-up.
IMPORTANT To find out the correct oil
quantity, always check using the
dipstick (see paragraph “Checking
levels” in the section “Maintenance and
care”).
After a few seconds, the symbol display
indicating the amount of engine oil
disappears and:❒When the next scheduled servicing
intervention is approaching, the
time to the next service is displayed
and the õ symbol lights up on the
display. When the service date is
reached, the display shows a
dedicated message;
❒Later on, if the time for changing the
engine oil is getting close, the
distance until the next oil change will
appear on the display. When the
service interval has expired a
dedicated warning will be shown on
the display.
IMPORTANT
19) If the needle for the engine
coolant temperature reaches the
red area, stop the engine
immediately and contact a Fiat
Dealership.
DISPLAY(for versions/markets, where provided)
The vehicle may be equipped with a
multifunction display or with a
reconfigurable multifunction display,
able to display information that is useful
and necessary when driving.
MULTIFUNCTION
DISPLAY "STANDARD"
SCREEN
The standard screen fig. 147 can
display the following information:ADateBMilometer (distance covered in km or
miles).CTime.DOutside temperatureEHeadlamp alignment position (only
with dipped headlamps on).
Liv.olio
MAX MIN
146 - Versions with reconfigurable multifunction dis-
play
F1A0355
147
F1A1040
109
Page 114 of 367
NoteWhen one of the front doors is
opened, the display is activated,
showing the time and mileage for a few
seconds.
RECONFIGURABLE
MULTIFUNCTION
DISPLAY "STANDARD"
SCREEN
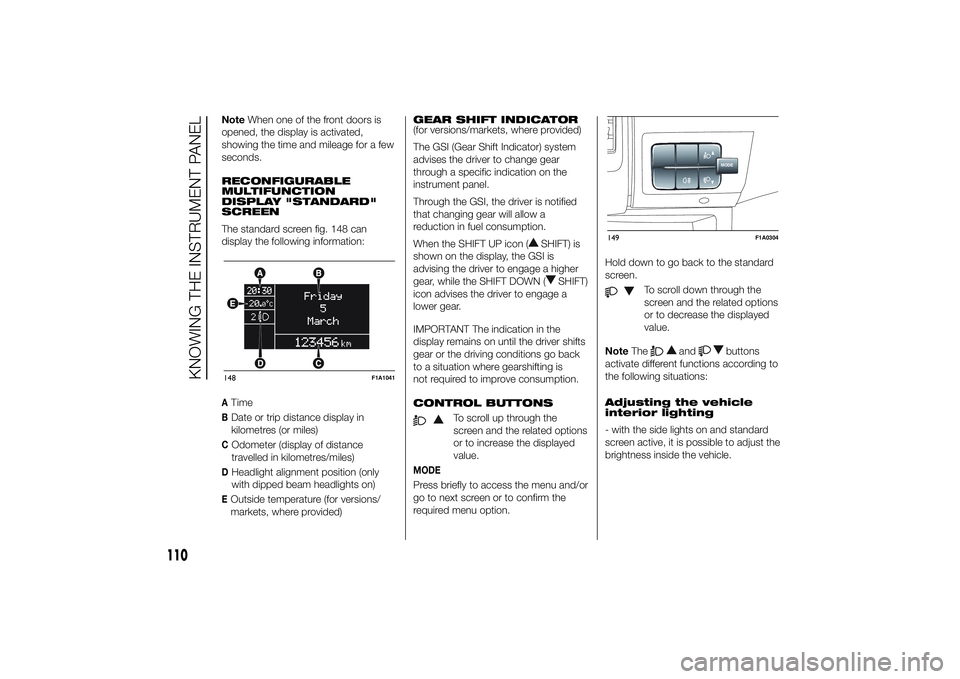
The standard screen fig. 148 can
display the following information:ATimeBDate or trip distance display in
kilometres (or miles)COdometer (display of distance
travelled in kilometres/miles)DHeadlight alignment position (only
with dipped beam headlights on)EOutside temperature (for versions/
markets, where provided)GEAR SHIFT INDICATOR
(for versions/markets, where provided)
The GSI (Gear Shift Indicator) system
advises the driver to change gear
through a specific indication on the
instrument panel.
Through the GSI, the driver is notified
that changing gear will allow a
reduction in fuel consumption.
When the SHIFT UP icon (
SHIFT) is
shown on the display, the GSI is
advising the driver to engage a higher
gear, while the SHIFT DOWN (
SHIFT)
icon advises the driver to engage a
lower gear.
IMPORTANT The indication in the
display remains on until the driver shifts
gear or the driving conditions go back
to a situation where gearshifting is
not required to improve consumption.
CONTROL BUTTONS
To scroll up through the
screen and the related options
or to increase the displayed
value.
MODEPress briefly to access the menu and/or
go to next screen or to confirm the
required menu option.Hold down to go back to the standard
screen.
To scroll down through the
screen and the related options
or to decrease the displayed
value.
NoteThe
and
buttons
activate different functions according to
the following situations:
Adjusting the vehicle
interior lighting
- with the side lights on and standard
screen active, it is possible to adjust the
brightness inside the vehicle.
148
F1A1041
MODE
149
F1A0304
110
KNOWING THE INSTRUMENT PANEL