change time FIAT DUCATO BASE CAMPER 2014 Owner handbook (in English)
[x] Cancel search | Manufacturer: FIAT, Model Year: 2014, Model line: DUCATO BASE CAMPER, Model: FIAT DUCATO BASE CAMPER 2014Pages: 367, PDF Size: 20.39 MB
Page 115 of 367
Setup menu
- within the menu, they allow you to
scroll up and down;
- during setting operations they allow
an increase or decrease.
SETUP MENU
Setup menu functions
The menu comprises a series of
functions arranged in a circular way,
which can be selected through the
and
buttons to access the
different selection operations and
settings (setup) given in the following
paragraphs. A submenu is provided for
some items (Clock and Unit setting).
The setup menu can be activated
by pressing the MODE button briefly.
The menu comprises the following
functions:
❒Menu
❒Lighting
❒Headlight alignment corrector
❒Speed warning
❒Headlight sensor
❒Cornering lights
❒Rain sensor
❒Trip B activation❒Traffic sign
❒Set time
❒Set date
❒Autoclose
❒Units of measurement
❒Language
❒Warning volume
❒Service
❒Passenger airbag
❒Daytime Running Lights
❒Automatic main beam headlights
❒Exit menu
Single presses of the
or
buttons permit navigation
through the setup menu options.
Operating modes are different
according to the characteristics of the
option selected.
Selecting an option from the main
menu without a submenu:
- briefly press the MODE button to
select the main menu option that needs
to be changed;
- press the
or
buttons (with
a single press) to select the new
setting;- briefly press the MODE button to
store the new setting and at the same
time go back to the previously selected
menu option.
Selecting an option from the main
menu with a submenu:
- briefly press the MODE button to
display the first submenu option;
- press the
or
buttons (with
a single press) to scroll through all
submenu options;
- briefly press the MODE button to
select the displayed submenu option
and to open the relevant settings menu;
- press the
or
buttons
(with a single press) to choose the new
setting for this submenu option;
- briefly press the MODE button to
store the setting and return to the
previously selected submenu option.
Selecting “Date” and “Set Clock”:
- briefly press the MODE button to
select the first value to be changed (e.g.
hours / minutes or year / month / day);
- press the
or
buttons (with
a single press) to select the new
setting;
111
Page 116 of 367
- briefly press the MODE button to
store the new setting and go to the
next settings menu option. If this is the
last one, the system brings you back
to the previously selected menu option.
Press the button MODE for long:
- to exit the set-up menu if you are in
the main menu;
- to exit the main menu if you are in
another point of the menu (e.g.: at
submenu option setting level, at
submenu level or at main menu option
setting level);
- to save only the changes stored by
the user (and confirmed by pressing the
MODE button).
The setup menu environment is timed;
when the menu is exited due to expiry
of the time allowed, only the changes
already stored by the user (confirmed
beforehand by a brief press of the
MODE button) will be saved.
From the standard screen, briefly press
button MODE to start navigation.
Press the
or
buttons to
navigate within the menu.NoteOnly the reduced menu can be
accessed while the vehicle is moving
for safety reasons ("Speed Beep"
setting). Stop the vehicle to access the
full menu.
Lighting
(Passenger compartment light
adjustment)
(only with side lights on)
This function is used to set the
brightness of the instrument panel,
uconnect™system controls (for
versions/markets where provided) and
automatic climate control system
controls (for versions/markets where
provided) to 8 levels.
Proceed as follows to adjust the light
intensity:
❒briefly press the MODE button. The
level set previously flashes on the
display;
❒press button
or
to set
the required brightness level;
❒briefly press the MODE button to
return to the menu screen or hold the
button down to return to the
standard screen without storing.NoteOn versions with reconfigurable
multifunction display adjustment can be
made both with lights off ("daytime"
mode brightness level) and with lights
on ("nighttime" mode brightness level).
Headlight alignment
(Headlight alignment
corrector position
adjustment)
(for versions/markets, where provided)
This function permits the adjustment (to
4 levels) of the headlight alignment
corrector position.
To carry out the adjustment, proceed as
follows:
❒briefly press the MODE button. The
level set previously flashes on the
display;
❒press button
or
to adjust
the position;
❒briefly press the MODE button to
return to the menu screen or hold the
button down to return to the
standard screen without storing.
112
KNOWING THE INSTRUMENT PANEL
Page 118 of 367
❒press
or
to make your
choice;
❒briefly press the MODE button to
return to the menu screen or hold the
button down to return to the
standard screen without storing.
Rain sensor
(Rain sensor setting adjustment)
(for versions/markets, where provided)
This function allows you to adjust the
rain sensor sensitivity to 4 levels.
To set the required sensitivity level,
proceed as follows:
❒briefly press the MODE button. The
sensitivity “level” set previously
flashes on the display;
❒press the
or
button to
make the adjustment;
❒briefly press the MODE button to
return to the menu screen or hold the
button down to return to the
standard screen without storing.
Trip B On/Off (Trip B
data)
This function can be used to activate
(On) or deactivate (Off) the Trip B
display (partial trip).
For more information see the "Trip
computer" paragraph.For activation/deactivation, proceed as
follows:
- briefly press the MODE button: ON or
OFF flashes on the display (depending
the previous setting);
- press the
or
button to
select;
- press the MODE button briefly to
return to the menu screen or hold the
button down to return to the standard
screen without storing.
Traffic sign
This function allows you to activate (On)
or deactivate (Off) the Traffic Sign
function to recognise the traffic signs
(no overtaking or speed limits).
For activation/deactivation, proceed as
follows:
- briefly press the MODE button: ON or
OFF flashes on the display (depending
the previous setting);
- press the
or
button to
select;
- press the MODE button briefly to
return to the menu screen or hold the
button down to return to the standard
screen without storing.Setting the clock (Set
time)
This function allows you to set the clock
through two submenus: “Time” and
“Format”.
To carry out the adjustment, proceed as
follows:
- briefly press the MODE button and
two submenus, "Time" and "Format",
will be displayed;
- press the
or
button to
switch between the two submenus;
- once you have selected the submenu
to be changed, press button MODE
briefly;
- if you enter the "Time" submenu,
pressing the MODE button briefly
makes the "hours" flash on the display;
- press the
or
button to
adjust;
- briefly press the MODE button: the
"minutes" starts to flash on the display;
- press the
or
button to
adjust;
– if you enter the "Format" submenu,
pressing the MODE button briefly
makes the display format flash on the
display;
- press the
or
button to
select "24h" or "12h" mode.
114
KNOWING THE INSTRUMENT PANEL
Page 119 of 367
When you have made the adjustment,
briefly press the MODE button to go
back to the submenu screen or hold
the button down to go back to the main
menu screen without storing.
- press the MODE button again to
return to the standard screen or to the
main menu according to where you
are in the menu.
Setting the date (Set
Date)
This function allows updating of the
date (day - month - year).
Proceed as follows to update:
- briefly press the MODE button: the
day starts flashing on the display (dd);
- press the
or
button to
adjust;
- briefly press the MODE button: the
month starts flashing on the display
(mm);
- press the
or
button to
adjust;
- briefly press the MODE button: the
year starts flashing on the display
(yyyy);
- press the buttonor
for
setting.NoteThe setting will increase or
decrease by one unit each time the
or
button is pressed.
Keeping the button pressed causes an
automatic rapid value increase/
decrease. Complete the adjustment
with single presses of the button when
you approach the desired value.
- press the MODE button briefly to
return to the menu screen or hold the
button down to return to the standard
screen without storing.
Automatic central
locking with vehicle
moving (Autoclose)
After activation (On), this function allows
the automatic locking of the doors
when the speed exceeds 20 km/h.
Proceed as follows to activate (On) or
deactivate (Off) this function:
- briefly press the MODE button to
display a submenu;
- briefly press the MODE button: ON or
OFF flashes on the display (depending
the previous setting);
- press theor
button to
select;
- press the MODE button briefly to
return to the submenu screen or hold
the button down to return to the main
menu screen without storing;- press the MODE button again to
return to the standard screen or to the
main menu according to where you
are in the menu.
Set units (Measurement
units)
With this function it is possible to set
the unit of measurement using three
submenus: "Distance", "Consumption"
and "Temperature".
To set the desired unit of measurement,
proceed as follows:
- briefly press the MODE button to
display the three submenus;
- press button
or
to
navigate through the three submenus;
- once you have selected the submenu
to be changed, press button MODE
briefly;
- if you enter the "Distances" submenu,
pressing the MODE button briefly
makes the display show "km" or "mi"
(depending on the previous setting);
- press the
or
button
to select;
- if you enter the "Consumption"
submenu, pressing the MODE button
briefly makes "km/l", "l/100km" or
"mpg" appear on the display
(depending on the previous setting);
115
Page 121 of 367
– briefly press the MODE button; the
display shows the estimated km
distance to the next oil change
(depending on the driving mode);
– briefly press button MODE to go back
to the menu screen or press the button
for longer to go back to the standard
screen.
NoteThe "Scheduled Servicing Plan"
requires the vehicle to be serviced every
48,000 km (or 30,000 mi). This
indication will appear automatically, with
the key at MAR-ON, starting from
2,000 km (or 1,240 mi) and will be
displayed every 200 km (or 124 mi). Oil
change notification messages are
displayed in the same way. Use the
and
buttons to alternate
between displaying scheduled servicing
and engine oil change information.
Below 200 km servicing indications are
more frequent. The display will be in
km or mi depending on the
measurement unit settings. When the
next scheduled service is approaching,
the word “Service” will appear on the
display, followed by the number of
kilometres or miles left, when the key is
turned to MAR-ON. Contact a Fiat
Dealership to carry out any service
operation in the "Scheduled servicing
plan" and to reset the display.NoteWhen an oil change is nearly due
and the ignition key is turned to
MAR-ON, the display will show a
dedicated message. Engine
performance will decrease still driving in
these conditions. When the change is
due, the dedicated message will
reappear on the display together with
the activation of both the
and
warning lights. Contact a Fiat
Dealership.
Activating/deactivating
front passenger side
airbags and side bags
for chest protection
(Passenger airbag)
(for versions/markets, where provided)
This function allows the passenger
side airbag to be activated/deactivated.
Proceed as follows:
❒press the MODE button and, after
the message "Bag pass: Off" (to
deactivate) or "Bag pass: On" (to
activate) is displayed by pressing the
and
buttons, press the
MODE button again;
❒the confirmation request message
will appear on the display;
❒by pressing the
or
buttons, select (Yes) (to confirm
activation/deactivation) or (No) (to
cancel);❒press the MODE button briefly and a
message confirming the selection will
be displayed, then you will return to
the menu screen, or hold the button
down to return to the standard
screen without storing.
Daytime running lights
(DRL)
(for versions/markets, where provided)
With this function is possible to turn the
daytime running lights on and off.
Proceed as follows to activate or
deactivate this function:
❒briefly press the MODE button. The
display shows a submenu;
❒briefly press the MODE button. "On"
or "Off" flash on the display,
according to what has been
previously set;
❒press
or
to make your
choice;
❒briefly press the MODE button to
return to the submenu screen or hold
the button down to return to the
main menu screen without storing;
❒press the MODE button again to
return to the standard screen or
to the main menu according to the
menu items where you are in.
117
Page 151 of 367
97) After the adjustment, always
check that the cursor to which the
ring is fastened is locked in one
of the preset positions. Release
the grip and push downwards
to enable the locking device to
click if the grip has not been
released in one of the possible
positions.
SBR SYSTEM
IN BRIEF
The vehicle is fitted with a Seat Belt
Reminder system (SBR), consisting of
a buzzer and a flashing warning light
on the instrument panel which
warns the driver that the seat belt
must be fastened.
The buzzer can be deactivated (until the
next engine stop) as follows:
❒fasten the driver's seat belt;
❒turn the ignition key to the MAR-ON
position;
❒wait for over 20 seconds and then
release one of the seat belts.
For permanent deactivation, contact a
Fiat Dealership.
With digital display, the SBR system
can only be reactivated at a Fiat
Dealership.
With multifunction display, the SBR
system can also be reactivated through
the set-up menu.
PRETENSIONERSTo increase the protective efficiency of
the front seat belts, the vehicle is fitted
with pretensioners. These devices, in
the event of a head-on crash or side
impact, rewind the seat belts a few
centimetres. In this way, they ensure
that the belts fit tightly to the wearer
before the restraining action begins.
The retractor locks to indicate that the
pretensioner has intervened; the seat
belt cannot be drawn back up even
when guiding it manually.
IMPORTANT To obtain the highest
degree of protection from the action of
the pretensioner, wear the seat belt
tight to the chest and pelvis.
A slight discharge of smoke may be
produced during the activation of the
pretensioner which is not harmful and
does not involve any fire hazard.
The pretensioner does not require any
maintenance or lubrication. Any
changes to its original conditions will
invalidate its efficiency. If, due to
unusual natural events (floods, sea
storms, etc.), the device has been
affected by water and mud, it must
absolutely be replaced.
98)25)
147
Page 178 of 367
IMPORTANT Reverse may only be
engaged when the vehicle is at a
standstill. With the engine running, wait
for at least 2 seconds with the clutch
pedal fully pressed before engaging
reverse to prevent damage to the gears
and grating.
To engage reverse R from neutral,
proceed as follows: raise sliding ring A
under the knob and at the same time
move the gear lever to the left and then
forwards.
127)34)
WARNING
127) Depress the clutch pedal fully
to change gear correctly. It is
therefore essential that there is
nothing under the pedals: make
sure the mats are lying flat and do
not get in the way of the pedals.
IMPORTANT
34) Do not drive with your hand
resting on the gear lever as the
force exerted, even if slight, could
lead over time to premature wear
of the internal gearbox
components. The clutch pedal
should be used only for gear
changes. Do not drive with your
foot resting on the clutch pedal,
however lightly. For versions/
markets where provided, the
electronic clutch pedal control
could cut in, interpreting the
incorrect driving style as a fault.
174
STARTING AND DRIVING
Page 199 of 367
138) The spare wheel supplied (for
versions/markets, where
provided) is specific for your
vehicle. Therefore, it must not be
used on other models. Do not
use spare wheels of other models
on your vehicle. The wheel bolts
are specific for your vehicle: do
not use them on different models
and do not use bolts from other
models on your car.
139) Have the wheel repaired and
refitted as soon as possible. Do
not apply grease to the bolt
threads before fitting: they could
come unscrewed.
140) Use the jack only to replace
wheels on the vehicle with which
it is supplied or on other vehicles
of the same model. Never use
the jack for other purposes, such
as lifting other car models. Never
use the jack to carry out repairs
under the vehicle. Incorrect
positioning of the jack may cause
the lifted vehicle to fall. Do not
use the jack for loads higher than
those shown on the label.
141) Never tamper with the inflation
valve. Never introduce tools of any
kind between rim and tyre. Check
tyre and spare wheel pressure
regularly, referring to the values
shown in the "Technical
specifications" section.142) No tools other than the crank
provided should be used with
the spare wheel lifting device; it
should be operated by hand only.
143) On versions equipped with
self-levelling air suspension, never
introduce the head or hands in
the wheel arch: the vehicle could
raise or lower automatically
depending on possible load or
temperature changes.
144) The device should only be
operated by hand, without using
any type of tool other than the
crank provided, like pneumatic or
electrical screwers.
145) The moving components of the
jack (screw and joints) can also
cause injuries: do not touch them.
If you come into contact with
lubricating grease, clean yourself
thoroughly.146) At the end of the operation of
raising/locking the spare wheel,
after having checked the correct
positioning of the wheel under the
platform (white notch inside the
window on the device), the key
must be extracted, taking care not
to turn it in the wrong direction
to facilitate the extraction of the
key itself, to prevent the
attachment device from being
released and the wheel assembly
not being securely retained fig.
188.
147) Each time the spare wheel is
moved, check that it is correctly
positioned in its housing under
the platform. If it is not correctly
positioned, this could adversely
affect safety.
195
Page 230 of 367
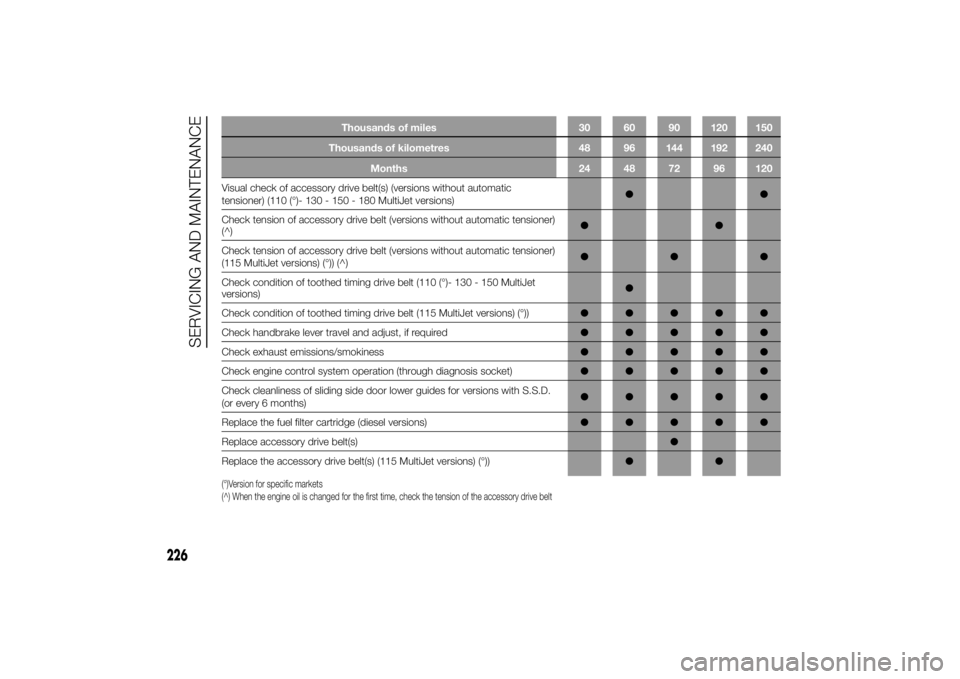
Thousands of miles 30 60 90 120 150
Thousands of kilometres 48 96 144 192 240
Months 24 48 72 96 120
Visual check of accessory drive belt(s) (versions without automatic
tensioner) (110 (°)- 130 - 150 - 180 MultiJet versions)●●
Check tension of accessory drive belt (versions without automatic tensioner)
(^)●●
Check tension of accessory drive belt (versions without automatic tensioner)
(115 MultiJet versions) (°)) (^)●●●
Check condition of toothed timing drive belt (110 (°)- 130 - 150 MultiJet
versions)●
Check condition of toothed timing drive belt (115 MultiJet versions) (°))●●●●●
Check handbrake lever travel and adjust, if required●●●●●
Check exhaust emissions/smokiness●●●●●
Check engine control system operation (through diagnosis socket)●●●●●
Check cleanliness of sliding side door lower guides for versions with S.S.D.
(or every 6 months)●●●●●
Replace the fuel filter cartridge (diesel versions)●●●●●
Replace accessory drive belt(s)●
Replace the accessory drive belt(s) (115 MultiJet versions) (°))●●(°)Version for specific markets
(^) When the engine oil is changed for the first time, check the tension of the accessory drive belt
226
SERVICING AND MAINTENANCE