tow FIAT DUCATO BASE CAMPER 2015 Owner handbook (in English)
[x] Cancel search | Manufacturer: FIAT, Model Year: 2015, Model line: DUCATO BASE CAMPER, Model: FIAT DUCATO BASE CAMPER 2015Pages: 367, PDF Size: 19.73 MB
Page 201 of 367
IN AN EMERGENCY
A punctured tyre or a burnt-out
bulb?
At times, a problem may interfere
with our journey.
The pages on emergencies can
help you to deal with critical
situations independently and with
calm.
In an emergency we recommend
that you call the freephone number
found in the Warranty Booklet.
It is also possible to call the 00 800
3428 0000 freephone number to
search the nearest Fiat Dealership.STARTING THE ENGINE .................198
REPLACING A WHEEL ...................199
FIX & GO AUTOMATIC QUICK
TYRE REPAIR KIT ...........................204
CHANGING A BULB .......................208
REPLACING AN EXTERIOR BULB ..211
CHANGING AN INTERIOR BULB ....216
REPLACING FUSES........................217
BATTERY RECHARGING ................225
LIFTING THE VEHICLE....................226
TOWING THE VEHICLE ..................226
197
Page 202 of 367
STARTING THE
ENGINE
Go to a Fiat Dealership immediately
if warning light
stays on
constantly on the instrument panel.
JUMP STARTING
If the battery is flat, it is possible to
start the engine using an auxiliary
battery with the same capacity or a
little higher than the flat one.
It is advisable to contact a Fiat
Dealership to check/replace the
battery.
140)
Proceed as follows to start the
vehicle:
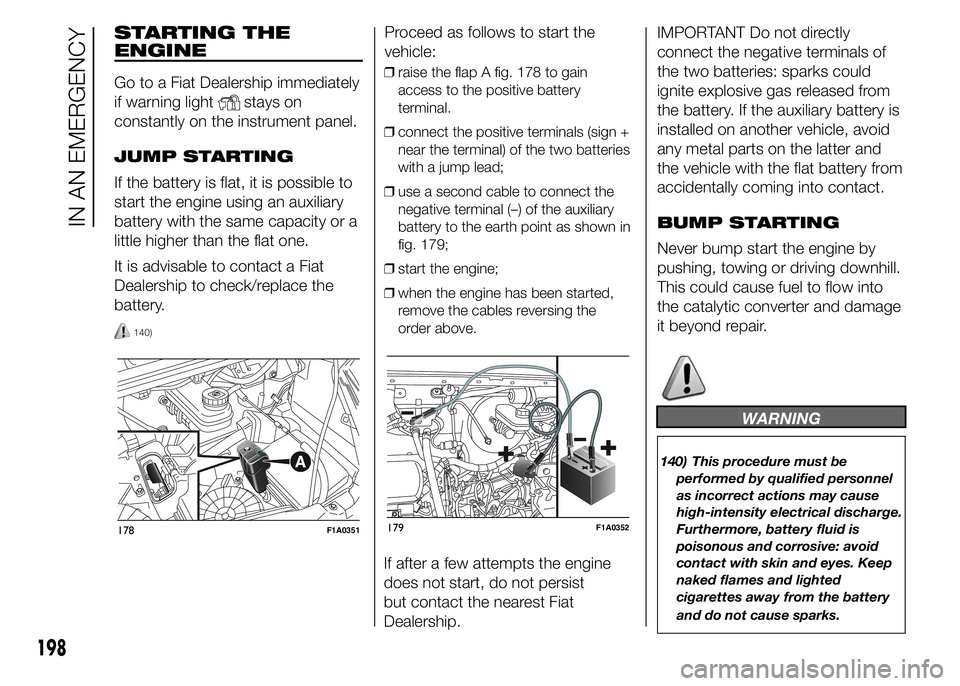
❒raise the flap A fig. 178 to gain
access to the positive battery
terminal.
❒connect the positive terminals (sign +
near the terminal) of the two batteries
with a jump lead;
❒use a second cable to connect the
negative terminal (–) of the auxiliary
battery to the earth point as shown in
fig. 179;
❒start the engine;
❒when the engine has been started,
remove the cables reversing the
order above.
If after a few attempts the engine
does not start, do not persist
but contact the nearest Fiat
Dealership.IMPORTANT Do not directly
connect the negative terminals of
the two batteries: sparks could
ignite explosive gas released from
the battery. If the auxiliary battery is
installed on another vehicle, avoid
any metal parts on the latter and
the vehicle with the flat battery from
accidentally coming into contact.
BUMP STARTING
Never bump start the engine by
pushing, towing or driving downhill.
This could cause fuel to flow into
the catalytic converter and damage
it beyond repair.
WARNING
140) This procedure must be
performed by qualified personnel
as incorrect actions may cause
high-intensity electrical discharge.
Furthermore, battery fluid is
poisonous and corrosive: avoid
contact with skin and eyes. Keep
naked flames and lighted
cigarettes away from the battery
and do not cause sparks.
178F1A0351179F1A0352
198
IN AN EMERGENCY
Page 203 of 367
REPLACING A
WHEEL
GENERAL
INSTRUCTIONS
Wheel replacement and correct use
of the jack and spare wheel (for
versions/markets, where provided)
call for some precautions, which
are listed below.
141) 142) 143) 144) 145)
Please note that:
❒the jack weight is 4.5 kg;
❒the jack requires no adjustment;
❒the jack cannot be repaired: in the
event of a fault it must be replaced by
another original one;
❒no tool other than its cranking device
may be fitted on the jack.
146)
To change a wheel,
proceed as follows:
❒stop the vehicle in a position that is
not dangerous for oncoming traffic
where you can change the wheel
safely. The ground should be flat
if possible, and sufficiently firm;❒stop the engine and pull the
handbrake;
❒engage first gear or reverse;
❒put on the reflective safety jacket
(compulsory by law in certain
countries) before getting out of the
vehicle;
❒indicate that the vehicle has broken
down using the devices required by
the law in the current country (e.g.
warning triangle, hazard lights, etc.);
❒In the event of a wheel change on a
slope or on unsurfaced roads, put
any object as stop under the wheels;
❒take the tool bag under the
passenger seat (see “Compartment
under front passenger seat” in the
“Know your vehicle” section);
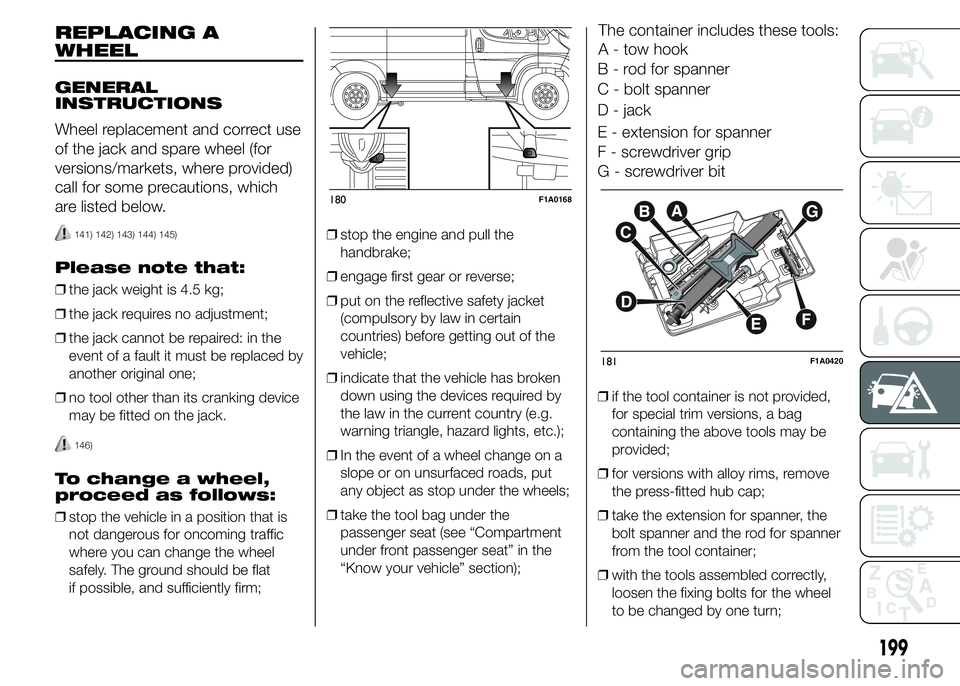
The container includes these tools:
A - tow hook
B - rod for spanner
C - bolt spanner
D - jack
E - extension for spanner
F - screwdriver grip
G - screwdriver bit
❒if the tool container is not provided,
for special trim versions, a bag
containing the above tools may be
provided;
❒for versions with alloy rims, remove
the press-fitted hub cap;
❒take the extension for spanner, the
bolt spanner and the rod for spanner
from the tool container;
❒with the tools assembled correctly,
loosen the fixing bolts for the wheel
to be changed by one turn;
180F1A0168
181F1A0420
199
Page 230 of 367
170) Do not attempt to charge a
frozen battery: it must be thawed
first, otherwise it may explode.
If freezing has occurred, the
battery should be checked by
skilled personnel to make sure
that the internal elements are not
damaged and that the body is
not cracked, with the risk of
leaking poisonous and corrosive
acid.LIFTING THE
VEHICLE
If the vehicle needs to be lifted, go
to a Fiat Dealership which is
equipped with the arm hoist or
workshop lift.
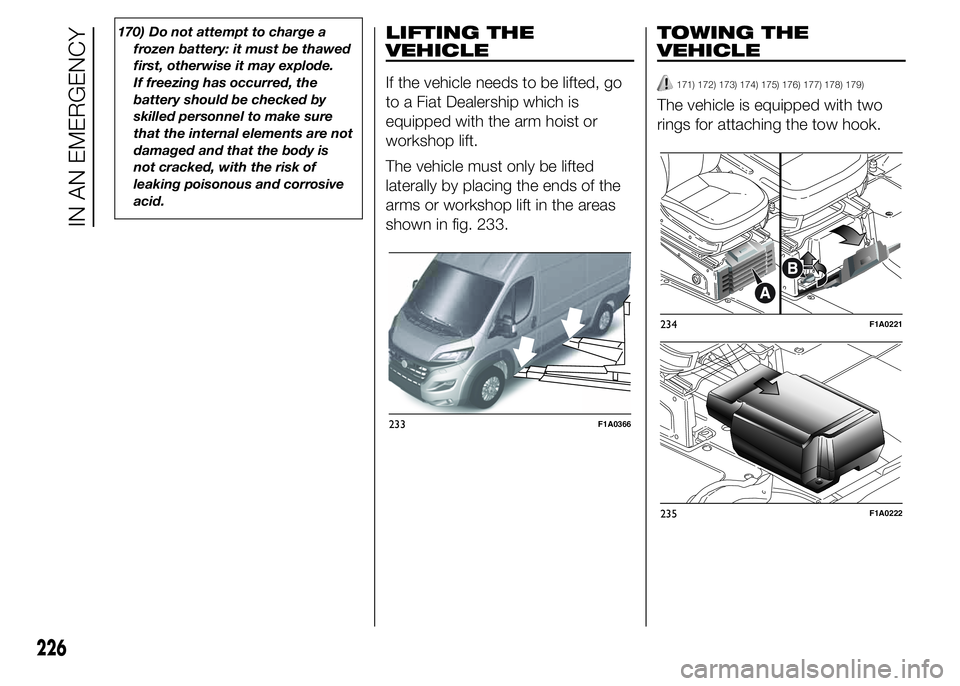
The vehicle must only be lifted
laterally by placing the ends of the
arms or workshop lift in the areas
shown in fig. 233.
TOWING THE
VEHICLE
171) 172) 173) 174) 175) 176) 177) 178) 179)
The vehicle is equipped with two
rings for attaching the tow hook.
233F1A0366
234F1A0221
235F1A0222
226
IN AN EMERGENCY
Page 231 of 367
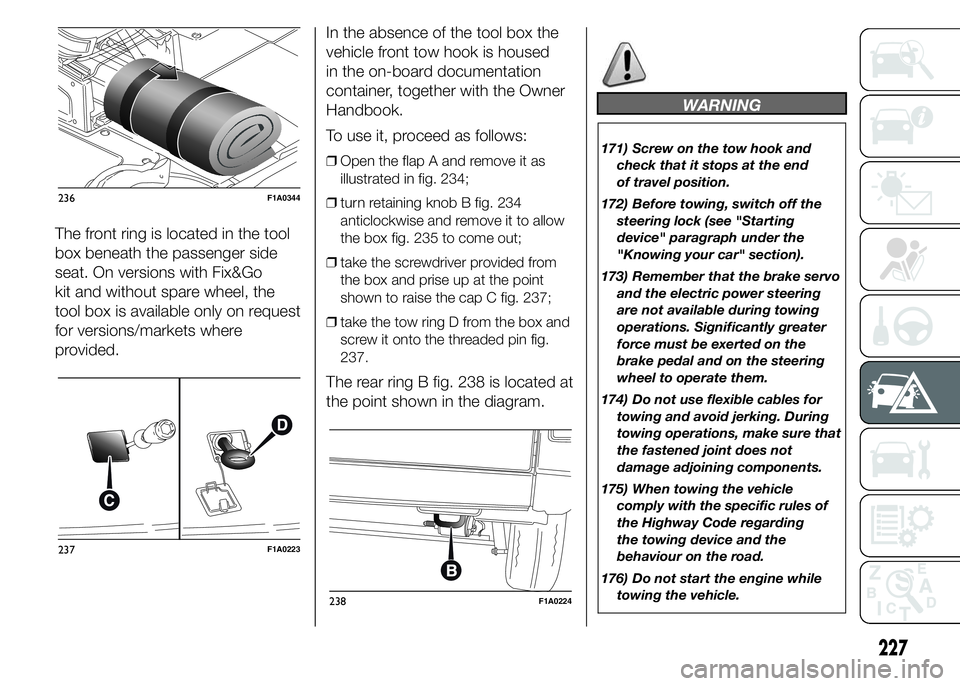
The front ring is located in the tool
box beneath the passenger side
seat. On versions with Fix&Go
kit and without spare wheel, the
tool box is available only on request
for versions/markets where
provided.In the absence of the tool box the
vehicle front tow hook is housed
in the on-board documentation
container, together with the Owner
Handbook.
To use it, proceed as follows:
❒Open the flap A and remove it as
illustrated in fig. 234;
❒turn retaining knob B fig. 234
anticlockwise and remove it to allow
the box fig. 235 to come out;
❒take the screwdriver provided from
the box and prise up at the point
shown to raise the cap C fig. 237;
❒take the tow ring D from the box and
screw it onto the threaded pin fig.
237.
The rear ring B fig. 238 is located at
the point shown in the diagram.
WARNING
171) Screw on the tow hook and
check that it stops at the end
of travel position.
172) Before towing, switch off the
steering lock (see "Starting
device" paragraph under the
"Knowing your car" section).
173) Remember that the brake servo
and the electric power steering
are not available during towing
operations. Significantly greater
force must be exerted on the
brake pedal and on the steering
wheel to operate them.
174) Do not use flexible cables for
towing and avoid jerking. During
towing operations, make sure that
the fastened joint does not
damage adjoining components.
175) When towing the vehicle
comply with the specific rules of
the Highway Code regarding
the towing device and the
behaviour on the road.
176) Do not start the engine while
towing the vehicle.
236F1A0344
237F1A0223
238F1A0224
227
Page 232 of 367
177) Towing must be made
exclusively on roads/streets; the
device must not be used to
recover the vehicle if it got off the
road.
178) Towing must not be made for
getting past significant obstacles
on the road (e.g. heaps of snow
or material on the road surface).
179) Towing must take place with
the two vehicles (one towing,
the other towed) aligned as much
as possible; towing by roadside
assistance vehicles, too, must
take place with the two vehicles
aligned as much as possible
228
IN AN EMERGENCY
Page 234 of 367
SCHEDULED
SERVICING
Correct servicing is essential for
ensuring long vehicle life under the
best conditions.
This is why Fiat has planned a
series of checks and maintenance
operations every 48,000 km
depending on the engine version.
The scheduled maintenance does
not, however, cover all the needs of
the vehicle: also during the initial
period, before the 48,000 km
service and between one service
and the next, ordinary care such as
systematic fluid level checks with
top ups and tyre pressure checks,
etc. remain necessary.
IMPORTANT The Scheduled
Servicing services are set out by
the Manufacturer. Failure to have
them carried out may invalidate the
warranty.
Scheduled Servicing can be carried
out by any Fiat Dealership, at
pre-established times.If during each operation, in addition
to the ones scheduled, the need
arises for further replacements
or repairs, these may only be
carried out with the express
agreement of the Customer.
IMPORTANT It is advisable to
inform a Fiat Dealership of any
small operating irregularities without
waiting for the next service.
If your vehicle is used frequently for
towing, the interval between service
coupons must be reduced.
230
SERVICING AND MAINTENANCE
Page 237 of 367
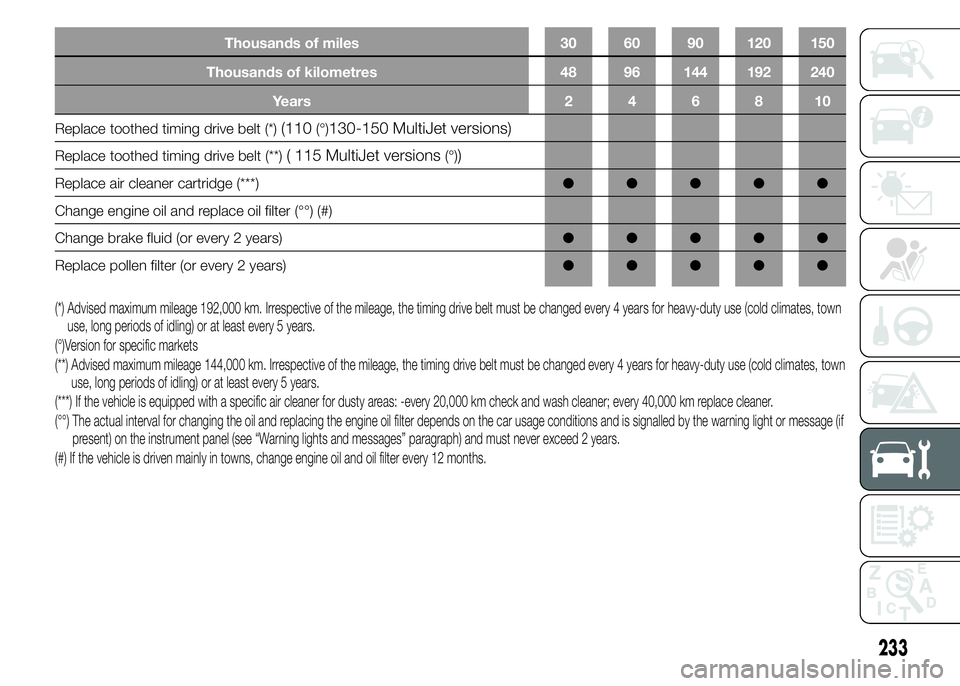
Thousands of miles 30 60 90 120 150
Thousands of kilometres 48 96 144 192 240
Years246810
Replace toothed timing drive belt (*)(110(°)130-150 MultiJet versions)
Replace toothed timing drive belt (**)( 115 MultiJet versions(°))
Replace air cleaner cartridge (***)●●●●●
Change engine oil and replace oil filter (°°) (#)
Change brake fluid (or every 2 years)●●●●●
Replace pollen filter (or every 2 years)●●●●●
(*) Advised maximum mileage 192,000 km. Irrespective of the mileage, the timing drive belt must be changed every 4 years for heavy-duty use (cold climates, town
use, long periods of idling) or at least every 5 years.
(°)Version for specific markets
(**) Advised maximum mileage 144,000 km. Irrespective of the mileage, the timing drive belt must be changed every 4 years for heavy-duty use (cold climates, town
use, long periods of idling) or at least every 5 years.
(***) If the vehicle is equipped with a specific air cleaner for dusty areas: -every 20,000 km check and wash cleaner; every 40,000 km replace cleaner.
(°°) The actual interval for changing the oil and replacing the engine oil filter depends on the car usage conditions and is signalled by the warning light or message (if
present) on the instrument panel (see “Warning lights and messages” paragraph) and must never exceed 2 years.
(#) If the vehicle is driven mainly in towns, change engine oil and oil filter every 12 months.
233
Page 238 of 367
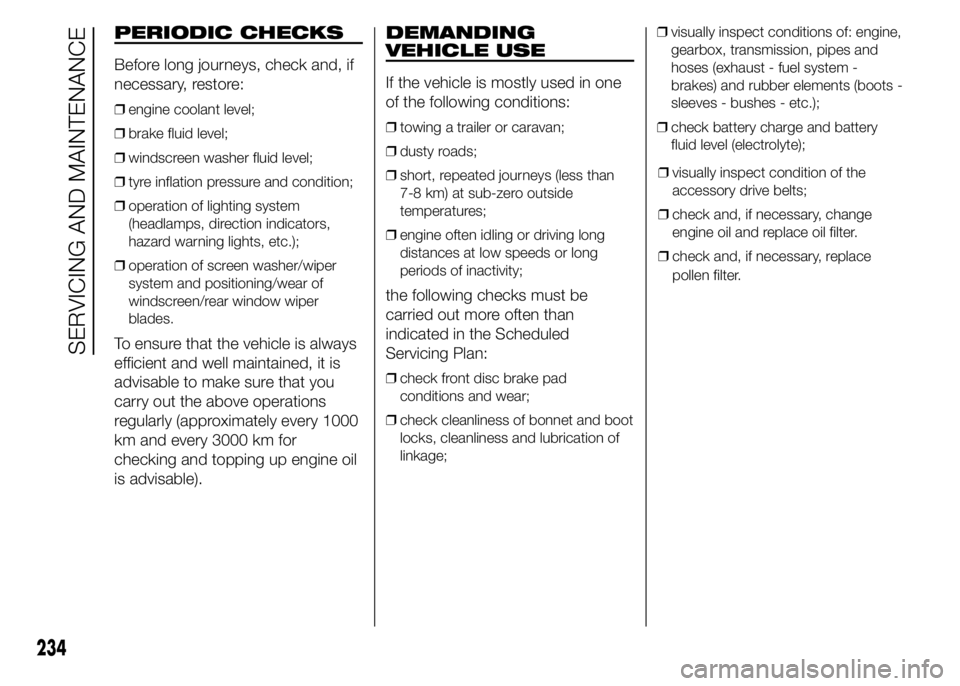
PERIODIC CHECKS
Before long journeys, check and, if
necessary, restore:
❒engine coolant level;
❒brake fluid level;
❒windscreen washer fluid level;
❒tyre inflation pressure and condition;
❒operation of lighting system
(headlamps, direction indicators,
hazard warning lights, etc.);
❒operation of screen washer/wiper
system and positioning/wear of
windscreen/rear window wiper
blades.
To ensure that the vehicle is always
efficient and well maintained, it is
advisable to make sure that you
carry out the above operations
regularly (approximately every 1000
km and every 3000 km for
checking and topping up engine oil
is advisable).
DEMANDING
VEHICLE USE
If the vehicle is mostly used in one
of the following conditions:
❒towing a trailer or caravan;
❒dusty roads;
❒short, repeated journeys (less than
7-8 km) at sub-zero outside
temperatures;
❒engine often idling or driving long
distances at low speeds or long
periods of inactivity;
the following checks must be
carried out more often than
indicated in the Scheduled
Servicing Plan:
❒check front disc brake pad
conditions and wear;
❒check cleanliness of bonnet and boot
locks, cleanliness and lubrication of
linkage;❒visually inspect conditions of: engine,
gearbox, transmission, pipes and
hoses (exhaust - fuel system -
brakes) and rubber elements (boots -
sleeves - bushes - etc.);
❒check battery charge and battery
fluid level (electrolyte);
❒visually inspect condition of the
accessory drive belts;
❒check and, if necessary, change
engine oil and replace oil filter.
❒check and, if necessary, replace
pollen filter.
234
SERVICING AND MAINTENANCE
Page 284 of 367
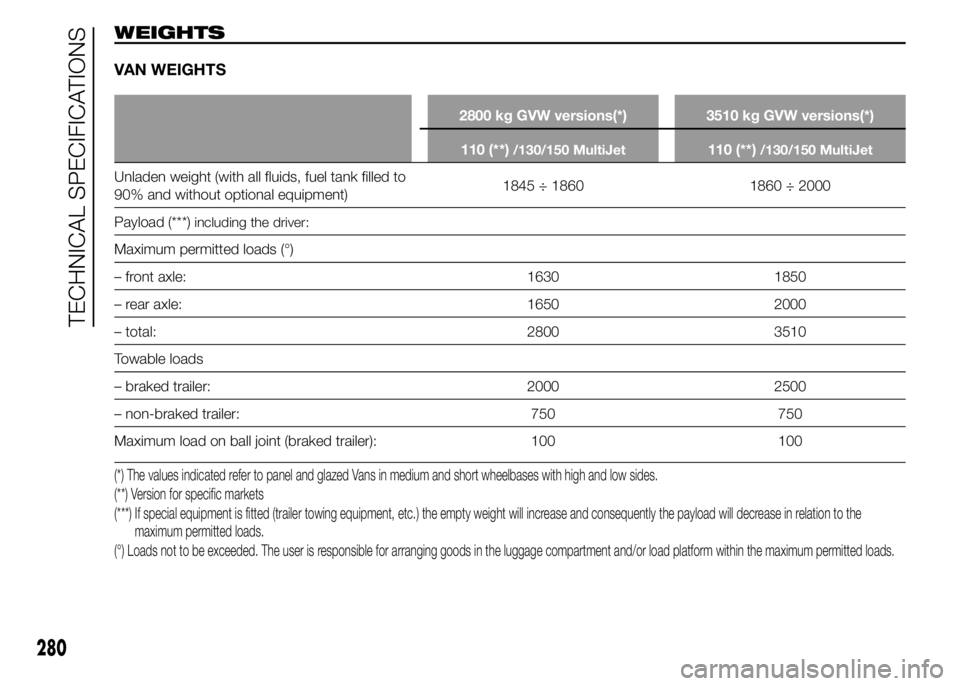
WEIGHTS
VAN WEIGHTS
2800 kg GVW versions(*) 3510 kg GVW versions(*)
110 (**)
/130/150 MultiJet110 (**)/130/150 MultiJet
Unladen weight (with all fluids, fuel tank filled to
90% and without optional equipment)1845 ÷ 1860 1860 ÷ 2000
Payload (***)
including the driver:
Maximum permitted loads (°)
– front axle: 1630 1850
– rear axle: 1650 2000
– total: 2800 3510
Towable loads
– braked trailer: 2000 2500
– non-braked trailer: 750 750
Maximum load on ball joint (braked trailer): 100 100
(*) The values indicated refer to panel and glazed Vans in medium and short wheelbases with high and low sides.
(**) Version for specific markets
(***) If special equipment is fitted (trailer towing equipment, etc.) the empty weight will increase and consequently the payload will decrease in relation to the
maximum permitted loads.
(°) Loads not to be exceeded. The user is responsible for arranging goods in the luggage compartment and/or load platform within the maximum permittedloads.
280
TECHNICAL SPECIFICATIONS