stop start FIAT DUCATO BASE CAMPER 2016 Owner handbook (in English)
[x] Cancel search | Manufacturer: FIAT, Model Year: 2016, Model line: DUCATO BASE CAMPER, Model: FIAT DUCATO BASE CAMPER 2016Pages: 387, PDF Size: 20.76 MB
Page 236 of 387
BATTERY
RECHARGING
IMPORTANT The battery recharging
procedure is given as information only.
You are advised to contact a Fiat
Dealership to have this operation
carried out.
IMPORTANT After turning the ignition
key to STOP and having closed the
driver side door, wait at least one
minute before disconnecting the
electrical supply from the battery. When
reconnecting the electrical supply to
the battery, make sure that the ignition
key is in the STOP position and the
driver side door is closed.
Charging should be slow at a low
ampere rating for approximately 24
hours. Charging for a longer time may
damage the battery.
174) 175)
IN THE ABSENCE OF
START&STOP SYSTEM
To recharge, proceed as follows:
❒disconnect the negative battery
terminal;
❒connect the charger cables to the
battery terminals, observing the
polarity;
❒turn on the charger;
❒when it is recharged, turn the charger
off before disconnecting it from the
battery;
❒reconnect the negative battery
terminal.
WITH START&STOP
SYSTEM
To recharge, proceed as follows:
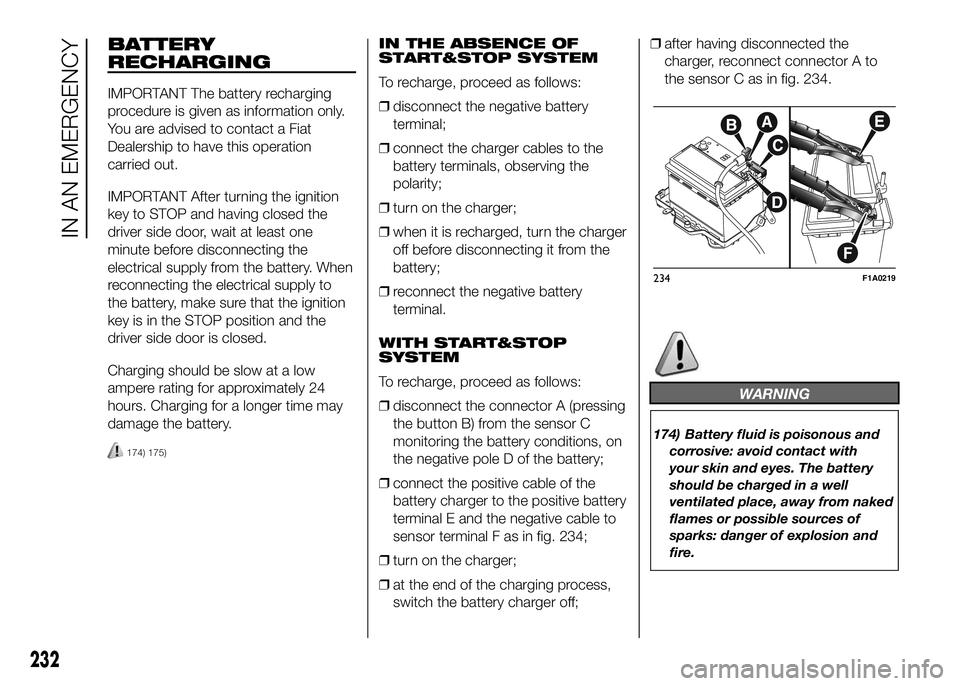
❒disconnect the connector A (pressing
the button B) from the sensor C
monitoring the battery conditions, on
the negative pole D of the battery;
❒connect the positive cable of the
battery charger to the positive battery
terminal E and the negative cable to
sensor terminal F as in fig. 234;
❒turn on the charger;
❒at the end of the charging process,
switch the battery charger off;❒after having disconnected the
charger, reconnect connector A to
the sensor C as in fig. 234.
WARNING
174) Battery fluid is poisonous and
corrosive: avoid contact with
your skin and eyes. The battery
should be charged in a well
ventilated place, away from naked
flames or possible sources of
sparks: danger of explosion and
fire.
234F1A0219
232
IN AN EMERGENCY
Page 238 of 387
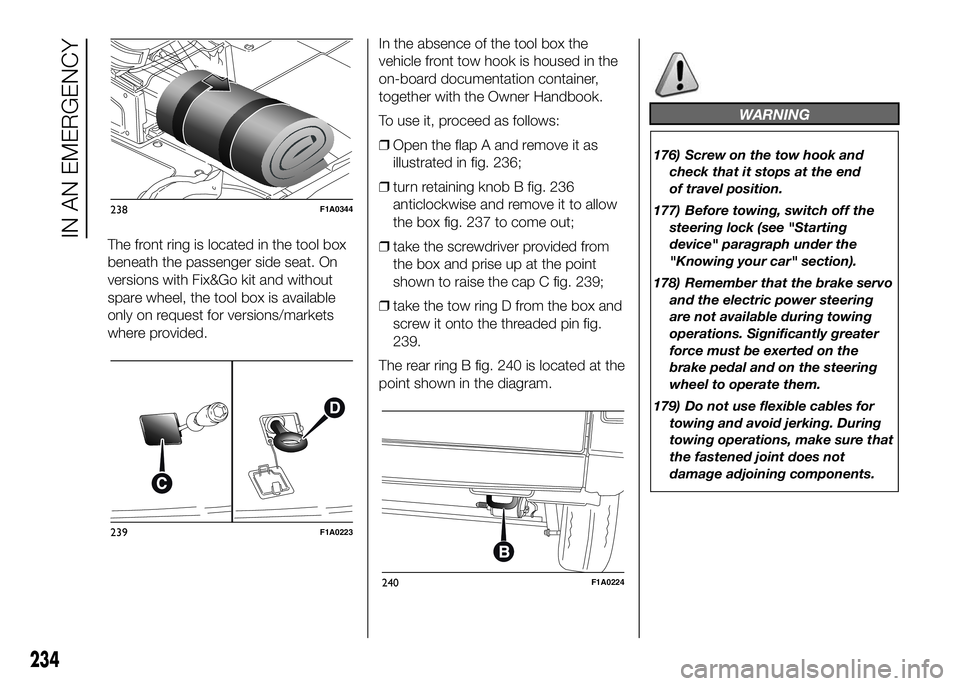
The front ring is located in the tool box
beneath the passenger side seat. On
versions with Fix&Go kit and without
spare wheel, the tool box is available
only on request for versions/markets
where provided.In the absence of the tool box the
vehicle front tow hook is housed in the
on-board documentation container,
together with the Owner Handbook.
To use it, proceed as follows:
❒Open the flap A and remove it as
illustrated in fig. 236;
❒turn retaining knob B fig. 236
anticlockwise and remove it to allow
the box fig. 237 to come out;
❒take the screwdriver provided from
the box and prise up at the point
shown to raise the cap C fig. 239;
❒take the tow ring D from the box and
screw it onto the threaded pin fig.
239.
The rear ring B fig. 240 is located at the
point shown in the diagram.
WARNING
176) Screw on the tow hook and
check that it stops at the end
of travel position.
177) Before towing, switch off the
steering lock (see "Starting
device" paragraph under the
"Knowing your car" section).
178) Remember that the brake servo
and the electric power steering
are not available during towing
operations. Significantly greater
force must be exerted on the
brake pedal and on the steering
wheel to operate them.
179) Do not use flexible cables for
towing and avoid jerking. During
towing operations, make sure that
the fastened joint does not
damage adjoining components.
238F1A0344
239F1A0223
240F1A0224
234
IN AN EMERGENCY
Page 256 of 387
USEFUL ADVICE FOR
EXTENDING THE LIFE OF
YOUR BATTERY
To avoid draining your battery and
make it last longer, observe the
following instructions:
❒when you park the vehicle, ensure
that the doors, tailgate and bonnet
are closed properly, to prevent any
roof lights from remaining on inside
the passenger's compartment;
❒switch off all roof lights inside the
vehicle: the vehicle is however
equipped with a system which
switches all internal lights off
automatically;
❒do not keep accessories (e.g. sound
system, hazard lights, etc.) switched
on for a long time when the engine
is not running;
❒before carrying out any operation on
the electrical system, disconnect the
negative battery cable through the
suitable terminal;
❒Completely tighten the battery
terminals.IMPORTANT After turning the ignition
key to STOP and having closed the
driver side door, wait at least one
minute before disconnecting the
electrical supply from the battery. When
reconnecting the electrical supply to
the battery, make sure that the ignition
key is in the STOP position and the
driver side door is closed.
IMPORTANT If the charge level remains
under 50% for a long time, the battery
is damaged by sulphation, reducing
its capacity and efficiency at start-up.
The battery is also more prone to the
risk of freezing (at temperatures as high
as -10°C).
Refer to the paragraph "Car inactivity"
in "Starting and driving" if the car is
left parked for a long time.If, after buying the vehicle, you want to
install electrical accessories which
require permanent electric supply
(alarm, etc.) or accessories that in any
case burden the electrical supply,
contact a Fiat Dealership, whose
qualified personnel, in addition
to suggesting the most suitable devices
from Lineaccessori Fiat, will evaluate
the overall electrical consumption,
checking whether the vehicle’s electrical
system is capable of withstanding the
load required, or whether it should
be integrated with a more powerful
battery.
Since some of these devices continue
to consume electricity even when
the engine is off, they gradually run
down the battery.
IMPORTANT If a tachograph is fitted, if
the vehicle is parked for a long period
of 5 days, it is advisable to disconnect
the negative battery terminal to
maintain its charge.
If the vehicle is equipped with a battery
disconnection function (disconnector),
see the description of the procedure
in the "Controls" paragraph in the
"Dashboard and controls" section.
252
SERVICING AND MAINTENANCE
Page 258 of 387
WHEELS AND TYRES
Check the pressure of each tyre,
including the space-saver wheel,
approximately every two weeks and
before long journeys: the pressure
should be checked with the tyre rested
and cold.
It is normal for the pressure to increase
when the vehicle is used; for the correct
tyre inflation pressure, see “Wheels” in
the “Technical specifications” section.
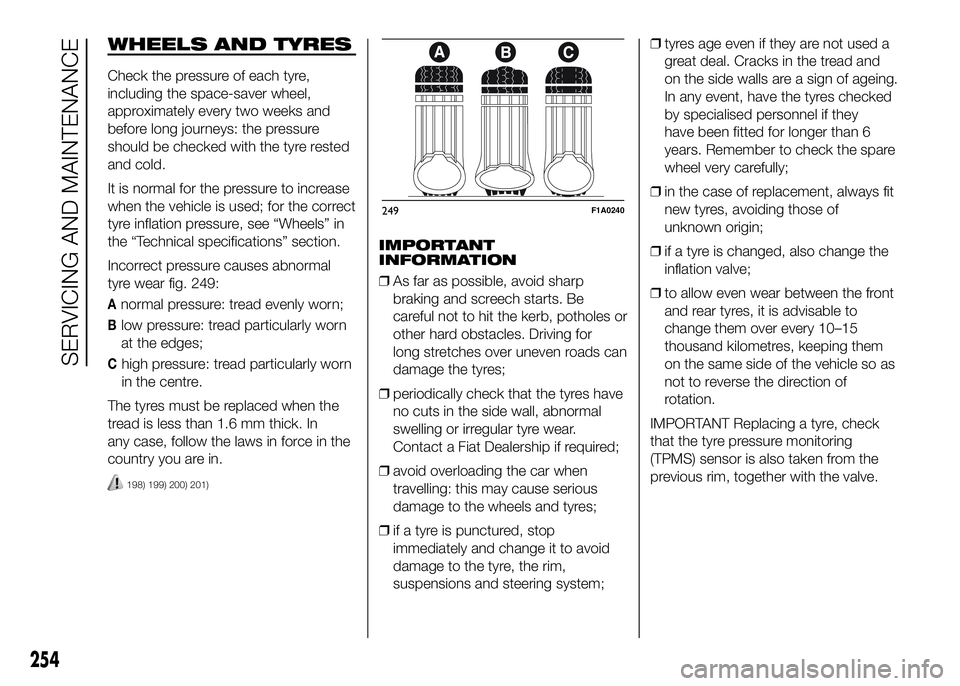
Incorrect pressure causes abnormal
tyre wear fig. 249:
Anormal pressure: tread evenly worn;
Blow pressure: tread particularly worn
at the edges;
Chigh pressure: tread particularly worn
in the centre.
The tyres must be replaced when the
tread is less than 1.6 mm thick. In
any case, follow the laws in force in the
country you are in.
198) 199) 200) 201)
IMPORTANT
INFORMATION
❒As far as possible, avoid sharp
braking and screech starts. Be
careful not to hit the kerb, potholes or
other hard obstacles. Driving for
long stretches over uneven roads can
damage the tyres;
❒periodically check that the tyres have
no cuts in the side wall, abnormal
swelling or irregular tyre wear.
Contact a Fiat Dealership if required;
❒avoid overloading the car when
travelling: this may cause serious
damage to the wheels and tyres;
❒if a tyre is punctured, stop
immediately and change it to avoid
damage to the tyre, the rim,
suspensions and steering system;❒tyres age even if they are not used a
great deal. Cracks in the tread and
on the side walls are a sign of ageing.
In any event, have the tyres checked
by specialised personnel if they
have been fitted for longer than 6
years. Remember to check the spare
wheel very carefully;
❒in the case of replacement, always fit
new tyres, avoiding those of
unknown origin;
❒if a tyre is changed, also change the
inflation valve;
❒to allow even wear between the front
and rear tyres, it is advisable to
change them over every 10–15
thousand kilometres, keeping them
on the same side of the vehicle so as
not to reverse the direction of
rotation.
IMPORTANT Replacing a tyre, check
that the tyre pressure monitoring
(TPMS) sensor is also taken from the
previous rim, together with the valve.
249F1A0240
254
SERVICING AND MAINTENANCE
Page 365 of 387
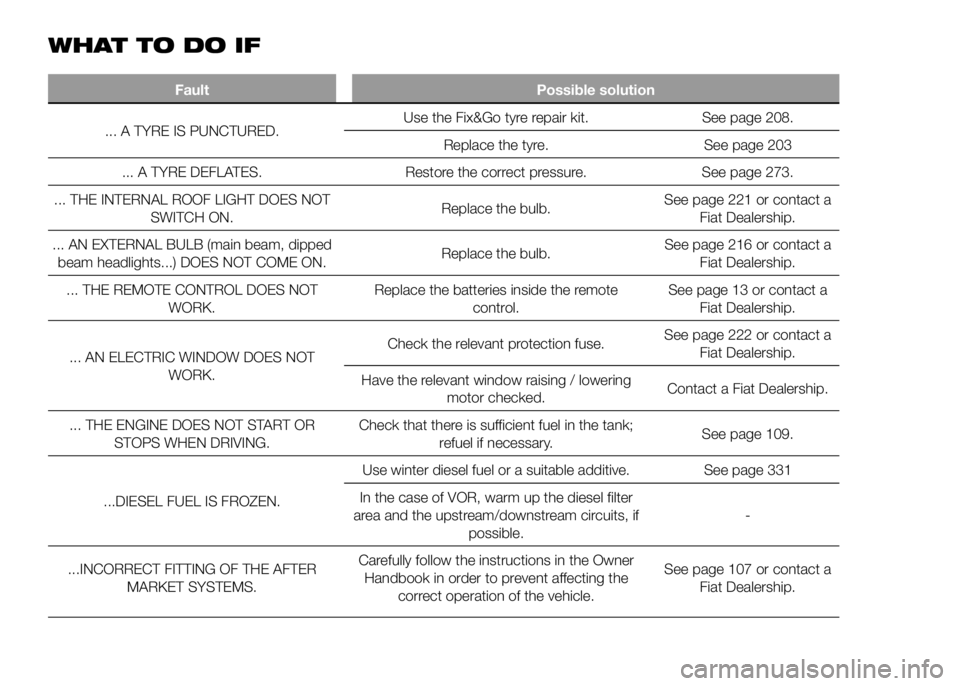
WHATTODOIF
Fault Possible solution
... A TYRE IS PUNCTURED.Use
the Fix&Go tyre repair kit. See page 208.
Replace the tyre. See page 203
... A TYRE DEFLATES. Restore the correct pressure. See page 273.
... THE INTERNAL ROOF LIGHT DOES NOT
SWITCH ON.Replace the bulb.See page 221 or contact a
Fiat Dealership.
... AN EXTERNAL BULB (main beam, dipped
beam headlights...) DOES NOT COME ON.Replace the bulb.See page 216 or contact a
Fiat Dealership.
... THE REMOTE CONTROL DOES NOT
WORK.Replace the batteries inside the remote
control.See page 13 or contact a
Fiat Dealership.
... AN ELECTRIC WINDOW DOES NOT
WORK.Check the relevant protection fuse.See page 222 or contact a
Fiat Dealership.
Have the relevant window raising / lowering
motor checked.Contact a Fiat Dealership.
... THE ENGINE DOES NOT START OR
STOPS WHEN DRIVING.Check that there is sufficient fuel in the tank;
refuel if necessary.See page 109.
...DIESEL FUEL IS FROZEN.Use winter diesel fuel or a suitable additive. See page 331
In the case of VOR, warm up the diesel filter
area and the upstream/downstream circuits, if
possible.-
...INCORRECT FITTING OF THE AFTER
MARKET SYSTEMS.Carefully follow the instructions in the Owner
Handbook in order to prevent affecting the
correct operation of the vehicle.See page 107 or contact a
Fiat Dealership.
Page 385 of 387
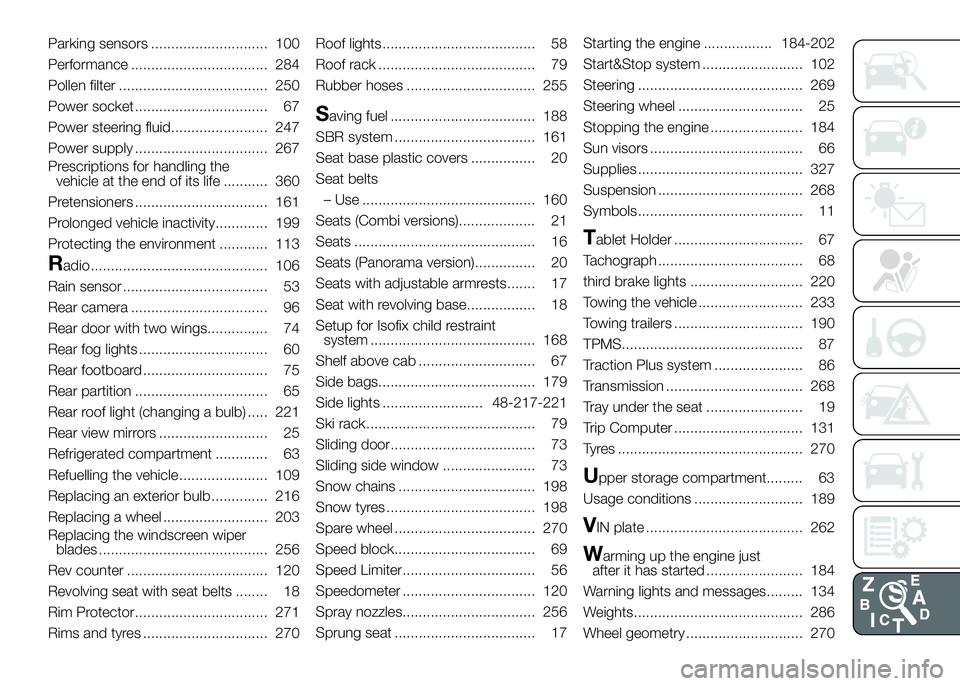
Parking sensors ............................. 100
Performance .................................. 284
Pollen filter ..................................... 250
Power socket ................................. 67
Power steering fluid........................ 247
Power supply ................................. 267
Prescriptions for handling the
vehicle at the end of its life ........... 360
Pretensioners ................................. 161
Prolonged vehicle inactivity............. 199
Protecting the environment ............ 113
Radio ............................................ 106
Rain sensor .................................... 53
Rear camera .................................. 96
Rear door with two wings............... 74
Rear fog lights ................................ 60
Rear footboard ............................... 75
Rear partition ................................. 65
Rear roof light (changing a bulb) ..... 221
Rear view mirrors ........................... 25
Refrigerated compartment ............. 63
Refuelling the vehicle ...................... 109
Replacing an exterior bulb .............. 216
Replacing a wheel .......................... 203
Replacing the windscreen wiper
blades .......................................... 256
Rev counter ................................... 120
Revolving seat with seat belts ........ 18
Rim Protector................................. 271
Rims and tyres ............................... 270Roof lights...................................... 58
Roof rack ....................................... 79
Rubber hoses ................................ 255
Saving fuel .................................... 188
SBR system ................................... 161
Seat base plastic covers ................ 20
Seat belts
– Use ........................................... 160
Seats (Combi versions)................... 21
Seats ............................................. 16
Seats (Panorama version)............... 20
Seats with adjustable armrests....... 17
Seat with revolving base................. 18
Setup for Isofix child restraint
system ......................................... 168
Shelf above cab ............................. 67
Side bags....................................... 179
Side lights ......................... 48-217-221
Ski rack.......................................... 79
Sliding door.................................... 73
Sliding side window ....................... 73
Snow chains .................................. 198
Snow tyres ..................................... 198
Spare wheel ................................... 270
Speed block................................... 69
Speed Limiter................................. 56
Speedometer ................................. 120
Spray nozzles................................. 256
Sprung seat ................................... 17Starting the engine ................. 184-202
Start&Stop system ......................... 102
Steering ......................................... 269
Steering wheel ............................... 25
Stopping the engine ....................... 184
Sun visors ...................................... 66
Supplies ......................................... 327
Suspension .................................... 268
Symbols......................................... 11
Tablet Holder ................................ 67
Tachograph .................................... 68
third brake lights ............................ 220
Towing the vehicle .......................... 233
Towing trailers ................................ 190
TPMS............................................. 87
Traction Plus system ...................... 86
Transmission .................................. 268
Tray under the seat ........................ 19
Trip Computer ................................ 131
Tyres .............................................. 270
Upper storage compartment......... 63
Usage conditions ........................... 189
VIN plate ....................................... 262
Warming up the engine just
after it has started ........................ 184
Warning lights and messages......... 134
Weights.......................................... 286
Wheel geometry ............................. 270