warning FIAT DUCATO BASE CAMPER 2016 Owner handbook (in English)
[x] Cancel search | Manufacturer: FIAT, Model Year: 2016, Model line: DUCATO BASE CAMPER, Model: FIAT DUCATO BASE CAMPER 2016Pages: 387, PDF Size: 20.76 MB
Page 119 of 387
KNOWING THE INSTRUMENT PANEL
This section of the booklet gives you all
the information you need to
understand, interpret and use the
instrument panel correctly.CONTROL PANEL AND
INSTRUMENTS ...............................116
DISPLAY ........................................122
TRIP COMPUTER ...........................131
WARNING LIGHTS AND
MESSAGES ....................................134
- LOW BRAKE FLUID/HANDBRAKE
ENGAGED .......................................... 134
- EBD FAILURE .................................. 135
- AIRBAG FAILURE ............................. 135
- SEAT BELTS NOT FASTENED .......... 136
- ENGINE COOLANT TEMPERATURE
TOO HIGH .......................................... 137
- LOW BATTERY CHARGE ................. 137
- LOW ENGINE OIL PRESSURE ......... 138
-ENGINE OIL DETERIORATED ........... 138
-INCOMPLETE DOOR/LOAD
COMPARTMENT CLOSURE ............... 139
- POWER STEERING FAILURE ........... 139
-SELF-LEVELLING SUSPENSION
FAILURE ............................................. 139
- INJECTION/EOBD SYSTEM
FAILURE ............................................. 141
-UREA INJECTION SYSTEM FAILURE
............................................................ 142
- ABS FAILURE ................................... 142
-FUEL RESERVE ................................ 143
-GLOW PLUG PREHEATING / GLOW
PLUG PREHEATING FAILURE ............ 143
-INDICATION OF DIESEL EMISSIONS
ADDITIVE LOW LEVEL (UREA) ........... 144
-VEHICLE PROTECTION SYSTEM
FAILURE - FIAT CODE ........................ 144
- REAR FOG LIGHTS .......................... 144
- GENERAL FAILURE INDICATION ..... 145
-DPF (PARTICULATE FILTER)
CLEANING UNDERWAY ..................... 146
-WORN BRAKE PADS ........................ 147-DRIVING ADVISOR ........................... 147
- TPMS ............................................... 148
- DIPPED HEADLIGHTS ..................... 149
- FOLLOW ME HOME ........................ 149
- LEFT-HAND DIRECTION INDICATOR
............................................................ 149
- RIGHT-HAND DIRECTION
INDICATOR ........................................ 150
-FOG LIGHTS ..................................... 150
- CRUISE CONTROL .......................... 150
-SPEED LIMITER ................................ 150
- AUTOMATIC MAIN BEAM
HEADLIGHTS ..................................... 151
- MAIN BEAM HEADLIGHTS .............. 151
-"UP" FUNCTION ............................... 151
-EXTERIOR LIGHTS FAULT ................ 152
-BRAKE LIGHT FAILURE .................... 152
-MAIN BEAM AUTOMATISM FAULT ... 153
-POSSIBLE ICE ON ROAD ................. 153
-SPEED LIMIT EXCEEDED ................. 153
-SCHEDULED SERVICING ................. 153
-FUEL CUT-OFF DEVICE INERTIA
SWITCH TRIPPED .............................. 154
-PARKING SENSOR FAILURE ............ 154
-DRIVING ADVISOR SYSTEM
FAILURE ............................................. 154
-TRAFFIC SIGN RECOGNITION
FAILURE ............................................. 154
-LIMITED RANGE ............................... 154
-START&STOP SYSTEM
ACTIVATION/DEACTIVATION .............. 155
-START&STOP FAILURE .................... 155
-INDICATION OF DIESEL EMISSIONS
ADDITIVE LOW LEVEL (UREA) ........... 156
-WATER IN DIESEL FILTER (diesel
versions) ............................................. 156
115
Page 120 of 387
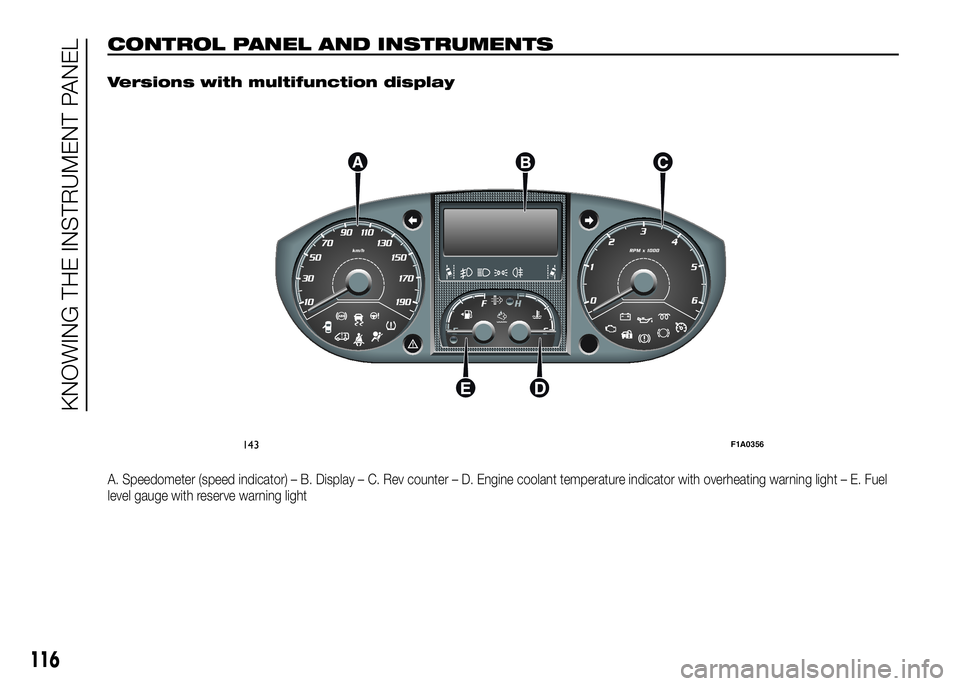
CONTROL PANEL AND INSTRUMENTS.
Versions with multifunction display
A. Speedometer (speed indicator) – B. Display – C. Rev counter – D. Engine coolant temperature indicator with overheating warning light – E. Fuel
level gauge with reserve warning light
143F1A0356
116
KNOWING THE INSTRUMENT PANEL
Page 121 of 387
.
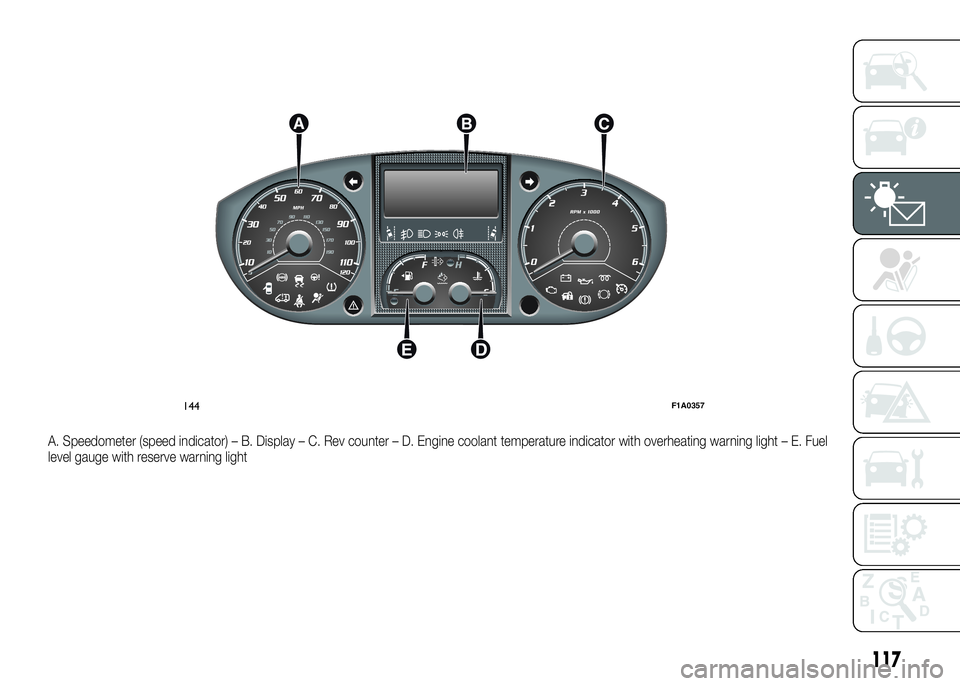
A. Speedometer (speed indicator) – B. Display – C. Rev counter – D. Engine coolant temperature indicator with overheating warning light – E. Fuel
level gauge with reserve warning light
144F1A0357
117
Page 122 of 387
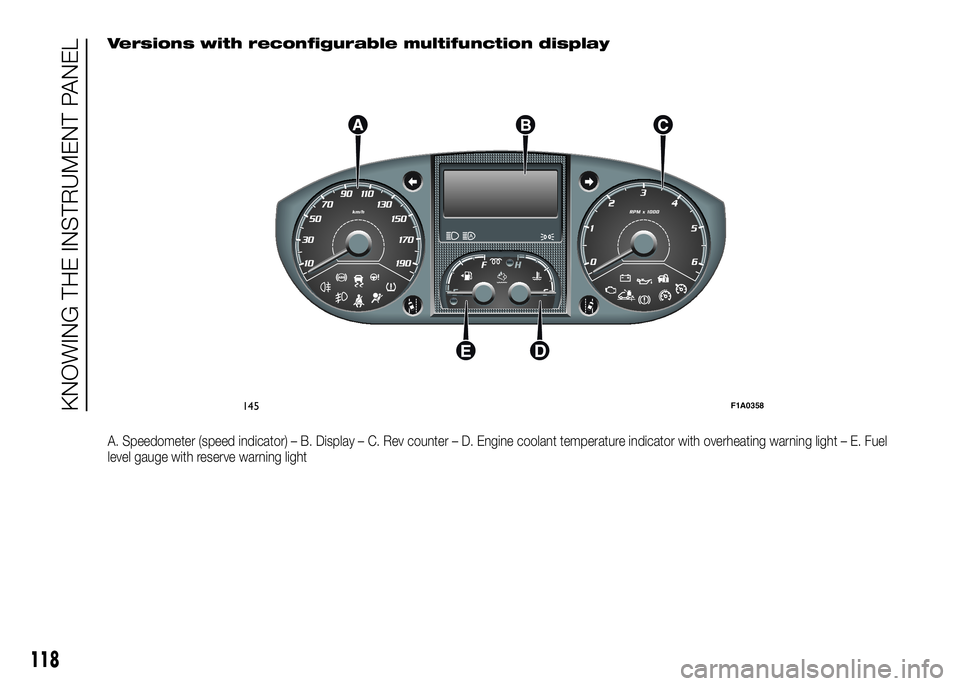
Versions with reconfigurable multifunction display
A. Speedometer (speed indicator) – B. Display – C. Rev counter – D. Engine coolant temperature indicator with overheating warning light – E. Fuel
level gauge with reserve warning light
145F1A0358
118
KNOWING THE INSTRUMENT PANEL
Page 123 of 387
.
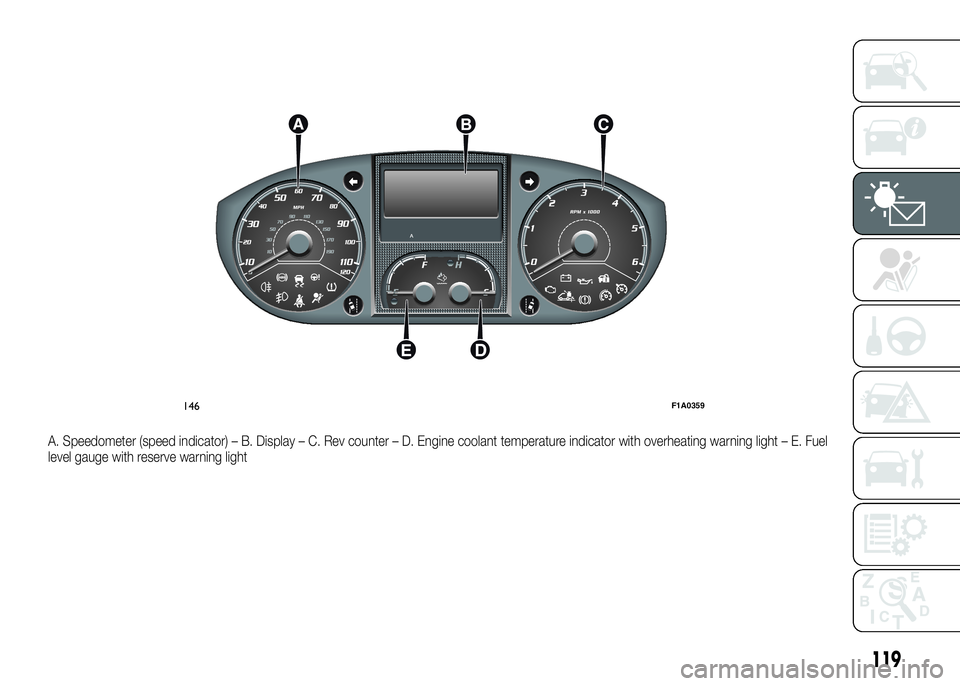
A. Speedometer (speed indicator) – B. Display – C. Rev counter – D. Engine coolant temperature indicator with overheating warning light – E. Fuel
level gauge with reserve warning light
146F1A0359
119
Page 124 of 387
SPEEDOMETER (speed
indicator)
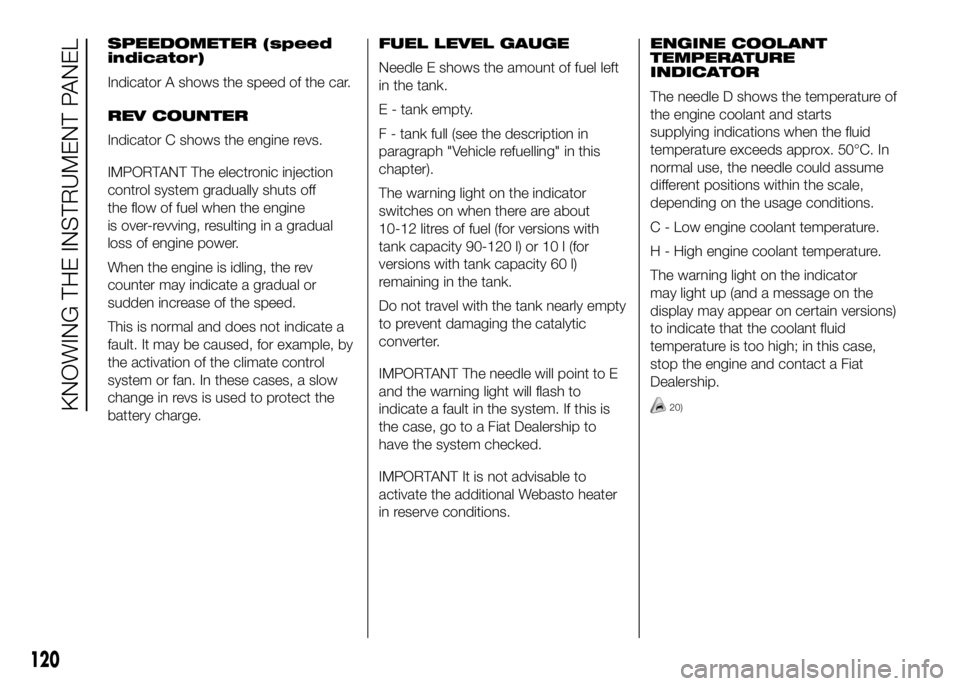
Indicator A shows the speed of the car.
REV COUNTER
Indicator C shows the engine revs.
IMPORTANT The electronic injection
control system gradually shuts off
the flow of fuel when the engine
is over-revving, resulting in a gradual
loss of engine power.
When the engine is idling, the rev
counter may indicate a gradual or
sudden increase of the speed.
This is normal and does not indicate a
fault. It may be caused, for example, by
the activation of the climate control
system or fan. In these cases, a slow
change in revs is used to protect the
battery charge.FUEL LEVEL GAUGE
Needle E shows the amount of fuel left
in the tank.
E - tank empty.
F - tank full (see the description in
paragraph "Vehicle refuelling" in this
chapter).
The warning light on the indicator
switches on when there are about
10-12 litres of fuel (for versions with
tank capacity 90-120 l) or 10 l (for
versions with tank capacity 60 l)
remaining in the tank.
Do not travel with the tank nearly empty
to prevent damaging the catalytic
converter.
IMPORTANT The needle will point to E
and the warning light will flash to
indicate a fault in the system. If this is
the case, go to a Fiat Dealership to
have the system checked.
IMPORTANT It is not advisable to
activate the additional Webasto heater
in reserve conditions.ENGINE COOLANT
TEMPERATURE
INDICATOR
The needle D shows the temperature of
the engine coolant and starts
supplying indications when the fluid
temperature exceeds approx. 50°C. In
normal use, the needle could assume
different positions within the scale,
depending on the usage conditions.
C - Low engine coolant temperature.
H - High engine coolant temperature.
The warning light on the indicator
may light up (and a message on the
display may appear on certain versions)
to indicate that the coolant fluid
temperature is too high; in this case,
stop the engine and contact a Fiat
Dealership.
20)
120
KNOWING THE INSTRUMENT PANEL
Page 125 of 387
ENGINE OIL LEVEL
GAUGE
(for versions/markets, where provided)
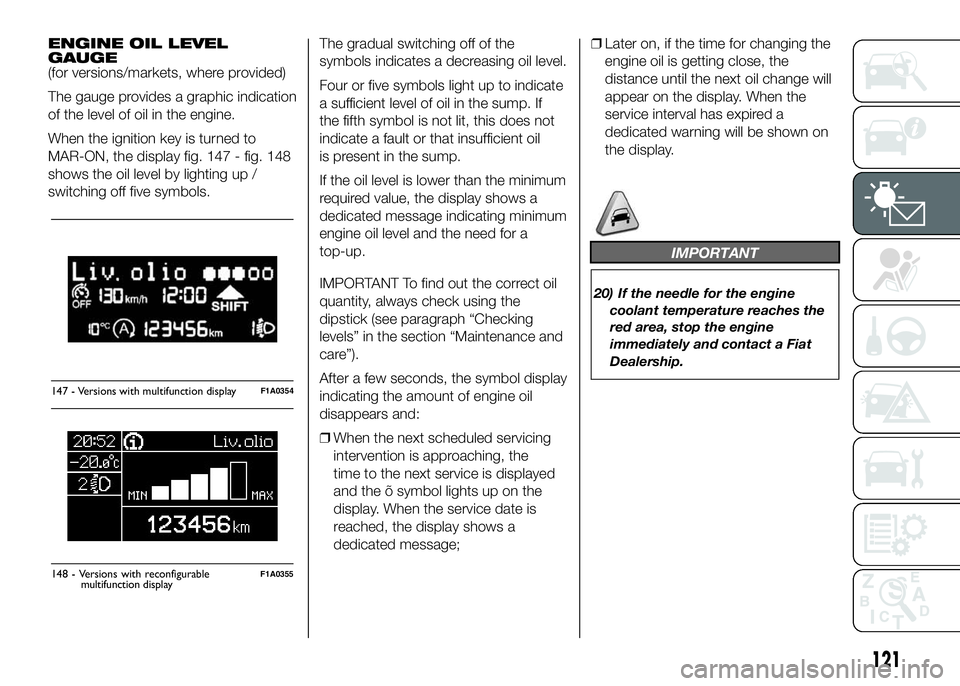
The gauge provides a graphic indication
of the level of oil in the engine.
When the ignition key is turned to
MAR-ON, the display fig. 147 - fig. 148
shows the oil level by lighting up /
switching off five symbols.The gradual switching off of the
symbols indicates a decreasing oil level.
Four or five symbols light up to indicate
a sufficient level of oil in the sump. If
the fifth symbol is not lit, this does not
indicate a fault or that insufficient oil
is present in the sump.
If the oil level is lower than the minimum
required value, the display shows a
dedicated message indicating minimum
engine oil level and the need for a
top-up.
IMPORTANT To find out the correct oil
quantity, always check using the
dipstick (see paragraph “Checking
levels” in the section “Maintenance and
care”).
After a few seconds, the symbol display
indicating the amount of engine oil
disappears and:
❒When the next scheduled servicing
intervention is approaching, the
time to the next service is displayed
and the õ symbol lights up on the
display. When the service date is
reached, the display shows a
dedicated message;❒Later on, if the time for changing the
engine oil is getting close, the
distance until the next oil change will
appear on the display. When the
service interval has expired a
dedicated warning will be shown on
the display.
IMPORTANT
20) If the needle for the engine
coolant temperature reaches the
red area, stop the engine
immediately and contact a Fiat
Dealership.
147 - Versions with multifunction displayF1A0354
Liv.olio
MAX MIN
148 - Versions with reconfigurableF1A0355
121
display
multifunction
Page 127 of 387
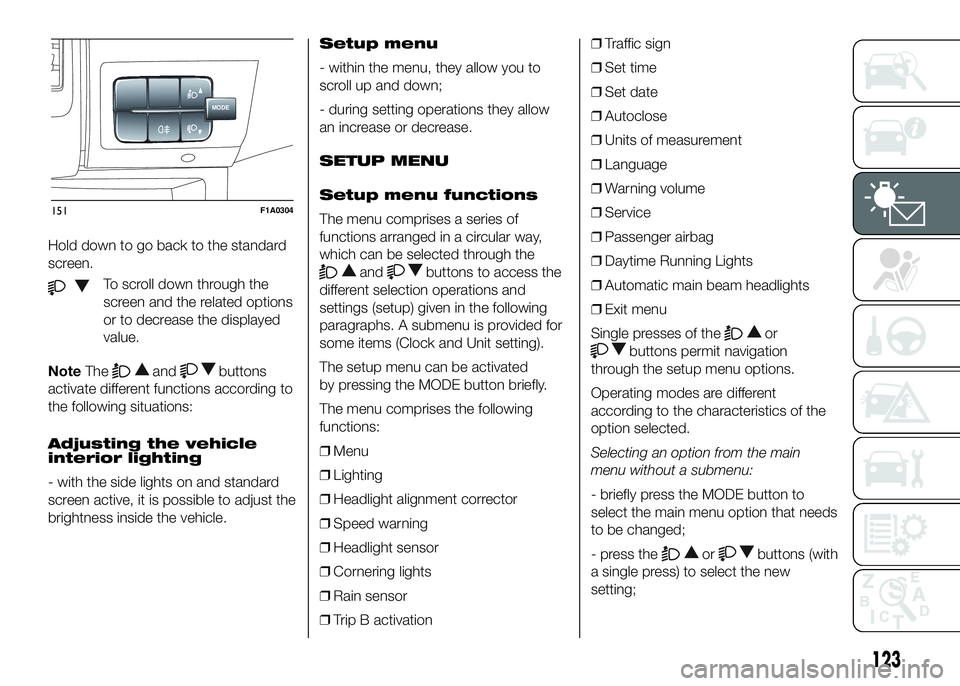
Hold down to go back to the standard
screen.
To scroll down through the
screen and the related options
or to decrease the displayed
value.
NoteThe
andbuttons
activate different functions according to
the following situations:
Adjusting the vehicle
interior lighting
- with the side lights on and standard
screen active, it is possible to adjust the
brightness inside the vehicle.Setup menu
- within the menu, they allow you to
scroll up and down;
- during setting operations they allow
an increase or decrease.
SETUP MENU
Setup menu functions
The menu comprises a series of
functions arranged in a circular way,
which can be selected through the
andbuttons to access the
different selection operations and
settings (setup) given in the following
paragraphs. A submenu is provided for
some items (Clock and Unit setting).
The setup menu can be activated
by pressing the MODE button briefly.
The menu comprises the following
functions:
❒Menu
❒Lighting
❒Headlight alignment corrector
❒Speed warning
❒Headlight sensor
❒Cornering lights
❒Rain sensor
❒Trip B activation❒Traffic sign
❒Set time
❒Set date
❒Autoclose
❒Units of measurement
❒Language
❒Warning volume
❒Service
❒Passenger airbag
❒Daytime Running Lights
❒Automatic main beam headlights
❒Exit menu
Single presses of the
or
buttons permit navigation
through the setup menu options.
Operating modes are different
according to the characteristics of the
option selected.
Selecting an option from the main
menu without a submenu:
- briefly press the MODE button to
select the main menu option that needs
to be changed;
- press the
orbuttons (with
a single press) to select the new
setting;
MODE
151F1A0304
123
Page 129 of 387
NoteOn versions with reconfigurable
multifunction display adjustment can be
made both with lights off ("daytime"
mode brightness level) and with lights
on ("nighttime" mode brightness level).
Headlight alignment
(Headlight alignment
corrector position
adjustment)
(for versions/markets, where provided)
This function permits the adjustment (to
4 levels) of the headlight alignment
corrector position.
To carry out the adjustment, proceed as
follows:
❒briefly press the MODE button. The
level set previously flashes on the
display;
❒press button
orto adjust
the position;
❒briefly press the MODE button to
return to the menu screen or hold the
button down to return to the
standard screen without storing.Speed limit (Speed
Beep)
This function makes it possible to set
the vehicle speed limit (km/h or mph).
When this limit is exceeded the driver is
immediately alerted (see “Warning
lights and messages” section).
To set the desired speed limit, proceed
as follows:
- briefly press the MODE button: the
display will show the wording (Speed
Beep);
press button
orto select
speed limit activation (On) or
deactivation (Off);
- if the function has been activated (On),
press the
orbutton to
select the desired speed limit and then
press MODE to confirm.NoteSetting is possible between 30
and 200 km/h, or 20 and 125 mph,
according to the previously set unit.
See the "Setting the unit of
measurement (Measurement unit)"
paragraph described below. The setting
will increase/decrease by 5 units each
time button
/is pressed.
Hold down the
/button to
automatically increase/decrease the
setting rapidly. Complete the
adjustment with single presses of the
button when you approach the desired
value.
- press the MODE button briefly to
return to the menu screen or hold the
button down to return to the standard
screen without storing.
To cancel the setting, proceed as
follows:
- briefly press button MODE, (On) will
flash on the display;
- press button
, (Off) will flash on
the display;
- press the MODE button briefly to
return to the menu screen or hold the
button down to return to the standard
screen without storing.
125
Page 132 of 387
- briefly press the MODE button: ON or
OFF flashes on the display (depending
the previous setting);
- press the
orbutton to
select;
- press the MODE button briefly to
return to the submenu screen or hold
the button down to return to the main
menu screen without storing;
- press the MODE button again to
return to the standard screen or to the
main menu according to where you
are in the menu.
Set units (Measurement
units)
With this function it is possible to set
the unit of measurement using three
submenus: "Distance", "Consumption"
and "Temperature".
To set the desired unit of measurement,
proceed as follows:
- briefly press the MODE button to
display the three submenus;
- press button
orto
navigate through the three submenus;
- once you have selected the submenu
to be changed, press button MODE
briefly;- if you enter the "Distances" submenu,
pressing the MODE button briefly
makes the display show "km" or "mi"
(depending on the previous setting);
- press the
orbutton
to select;
- if you enter the "Consumption"
submenu, pressing the MODE button
briefly makes "km/l", "l/100km" or
"mpg" appear on the display
(depending on the previous setting);
If the set distance unit is "km", the
display enables setting of the fuel
consumption unit (km/l or l/100km).
If the set distance unit is "mi", the
display shows the amount of fuel
consumed in "mpg".
- press the
orbutton to
select;
- if you enter the "Temperature"
submenu, pressing the MODE button
makes "°C" or "°F" appear on the
display (depending on the previous
setting);
- press the
orbutton to
select;
When you have made the adjustment,
briefly press the MODE button to go
back to the submenu screen or hold
the button down to go back to the main
menu screen without storing.- press the MODE button again to
return to the standard screen or to the
main menu according to where you
are in the menu.
Selecting the language
(Language)
Display messages can be shown in
different languages: Italian, German,
English, Spanish, French, Portuguese
and Dutch.
To set the desired language, proceed
as follows:
- briefly press the MODE button: the
previously set "language" starts flashing
on the display;
- press the
orbutton to
select;
- press the MODE button briefly to
return to the menu screen or hold the
button down to return to the standard
screen without storing.
Adjust the failure/
warning buzzer volume
(Buzzer Volume)
With this function the volume of the
acoustic signal which accompanies the
display of failure/warning can be
adjusted according to 8 levels.
To set the desired volume, proceed as
follows:
128
KNOWING THE INSTRUMENT PANEL