technical data FIAT DUCATO BASE CAMPER 2017 Owner handbook (in English)
[x] Cancel search | Manufacturer: FIAT, Model Year: 2017, Model line: DUCATO BASE CAMPER, Model: FIAT DUCATO BASE CAMPER 2017Pages: 296, PDF Size: 14.44 MB
Page 3 of 296
Dear Customer,
We would like to congratulate and thank you for choosing a Fiat Ducato.
We have written this handbook to help you get to know all the features of your vehicle and use it in the best possible way.
Here you will find information, advice and important warnings regarding vehicle use and how to achieve the best performance from the
technical features of your Fiat Ducato.
You are advised to read it right through before taking to the road for the first time, to become familiar with the controls and above all
with those concerning brakes, steering and transmission; at the same time, you can understand the vehicle behaviour on different road
surfaces.
This document also provides a description of special features and tips, as well as essential information for the safe driving, care and
servicing of your Fiat Ducato over time.
After reading it, you are advised to keep the handbook inside the vehicle, for an easy reference and for making sure it remains on
board the vehicle should it be sold.
In the attached Warranty Booklet you will also find a description of the Services that Fiat offers to its customers, the Warranty
Certificate and the detail of the terms and conditions for maintaining its validity.
We are sure that these will help you to get in touch with and appreciate your new vehicle and the service provided by the people at
Fiat.
Enjoy reading. Happy motoring!
IMPORTANT
This Owner Handbook describes all Fiat Ducato versions. As a consequence, you should only consider the information
related to the trim level, engine and version that you have purchased. All data contained in this publication are purely
indicative. FCA Italy S.p.A. can modify the specifications of the vehicle model described in this publication at any time, for
technical or marketing purposes. For further information, contact a Fiat Dealership.
Page 7 of 296
KNOWING YOUR VEHICLE
KNOWING THE INSTRUMENT PANEL
SAFETY
STARTING AND DRIVING
IN AN EMERGENCY
SERVICING AND CARE
TECHNICAL DATA
MULTIMEDIA
INDEX
5
Page 129 of 296
wait for the warning on the
instrument panel to switch off before
moving the vehicle, the warning light
may stay on for a few seconds to half a
minute. In case of motor start-up and
movement of the vehicle, the warning
light will remain on for a longer period of
time, but there are no problems on the
engine functionality. If topping up is
done with the UREA tank empty, you
have to wait two minutes before
starting the vehicle.
When refuelling the additive for
Diesel Emissions AdBlue (UREA)
with bottle:
park the vehicle on ground level;
turn off the engine by turning the key
in the OFF position;
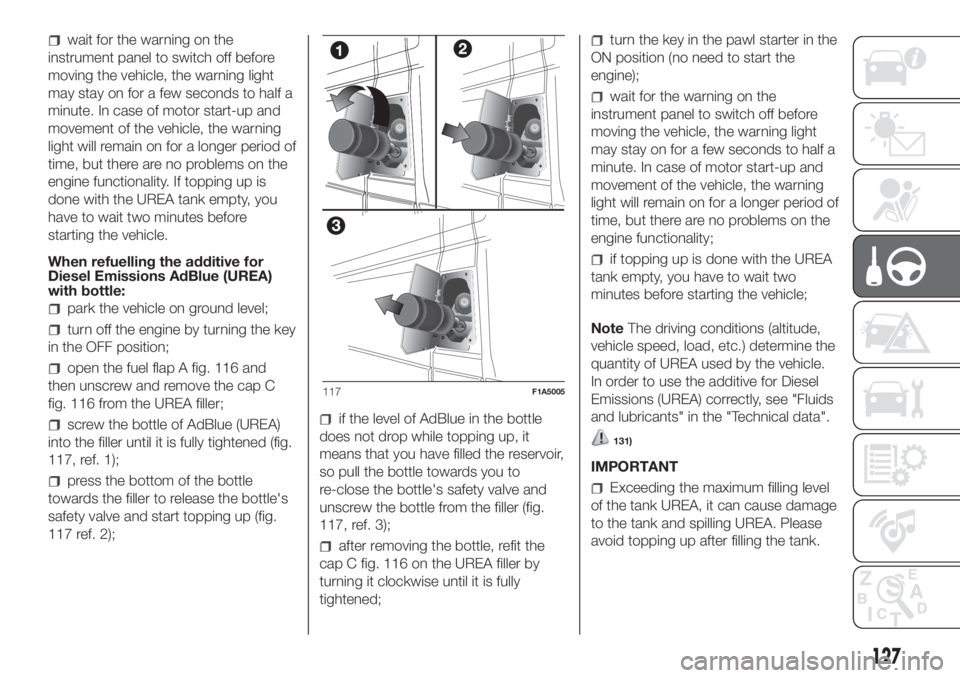
open the fuel flap A fig. 116 and
then unscrew and remove the cap C
fig. 116 from the UREA filler;
screw the bottle of AdBlue (UREA)
into the filler until it is fully tightened (fig.
117, ref. 1);
press the bottom of the bottle
towards the filler to release the bottle's
safety valve and start topping up (fig.
117 ref. 2);
if the level of AdBlue in the bottle
does not drop while topping up, it
means that you have filled the reservoir,
so pull the bottle towards you to
re-close the bottle's safety valve and
unscrew the bottle from the filler (fig.
117, ref. 3);
after removing the bottle, refit the
cap C fig. 116 on the UREA filler by
turning it clockwise until it is fully
tightened;
turn the key in the pawl starter in the
ON position (no need to start the
engine);
wait for the warning on the
instrument panel to switch off before
moving the vehicle, the warning light
may stay on for a few seconds to half a
minute. In case of motor start-up and
movement of the vehicle, the warning
light will remain on for a longer period of
time, but there are no problems on the
engine functionality;
if topping up is done with the UREA
tank empty, you have to wait two
minutes before starting the vehicle;
NoteThe driving conditions (altitude,
vehicle speed, load, etc.) determine the
quantity of UREA used by the vehicle.
In order to use the additive for Diesel
Emissions (UREA) correctly, see "Fluids
and lubricants" in the "Technical data".
131)
IMPORTANT
Exceeding the maximum filling level
of the tank UREA, it can cause damage
to the tank and spilling UREA. Please
avoid topping up after filling the tank.
117F1A5005
127
Page 135 of 296
LOADING ADVICE
The Fiat Ducato version used by you
has been designed and type approved
on the basis of certain maximum
weights (see "Weights" table in the
"Technical Data" chapter): kerb weight,
payload, total weight, maximum weight
on front axle, maximum weight on
rear axle, towable weight.
IMPORTANT The maximum permitted
load on the floor fastenings is 500
kg; the maximum permitted load on the
side panel is 150 kg.
IMPORTANT For versions with right and
left side flaps, it is advisable to
reposition the release lever in the closed
position before lowering the sides.
133) 134) 135)
39)In addition to these general
precautions, some simple precautions
can improve driving safety, travelling
comfort and vehicle durability:
distribute the load evenly over the
platform: if it is necessary to
concentrate it in a single area, choose
an area mid-way between both axles;
lastly, remember that the vehicle’s
dynamic behaviour is affected by the
weight transported: in particular, the
stopping distances are longer,
especially at high speed.
WARNING
133)Bumpy roads and abrupt braking may
cause unexpected load shifting with
consequently hazardous situations for the
driver and passengers: before setting
off, secure the load tightly using the
partition and appropriate hooks, steel
cables, ropes or chains strong enough to
hold the items to be secured.
134)Even when the car is stopped on a
steep hill or side slope, opening the rear or
side doors could cause unsecured goods
to fall out.
135)If you wish to carry a reserve of petrol
in a can, observe the legal restrictions
and only use a can that is type-approved
and properly secured to the load
anchorage eyebolts. In the event of a
collision the fire risk is increased all the
same.
WARNING
39)Each of these must be strictly
observed and MUST NEVER BE
EXCEEDED in any case. In particular,
ensure that you never exceed the
maximum permitted weights on the front
and rear axles when arranging the load on
the vehicle (particularly if the vehicle is
equipped with a specific trim level).
133
Page 138 of 296
In addition to the electrical branches,
the vehicle's electric system can only
be connected to the supply cable for an
electric brake and to the cable for an
internal light, though not above 15
W. For connections use the preset
control unit with battery cable no less
than 2.5 mm
2.
IMPORTANT The trailer tow hook
contributes to the length of the vehicle.
When installing on long wheelbase
versions, it is only possible to install
removable tow hooks because the total
vehicle length limit of 6 metres is
exceeded.
If no trailer is fitted, the hook must be
removed from the attachment base and
it must not exceed the vehicle's
original length.
IMPORTANT If you wish to leave the
tow hook fitted without towing a trailer,
it is advisable to contact a Fiat
Dealership for the relevant system
update operations because the tow
hook could be detected as an obstacle
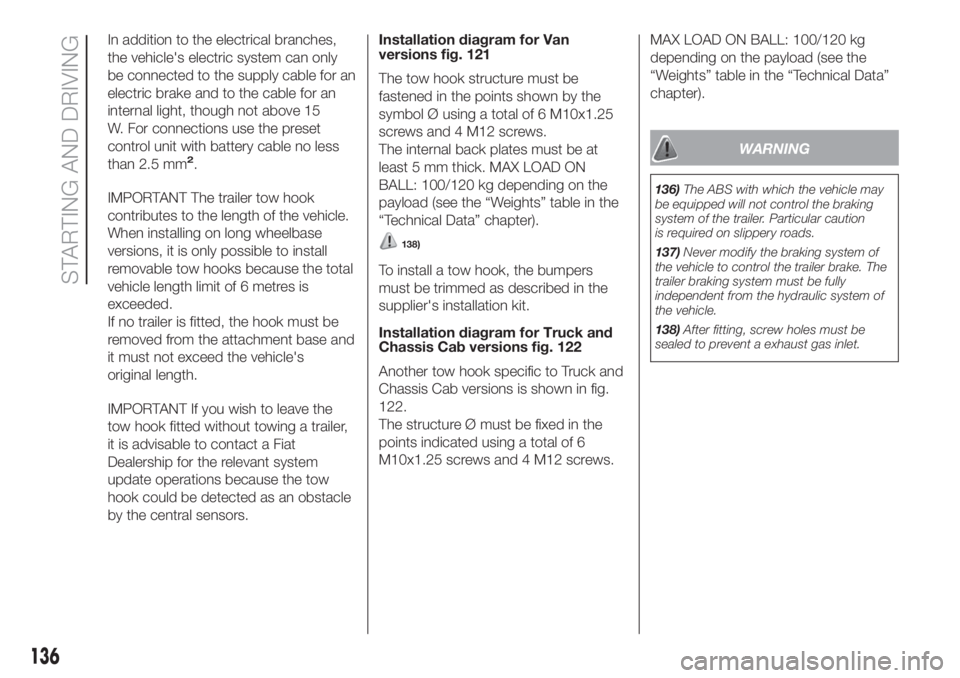
by the central sensors.Installation diagram for Van
versions fig. 121
The tow hook structure must be
fastened in the points shown by the
symbol Ø using a total of 6 M10x1.25
screws and 4 M12 screws.
The internal back plates must be at
least 5 mm thick. MAX LOAD ON
BALL: 100/120 kg depending on the
payload (see the “Weights” table in the
“Technical Data” chapter).
138)
To install a tow hook, the bumpers
must be trimmed as described in the
supplier's installation kit.
Installation diagram for Truck and
Chassis Cab versions fig. 122
Another tow hook specific to Truck and
Chassis Cab versions is shown in fig.
122.
The structure Ø must be fixed in the
points indicated using a total of 6
M10x1.25 screws and 4 M12 screws.MAX LOAD ON BALL: 100/120 kg
depending on the payload (see the
“Weights” table in the “Technical Data”
chapter).
WARNING
136)The ABS with which the vehicle may
be equipped will not control the braking
system of the trailer. Particular caution
is required on slippery roads.
137)Never modify the braking system of
the vehicle to control the trailer brake. The
trailer braking system must be fully
independent from the hydraulic system of
the vehicle.
138)After fitting, screw holes must be
sealed to prevent a exhaust gas inlet.
.
136
STARTING AND DRIVING
Page 177 of 296
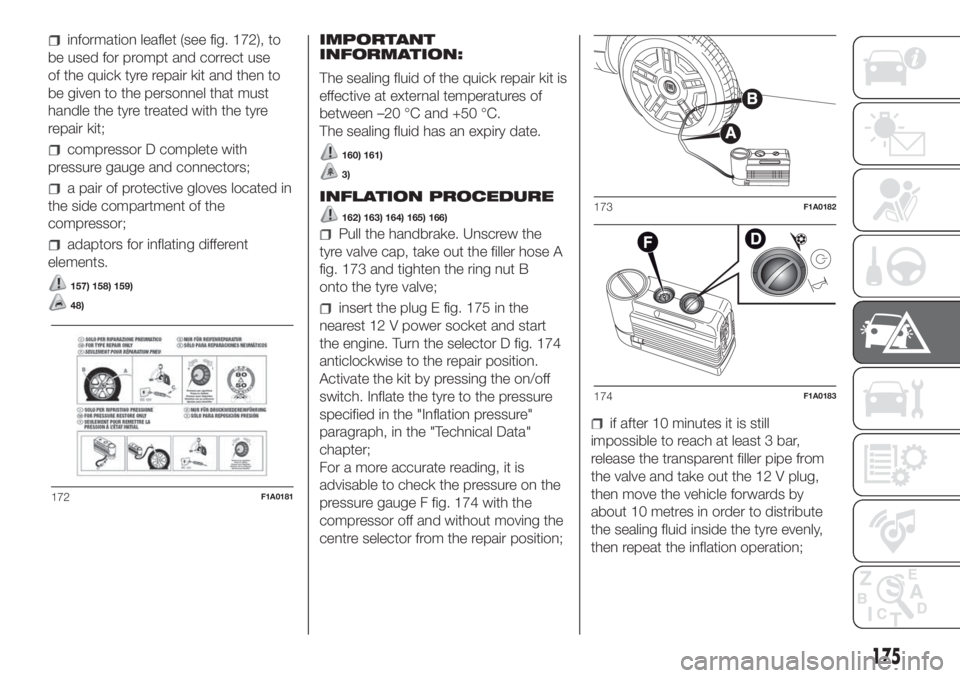
information leaflet (see fig. 172), to
be used for prompt and correct use
of the quick tyre repair kit and then to
be given to the personnel that must
handle the tyre treated with the tyre
repair kit;
compressor D complete with
pressure gauge and connectors;
a pair of protective gloves located in
the side compartment of the
compressor;
adaptors for inflating different
elements.
157) 158) 159)
48)
IMPORTANT
INFORMATION:
The sealing fluid of the quick repair kit is
effective at external temperatures of
between –20 °C and +50 °C.
The sealing fluid has an expiry date.
160) 161)
3)
INFLATION PROCEDURE
162) 163) 164) 165) 166)
Pull the handbrake. Unscrew the
tyre valve cap, take out the filler hose A
fig. 173 and tighten the ring nut B
onto the tyre valve;
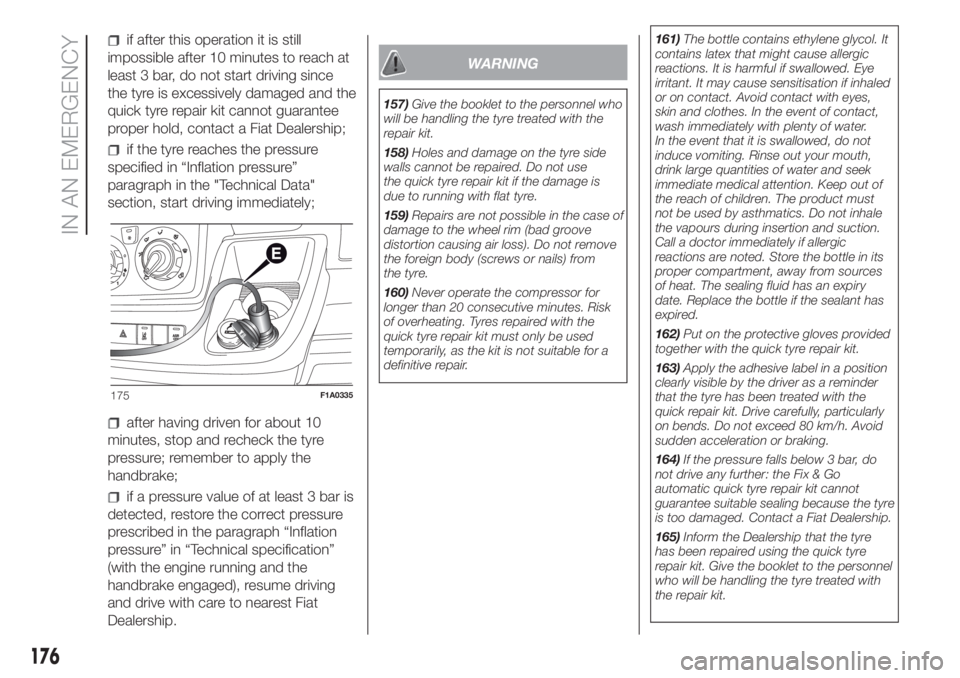
insert the plug E fig. 175 in the
nearest 12 V power socket and start
the engine. Turn the selector D fig. 174
anticlockwise to the repair position.
Activate the kit by pressing the on/off
switch. Inflate the tyre to the pressure
specified in the "Inflation pressure"
paragraph, in the "Technical Data"
chapter;
For a more accurate reading, it is
advisable to check the pressure on the
pressure gauge F fig. 174 with the
compressor off and without moving the
centre selector from the repair position;
if after 10 minutes it is still
impossible to reach at least 3 bar,
release the transparent filler pipe from
the valve and take out the 12 V plug,
then move the vehicle forwards by
about 10 metres in order to distribute
the sealing fluid inside the tyre evenly,
then repeat the inflation operation;
172F1A0181
173F1A0182
174F1A0183
175
Page 178 of 296
if after this operation it is still
impossible after 10 minutes to reach at
least 3 bar, do not start driving since
the tyre is excessively damaged and the
quick tyre repair kit cannot guarantee
proper hold, contact a Fiat Dealership;
if the tyre reaches the pressure
specified in “Inflation pressure”
paragraph in the "Technical Data"
section, start driving immediately;
after having driven for about 10
minutes, stop and recheck the tyre
pressure; remember to apply the
handbrake;
if a pressure value of at least 3 bar is
detected, restore the correct pressure
prescribed in the paragraph “Inflation
pressure” in “Technical specification”
(with the engine running and the
handbrake engaged), resume driving
and drive with care to nearest Fiat
Dealership.
WARNING
157)Give the booklet to the personnel who
will be handling the tyre treated with the
repair kit.
158)Holes and damage on the tyre side
walls cannot be repaired. Do not use
the quick tyre repair kit if the damage is
due to running with flat tyre.
159)Repairs are not possible in the case of
damage to the wheel rim (bad groove
distortion causing air loss). Do not remove
the foreign body (screws or nails) from
the tyre.
160)Never operate the compressor for
longer than 20 consecutive minutes. Risk
of overheating. Tyres repaired with the
quick tyre repair kit must only be used
temporarily, as the kit is not suitable for a
definitive repair.161)The bottle contains ethylene glycol. It
contains latex that might cause allergic
reactions. It is harmful if swallowed. Eye
irritant. It may cause sensitisation if inhaled
or on contact. Avoid contact with eyes,
skin and clothes. In the event of contact,
wash immediately with plenty of water.
In the event that it is swallowed, do not
induce vomiting. Rinse out your mouth,
drink large quantities of water and seek
immediate medical attention. Keep out of
the reach of children. The product must
not be used by asthmatics. Do not inhale
the vapours during insertion and suction.
Call a doctor immediately if allergic
reactions are noted. Store the bottle in its
proper compartment, away from sources
of heat. The sealing fluid has an expiry
date. Replace the bottle if the sealant has
expired.
162)Put on the protective gloves provided
together with the quick tyre repair kit.
163)Apply the adhesive label in a position
clearly visible by the driver as a reminder
that the tyre has been treated with the
quick repair kit. Drive carefully, particularly
on bends. Do not exceed 80 km/h. Avoid
sudden acceleration or braking.
164)If the pressure falls below 3 bar, do
not drive any further: the Fix & Go
automatic quick tyre repair kit cannot
guarantee suitable sealing because the tyre
is too damaged. Contact a Fiat Dealership.
165)Inform the Dealership that the tyre
has been repaired using the quick tyre
repair kit. Give the booklet to the personnel
who will be handling the tyre treated with
the repair kit.
175F1A0335
176
IN AN EMERGENCY
Page 210 of 296
TECHNICAL DATA
Everything you may find useful for
understanding how your vehicle
is made and works is contained in this
chapter and illustrated with data, tables
and graphics. For the enthusiasts and
the technician, but also just for those
who want to know every detail of their
vehicle.IDENTIFICATION DATA....................209
ENGINE CODES - BODYWORK
VERSION ........................................211
ENGINE ..........................................213
STEERING SYSTEM .......................216
WHEELS .........................................217
DIMENSIONS ..................................222
PERFORMANCE .............................232
WEIGHTS AND LOADS...................234
REFUELLING ..................................237
FLUIDS AND LUBRICANTS ............242
FUEL CONSUMPTION ....................245
CO2 EMISSIONS ...........................252
208
TECHNICAL DATA
Page 212 of 296
ENGINE MARKING
It is stamped on the cylinder block and
includes the type and the engine serial
number.
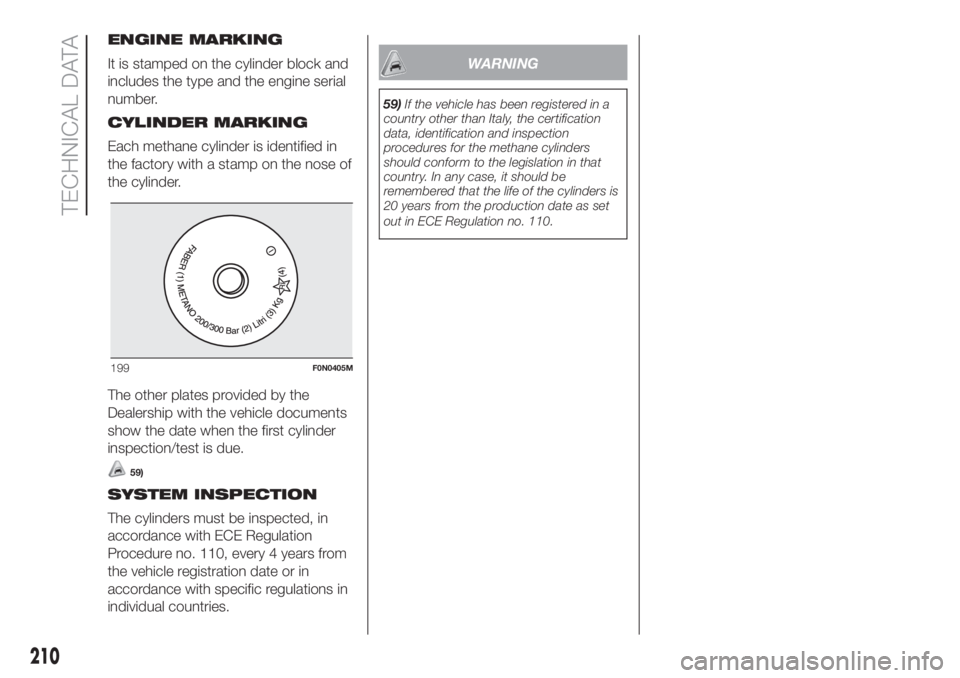
CYLINDER MARKING
Each methane cylinder is identified in
the factory with a stamp on the nose of
the cylinder.
The other plates provided by the
Dealership with the vehicle documents
show the date when the first cylinder
inspection/test is due.
59)
SYSTEM INSPECTION
The cylinders must be inspected, in
accordance with ECE Regulation
Procedure no. 110, every 4 years from
the vehicle registration date or in
accordance with specific regulations in
individual countries.
WARNING
59)If the vehicle has been registered in a
country other than Italy, the certification
data, identification and inspection
procedures for the methane cylinders
should conform to the legislation in that
country. In any case, it should be
remembered that the life of the cylinders is
20 years from the production date as set
out in ECE Regulation no. 110.
199F0N0405M
210
TECHNICAL DATA
Page 214 of 296
WHEELBASE
AShort wheelbase
BMedium wheelbase
CLong wheelbase
DMedium-long wheelbase
UAll wheelbases (incomplete vehicles)
BODY
ACab chassis
BChassis without cab
CPlatform chassis cab
DBox truck
EPrimary school bus
FVa n
GLong cab tipper
HLong cab chassis
MMinibus
PPanorama
RCombinato 6/9-seater
212
TECHNICAL DATA